Quite a few roofs are covered with metal tiles. It is one of the most popular materials with a number of advantages. Among them: excellent appearance, long service life, a large selection of colors, light weight and strength of the coating. But so that all the heat does not go through the roof, it must be insulated well. This will reduce your heat losses, which will affect your heating costs. In addition, one of the disadvantages of metal tiles is noise. You will hear the raindrops distinctly. Thanks to the insulating material, all noise can be minimized.
This article will help you learn how to insulate a metal profile roof. To begin with, we will consider the materials that are recommended for insulating a metal roof.
How a warm roof works and why is it called that
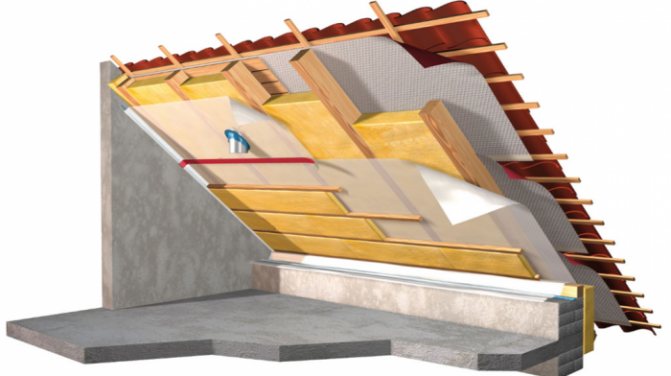
Such a roof has insulated roof slopes, thanks to which it is quite possible to arrange a comfortable living space in the attic - an attic. But this requires performing a number of operations to create an entire roofing system. Let's study the structure of such a roof.
Water resistant
Condensation can collect on the reverse side of the metal tile, and in order to prevent it from getting on the insulation and wetting it, it is necessary to consider waterproofing. Membranes are well suited for these purposes, they are better than polyethylene film, since they are permeable to steam. Accordingly, moisture will calmly leave outside, not accumulating anywhere. Thanks to such super-diffusion properties, the membranes are functional, moreover, they save space (they can be laid directly on the insulation without any gap).
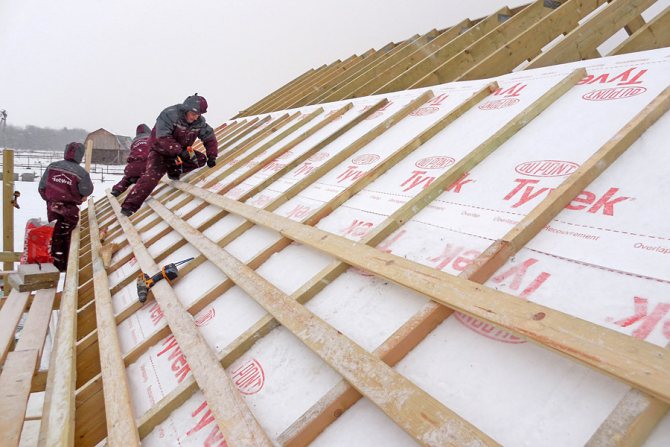
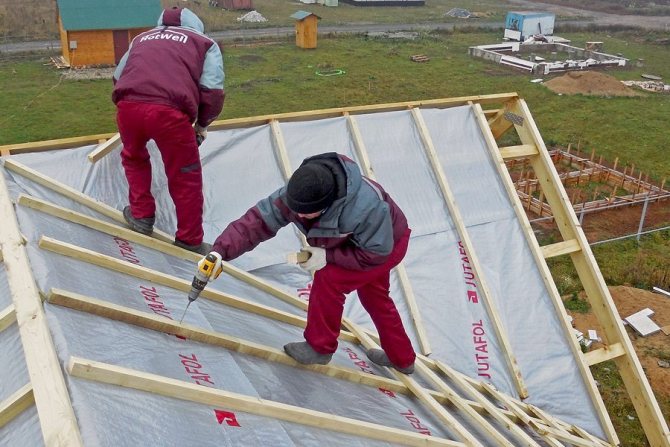
The first thing to do is to isolate the valley. Starting from the top, the membrane is laid along its entire length, and the joints on the valley and abutments are glued with construction tape from the same manufacturer as the membrane. The waterproofing is laid along the rafters, starting from the eaves to the ridge, the rolls are rolled horizontally. It is necessary to ensure that the joints of individual rolls fall on the rafters, the rolls are laid with an overlap of 15 cm. The membranes must not be allowed to sag, they must be well tensioned.
We insulate the roof and put a vapor barrier
We continue to work on the creation of a metal roofing tile. On the inside, after the waterproofing membrane, insulation is laid. As a rule, basalt wool mats are used for this, but other types of insulation are also possible.
Insulation is placed between the roof rafters. When laying more than one layer, the joints between the mats of the first layer must be covered with the mats of the second, otherwise cold bridges may appear. A vapor barrier membrane is placed on top. It is necessary so that the fumes from the inner rooms do not accumulate on the insulation.
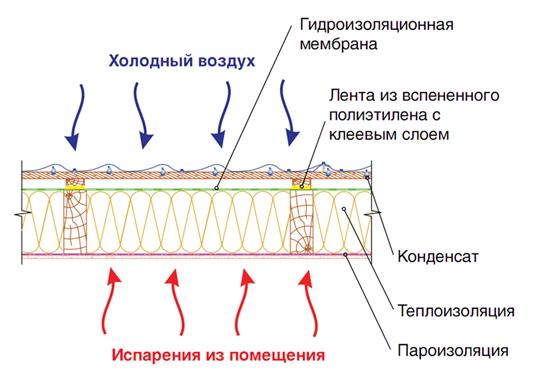

Protection of insulation from moisture penetration both from the inside and outside.
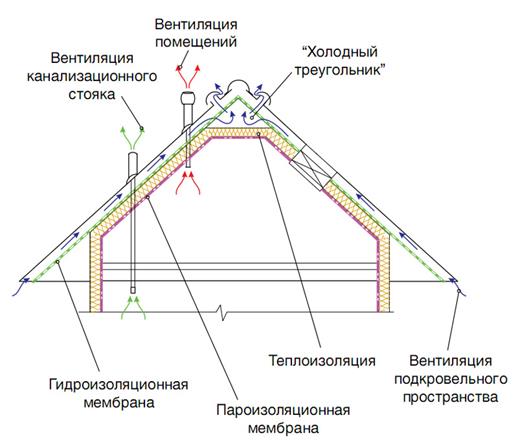

General arrangement of a warm metal roofing.
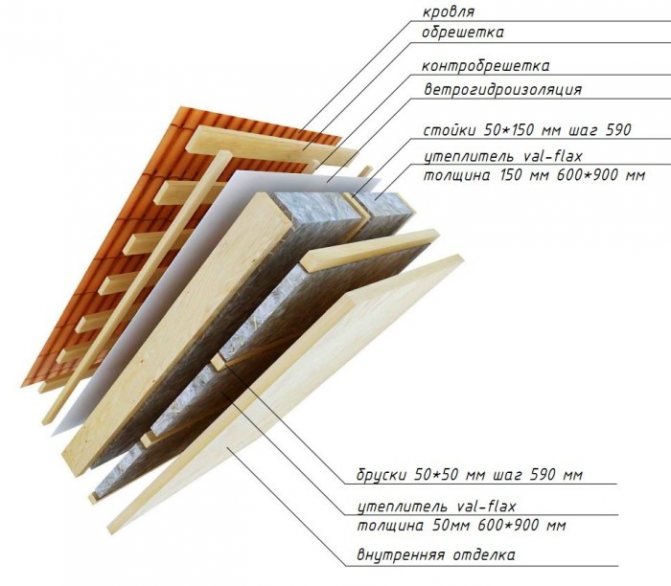
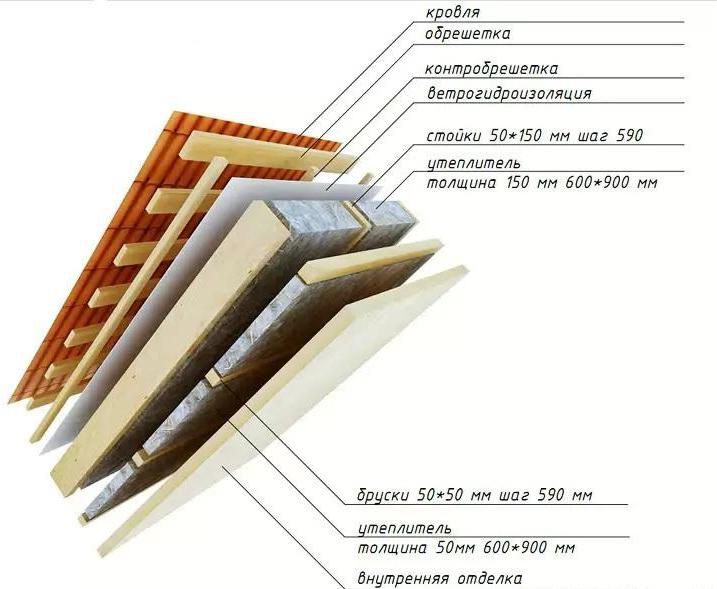
Roofing cake for metal tiles. Scheme.
Typically, a roofing cake includes: (from the inside to the outside):
- filing from the side of the roofing room;
- vapor barrier, for example, polypropylene film;
- insulation, for example, mineral wool, placed between the rafter system;
- waterproofing, for example, a membrane that is laid along the upper edge of the rafter joists;
- counter-lattice made of wooden slats;
- lathing made of wood;
- covering material, that is, metal tiles.

The roof can be insulated in different ways, it can be cold or insulated.
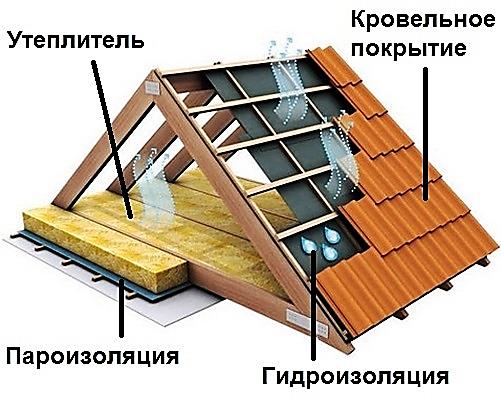

Roofing cake for metal tiles. Cold attic
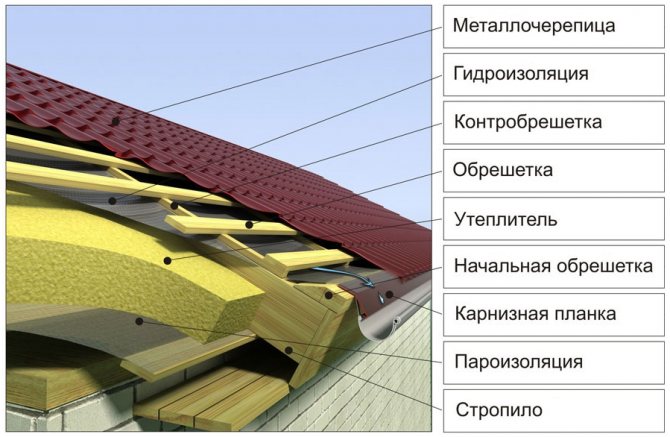
That is, the roofing cake consists of certain layers, with each layer performing its own function:
1. The topmost layer of the cake is metal. It provides protection from atmospheric precipitation, temperature changes, and determines the appearance of the roof.
2. Vibration isolation elements. They stop vibrating, and you cannot hear the noise from the downpour banging on the metal roof.
3. The frame of the lathing is made of wood. It is required to attach the outer covering - metal tiles and make a gap under the roof so that there is ventilation between the materials.
4. Counter-lattice, consisting of wooden battens. Provides the necessary air circulation between metal tiles, battens and insulating materials.
5. Waterproofing. It does not allow moisture to penetrate to the frame of the rafter system and into the insulation.
6. Thermal insulation material. It performs the function of insulation from noise and does not allow heat to escape from the room.
7. Roof rafters. A roofing cake and insulation are attached to them. With the help of the rafter system, free space is obtained in the attic.
8. Vapor barrier. She takes out into the street the fumes that form inside the house.
9. The layer of the inner roof sheathing. Designed for fastening finishing material.


Rafters.
Metal roof rafters are identical with other rafters on which sheet or heavy coverings are attached. But these rafters differ in that the metal tile does not load them very much, therefore, to build the rafters, you do not need to take a large section bar.
The distance between the rafter legs is usually 60-90 mm. When choosing the pitch of the rafters, it is worth considering the width and thickness of the material used for insulation. It must be tightly packed between the frame, so that there are no gaps.
The rafter system is made of bars with a section of 50x150 mm. If the boards have this width, then you can choose a heater with a thickness of 150 mm. If you want to build a roof in cold regions of the country, then you should select bars with a width of about 200 mm. Then you can pick up insulation with a thickness of also 200 mm.

Vapor barrier.
Vapor barrier is required to protect the insulation from moisture, as well as to maintain a certain microclimate in the rooms. Typically, the steam generated in the room rises upward. If there is no vapor barrier layer in the installed roof, then the steam will be absorbed into the insulation.


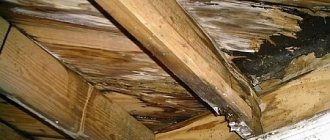
In frosty conditions, steam will begin to stop on the outside of the insulation. There it will first become frost and then a crust of ice on the material. And in the spring, when it gets warm, the insulation covered with a crust of ice will become unusable. The ice will melt and water will flow onto the insulation. Previously, glassine was used as a vapor barrier. Now they are installing films made of polyethylene or polypropylene:
1. The film of their polyethylene is not very strong, because of this it is reinforced with a mesh.
2. A polypropylene film is a woven fabric, it is laminated on both sides with a thin layer of the same material. One side is rough.
Thermal insulation.
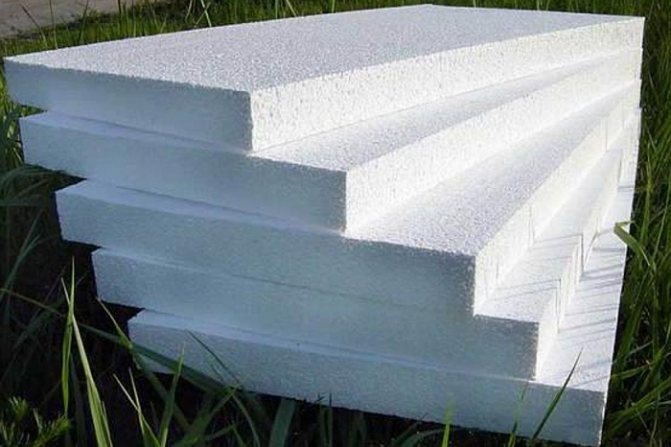
The most widely used heaters are mineral wool or polystyrene. They are pretty inexpensive. Minvata, foam blocks are placed between the rafter beams. They are mounted end-to-end. If this results in cracks and gaps, then they are blown out with polyurethane foam.


If you do not have time to install insulation, then you can insulate the roof with polyurethane foam.


Waterproofing.
Previously, glassine or roofing material was used as waterproofing. Now, in order for the roof to last a long time, special membranes are used. Although this material is not cheap, it is reliable and durable. The membrane material consists of 2 layers: the first is reinforcing, the second is moisture-repelling.


Counter grill and ventilation gap.
The counter lattice is created from wooden battens. They are attached to a layer of waterproofing, which is placed on top of the rafter log. Then the mounted counter-lattice bars provide a gap between the waterproofing layer and the roof covering.
Lathing.
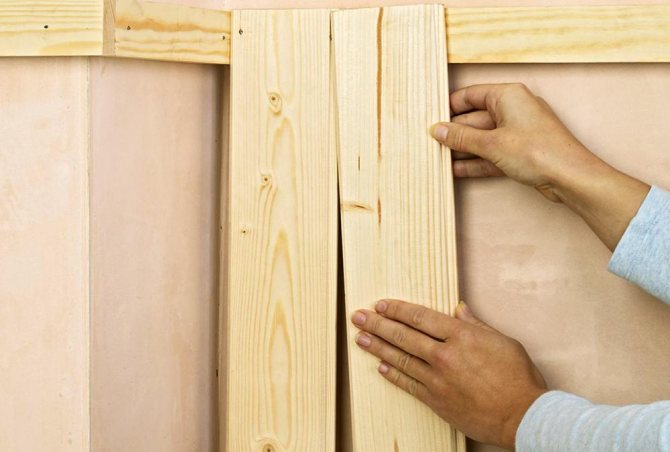
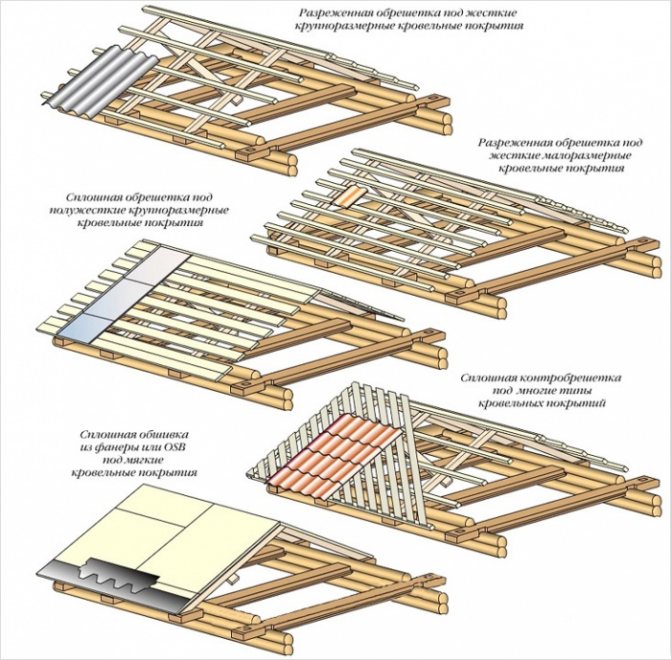
The lathing is the basis for attaching metal tiles. It is made from wooden blocks, they are mounted perpendicular to the legs of the rafters. Reiki, boards or lathing bars are attached end-to-end or through a small gap equal to the step of the metal tile wave. The lathing of wood is created by attaching it with nails, screws, staples.
But do not forget in this case that the whole tree should be treated with antifungal compounds, otherwise it will rot.
Vibration isolation.
It is imperative to make vibration isolation if you plan to cover the roof with metal tiles, since quite a lot of noise appears during rain and downpours.
To protect the metal roof from noise, sound-absorbing materials are used.
To reduce noise and vibration, you can:
1. Tightly attach all layers of the roofing cake, thus increasing its rigidity. This is easy to do if, when attaching, you screw in a lot of self-tapping screws for 1 m.
2. Calculate the distance required for the installation of bars and battens in relation to the length of the roof.
3. Make the lathing and counter-lathing in the same plane. Since if the slats are attached unevenly, then after the installation of the metal tile, the final coating will deform, and this may cause noise.
4. It is also possible to reduce the noise by placing a seal between the counter-grill and the rafters, which isolates the sounds.
Metal tiles.
For the manufacture of metal tiles, thin sheets of aluminum, steel, copper are taken. If you are planning to buy metal tiles in Kiev, we recommend that you follow the link citybud.in.ua/krovlya/metalocherepica/, where you will find your option for buying a roof at an excellent price.


Such material can serve as a roof for several decades, it is reliable and durable. True, such properties depend on the density of laying the metal tiles when creating the roof. To put the material tightly, sealing elements are used.
Cold roof differences
The main difference between such a roof is the lack of insulation on the slopes. Insulation is placed only in the lower part of the attic. Thanks to this, the house is always warm, and the slopes are ventilated at the same time.
How to protect the insulation from moisture?
In addition to the membranes that have already been mentioned above, cold metal roofing also allows the use of a waterproof film. But, unlike membranes, it must sag a little between the rafters (by about 20 mm) in order for the condensate to drain off. Waterproofing, as well as for a warm roof, must be laid horizontally, from the eaves to the ridge, making an overlap of 15 centimeters.
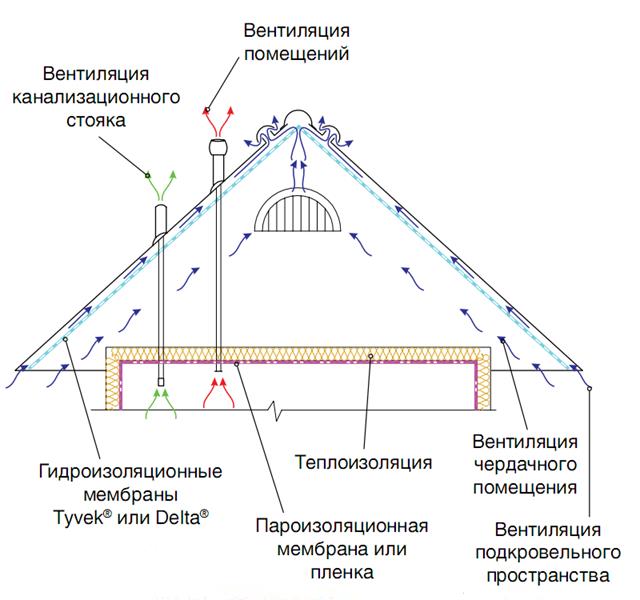

The general arrangement of the cold metal roofing.
Roof type with metal tiles
If the attic of the house is planned to be used as a living space, then the metal roof will need to be insulated. And if you want to leave the space above the ceiling completely empty, it is allowed to make the roof cold.
Insulated roof
Roofing cake with insulation has the following positive characteristics:
- reduces the audibility of extraneous sounds in the house;
- contributes to the creation of an ideal microclimate in the house;
- allows you to make a living room under the roof.


When installing a warm roof, a heater and a vapor barrier film are placed under the metal tile
When installing a warm roof with metal tiles, 7 layers are created, which are arranged in a certain order:
- A vapor barrier that allows steam to escape freely from the building, but does not allow it to flow back.
- Rafter legs and girders that make up the backbone of the structure.
- A heat-insulating layer inserted into the cells between the rafters and the girders with the creation of a ventilation gap.
- Waterproofing material that protects insulation and other layers of the roofing cake from moisture.
- Counter-grating, which fixes the waterproofing film, when installed parallel to the rafter legs.
- Sheathing made of beams located at a distance of 35–45 cm from each other in a direction perpendicular to the rafters.
- Finishing roofing material, that is, metal shingles.
Unfortunately, the insulation in the composition of the roofing structure can turn from a plus into a big minus. If suddenly for some reason, for example, due to an error in the roofing, the insulating material absorbs moisture, then the value of the warm roof will be lost.
Video: construction of an insulated metal roof
Cold roof
A cold-type roof with metal tiles as a topcoat is considered a simple structure.


During the construction of a cold-type roof, only waterproofing material, lathing and counter-lattice are placed under the metal tile
A cold roofing cake consists of only 4 layers:
- The frame is made of rafters.
- Film waterproofing, fixed either with small nails or with a construction stapler with sagging from 1 to 2.5 cm.
- Counter lattice, fixed on self-tapping screws and holding the waterproofing material in place.
- The lathing serves as the basis for attaching the topcoat sheets.
- Metal roof tiles.
A cold roof with metal tiles will not suit every owner of a private building. In heavy rain, a roof without insulation will involuntarily want to be compared to a drum.
The lathing is an important element of the roof
When creating the lathing, wooden bars with a section of 50x50 mm are used, as well as edged boards with dimensions of 32x100 and 50x100 mm. In the lower part of the roof slope, along the eaves, you need to nail two boards 50x100 mm. Further, from the bars of 50x50 mm on top of the waterproofing, you need to fill the counter-lattice, nailing the bars along the rafters, starting from the ridge to the bottom. On top of it, with an equal pitch, the sheathing boards are horizontally fixed. The fastening step depends on which type of metal tile profile, which will cover the roof, will be chosen.
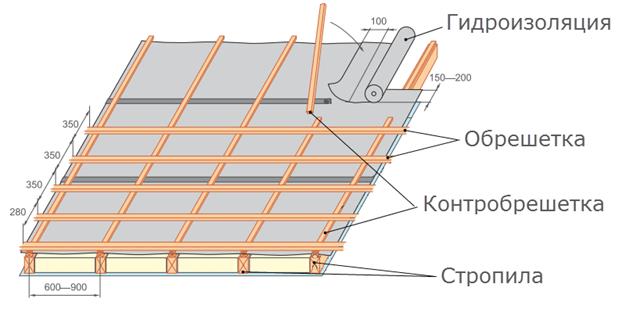

Sheathing for the ridge
The top-most part of the roof must be reinforced. For this purpose, a pair of boards are nailed on each side of the ridge strip.


Roof ends
From the end side of the roof to the height of the metal tile profile, it is necessary to nail boards - larger than the crate itself.


Lathing for the valley
Endova is the inner joint of two roof slopes. On sections of the valley, the crate must be made continuous.


Roof fencing
Such a fence must be reliable, therefore it is made above the eaves overhang. The height of the load-bearing wall can be used as a guide. In these places, a solid crate is also needed, therefore, several additional boards are added between the usual crate to make a solid base.


Additional elements of a roof made of metal tiles
A roof made of metal tiles will be able to provide reliable protection of the attic from wind, precipitation and debris only if the roofing sheets are mounted together with special strips.


Additional elements make a roof covered with metal tiles not only beautiful and complete, but also reliable and durable.
The so-called additional roof elements (roofers often call them simply extras) allow:
- to reliably join metal sheets in places with a complex configuration;
- protect the end parts of the slopes from wind and moisture;
- prevent the penetration of debris into the under-roof space;
- provide waterproofing of the junction of roof slopes to horizontal structures - walls, chimneys, etc .;
- perform high-quality drainage and snow retention.
Special strips are made of the same material as the metal tile. Since there are several types of auxiliary roofing elements, we will consider the main types of accessories and their installation in more detail.


Additional elements are produced from the same material as the main covering, and have a shape corresponding to the configuration of the protected parts of the roof
Skate
The ridge element covers the sheet joints at the top of the roof. There are several types of ridge slats:
- triangular - universal extensions that are suitable for any roof. Due to the ease of manufacture, these elements have the lowest price;
- trapezoidal - used to form a wide ventilation duct in the upper part of the roof;
- semicircular - they are more expensive than others, but at the same time they provide good ventilation and an excellent appearance.
The ridge strips are mounted to the surface of the slopes with a ventilation gap into which insects and debris can penetrate. To protect the under-roof space, a sealant made of foamed polyethylene or polyurethane is placed in the gap between the metal tile and the addition. The ends of the skates are closed with special plugs.


In the manufacture of ridge elements, manufacturers take into account the need for ventilation of the under-roof space
Video: how to equip a metal roof ridge
Despite the fact that the ridge part is mounted at the final stage of construction, the method of its arrangement should be thought out even during the design work - the reliability of the roof and the durability of the roofing cake depend on this.
Endova
Endova (in the language of gutter roofers), allows you to protect adjacent joints of slopes with an internal corner from leaks. Similar to an ordinary triangular gutter, this additional element serves as a channel through which precipitation is diverted to the roof drain.
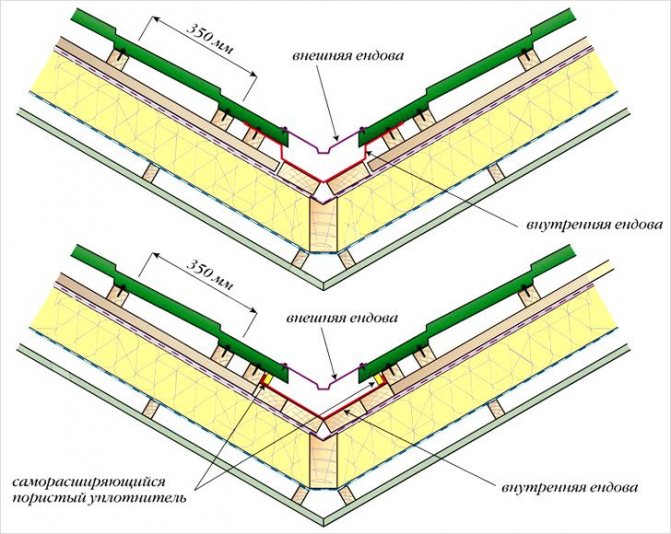

The end of the roof made of metal tiles consists of two shaped elements, due to which it is possible to make the gutter as tight as possible
The groove differs from the ridge extension in that it consists of several strips:
- bottom, which is installed under the sheets of metal at the point of their joint;
- external - for mounting over the junction of roofing panels;
- curly - it is attached above the upper end and performs a decorative function.
The installation of the lower end strips is carried out before laying the roofing material. For installation, roofing nails or self-tapping screws are used, with which the additional elements are attached to the solid crate in a zigzag pattern with an overlap between the elements of 15–20 cm. For waterproofing the slats, both silicone sealant and a special porous sealant are used. When calculating the number of gutter strips, it must be borne in mind that manufacturers produce valleys with a standard length of 2 m.


To prevent the valley from sagging under snow load, the base of the structure is made solid
Video: the internal structure of the valley under the metal tile
Wind bar
The purpose of the wind strips is to protect the end parts of the slopes from wind and moisture, which can get both on the wooden frame elements and inside the roofing cake. Like ridge extensions, end pieces prevent birds and insects from entering the under-roof space, and also prevent debris and falling leaves from blowing out. Depending on the roof structure, end strips with a wing extension of 100 to 250 mm can be used. The standard length of the wind bar is 2 m.
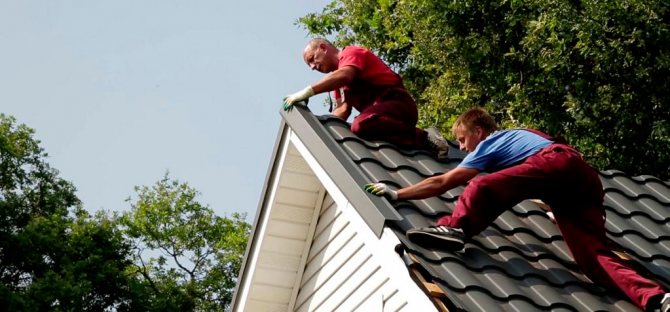

The end strip reliably protects the side surfaces of the roof slopes from wind and precipitation
End additional elements are mounted at the final stage of roof construction, fixing them over the sheets of metal tiles. The installation starts from the side of the cornice, placing the attachment points in increments of 50-60 cm. The overlap of adjacent strips should be from 5 to 10 cm.
Video: arrangement of the end parts of the roof made of metal tiles
Eaves plank (drip)
The cornice elements are used to protect the lower elements of the crate from moisture and to direct precipitation into the gutters. Shelves of add-ons of this type have a ratio of 1: 1.5 and are made in standard sizes 70x100 mm or 150x100 mm with a standard length of 2 m.


The cornice strip not only protects the edge of the sheathing from moisture, but also serves to direct condensation drops into the gutter
The cornice strip, which is also called a drip, is a metal strip bent in half. One part of the extension, called the apron, is wound under the roofing material and attached to the bottom board of the sheathing. The second part serves to drain condensate and precipitation into the gutter. To increase the rigidity, it is formed with a bend made along the long edge of the additional element. To attach the drip, use the same method as when installing the end strips.
Video: installing eaves
Fencing elements
The metal roof fencing consists of vertical supports and longitudinal horizontal elements, which are installed along the perimeter of the roof. The design serves to ensure safe movement during maintenance and repair activities. According to the existing SNiP, the enclosing system must be installed on all high-rise residential buildings. As for the private sector, the decision on the installation of fences is made by the owner of the structure - this element of the structure is not mandatory.


Fencing structures allow safe movement on the roof during its maintenance and repair
Snow holders
Snow protectors, like fences, are not an obligatory element of a metal-tile roof, however, they are installed by owners of country houses much more often. The thing is that these elements do not allow snow caps and pieces of ice to come off the roof like an avalanche, thereby increasing the safety of the structure.
Manufacturers produce several types of snow guards:
- tubular - in the form of parallel pipes installed on vertical supports. These are powerful systems, thanks to which the instantaneous convergence of large volumes of precipitation is prevented;
- lattice, which, like tubular, are installed at the edges of the roof slopes. Roofing elements of this type represent a lattice with small cells, which allows you to keep snow caps of the maximum volume;
- point or corner - have the lowest holding capacity. These snow holders are corners bent from a metal strip, which are fixed in a checkerboard pattern over the entire area of the roof slopes.
When choosing the type of snow holders, you should be guided by the amount of precipitation falling in your area during the winter. So, for the northern regions of our country, tubular and lattice structures should be chosen, while in the southern regions it will be more rational to use point retaining elements.


Depending on the snow load in the region, you can choose a different design of snow holders: tubular (1), lattice (2), corner (3) or point (4)
Structural elements of the roofing system
The construction of a metal roofing tile assumes that all elements of the roofing system are attached to the mounted lathing. Let's consider these elements in more detail.
Eaves strip, gutter and gutter holder
First of all, the gutter holders are fixed, and then the gutters for the water drain. After that, you can fix the curtain rod. It is attached to the crate with self-tapping screws so that the edge of the gutter does not protrude from under it.


Endovy roofs made of metal tiles
The number of such elements depends on the shape of the roof.The lower valley is attached to the lathing under the roof, and the upper valley (decorative strip) - above the roof. When joining the planks of the lower valley, an overlap of about 10 - 15 cm must be made.
Adjacencies
Such elements are needed for a tight abutment of the roof to pipes and walls. Just like valleys, abutments consist of upper and lower planks. A so-called apron is made from the lower slats, after which a tie is placed under it, which is necessary to drain water into the valley or to the outer cornice. After that, the roofing is fixed, and the upper abutment strips are mounted on top of it.


Types of roofing cake
The design of the roofing cake depends on the purpose of the attic space.
Cold roof
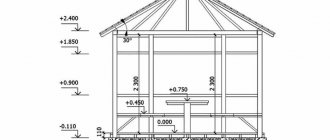
A cold roof is installed if the attic space under the roof is uninhabited. Most often, this design is relevant for outbuildings or gazebos. Since insulation is not required, the design is very simple:
- metal tile;
- lathing and counter-lathing;
- waterproofing;
- rafter system.


The cold roof has a simple structure, in which the roof space is protected only by a layer of waterproofing
Although the metal tile is not a heavy material, the rafter system must withstand significant loads (snow and wind loads, the mass of the roof itself and the person who performs the repair work), therefore, it is impossible to save on the quality of materials for each layer of the cake.
Features of the insulated roof
An insulated roof for metal tiles has a more complex structure, implying the arrangement of functional layers, each of which solves certain problems:
- roof covering - performs not only an aesthetic, but also a protective function, preventing the ingress of atmospheric precipitation;
- vibration insulating material - hides noise and vibration that are formed during the operation of a metal roof;
- lathing for roofing material;
- counter grill - creates a ventilation gap;
- waterproofing material - prevents the insulation from getting wet by trapping moisture that can come from outside;
- heat-insulating layer - retains heat inside the dwelling;
- rafter system;
- vapor barrier material - retains moisture that can get out of the living space;
- inner lining.


The construction of the roofing cake of the insulated roof provides for the presence of layers of steam and waterproofing that protect the insulation on both sides
Installation of metal tiles
In cases where a sheet of metal tile completely covers the entire roof slope, installation begins from the ridge. It is necessary to check the location of the first sheet in relation to the end and the cornice (it should protrude 5 centimeters above the cornice). It is possible to mount metal tiles both from right to left (making an overlap of the next sheets on the previous ones), and from left to right (with an overlap of the previous sheets). After laying 3 sheets, you need to check their parallelism to the cornice. The self-tapping screws must be screwed into the side of the overlap (to the upper point), but not allowing the crate to be caught.
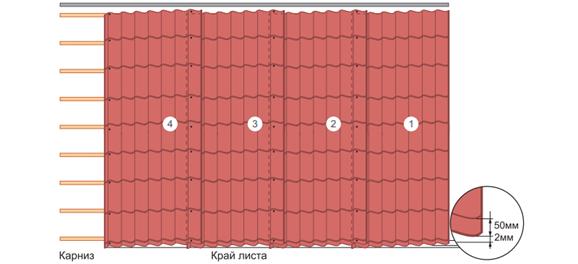

Consider a metal roofing scheme for situations where the roof slope is longer than the sheets of material. First you need to dock the sheets along the length, and then align the first 4 sheets along the end. Each square meter of shingles is fixed with self-tapping screws (with EPDM gasket) - 6 or 8 pieces are required. In places where the material is adjacent to the sheathing, the lower part of the sheet must be fixed in the bend of the wave. Installation is carried out through the wave, and the subsequent rows of self-tapping screws should be shifted in a checkerboard pattern.
Insulation technology
To insulate the roof efficiently and quickly, all the necessary tools should be at hand:
- assembly knife;
- roulette;
- construction stapler;
- a hammer;
- screwdriver;
- fishing line;
- screws and nails.


Insulation of the roof from the inside.
When insulating a structure made of metal tiles, it is imperative to make an air gap of about 2-3 cm thick. Additionally, the roof must have ventilation holes in the lower and upper parts of the battens. Proper ventilation will help extend the lifespan of the rafter system. The air gap is done as follows: nails are driven in along the entire length of the rafters at regular intervals, but not completely, but only up to half. After that, a construction line is tied on them and pulled, and the nails are driven in to the end. Without ventilation, insulation will provoke the accumulation of atmospheric moisture under the rafters and rotting of the wood.
The next stage: plates of thermal insulation material are cut into pieces equal in width to the distance between the rafters, plus a small tolerance of 7-10 millimeters at the edges. This will provide a tighter fit for the insulation. The prepared material is carefully inserted in the middle between the beams, and then gently pressed against the line itself, smoothing from the center to the edges. Deformation of the plates must not be allowed, which reduces the effectiveness of thermal insulation. Having filled all the space between the rafters, the fishing line is again pulled over the insulation to secure it.
http:
Now the thermal insulation must be protected from condensation from the interior. An ordinary two-layer polyethylene film is perfect for this. With the help of a stapler, sections of the film are overlapped from the inside of the crate, from the attic. It is unacceptable to leave even small gaps, since condensation will surely penetrate into the insulation and reduce its effectiveness. If the attic is not used, such protection is quite sufficient, but if it is planned to equip the attic there, it is necessary to additionally cover the film with drywall.
For reliability, the insulation is covered with a special vapor-permeable membrane from the outside. It is important to prevent it from getting wet, because then the material loses all its qualities and it will not be possible to insulate the roof. With the same stapler, carefully fix the membrane along the edges and at regular intervals over the entire area. After that, a wooden crate is mounted, taking into account a gap of 5 centimeters, and sheets of metal tile are already attached to it. At this point, the roof is considered complete. It will be possible to check the insulation for quality only with the onset of cold weather.
Finishing parts of the roofing system
End strips
End strips are installed from the end side of the roof. They are fastened with self-tapping screws every 50-60 cm. It is necessary to make an overlap between adjacent strips of about 50 mm.
Ridge strips
Such elements can be flat or rounded. The latter must be additionally attached to their end caps. It can be simple or conical, it is fastened with self-tapping screws or rivets. Before installing the strips, you need to put a universal or shaped seal under the ridge. These strips are mounted using ridge screws.


Ventilation device and passages
The following additional metal roofing elements are necessary for ease of installation of air ducts, antennas and other elements.
Ventilation outlet
For normal air exchange in each span of the rafters, ventilation outlets are required. However, if the roof itself has an uninsulated “cold triangle”, then one exit for every 60 m2 of the roof will be enough. You need to make a hole in the metal tile and fix the knot to its edges with self-tapping screws. If silicone sealant is not included in the vent outlet kit, apply additionally.
Sewer outlet
The sewer outlet must be connected to the riser, usually a corrugated pipe is used for this. On the roof, for the installation of such a passage element, you need to cut out a fragment of the metal tile.The sewer outlet must be inserted into the passage element and attached to the metal tile with self-tapping screws after the installation of the waterproofing, sealant and sealant is completed.
Outputs for antennas and electric cables
In order to seal the joints between antennas, cables and sandwich-type chimneys, special antenna outputs must be used. It is necessary to cut off the rubber top of the antenna outlet so that it is 20% smaller than the diameter of the passing pipe, and pull it over the pipe. After giving the base of the antenna outlet the shape of the metal tile profile, it is coated with silicone sealant and attached to the metal tile with self-tapping screws.
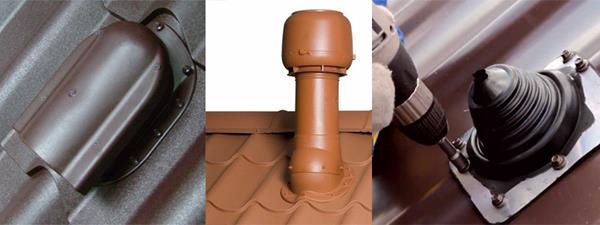

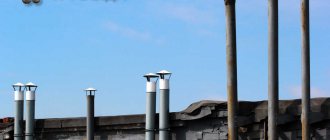
In the photo (from left to right): 1. Ventilation outlet; 2. Sewerage and exhaust outlet; 3. Antenna output.
Construction of metal roofing units
When constructing a roof made of metal tiles, it is important not only to correctly lay the sheets that form the plane of the slope, but also to carry out the installation of individual units and elements in accordance with the technology provided by the manufacturer. The most important areas are the eaves of the roof, the junction of the slopes, as well as the passage and ventilation elements.
Roof eaves device
An eaves overhang is a section of a roof slope that protrudes beyond the outline of the outer walls of a building. In other words, a cornice is a part of the roof from the lower edge to the line of contact of the rafters with the Mauerlat (support bar or upper crown, if we are talking about a house made of timber). The length of this structural element depends on many factors - the steepness of the slope, the height of the building, the amount of precipitation, the roof structure and the architectural features. Usually, the overhang of the rafters is in the range from 40 to 100 mm, however, this value can vary significantly in either direction.


Made of durable timber, the eaves box not only connects the roof frame and walls, but also increases the rigidity of the rafter legs
In addition to its main function of protecting walls and foundations from precipitation, the eaves overhang also performs other tasks - it forms a ventilation gap, does not allow moisture to enter the crate, and binds the walls and roof into a single structure. The cornice serves as both a functional and decorative element and an additional stiffening unit for the overhangs of the rafter legs.
In general, the eaves overhang includes several basic elements:
- parts of the wooden frame protruding beyond the contours of the outer walls (overhangs of rafters with lathing and counter battens);
- waterproofing, which serves to drain moisture from the under-roof space;
- vertical frontal boards attached to the ends of the rafter legs;
- horizontal and vertical beams that create the triangular shape of the eaves box;
- horizontal filing boards (or soffits installed along the lathing of the lower part of the eaves box);
- drip tip, brackets and drainage gutters, etc.


For the arrangement of eaves overhangs of metal roofing, manufacturers offer various decorative strips, soffits, panels, etc.
In addition, eaves can be arranged:
- flush with walls;
- without a triangular box - with filing along the lower plane of the rafter legs;
- with closed or protective sheathing - when it is necessary to protect the ends of the rafter legs protruding beyond the gable part of the roof;
- with a gable overhang, which can be performed both flush and with a protrusion behind the end parts of the roof.

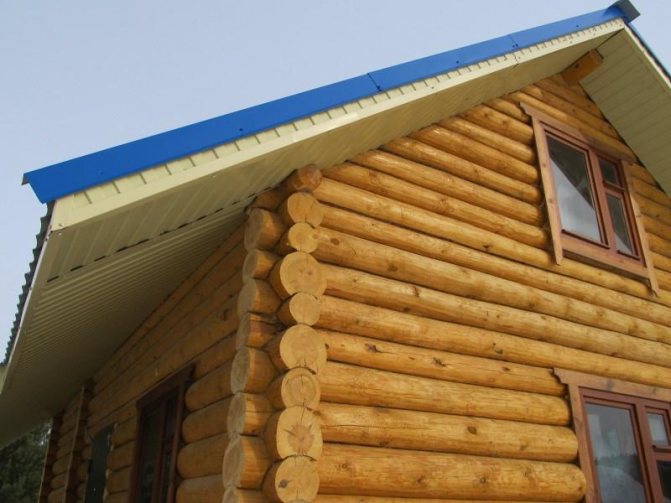
An open eaves overhang does not need a special box arrangement
Regardless of the chosen overhang design, care should be taken to ventilate the under-roof area. Air must penetrate under the sheets of metal tiles and exit in the ridge part.
Video: how to equip a cornice overhang
A fine mesh is used to protect the ventilation openings from birds and insects.
Arrangement of junction points
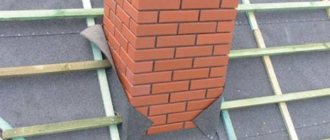
The junction of the metal roof to various vertical surfaces (walls, brick chimneys, ventilation ducts, etc.) are among the most vulnerable areas. In order to ensure reliable waterproofing, a special metal apron (single or double) or a corner strip is used. For the installation of the protective structure, the joint must be waterproofed with silicone sealant or the wall channeled, otherwise moisture will enter the gap between the metal sheet and the brick surface. The groove is made along the abutment line, while its depth should be at least 20 mm. The upper edge of the apron is treated with a sealant and launched into the groove, after which it is fastened with self-tapping screws. The lower wing is laid on top of the metal tile (the overlap must be at least 200 mm) and fixed with self-tapping screws with rubber or plastic washers. After installation, the strobe can be filled with a cement-sand mortar.
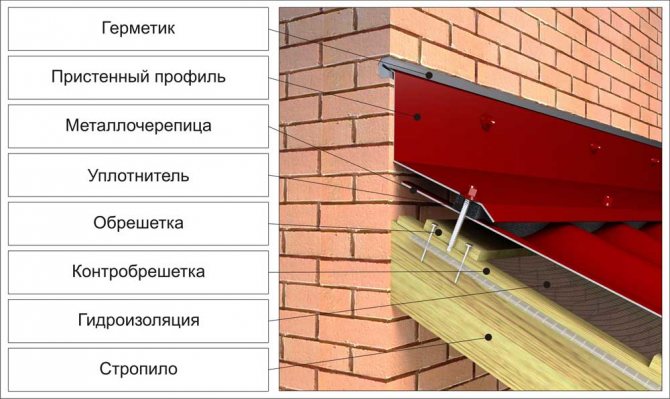

Special curly aprons are used to waterproof the junction of the metal-tile roof to the walls.
There must be a ventilation gap between the metal tiles and the vertical structure, capable of providing air movement in the under-roof space.
Video: how to make the roof adjoining the wall airtight
Today, you can also find on sale double aprons for the places of abutment of profile sheets to vertical surfaces. Their advantage lies in the fact that you can do without chipping the walls and at the same time provide high-quality waterproofing. The outer structural element is attached to the brick surface with dowels, after which the lower apron is brought under it and fixed to the upper one with the help of snap locks. The fastening of the inner strip to the metal tile is carried out by means of special clamps and self-tapping screws. To prevent leaks, the places of all joints are treated with a sealant.
Arrangement of ventilation and passage elements
For the output through the roof of various utilities and ventilation (drainage) pipes, manufacturers produce several types of pass-through elements:
- antenna penetrations;
- rubber and silicone cuffs;
- sealing tapes;
- ventilation valves;
- hood outlets, etc.


A huge assortment of penetrations for metal roofing allows you to choose a product that best suits the purpose and size of the element that you want to bring out
If a cuff or antenna outlet is used for waterproofing, then a hole is made in it corresponding to the hole of the passage element. After that, the flexible membrane is pulled over the fan outlet or pipe, carefully leveled over the surface and fastened with self-tapping screws. For sealing, both silicone sealant and a special tape with a sticky coating are used.


The appearance of the roof and the absence of leaks at the place where utility lines are taken out depends on how accurately the penetration is installed.
Special ventilation valves and outlets have a geometry that follows the profile of the metal tile. They are placed no further than 60 cm from the ridge and are attached with self-tapping screws. As a rule, flanges of this type of penetration have a factory layer of butyl sealant, therefore, additional sealing is not required. As for the places of abutment to the roof, just like the cuffs or antenna outputs, they must be treated with silicone sealant.
Design and purpose of safety elements
Stairs
To climb to the roof, you need a stable ladder, consisting of wall and roof fragments with brackets. Requires 4 brackets per section. They are mounted in the section of the lower wave bend, where there is a solid crate. The brackets themselves and the upper part of the roof ladder are fixed with bolt-screws. The wall ladder is mounted in such a way that its top step is opposite the edge of the eaves.The wall ladder must be positioned in alignment with the roof ladder.
Roof railing
Such metal barriers are essential for roof work. They are attached with special supports to the solid crate through the lower part of the wave and are sealed with rubber gaskets.
Transition bridge
In order to safely walk on the roof from an attic window, hatch or staircase, walkways are necessary. They are fixed in the same way as fences, but a solid crate is not required in this case.
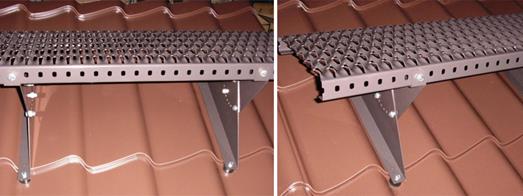

Snow holders
The most popular are tubular metal snow guards and are usually painted black, brown, green or red. They are mounted along the entire perimeter of the roof above the eaves. Also, they must be placed above the entrance, dormers and above each level of a multi-tiered roof.


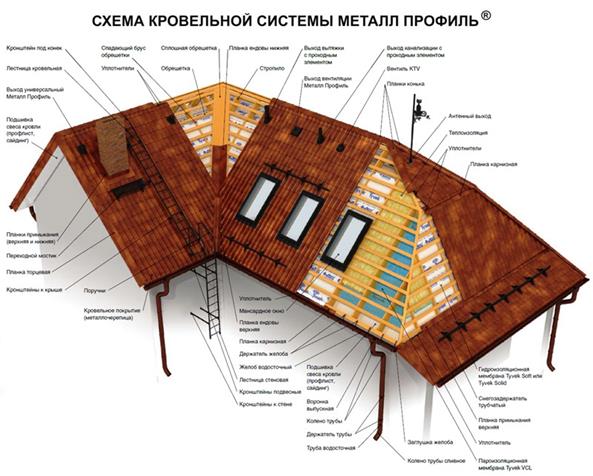
Roofing system diagram
Below you can see a diagram of the roofing system. On it, all the nodes discussed above are connected into a single roof.

Metal tiles - the top layer of the roof
As the roof itself is a certain completion of the structure, so a material such as metal tiles is the upper part of the roofing pie.
Important! Competent professional installation of high-quality metal tiles, which have high quality characteristics, is a guarantee of the most efficient operation of the roof covering. This material is able to serve without loss of quality for a huge number of years, the roof will delight every owner of the house for a long time.
Modern professional manufacturers of this material guarantee that the total life of metal tiles, subject to all standards for installation and use, can reach 50 years. This attracts a large number of developers and also determines their choice.
An important element that is responsible for the quality and practicality of the roofing cake, which is directly responsible for the tightness of an element such as a roof, is an element such as a seal. It is installed on special skates, to elements such as wind, valley and special wall strips.
Important! It is required approximately twice a year to carry out the most thorough inspection of the entire roof surface for preventive purposes. Particular attention must be paid to all the additional elements present, structural joints and some kind of abutments.
Important! All materials used must be properly calibrated and very well dried, strictly in natural conditions. Before equipping the lathing or counter-lattice, the materials used are best treated with special antiseptics and substances such as a fire retardant.
Gutter system
A competent roof structure for metal tiles is impossible without a reliable drainage system. It consists of several elements.
Gutter
According to the rules, no more than 10 meters of gutter is required for one downpipe. A V-shaped hole 10 cm wide is cut out on it, into which the outlet funnel will be inserted. You need to fix it 15 cm from the edge of the gutter.
Holders for gutters
They must be installed before the eaves and metal tiles are finally installed. The holders are fixed every 0.4-0.5 m. They need to be marked so that a slope of up to 5 mm per meter comes out, after which they are bent with a strip bender. You can also bend the already installed holders by marking them using a stretched cord.
Gutter plugs
They are installed at both ends of the gutter and are tightly hammered inward with a mallet.
Outlet funnel
The front edge of the outlet funnel is brought under the outer folded edge of the gutter and is fixed with a carved flange, which is folded against the trailing edge of the gutter.
Connectors
When fastening gutters or their corners together, it is necessary to overlap from 2.5 to 3 cm. For this, connectors are used.They have rubber gaskets, as well as a lock, which consists of a tongue in the front and a rear flange. Using such a lock, it is easy to connect the gutters both in a row and at an angle.
Spider
This part is installed in the funnel of the downpipe. It is designed to keep out debris and leaves. The spider must be cleaned at least once a year to continue performing its functions.
Connection pipe and its elbow
Two transition elbows and a connecting pipe are installed between the funnel and the drainpipe. They are sawn off directly on the spot, having determined the desired size.
Downpipe and its holders
There are two types of holders. They are versatile and suitable for all surfaces and materials. They need to be fixed to the wall every meter. You also need fasteners at pipe joints. During installation, pieces of pipe of the required length are cut off, inserted into holders and snapped into place with locks. At the bottom of the drainpipe, 30 cm from the blind area, a knee is attached to drain the water.
Downspout tee
It is required if one outlet is provided for two funnels. In the lower part it is compressed, and on the side it has a sufficiently wide socket that allows you to change the angle of entry of the side pipe.
Funnel for collecting water
Seam and other complex types of roofing involves the use of a funnel instead of a gutter. It is inserted into the pipe, which is attached to the eaves with a clamp. It is made from a strip of metal and connected with a self-tapping screw.


