general information
Why do you need water containers made of metal or any other material at all? The answer to this question is obvious, but for some it remains open. The fact is that everyone uses storage tanks in their own way. Their purpose is to collect and store water for future use. And how and in what form you will do it - it's up to you to decide.
The tank can have a different shape, depending on its purpose. A regular rectangular large accumulator can be used to collect rainwater. For a summer shower, you can use a flat, low tank, which can be easily mounted on top of a metal frame. It all depends on the purpose of the application.

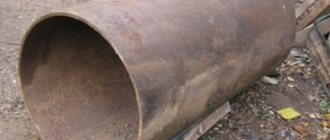
Often, ordinary metal drums are used as such a storage tank. This is a practical and inexpensive option, but not always convenient. Especially because of its open top, through which insects enter the water, and plants and rust form on the walls of the tank. It can also be used to collect rainwater only if you have gutters and the ability to lead the pipe directly to the barrel.
In order not to suffer with barrels, craftsmen make homemade metal tanks. They have a simple design and low cost. Below you can see one of the possible drawings of the storage tank. This container is small in size, but large enough to hold up to 200 liters of water.


Equipment features and manufacturing secrets
Now it's time to talk about how to create a moonshine still from copper pipes with your own hands. In fact, there is nothing complicated about this, you just need to adhere to certain rules.
A self-made moonshine still made from a copper pipe has a number of advantages and features. In particular, all processes, including chemical ones, occurring in it, differ significantly from those that take place in other products.
The main alcoholic product - high-quality alcoholic beverages (brandy, calvados, whiskey, cognac) - is made exclusively on copper apparatus. Copper absorbs all sulfur compounds that appear in the mash during fermentation, but this is especially true for grain and fruit mash.
If we talk about the most pronounced differences, then several of them should be highlighted:
- high level of thermal conductivity - has a positive effect on the final quality of the product;
- durability and reliability - a copper moonshine still made with your own hands according to drawings, practically eternal, not wearing out;
- more intense taste - it has long been established that it is this metal that makes it possible to obtain a more subtle aroma and pleasant taste, which is due to special chemical processes that almost completely eliminate sulfur oxide and certain fatty acids;
- faster exposure - the infusion time is reduced;
- environmental friendliness - unlike aluminum products or models made of low-quality plastic, in this case there is no release of harmful, dangerous and absolutely useless compounds and substances that can change the taste and reduce the final strength;
- presentable appearance - a hand-made copper coil for a moonshine still looks incredibly beautiful and atmospheric, fully consistent with the process that you are performing.
Among the negative aspects, it is worth noting the relatively high final cost of such a model. However, it can be significantly reduced if copper pipes are used, and all other components are made of steel or plastic.
Over time, a thin oxide layer appears on the copper product. It does not have a noticeable effect on taste, but experts recommend getting rid of it in a timely manner, avoiding a large increase. The best copper oxide remedy is lemon juice or concentrated citric acid.
How to make a copper moonshine still
It is immediately necessary to understand that this is not a traditional moonshine still about which we have written so much. This is a reinforcing column, where two streams interact simultaneously - liquid and gaseous.
Distillation - the traditional moonshine still works according to this principle - implies the separation of steam into steam itself and condensate, which flows down the coil and enters the receiving tank. This process is one-time within the framework of one distillation.
Rectification is a process that is different in nature, which ensures the constant interaction of both fractions - liquid and gaseous, due to which there is a crystal purification and high (up to 960) strength of the drink. When the mash boils in the distillation still, the steam tends up the column and condenses in the reflux condenser located at the top. Further, the condensate flows down, and a new portion of steam is already moving towards it. As a result, it turns out that at each stage of the column there is a constant interaction of both fractions.
The most optimal material for the manufacture of such a column is copper, which is absolutely safe for health even at high temperatures and least of all exposed to alcohol. The main advantage of copper is that it absorbs all sulfur-based compounds that inevitably arise from the fermentation of the mash. The smallest amount of sulfur in the production of mash is based on sugar and water, the largest is on the basis of fruits and cereals.
The height of the copper column is selected so that in its upper part there is a temperature of 78 ° C - the boiling point of alcohol. In this case, only alcohol reaches the top, and ALL fusel oils, the boiling point of which is above 100 ° C, settle in the evaporator.
To make copper moonshine stills with your own hands, it is recommended to additionally watch the corresponding video - so you can visually appreciate all the nuances.
Homemade water tank
Preparatory stage
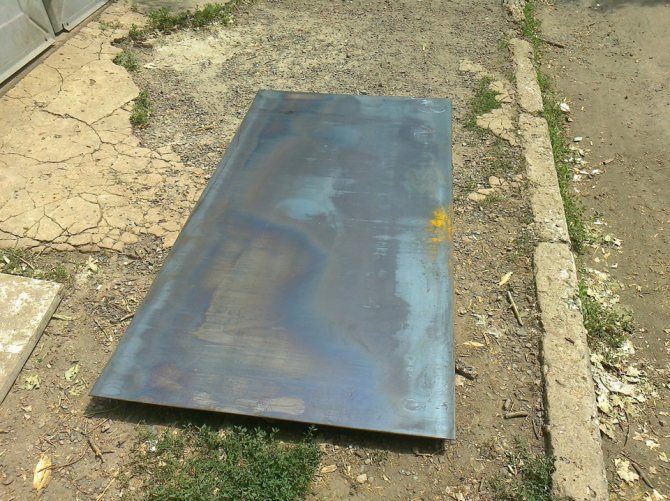
First of all, you must have a drawing according to which you need to cut out the necessary blanks from the metal in advance. The Internet is full of drawings, you can use any of them, or the one that is indicated above.
It is better to make a tank for the house and a stainless steel bath tank. Stainless steel is resistant to corrosion and the formation of plants on the walls, which is important if the container is used irregularly (for example, only in summer). As a material, you can take metal with a wall thickness of about 2 millimeters, this will be enough.
The container must have an expansion tank into which excess liquid will be drained. Otherwise, the storage tank may deform due to overpressure. The expansion tank can be made from the same materials.
If finances do not allow the use of stainless steel, you can purchase steel (technical or food). It's cheaper. But it copes with corrosion at times worse. Please bear this in mind.
Tank welding
Let's move on to the question of how to properly brew the tank.
Better to work with a partner. One will cook and the other will hold the pieces at the right angle. We also recommend placing bricks or boards under the future bottom so that the plane is even.
Cooking stainless steel is not easy, you need to have at least minimal experience. Then the work can turn out to be of more or less high quality. Use argon welding with tungsten electrodes or stainless steel wire.
Sauna boiler drawings hot water tank or storage tank
Category: Accessories 5 021
0
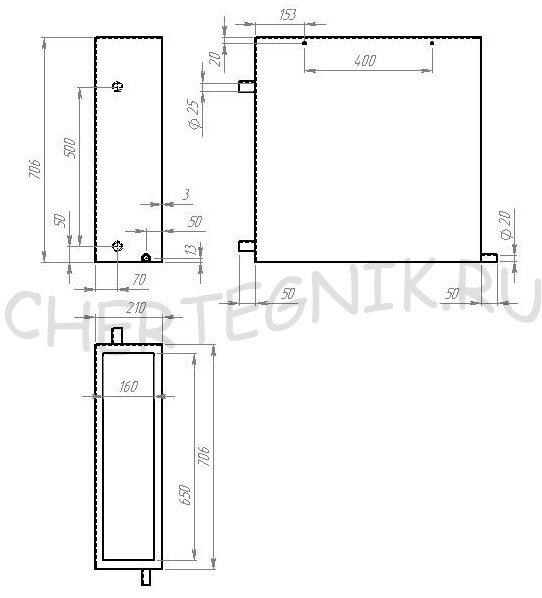
A boiler for a bath drawings a hot water tank or a storage tank with a volume of one hundred liters, a home-made design, and not difficult to manufacture. It is good to use it in a small bath, where the steam room is combined with a sink.
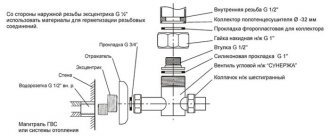
Let's consider the hot water preparation scheme.

1. Heating radiator
... Standard, cast iron, assembled from four sections (the distance between the axes of the inlet and outlet pipes is 500mm). It is installed in the heating furnace at the level of the grate on the right or left side of the furnace compartment of the furnace relative to the heating door.
2. Expansion tank (storage tank).
Serves as a vibration damping device for the hot water tank when it is ejected from the radiator. The size of the container is 200x200x140mm. It is welded from stainless steel sheets 2 ... 3mm thick. To give additional rigidity to the body, stiffening ribs are welded inside it, which dampen the energy of the ejection of heated water and at the same time serve as additional through channels.

The inlet and outlet of the heated product is provided through inch squeegees.
3. Boiler for a bath.
The boiler size is 706x706x210mm. It is welded from stainless steel sheets 3 ... 4mm thick. Inch squeegees are provided for water inlet and outlet. For rigidity of the structure, plates with a width of twenty-five millimeters are welded from above along the perimeter.

We connect the three presented units together with inch galvanized pipes or heat-resistant rubber hoses. Moreover, the outlet from the tank and the entrance to the radiator, the pipeline must be placed horizontally, or at an angle towards the radiator. Place the storage tank above the boiler. The system must be constructed in such a way that the radiator is completely filled with the working medium. This will keep the radiator intersection gaskets intact from overheating. The principle of steam heating is taken as a basis. As the water heats up, it rises to the top, circulating in a closed circuit. Heating to the boiling point occurs within two and a half to three hours. This scheme has been tested on our own bath. Works flawlessly. The hot water tank is located not far from the beds; it is convenient to throw hot water on hot stones. If we want to keep hot water for a long time, it is better to place a container for water above the stones, see the article "Drawing of a stove for a bath." In this design, the chimney is centered inside the tank. The chimney size corresponds to a stack of six standard red oven bricks per row (250x250mm). The chimney in the center increases the rigidity and strength of the product, which freely withstands not a small weight of the brick pipe. It is welded from stainless steel sheets five millimeters thick. It provides for the following drives: - cold product inlet (one second inch); - outlet of hot product in the washing compartment (three quarters of an inch); -output of hot product in the steam room (one second inch); - a technological hole for pressure relief (at your discretion), to them, the appropriate piping is supplied, taking into account the layout of the entire room. A red brick pipe is installed on top. A detailed diagram of the ordering of the pipe is described in the article "Drawing of a pipe. Building a red brick pipe. Ordering scheme ". Fire from the furnace compartment of the furnace passes through the stones and the tank. After 2.5 ... 3 hours of the furnace, stones and water are heated. The heat from the stones keeps the contents of the container hot for a long time.
Order drawing
Share with your friends!
Recommendations of the masters
We have collected some tips from professional welders. They will be useful for beginners and dacha craftsmen.
It is better to use stainless steel grade 8-12X18H10 or AISI 430 08X17 as a material. These brands are best suited for storing water, including long-term storage.However, it is better to drain the water before winter.
Before welding a stainless steel water tank, it is necessary to determine its volume and, based on this, make a drawing. For a bath, a tank of up to 60 liters for two or three people will be enough. On average, one person needs about 20-30 liters of water.
If you are cooking a tank for household needs, then it is better to stock up on a volume of 100 liters or more. 200 liters is just right for watering gardens and collecting rainwater.
It is better to give up the idea of welding an aluminum water tank. At home, it is not easy to make quality sealed seams. Stainless steel is also not easy to cook, then this task is quite feasible. But to work with aluminum, you need experience and a good welding machine.
Depending on the size of the tank and your experience, the entire process can take anywhere from a couple of hours to several days. If you've never cooked before, practice on unnecessary pieces of metal. After all, stainless steel is far from being a cheap material. And you are unlikely to be happy if you unknowingly weld a tank with defective seams, and it turns out to be unusable.
Making a heat storage tank with your own hands
H2_2
Choice of design

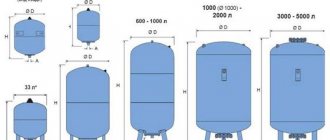
Heat accumulators are of two types:
- With a heat exchanger - a heat exchanger is placed inside the tank in the form of a spiral made of a stainless (or copper) tube, which is connected directly to the boiler, as a result of which the boiler coolant moves along a separate circuit and due to this the water is heated;
- Without a heat exchanger - the heat carrier in the boiler and the heating system is the same.
A tank with a heat exchanger is used when more than one source of heat energy is connected to the heat accumulator, for example, in addition to the boiler, a solar collector or a heat pump is also connected, or the pressure in the boiler circuit is unacceptable for the heating system, etc.
Advice! If there is only one boiler in the heating system, it is easier to make a heat accumulator with your own hands without a heat exchanger.
Step-by-step instructions for the construction of a storage tank for water
How storage tanks are used
If your site has serious problems with regular water supply, it will be very difficult to do without a water storage tank. In such containers, both tap and rain water can be stored. Water supplies can be useful for organizing a summer shower, as well as in case of a possible fire. In addition, the water from the reservoir is used for irrigation and for "bathing needs".
There are several common types of storage tank designs, most commonly rectangular or circular.
In order to determine the optimal size of the tank in your case, it is necessary to clearly understand the possible water requirements of the site for a certain period of time. So, if you rarely use the container, there is a high probability that various harmful organisms will multiply inside it. This probability can be several times greater if the tank is not protected from sunlight. So, it is really very important to decide in advance on the optimal volume of the tank.
Another important point: if we are dealing with a tank made of ferrous metal, then we cannot do without painting and priming, otherwise the structure will inevitably and quickly rust.
Types of containers
This design is not a whim, but a necessity, since water can be supplied strictly on schedule or absent altogether.
Unfortunately, during dry weather, plants may not wait for watering to begin. It hurts to watch how vegetables and fruits, flowers die under the scorching rays of the sun. The only option to save them is a container as an additional source of water.
It is possible to buy a container for storing water in specialized trading establishments. In this case, it will be possible to quickly solve the problem without exerting any physical effort. However, you will have to incur financial costs.
If there is no particular desire to throw away the earned funds, and there is a need for an additional supply of water, then a reservoir for collecting and storing water can be created independently.
Homemade containers are created on the basis of a suitable material, which are:
- tree;
- metal;
- plastic.
Each of these options involves the use of appropriate tools and the implementation of actions strictly according to the instructions.
Also, water containers differ depending on the purpose. If water is needed for watering the garden, the tank must have sufficient volume.
The owners of summer cottages often build. It also requires water to function. The capacity for collecting her water can be either small or medium, depending on the family members who plan to take water treatments every day.
In some cases, the purpose of the acquisition or construction of an additional water reservoir is to provide a supply of drinking water. Additional requirements are put forward for such containers, since it is important to maintain the purity and drinking quality of the water.
Self-creation of containers from the bus
If you can't buy a water tank for a small amount, and you don't want to spend a lot of money, you can create a structure yourself.
The storage tank can be made from scrap materials that are available on the farm or they can be borrowed from neighbors or friends for free.
For example, you can use old tires. It is desirable that these are tires for tractors, since they have a larger diameter.
Initially, they determine the place where the structure will subsequently be installed. This space is leveled, after which they begin to create the basic structure, following the step-by-step instructions:
- the upper inner part is cut off from the tire;
- the cut tire is laid out on the prepared place;
- prepare a solution by combining sand and cement in a 3: 1 ratio, adding water until a mixture of thick sour cream consistency is obtained;
- the solution is poured into the bottom of the tire, leveling the surface;
- the tire with the solution is covered with polyethylene and left for a week (polyethylene performs protective functions, preventing the negative effects of rain);
- after a week, the film is removed, the volume is filled with water.
It is not difficult to create such a tank, but it is important to remember that water from such a tank can only be used for technical purposes. An excellent advantage of such a tank is that the accumulated water mass in it heats up quickly.
Welding stages
At the initial stage of welding, boards must be placed under the corners of the sheet, which will serve as the bottom. It is important that the thickness of the substrate is the same. This will give a flat plane along the entire length and at the corners of the structure.
During the welding process, it is necessary to constantly check whether the sides do not go beyond the base. You can immediately grab all sides together, then weld to the base.
The sheets should fit snugly together. The next step is the final welding of the seams. Welding can be done inside the tank or outside.
Lack of penetration should not be. Self-welding takes about 7-8 working hours.
It is imperative to discard laziness and check the structure for leaks
... After completing the work, you should prepare a chalk solution and apply it to the seams from the inside.
When it dries, with a cloth dipped in kerosene, go over the seams of the tank from the outside. Purpose: identification of "lack of penetration" clogged with slag. It only takes a few minutes to control.
If the liquid does not appear, then everything is fine. If spots appear, then the problem area should be boiled again. Inspection and re-welding is best done immediately before painting.
Installation can be carried out on pre-laid bricks, but it is better to use a stand.Then fill the tank with water and observe for several days: no liquid appeared on the walls of the structure.
How to make a storage tank for water with your own hands
Tractor tires will be the best for such purposes, namely, tires from the T-150 diesel tractor. Or you can buy used tires from a truck at any enterprise or in a vehicle fleet. It must be said right away that the water from such a reservoir cannot be used for drinking or cooking. For domestic needs only! It also becomes a reservoir for chlorine-free rainwater at the same time. Unlike plastic, the tire container cannot be punctured or scratched. The tire does not rot and does not allow water to pass through.
Stages of making a tank from a tire:
- Align the surface on which the tire will lie.
- We put the tire and cut off its upper part with a knife.
- We make a mortar from 30 kg of sand and 10 kg of cement.
- Pour the bottom of the tire with the resulting solution and level the solution with a spatula. This must be done to make the structure stable.
- You need to wait a week for the solution to dry. That's it, the tank is ready!
The containers will be very useful in the country. Water can be used for irrigation and for other household needs.
For many residents of high-rise buildings, the problems of owners of private houses are not known. For example, welding a tank to fill with water can only make city dwellers laugh ironically. And yet the question is not idle. The urgency of the problem lies in the question of which way to go - to order a finished product or to weld a water tank on your own.
For the manufacture of a container for collecting water, you can seek help from specialists. They will weld a barrel or tank according to your drawings and dimensions, or offer their own design. But for quality products, you will need to pay a round sum.
Therefore, many residents of the private sector choose the second option: to make containers on their own, while receiving savings of their own funds and moral satisfaction from the welding process.
Cheap container for large volume of water
The photo below shows one such tank in operation. It is intended for servicing the heating system of the premises in which the quails are kept. For this business, the appearance and aesthetic qualities of the tank were not decisive: the functional qualities of the tank and the cost of its manufacture were paramount.
For such a tank with a volume of about 1000 liters, it would be necessary to buy 5 metal barrels of 200 liters each, and in the region where the quail lover lives, the cost of the discarded barrels was unreasonably high. Therefore, it was decided to make a film tank in a wooden frame.
The first step was to select suitable boards: there were two unedged wide pine 40mm boards. They were marked along the length and cut with a chainsaw so that each formed the side walls of a rectangular box.
These boxes were stacked one on top of the other, so the edges of the unedged boards had to be trimmed with an ax so that it was not too crooked, and so that the upper box was firmly supported on the lower one.
With 100 mm nails, the boxes were knocked down in the corners so that you could visually evaluate the structure being created. Nails here play only an auxiliary role for the preliminary fastening of the box, since the main load from the severity of the water is borne by the binding of the frame made of strong rope.
Tied tightly in several turns with a strong rope, the first box made up the first floor of the tank frame. A second box, which was tied in the same way, was installed on it, which made up the second floor of the frame. The frame was not made entirely, but floor by floor, since there was no assistant nearby, and everything had to be done alone.
When the stability and reliability of the structure was tested, the construction of a waterproof shell inside the frame was started.This requires a durable film that does not allow water to pass through. In our case, an old truck tent turned up. A waterproof insert was cut from it into the container.
It was cut with a small margin so that the useful volume of the tank was maximized (the excess of the awning is wrapped on the sides of the frame and does not interfere with anyone).
For the purpose of reinsurance, two more layers of thick film were laid on top of the awning: in the event of a leak, the cost of eliminating it would be much higher than those two extra layers of film.
After a year of operation, the tank showed no signs of structural wear. The useful volume of the tank is 750 liters, but the water storage tanks of the described design can be made of arbitrary dimensions for the size of the room.
If necessary, the reservoir can be easily disassembled and assembled for reuse. Only a few hours were spent on direct manufacturing, more time was spent on preparing materials and designing.
Other interesting articles
Remote suburban areas are often cut off from the central water supply system, which greatly complicates the care of grown crops. Plants require ample watering throughout the season, especially in hot and dry weather. If it is quite problematic to equip a well on the site, you can create your own storage, where water will accumulate and be saved.
Everyone can afford to install an irrigation tank on the site. With its help, timely watering is organized, and a prototype of a water supply system is created, which allows the liquid to be used for various purposes.