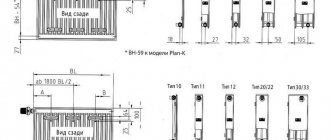
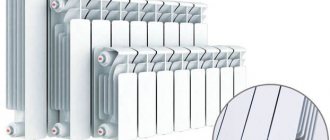
What are bimetallic radiators?
These are batteries for water heating, which have a composite structure:
- internal steel (less often - copper) pipes;
- external sectional casing made of aluminum alloys.
The circulation of the heat-transfer fluid takes place through the internal collectors, which transmit the temperature to the body, and that to the air. The advantage of such units over aluminum radiators is obvious: they are more resistant to aggressive environments. Steel and copper are less susceptible to rust, and high temperatures are less damaging to them.
Step-by-step instructions for connecting bimetallic heating radiators
First of all, you need to calculate the diameter of the supply pipes and order a mounting kit of the appropriate size. Be sure to check the presence of the elements required to connect the radiators of your choice. For this you will need:
- air vent valve;
- 2 adapters;
- adapter for Mayevsky valve;
- bung;
- brackets;
- gaskets for the plug and adapter.
Before connecting bimetallic radiators, it is necessary to properly prepare the container. To do this, turn off the water and drain its residues from the heating system. Dismantle the old battery, while it is necessary to loosen the threaded connections of the outlet and supply pipes.
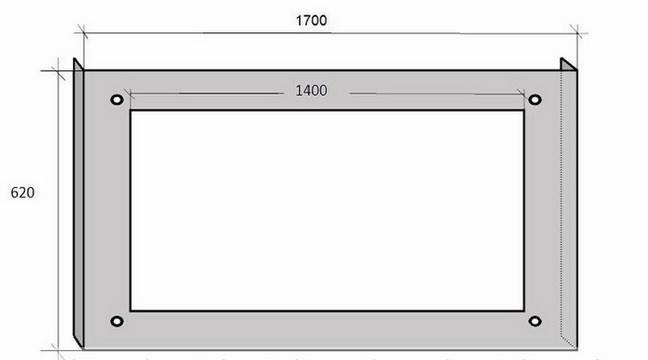
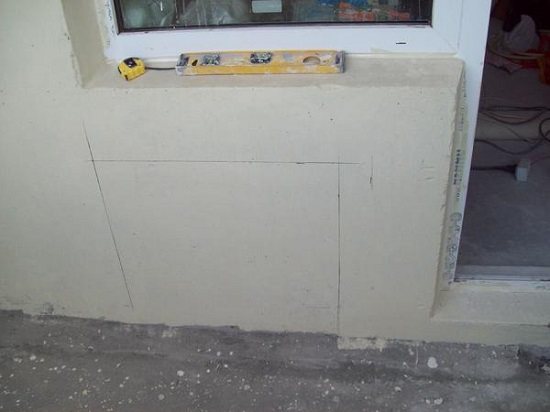
Drawing of a screen for a bimetallic radiator.
Mark the locations of the mountings. To do this, it is necessary to attach the heating radiator to the pipe connections. Check levelness with a building level. Next, mark the mounting holes with a pencil. For this, it is necessary to attach the fasteners to the place of their installation.
In the previously marked places, it is necessary to make holes of the corresponding diameter. For this, a puncher is used. Fasteners are fixed with dowels. Consider the fact that for 8 or fewer sections of a bimetallic radiator, 3 fasteners are enough. With a larger number of sections, you need to use 4 fasteners.
Install the battery on the prepared mounts. It must be installed so that the horizontal collector is on the hooks. In addition, you should be aware that the main feature of connecting bimetallic batteries is that the heating unit, as already mentioned, should be stored in the package until it is fully installed and a performance test is carried out.
Install the Mayevsky valve, which should be included in the delivery kit, on any battery. Always use a torque wrench when tightening the valve. This will allow you to stay within the allowable voltage. Install thermostatic and shut-off valves.
Finally, bimetallic radiators are connected to heat transfer heating systems. It is forbidden to clean the surfaces to be connected with emery paper or a file, because this can lead to leaks.
How much do bimetallic batteries cost?
Radiators combine all their excellent consumer qualities with an affordable price. On MirCli you can buy a model for 4 sections with a height of 500 mm for 4-5 thousand rubles. It will be a first-class unit, designed by a trusted brand and backed by an official warranty.
With the increase in the size of the battery, on which the heat transfer performance depends, the cost of the products also increases. A 7-section radiator, which can serve up to 11 square meters, will cost 7-8 thousand rubles. And to heat a room up to twenty squares, you will have to spend 10-12 thousand.
Types of heating systems
The amount of heat that a heating radiator will emit depends not least on the type of heating system and the selected type of connection. To choose the best option, you must first figure out what kind of heating systems are and how they differ.
Single pipe
A single pipe heating system is the most economical option in terms of installation costs. Therefore, it is this type of wiring that is preferred in multi-storey buildings, although in private such a system is far from uncommon. With this scheme, the radiators are connected to the line in series and the coolant first passes through one heating part, then enters the inlet of the second, and so on. The output of the last radiator is connected to the input of the heating boiler or to the riser in high-rise buildings.

Example of a one-pipe system
The disadvantage of this wiring method is the impossibility of adjusting the heat transfer of the radiators. By installing a regulator on any of the radiators, you will regulate the rest of the system. The second significant drawback is the different temperature of the coolant for different radiators. Those that are closer to the boiler heat up very well, those farther - get colder. This is a consequence of the serial connection of heating radiators.
Two-pipe wiring
The two-pipe heating system differs in that it has two pipelines - supply and return. Each radiator is connected to both, that is, it turns out that all radiators are connected to the system in parallel. This is good because a coolant of the same temperature is supplied to the input of each of them. The second positive point is that a thermostat can be installed on each of the radiators and with its help you can change the amount of heat that it emits.
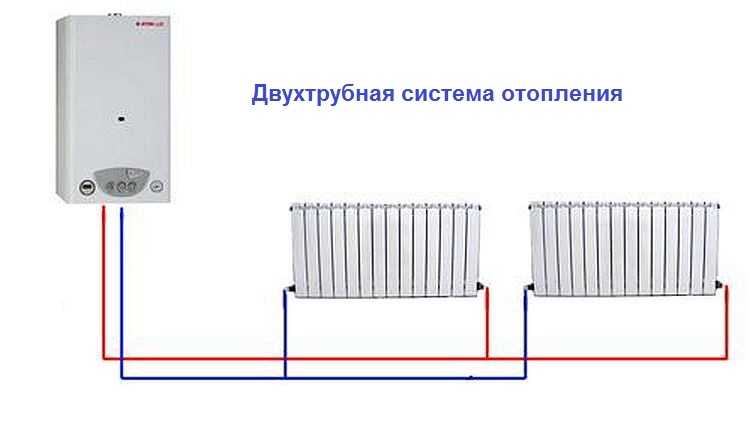
Two-pipe system
The disadvantage of such a system is that the number of pipes in the wiring of the system is almost twice as large. But the system can be easily balanced.
Read more about heating systems for a private house here.
How can hybrid heating radiators be connected?
There are three ways to connect batteries:
- Below.
- Sideways.
- Diagonally.
A radiator with a bottom connection requires connection to the pipes on both sides from the bottom. This method makes it possible to maximize the heat exchange capacity of all sections of the battery along the length, however, the height may not be completely filled. In this case, the temperature exchange will be significantly reduced, up to 15%. Tubular radiators with bottom connection allow you to hide the coolant inlet and outlet from prying eyes: for example, remove it behind a panel or run it under the floor.
When connected to the side, it is connected to the pipes on one side. This type is good with a small number of sections, then the temperature carrier will be able to fill the entire internal space.
When diagonally connected to the discharge and discharge pipes, water or antifreeze goes from top to bottom, entering from one side and exiting from the other. This is the most effective way, as it will allow the coolant to spread throughout the entire volume of the battery.


Calculation of Rifar radiators and connection diagrams
Rifar is a Russian manufacturer of high-tech heating radiators. The products of this company are distinguished not only by proper quality, but also have high technical and operational characteristics. However, no matter what characteristics and quality the heating devices have, it is impossible to do without preliminary calculations for the device of an effective heating system in a single room or a whole house.

The installation of heating batteries, the instructions of which will be described in this article, always begins with the choice of equipment suitable for the parameters.The purpose of the calculations is precisely to derive the optimal formula according to which all further actions for the installation of the heating system will be carried out.
At first glance, the calculation of Rifar radiators may seem like a complicated process, but it is not. You only need to use the room data and the heater output as input values. The calculation, in turn, can be carried out in two ways. The first method assumes the use of its area as the values of the parameters of the room, the second - the volume. Let's consider both options.
Rifar batteries: area calculation
As an example, let's take one of the most common models of batteries - Rifar Monolit 500. We will make calculations for rooms with an area of, let it be, 23 sq. M.
These radiators are an all-metal construction with a different number of sections (depending on the model) - from 4 to 14 units. Approved for use in both autonomous and central heating systems.
To calculate the number of Rifar Monolith 500 sections, first you need to refer to the radiator passport. It should indicate the technical characteristics of one section of the device, we are only interested in the parameter of the nominal heat flux (i.e. power). In this case, it is - 196 watts. There is one unspoken rule according to which 1 sq. meter of room requires approximately 90-100 watts of power for heating. To calculate the total number of required sections for heating, the area of the room is multiplied by 100, and then the resulting value is divided by the power of one section, i.e.: X = S * 100 / W_sections
In our case, this is: 23 * 100/196 ≈ 11.73
As a result, we have a value of 11.73, i.e. for heating a room with an area of 23 sq. meters, you will need to use a 12-section (better to the big side) radiator. This value should be slightly increased if the calculation is made for end or corner rooms. To do this, the result is multiplied by a factor from 1.1 to 1.3. You can take the average value, i.e. 1.2. As a result, we get: 11.73 * 1.2 = 14.07 - this is the number of sections required to heat the end or corner room.
Installation
When connecting heating radiators with a bottom connection type, you must follow the installation rules.
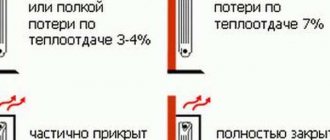
Take care of easy access to the junction of the lower line with the battery itself. The distance from the radiator to the floor should be at least 7 cm. Above, you should also provide the necessary space: the distance from the coolant to the edge of the window sill should be at least 10 cm. Measures are aimed at correct air convection so that the battery heats the room, and not flower pots. Plus, in this case, getting to the radiator will not be difficult (for example, when dismantling). The distance from the wall to the back of the battery must be at least 2 cm.

Installation rules for heating radiators.
Important! When installing, be sure to pay attention to where the pipes for supply and discharge are located. In some cases, they are located on different sides of the coolant - in this case, it is necessary to follow the marking so as not to confuse the supply and discharge pipes. If the connection points are equipped on one side, you need to be very careful. Heat transfer at the bottom connection is far from ideal, therefore, if the connection is incorrect, the heating efficiency will decrease significantly.
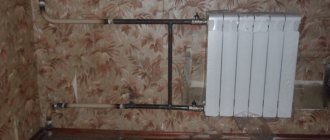
Marking the place for installing the battery
The place for installing the radiator must be selected in advance in order to have an idea of the fastening points. The battery should be installed in the manufacturer's packaging to avoid damage to the coolant. This rule applies to all types of radiators. After determining the place for installation, you should work out the connection diagram of the heating elements.The heat carrier with the lower type of connection is completed with a thermostatic insert for installing a thermostat. The device will allow you to adjust the heating level, which is a significant advantage. However, this will significantly (in the region of 10%) affect the cost of the battery.