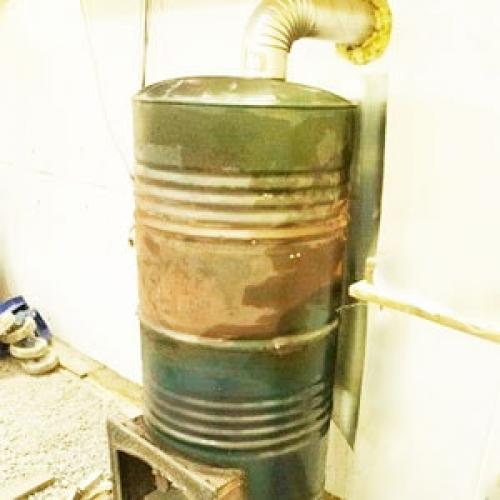
The advantages of a barrel stove
When assembling homemade stoves, artisanal craftsmen often use old gas cylinders or sheet metal. It is problematic to get both, and even almost free of charge. This applies to the greatest extent to sheet metal, which is most often simply bought. Barrels of 200 liters are a more affordable raw material for the construction of heating equipment.
200 liters is quite a decent volume. A firebox organized in a barrel will fit a large amount of firewood, which is necessary for the implementation of long burning. Also, there will be a place for a spacious ash pan. In other words, an old metal barrel will still serve for the benefit of a person, providing him with warmth and comfort.
A barrel stove is an excellent solution for heating non-residential premises of any type. It will fit in the garage, give warmth to a small workshop, and heat the basement. Its assembly does not take much time, but you need to pay attention to the choice of source material. The selected barrel should not be rusted through - the thicker the metal, the longer the stove itself will last. Therefore, you do not need to save on assembly materials.
Other advantages of a barrel stove:
- The volume of 200 liters is enough for normal combustion of a flame in the furnace.
- Possibility to organize a spacious and easy-to-clean ash pan.
- Unpretentiousness to fuel - the stove will be able to work on anything that burns.
- Easy to operate.

A potbelly stove from a 200-liter barrel is in certain demand among those who need inexpensive and easy-to-assemble heating equipment.
There are also disadvantages:
- High case temperature.
- Low efficiency - some of the heat simply flies into the chimney.
- Thin Walls - Durable furnaces require 3-4mm metal.
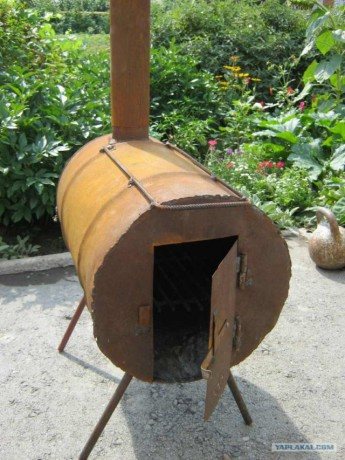
Barrel stove: features of the horizontal model
From a barrel, which has a volume of 200 liters, it is also possible to make a heating device located in a horizontal plane. In this case, it is also necessary to prepare the supporting structure. Its height is calculated taking into account individual operational characteristics. When choosing this indicator, first of all, you need to focus on the dimensions of the room in which the homemade heater will be installed.
In the drawing of the furnace, it is necessary to take into account the peculiarities of its location. The assembly of such a structure takes place in an almost identical way as in the case of a vertical heating device. Let's consider in more detail the process of self-manufacturing of a stove from a metal canister.

From a barrel with a volume of 200 liters, you can make a heating device located in a horizontal plane
Note! The dimensions of the ash pan should not exceed 1/3 of the canister height. The size of a 200 l barrel (more precisely, the height) is usually 85 cm.
A hole must be made in the bottom of the tank, which will be used for ash removal. At the same time, you need to understand that its parameters should not be too large. Next, you need to make an ash pan. As a material for this element, an ordinary metal sheet of appropriate thickness is used. Then it should be docked with the bottom of the heater. For this, it is customary to use welding equipment.
Related article:
Waste oil oven: DIY options for making a device
Principle of operation. Device types. Factory assembled models. Making a furnace for working off with your own hands, design options.
When arranging the ash pan, it is necessary to provide for a viewing window through which this compartment will be cleaned. Next, the installation of the chimney structure is carried out. In this case, there are two common options for the location of the pipe - on the back wall or at the top.
A potbelly stove of long burning, located in a horizontal plane, can be used not only for heating garages, basements and outbuildings, but also for cooking. For this, it is equipped with a special hob. Such a device is mobile, so it can be taken out into the countryside.
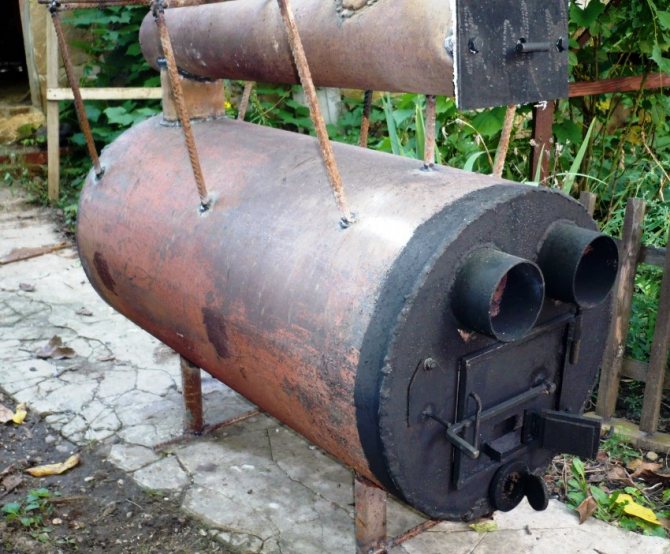
A barrel with a volume of 200 liters is installed horizontally on supports
Assembly sequence
The barrel stove is easy to assemble and requires no less sophisticated tools. We will need:
- angle grinder (grinder);
- welding machine;
- a hacksaw for metal for working with small parts (it's more convenient this way);
- grinder machine.
You will also need auxiliary materials:
- pieces of sheet metal - for scalding doors;
- door hinges;
- chimney metal;
- metal for the legs;
- brick and cement for organizing the base for the stove;
- fittings for creating a grate.
Prepare cutting wheels for the grinder and electrodes for the welding machine (if electric welding is used).

Making a potbelly stove from a barrel is not the most difficult task, the main thing is to follow our instructions exactly and observe safety precautions.
Initial preparation of the barrel
Making a stove from a barrel with your own hands is easier than ever. The first step is preparing our "source". A barrel with a volume of 200 liters must be cleaned of paint (if it has been painted). Those who neglect this step will have to inhale the aromas from the burning paint. Our goal is to make the barrel shiny, and at the same time get rid of rusty stains. Use a grinder to grind metal.
In the next step, arm yourself with a grinder and carefully cut out two rectangular windows in the barrel. Work with the tool carefully, as the sawn out rectangles will come in handy for us as doors. We process the edges with the same grinder or file so that they are not so sharp. The door for the firebox should be larger than the door for the ash pan. In addition, the ash pan door will serve as a blower.
We collect the grate
For the manufacture of a grate, use fittings. The diameter of a standard 200 liter barrel is 571.5 mm. Therefore, the lattice must be smaller in diameter in order to pass through the internal volume. At the level between the firebox door and the ash pan door, we make arbitrary projections - the grate itself will rest on them. For example, you can make them from sheet iron and weld them to the inner walls.
A potbelly stove from a barrel will generate quite a lot of ash that falls into the ash pan. Therefore, it must be large - the recommended height is 100-130 mm. Do not make the door too narrow, otherwise there will be problems with the ease of cleaning.
We prepare the doors
The doors of our stove will be clearly smaller than the loading and ash windows. Therefore, they must be scalded around the perimeter with pieces of sheet iron about 20 mm wide. We also cut out handles from sheet iron, rivet or screw them to the doors. At the next stage, we carefully weld the hinges, after which we weld the doors to the stove itself - now our 200 liter barrel is almost ready to serve a second life.
Making the foundation

For our 200 liter barrel, it is desirable to make legs. Adapt pieces of thick reinforcement for this or make them from metal corners with a thickness of 2-3 mm. The optimum distance from the bottom of the barrel to the base is 100 mm.
Intending to make a potbelly stove from a barrel, think about the place of its installation. You will need a reliable, non-flammable base.It is best to make it out of bricks or pour in a concrete screed. The space in front of the stove is made of non-combustible material - for example, sheet iron laid here. If the floor in the heated room is concrete, just lay a sheet of iron on it and place a barrel on it.
We prepare the chimney
The design of the stove from a 200 liter barrel implies the obligatory presence of a chimney. It would be nice if it was removable - the pipe-in-pipe system is suitable for this. That is, we weld a pipe of a smaller diameter with a height of 100-150 mm to the stove, and already we put on the main chimney of a larger diameter on it. You can also use ready-made factory collapsible chimneys. The bottom line is that the stove can be quickly cleaned by removing it from the base - the volume of 200 liters does not mean at all that it will never get clogged with smoke and soot.
Final assembly of the oven
We take our 200 liter barrel with legs welded to it, install it on a previously prepared base. We lower the grate inside. In the next step, we weld the top cover with a short chimney. Next, we put on the main chimney on it and go for firewood.
Put some paper and small chips on the grate, light a fire, achieve a steady flame. Now start laying the main firewood - it is best if it is dry. Wet logs burn worse, and even smoke, clogging the chimney. Close the door of the firebox and adjust the intensity of combustion with the blower. Do not forget to periodically add new portions of fuel until the set temperature is reached.
Stove from a barrel of 200 liters: diagram, drawings, photos, video
Homemade stove from a metal 200 liter barrel: drawings, stove diagram, photo and
A standard metal 200 liter barrel has a height of 860 mm, a diameter of 590 mm and a weight of 20 - 26 kg.
The dimensions of the barrel are almost ideal for making a stove from it, the only caveat is the thin walls of the barrel 1 - 1.5 mm, which will quickly burn out from the high temperature. Alternatively, the firebox can be lined with refractory bricks from the inside.
To make a furnace you will need:
- Two 200 liter barrels.
- Oven door.
- Grizzlies.
- Sheet metal, corners and rods.
- Chimney pipe.
- Refractory bricks.
Tools:
- Grinder with a cut-off wheel.
- Welding machine.
- Electric drill.
Stove from a 200 liter barrel: diagram.
Using a grinder, we cut off the top of the barrel and cut out a side opening for the furnace door.
Using a welding machine, we weld the furnace door to the barrel. At a height of 20 cm from the bottom of the barrel, we install grate bars for ash.
A separate door can be made for the ash pan; by opening it slightly, you can adjust the traction force in the oven.
To prevent the metal walls of the barrel from burning out over time, you need to lay out the inner surface of the firebox with refractory bricks. To fit the bricks more tightly, we saw them off with a grinder.
For laying the labyrinth of the chimney, you need to weld the crossbeam from the corners under the bricks.
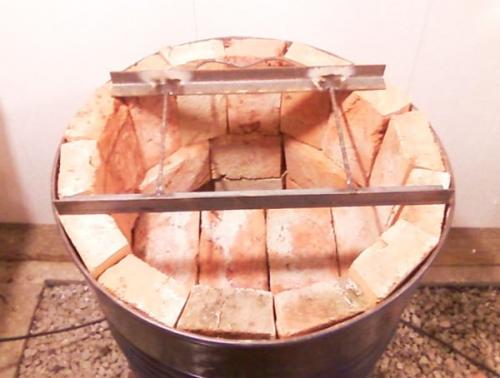
Bricks are laid out on the oven mortar. The composition of the kiln solution is 1 part clay to 2 parts sand, the mixture is kneaded with a minimum amount of water to a very thick consistency.
The thickness of the masonry joints should not exceed 5 mm.
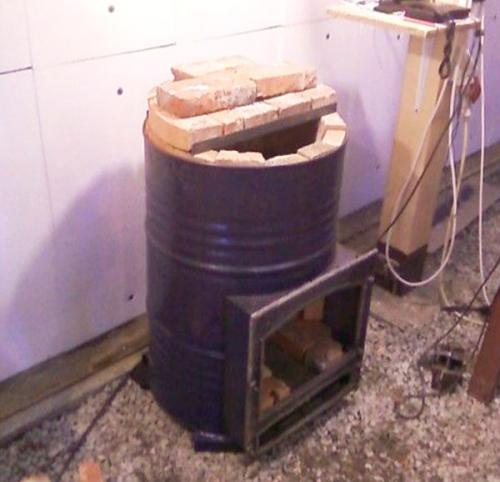
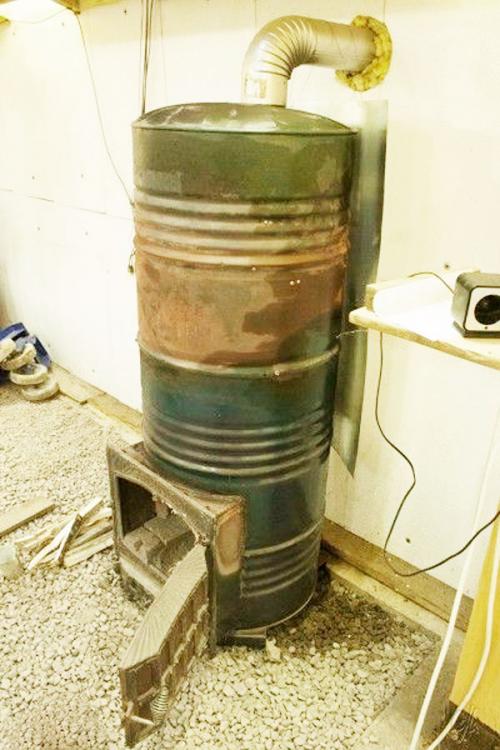
To increase the heat transfer of the furnace, you can install another barrel on top. Under the chimney, you need to make a hole in the barrel and weld a piece of pipe under the chimney.
The chimney will have to be periodically cleaned of soot, so it is better to make it collapsible, I recommend reading the article on how to make a chimney for a stove.
Modernization of the structure
A barrel with an internal volume of 200 liters can provide a decent amount of heat. But the heat transfer efficiency will be small. Part of the thermal energy will completely fly away into the pipe. Therefore, the stove needs to be slightly retrofitted. This is done in the following ways:

These steps will help you make your barrel stove more efficient. If you do not find a sample for 200 liters, you can take 150 liters - there will be a little less space in it, so you will have to throw up the firewood more often.
- To the right, to the left and to the back of the barrel, brick walls are being built - they will work as a kind of heat accumulators.
- The stove is scalded with round pipes of a small diameter (for example, ¾ inch) - a convector is formed, which will cause air circulation in the room and effectively remove heat from the stove.
- By lengthening the horizontal part of the chimney - lead it through the entire room in order to take maximum thermal energy from the combustion products.
We will offer you a few more ideas for modernizing the stove from a 200 liter barrel. For example, you can lay out the inside of it with refractory bricks. To organize the hob, use the cast iron insert in the top cover. Try to make a stove with increased heat dissipation - weld two barrels together in height. There are also modifications with horizontal barrels.
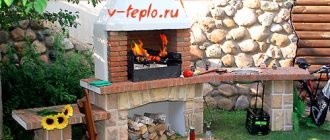
Interesting potbelly stove with stone masonry
A 200 liter barrel can serve as the basis for another interesting stove - with masonry inside. To build it you will need:
- the barrel itself;
- thick metal wire or reinforcement;
- large rounded river stones;
- chimney pipes.
There is no ash pan in such a stove, so there will be some difficulties with cleaning. We immediately recommend making the door of the firebox at the level with the bottom of the barrel - this way it is more convenient to rake out the ash. From reinforcement or thick metal wire we make a kind of grate. Only here it will fulfill a different role - it will support the masonry.
To assemble the stove, it is necessary to cut off the top cover from a barrel with a volume of 200 liters and equip it with a pipe for connecting the chimney. In the lower part, we cut out a door for laying firewood with a height of 150-200 mm. We fix a grate at a height of 250 mm, on which we pile stones to the top. Please note that it is precisely large stones that are needed so that combustion products pass through the space between them.
The stove will need a solid non-combustible base with a metal sheet in front of the firebox - it will be quite weighty, so the legs must be strong or absent altogether. The barrel is placed on the base before the stones are placed in it. Otherwise, you won't budge it later. After installing the stove in its original place, weld the lid and connect the chimney - you can start kindling. To improve traction, it is recommended to drill several holes with a drill with a diameter of 4-5 mm - air will be sucked in through them.
With the onset of cold weather, the problem of heating the premises arises. This is especially true for country houses, which do not have central heating. However, any difficulty must be addressed on time. In the post-Soviet space, there is a well-known stove called "stove". It is made from various metals, but sometimes scrap materials are used. The article will discuss the process of how to make a stove from a barrel with your own hands.
Firebox from a barrel. Rules for installing a stove stove
In order for you to have no problems and all kinds of trouble with the stove, it should be installed, adhering to certain safety rules:
- The oven should only be installed on a fire-resistant surface. It is possible to make it yourself using a tile from a tile or using a brick. The walls located in the vicinity of the stove must also be protected from overheating. The best effect can be achieved by using specialized drywall, as well as any other non-combustible material;
- Never place flammable materials near the firebox;
- You should also equip an excellent ventilation system in the room in which the stove will be located.This is a very important factor, since the concentration of carbon monoxide in the room must be reduced to zero;
- In order to make a potbelly stove, you need to use only high-quality material.
Making a potbelly stove is absolutely simple, as you have seen. For such a case, you only need materials at hand, which are often found in the garage or at the dacha of almost every person. The potbelly stove will delight the eye if all the details are thought out to the smallest detail and done very carefully.
Homemade stove from a metal 200 liter barrel: drawings, stove diagram, photo and video. The barrel stove can be used to heat garages, workrooms, greenhouses and other areas.
A standard metal 200 liter barrel has a height of 860 mm, a diameter of 590 mm and a weight of 20 - 26 kg.
The dimensions of the barrel are almost ideal for making a stove from it, the only caveat is the thin walls of the barrel 1 - 1.5 mm, which will quickly burn out from the high temperature. Alternatively, the firebox can be lined with refractory bricks from the inside.
To make a furnace you will need:
- Two 200 liter barrels.
- Oven door.
- Grizzlies.
- Sheet metal, corners and rods.
- Chimney pipe.
- Refractory bricks.
Tools:
- Grinder with a cut-off wheel.
- Welding machine.
- Electric drill.
Stove from a 200 liter barrel: diagram.
Using a grinder, we cut off the top of the barrel and cut out a side opening for the furnace door.
Using a welding machine, we weld the furnace door to the barrel. At a height of 20 cm from the bottom of the barrel, we install grate bars for ash.
A separate door can be made for the ash pan; by opening it slightly, you can adjust the traction force in the oven.
To prevent the metal walls of the barrel from burning out over time, you need to lay out the inner surface of the firebox with refractory bricks. To fit the bricks more tightly, we saw them off with a grinder.
The advantages of a homemade heating device
A stove stove can be assembled from various materials. Craftsmen for this business use old cylinders or metal sheets, which are then connected using a welding machine. However, not everyone has the things mentioned, all the more so it is not easy to weld metal correctly. In addition, iron sheets will have to be bought, and their price is high. Therefore, the masters recommend making a stove from a 200 liter barrel. This is an inexpensive and affordable design from which a heating device of any complexity can be made.
Why is it recommended to use a barrel of this size? The answer is this: a lot of firewood or other raw materials will fit into it, with which you can ensure long-term burning. In addition, there is enough room in the metal barrel to equip a spacious ash pan. However, you need to know: the equipment cannot be heated with coal, since its walls will simply deteriorate due to the high combustion temperature of the mentioned raw materials.
A stove stove is an optimal heating device that can be installed in a small shed, garage or basement. In addition, you can assemble it quickly with your own hands. You need to know: it is allowed to make a stove from a barrel only from high-quality raw materials - the thicker the metal, the better the manufactured device will be. Therefore, it is recommended not to skimp on the source material.
The advantages of a potbelly stove from a barrel are as follows:
- spacious ash pan;
- the volume is enough for a long burning of the flame;
- the device will instantly heat the room;
- unpretentiousness to fuel;
- ease of manufacture and operation.
But there are also disadvantages, namely:
- low efficiency;
- the case gets very hot;
- thin walls.
If you need to make heating equipment with your own hands, a barrel stove is an ideal device for heating a small room.

About construction
Before starting an independent assembly, you need to study how the device is built and functions. An understanding of the principle of operation helps to facilitate the process of creating an improvised stove.In addition, the price of fuel for a potbelly stove is minimal, and therefore it has become even more common.
The diameter of a 200 l drum is approximately 600 mm. If desired, a functional structure is constructed from it - in addition to heating, it will look beautiful in the interior.
The tank capacity of 200 liters makes it possible to place a hexagon with sides of 314 mm inside. So, in terms of technology, such units are similar to classic ovens.
The finished potbelly stove does not have a high efficiency, it is only 15%. To improve the efficiency of work, the design is complemented by a screen. This is a reflective shield that helps to increase efficiency, but it also has a negative side. A screen that reflects heat provokes a decrease in the operating time of a homemade stove.
The main reason for the low efficiency is the height of the tank. Barrels with a capacity of 200 liters and a length of 85 cm are often made of very thin metal - no more than 2 mm in thickness.
If the grate is raised due to the high localization of the blower, then the productivity of the device decreases. This is due to the fact that the air is dissipated. To eliminate the problem, you need to hide the bottom of the stove with brickwork.

Unit design
The service life of potbelly stoves from barrels is 3-4 years. To increase the efficiency, a large number of tweaks are used, but still it is impossible to achieve a return above 20%.
Required materials and tools
Before you start assembling the device, you need to prepare the following construction devices:
- grinder;
- grinder;
- welding machine;
- file;
- hacksaw.
To make a stove from a metal barrel, you must also purchase the following additional materials:
- metal for legs and chimney;
- door hinges;
- pieces of sheet iron;
- bolt;
- reinforcement (for the lattice);
- brick;
- cement and sand (for mortar).
Making a heating device with your own hands is an easy task. The main thing is to comply with the technical conditions and strictly follow the instructions.
Initial stage: barrel preparation
The first thing to do is to put the metal container in order. The barrel is covered with paint, which means that this layer must be removed with a grinder. If you neglect this point, you will have to inhale the toxic aromas emanating from the heated metal.
After that, you need to carefully cut out two small rectangular holes with a grinder. In the future, the cut out pieces of metal will be useful for making doors. The sharp edges of the barrel must be filed. The device will have two doors: for the firebox and the ash pan. The first must be larger than the second.
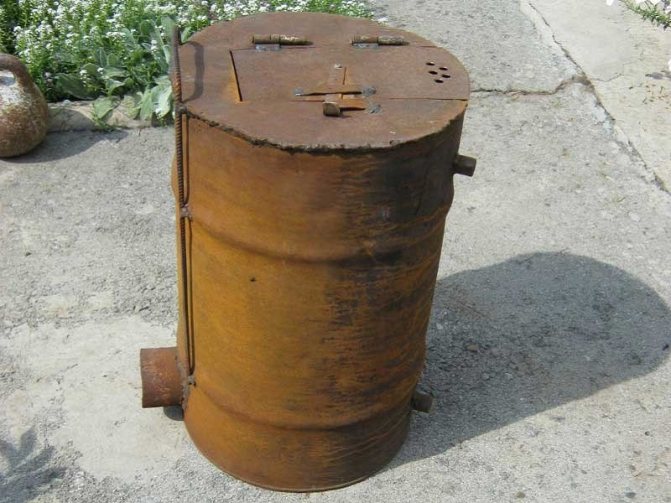
A grate will be placed inside the stove from the barrel, so the upper part of the container is completely removed. The cover will later be welded together with the chimney.

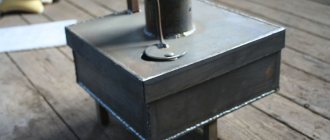
Simple heating stove from a top loading barrel
Materials and tools used by the author:
List of materials:
- a barrel with a lid; - Sheet steel; - a piece of a square pipe for the furnace; - chimney (from a hardware store); - heat-resistant paint.
Tool list:
- rivet gun; - grinder; - welding machine; - drill; - tape measure, marker. Furnace manufacturing process:
Step one. Top part
The whole essence of the manufacture of the furnace converges to one single part, which is installed in the lid. This part contains a branch pipe for installing a chimney, as well as a firebox.
We cut out the base for the part from sheet steel, cut out holes in it for the firebox and the smoke pipe.
As for the flue pipe, the pipe can be made from a steel plate to obtain the desired diameter. We just make a number of cuts, bend the plate into a ring and weld it. We also make holes in the barrel lid in the appropriate places.
Step two. Painting and assembly
To paint the barrel, you need to remove the old paint, the author decided to melt his stove, it works fine, but the stove body did not heat up to such a temperature that the paint could burn. As a result, the author put firewood directly into the barrel and calcined it well. After firing, the paint can be easily removed with a grinder with a wire brush. Well, then we paint the barrel with heat-resistant paint.
Step three. Refinement
As a modification, a dividing wall must be installed inside the barrel so that the hot gases reach the base and heat the entire furnace body. The partition is made of sheet steel and is removable.
Also, as a decoration, you can drill a symbol or an inscription that will glow in the dark when the stove is burning.
This completes the project, the homemade product turned out to be simple and effective, on the upper plane of the oven you can completely heat something up or fry an egg. Good luck and creative inspiration if you decide to do this again. Don't forget to share your ideas and homemade products with us!
Source
Become an author of the site, publish your own articles, descriptions of homemade products with payment per text. More details here.
Preparing the doors
This process is an important step in the manufacture of a heating device. First of all, you need to make iron handles and weld them to the doors, which should be scalded with pieces of metal, the thickness of which is 20 mm. It is recommended to use the factory door for this purpose.
The next step is to weld steel hinges to the stove from an old barrel using electric welding. Do not forget that the outside of the door must be equipped with a locking device (deadbolt).

Preparation of the base
Before installing the oven, you must make a safe and non-combustible place for it. Such a base can be made of bricks laid on a concrete screed. It is important to know: the free space in front of the barrel is also made of non-combustible material, for example, sheet metal. The best option is to make concrete floors, and then put iron on them and install a stove-stove.
Under no circumstances should the barrel be placed near flammable materials and explosive objects. The first include linoleum, polystyrene, polyurethane foam and bitumen. And to the second - gas cylinders and cans of gasoline.
Craftsmen recommend making steel legs on the stove from a barrel. To do this, you need reinforcement or metal corners. If the bottom of the drum is at a distance of 10 cm from the floor, then the device is located at a safe distance from the base.
Chimney making
A pipe is an indispensable element of a potbelly stove. Its diameter ranges from 10 to 15 cm.The pipe not only removes smoke, but also participates in heat transfer, so it is made of steel or cast iron.
The branch pipe can be positioned both on top and on the side of the oven. However, it is the last option that is considered optimal: in this way the gases slow down and there is space for arranging the brewing unit.
In order for the room to warm up faster, the pipe must be brought out to a distant point, and not in a straight line to the nearest hole. It is recommended to install a damper on the chimney: this element can be used to regulate the removal of warm smoke. In addition, when the stove is not in use, it is recommended that the chimney be closed off.

Final assembly of the oven
The only thing left to do is to transfer the barrel to the prepared brick base. After that, install the grate in the stove. Next, you need to weld the top cover and make a hole in it for the pipe. When the chimney is installed, you can heat the stove with wood.
The next step is to place the paper on the wire rack and set it on fire. Dry firewood must be laid carefully, since there is a high probability of accidentally getting burned. The barrel oven will gradually heat up. All you have to do next is to throw up the wood so that the flame does not go out.
The blower of the device can become clogged with ash, so it must be periodically cleaned of burnt raw materials.
How to improve the oven: the best options
The question often arises of how to make a stove from a barrel more modernized. To do this, the device must be improved in this way:
- Build a wall of refractory bricks on the right, left and back of the barrel.
- To get a kind of convector, the stove must be scalded with round 20-mm pipes. Thanks to this, warm air will circulate in the room.
- Run the chimney across the room.
- Lay out the inside of the stove with bricks.
- To get a hob for cooking, a cast iron insert must be installed in the lid.
Craftsmen recommend combining several barrels into one design. This can be done both vertically and horizontally.

Long burning oven for garage
This device is a good solution if you need to heat a small room using a minimum amount of firewood. If the question arises of how to make a stove for a garage out of a barrel, then this will require a welding machine and the ability to work with it.
To make a heating device with your own hands, you need to perform the following simple work:
- Cut a hole for the loading window.
- Make a circle of metal sheet, the thickness of which must be at least 4 mm. After that, make a 10 cm window for the chimney in it.
- Weld a steel pipe to the resulting circle, and 4 channels to its inner side.
- Lower the manufactured structure into the barrel.
- Weld the cut off cover, in the middle of which make a 10 cm hole for the pipe.
- Make a concrete or brick base on which the stove will stand.
- Weld all structural elements to the barrel: doors, hinges and latches.
- Install a chimney.
- Place the device on a concrete base.
The peculiarity of this design is that the wood in it will not burn, but smolder. In addition, a circle with a pipe and channels installed inside the barrel will go down as the raw material burns out. The main advantage of this potbelly stove is that there is no need to control the operation of the device: it works almost autonomously, due to which the metal gradually heats up. The only thing to do is to melt the stove.
How and from what to make a potbelly stove yourself
Modern potbelly stoves look presentable and stylish, but they are not cheap. You can make such a heating device yourself - for this you only need tools, the desire to create a heating device with your own hands and creative inspiration.
Potbelly stove from a 200-liter barrel
Let's start with making the simplest horizontal heating stove from a barrel
This is an ordinary metal barrel of 200 liters, and in addition to it there are metal pipes with a diameter of 50 centimeters
- A cut-out part of the bottom is used as a door, which is hinged
- At the end of the barrel, a hole is drilled to which a metal pipe is welded - this will be a chimney for a stove
- A grate-grate is laid inside the barrel - it will protect the bottom from burning out and help the stove to keep warm longer
- A thick steel wire can be welded on top of the barrel - you get a hob on which a kettle or frying pan is placed
Everything is simple enough. Such a model is ideal for a private house, it will work from wood and chips, and can heat about 100 squares of area.
Making a stove from a cylinder
Such a stove is made without a hob and will be a good portable heating option.
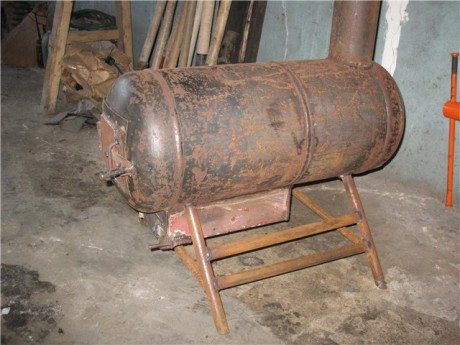
Another practical option is a potbelly stove from a gas cylinder.
Let's take a closer look at the process of its horizontal execution.
- In the bottom of the future potbelly stove, you need to drill holes for ash ejection. Drill along the entire length of rows 5-6 in width
- Next, you need to make an ash pan with a door from a metal sheet and weld it to the bottom of the cylinder
- Now you can weld on the legs and put the stove
- The bottom of the tank has moved - it is now the front of the stove. The bottom must be cut out and made of it a door, which is installed on the welded hinges
- Next, you need to make a chimney - the pipe can be welded from above or positioned behind the cylinder
This type of potbelly stove will be a good option for a garage, it can heat all 30 squares, and a homemade ash pan will allow you to keep the garage clean.
The device of the model on the "working off"
Another variant of the stove, which is most often installed in a small garage or utility room, is a stove stove with waste oil. It is clear that she uses oil for heating, which is poured into the lower tank of the furnace and ignited.

If you have a small garage or utility room that needs heating, take note of the way to make such a stove.
- The fuel tank is made of metal sheets - all elements must be cut
- In the upper part of the made tank, two holes are needed - for refueling and for a pipe. The first hole must have a sliding cover
- The tank turned out - you can weld the legs
- Next, you need to weld the pipe into a large hole, having previously made small slots in it - air will pass through them
The main thing is to observe the proportions and remember that the lid of the upper tank must be removable, and it is also worth making a hole in it for the chimney, which will be displayed on the street.
So, if you choose a ready-made potbelly stove, pay attention to its "gluttony" and appearance. If you only need a stove for a couple of months, a simple collapsible model will do. For a private house and constant heating, it is worth looking at a fireplace stove or a powerful gas generator. If your hands, as they say, “grow out of your shoulders,” you can build a potbelly stove from an ordinary barrel or a propane cylinder.
The principle of operation of a potbelly stove from a barrel
A potbelly stove from barrels is very similar to the type of burzhuikas that we perfectly imagine. However, it has no serial production. This structure is purely the creation of self-taught masters. Among other things, the modernized stove has a round shape and looks like a metal stove "Slobozhanka".
The appearance of the simplest potbelly stove from a barrel, however, has a large number of disadvantages
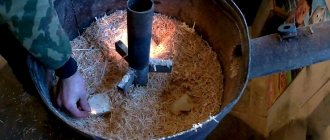
The main difference between them is the fuel combustion option. It uses wood sawdust for the following reasons:
- if you heat a potbelly stove with this fuel, then it will be quite economical due to the low cost of this type of fuel;
- Sawdust, which was previously compressed, burns out for a rather long time.One load may be enough for 6-10 hours for such a design.
Principle of operation
Ovens from a barrel, or the so-called "potbelly stoves", are designs of non-serial production, but they are quite efficient in heating and available in operation.
The outwardly primitive heating stove from a barrel has a dead hearth and, as a rule, has a standard diameter of 60 cm.
In a simple design, any solid fuel at hand can be used, including ordinary firewood, wood chips and sawdust, brushwood.
Due to its small size and relatively low weight, such an oven is characterized by sufficient mobility.
For the purpose of safe operation, it is necessary to periodically remove ash, as well as to clean the interior of the structure from accumulations of soot. Despite the insignificant accumulation of thermal energy, a high-quality non-combustible type base is necessarily equipped from a barrel.
Among other things, in order to provide a normal draft for the fuel combustion process, it is required to install a sufficiently high chimney. The main disadvantage of the principle of operation of a furnace made from a barrel is the need to control the combustion process, since otherwise reverse draft or strong smoke of the room is possible.
The efficiency of the furnace from the barrel rarely exceeds 10-15%, but with some design modernization, such indicators may well be increased by almost two or three times.
Making a stove stove
When a certain moment comes, many people wonder how a potbelly stove should be made from a barrel with their own hands. And in general, how to make a potbelly stove from a barrel of 200 liters.
The potbelly stove is created in different sizes and shapes. It can be round and square, vertical and horizontal. It all depends only on your imagination.
Note. To figure out how a potbelly stove from a barrel made by your own hands works, you do not need to invent something. The principle of operation is very simple.
Diagram of a potbelly stove from a barrel in a horizontal position
Horizontal stoves are considered simpler than vertical stoves. In such a stove, a part of the bottom is attached to the place of the door, which is cut out. She sits on the hinges. A hole is made at the opposite end of the barrel, to which a metal pipe should be attached, which will be a chimney for such a stove. Then put a grate in the middle of the barrel. It plays an important role, as it will help to retain heat for a longer time, and also protect the so-called bottom from burning out. If there is a great desire to create a hob, then you just have to weld steel wire of a large thickness.
Do you want to build a brick stove with your own hands? See detailed instructions on our website!
Note. The horizontal model is perfect for a private house, and can heat about one hundred square meters.
An example of a potbelly stove in a vertical position
Before you get to work, you need to prepare some tool. For a start, it is best to stock up on a welding machine, as well as a complete set of clothing for working with it, a grinder, grinding and cutting wheels, a hammer, a metal brush, pliers, tape measure and a drill.
Tip: Before starting the production of the stove, the barrels should be thoroughly washed, since when heated, it is possible that bad smoke will be released, which will depend only on what was in the container before using it in this matter.
At the required level in the barrel, first mark and then cut out two rectangular holes that will serve for the ash pan and firebox.
An approximate diagram of a potbelly stove in a vertical position
The parts that remain after cutting should not be thrown away, as they can later be used to make the door. In order for the door to be complete, metal strips are attached to it, and then a special latch with a handle is placed.
Then, on the inside of the barrel, just below the firebox, no more than 10 cm, corner-type brackets are attached, which will later serve for laying the grate.
For the manufacture of the grate, ordinary fittings are used. You need to cook it yourself.
It is best to weld the legs to the bottom of the barrel, but in the upper part you need to cut a hole for the future chimney and weld a pipe into it.
Diagram of vertical barrels from a barrel
The door is installed on the hinges that have already been attached in advance. Only after installing the door is a hook for the lock attached.
If you want to achieve a more aesthetic look for your stove, then it is worth carefully cleaning all welds. Heat-resistant paint is suitable for painting, after applying which your potbelly stove will be practically indistinguishable from the factory one.
After the complete completion of all work, the stove is connected directly to the chimney, which has already been brought out into the street.
Advice. Since the firebox of an ordinary stove is unlikely to last a long time, when making a potbelly stove on sawdust, instead of a combustion chamber, you can build a metal pipe that is suitable in diameter.
The device of a vertical potbelly stove from a barrel
How to make a do-it-yourself potbelly stove from a barrel
Probably more than one person asks how to make a potbelly stove with your own hands? and how to make a potbelly stove correctly?
A do-it-yourself potbelly stove is a small-sized oven, which is made of metal sheets. Such a stove can heat up a room very quickly (if it is not very large), but it cools down just as quickly after the fuel stops burning.
If we talk about their shape, then they can be very different (round, square, rectangular, conical or in the form of something), it depends on the imagination of the person who makes it.
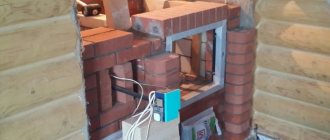
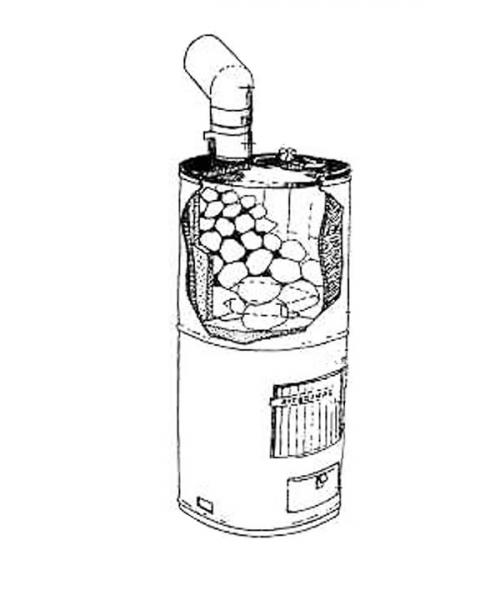
But in this article we will focus on a hexagonal potbelly stove from a barrel. Have you ever wondered how to make a potbelly stove out of a barrel?
1 - casing (barrel); 2 - fuel tank cap; 3 - outlet pipe; 4 - lining compartment cover; 5 - cover handle; 6 - oven; 7 - damper; 8 - firebox; 9 - blowing compartment (ash pan); 10 - support bricks; 11 - felt pad; 12 - metal sheet.
In the picture you can see a potbelly stove, in the development of which publicly available materials were used. First of all, we needed a barrel, the capacity of which is 200 liters, the height of the barrel is 850 mm, and the diameter is 600 millimeters. A hexagon can easily fit into such a barrel, the side of which is equal to 290-300 mm... This makes it possible to install standard furnace devices practically without additional work.
Such a stove is very different from many homemade stoves of the same class. It differs in the following:
- the stove has a voluminous firebox;
- has an increased area due to the fact that the fuel combustion chamber is hexagonal;
- volumetric ash pan with air regulator;
- volumetric oven with lining;
- the oven keeps warm for a long time.
In addition, this stove has a good convection effect - this is the transfer of heat through the air that passes through the channels between the fuel block and the casing.
Do-it-yourself stove stove - assembly procedure
We will cook the fuel block, therefore, in order to avoid mistakes, it is necessary to make a template that can be cut out of thick paper (cardboard) or plywood. Fuel block

1 - oven; 2 - lining compartment; 3 - the body of the fuel tank; 4 - front panel of the blower compartment; 5 - corner of the oven door frame; 6 - upper plate of the lining compartment; 7 - lining niche; 8 - top stop; 9 - side panel of the fuel block body; 10 - support rod; 11 - intermediate plate; 12 - corner of the firebox door frame; 13, 14, 15 - bottom plates of the firebox; 16 - grate saddle; 17 - asbestos gasket; 18 - door shell;

19 - side wall of the ash pan; 20 - bolt for fastening the door; 21 - bottom rack; 22 - damper fastening bracket.
The template should be in the form of a regular hexagon, the sides of which are equal to 290 millimeters. Having made a template, you will not have any problems with the assembly, you only need to assemble everything according to the template, make money, and you can start welding.
Next, according to the prepared drawings, we cook:
- oven;
- lining compartment;
- blower compartment.
Lining compartment
1 - bottom; 2 - sidewall; 3 - back wall; 4 - diagonal insert.
Oven
1 - oven box; 2 - supports.
Blower compartment
1 - side wall of the ash pan; 2 - the back wall of the ash pan; 3 - grate saddle; 4 - front panel of the blower compartment; 5 - frame for attaching the blower door; 6 - bottom of the ash pan.
Front Panel
First of all, we install and weld the blower compartment, for which the plates were prepared in advance according to templates.
We drill holes with a diameter 10-12 mm to install the support rod, then carefully weld the attachment points of the compartment. We also weld an intermediate plate, the dimensions of which are - 285x70 mm... We do this in such a way that its upper edge coincides with the upper level of the bar.
Next, we install the lining compartment on the rod with the plate, combine the narrower side of its bottom with all the ribs of the side panels of our body and weld all the necessary joints with a continuous seam. To the plate with the upper edge of the front panel of the blower compartment, we weld horizontal strips, the length of which is 290 mm, and the corners - 215 millimeters, in order to form a frame for attaching the combustion door, whose internal size is 255x215 mm... We install the oven in the lining compartment, weld the side corners 215 millimeters long, and then the top plate from the lining compartment.
After that, we weld the firebox cover to the protruding upper part of the lining compartment with side panels. And to the lid of this fuel block we weld a small piece of pipe, the diameter of which is 100 millimeters. Then, according to the drawing, we weld the upper stops with the lower struts of the block. We make racks from corners measuring 20x20x4 millimeters or a rod with a diameter 10-12 millimeters.
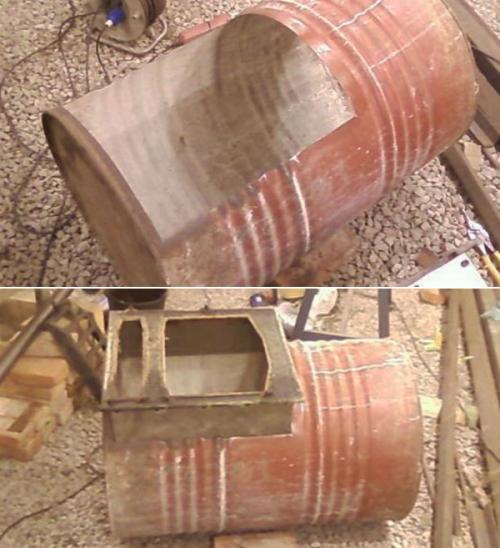
After we finish the work on the manufacture of the fuel block (firebox), refine the barrel. That is, to begin with, we proceed to cutting or cutting the upper bottom of the barrel. In the cylindrical part of the barrel, from top to bottom, cut a strip 300 millimeters wide so that this strip does not reach the bottom of the barrel by 50 millimeters. In the places of the supposed convection channels during the installation of the fuel block into the prepared barrel, holes (holes) are made in its bottom, the total area of which is - 5-6 decimeters square.
When the fuel block has already been installed in the barrel, we proceed to crimping, crimp the edges of the cutout along the edges of the block and weld them to it.
Draft regulator device:
1 - blower door; 2 - door locking handle; 3 - handle for turning the blower valve; 4 - gate valve; 5 - nut, swing handle locknut.
Before proceeding with the installation of the blower compartment in the fuel block, we modify the blower door according to the draft regulator device, that is, we make all the parts, cut out holes with a diameter of 35 millimeters in the door and two of the same holes in the valve.
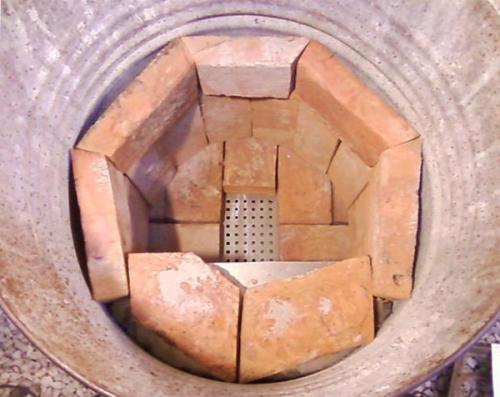
Next, we install the doors into the fuel block and after installing them we put three bricks (refractory) into the lining niche, and then close it with a flap, fill the space between the lining niche and the oven with granite chips. Granite
The crumb should be fractions of 15-20 millimeters. You can also use chips from earthenware products:
- baths;
- toilets;
- washbasins, etc.
Close the backfill with a removable lid - the lining compartment lid.
If it is necessary to replace the lining, for this we remove the bricks and remove the chips through the niche, and then fill the lining compartment with a new lining.
Before installing such a stove-stove in a permanent place, we put felt under it - this is necessary for fire safety.The felt must first be impregnated with clay. After laying the felt ball, cover it with a pre-furnace sheet.
The main devices and materials used for the manufacture of potbelly stoves
| Materials and devices | amount | |
| Side panel sheet of the fuel block housing 550x290 mm. | 5 | |
| Hexagonal sheet with a side of 300 mm. | 1 | |
| The sheet is triangular with equal sides 325 mm. | 6 | |
| Lining compartment sheet set | 400x380 mm. | 1 |
| 350x250 mm. | 2 | |
| 350x280 mm. | 1 | |
| 350x80 mm. | 2 | |
| Oven sheet set | 400x280 mm | 2 |
| 350x280 mm. | 2 | |
| 280x220 mm. | 1 | |
| Ash pan sheet set | 400x200 mm. | 2 |
| 400x210 mm. | 1 | |
| 210x200 mm. | 1 | |
| 290x90 mm. | 1 | |
| Pre-furnace leaf 800x1000x (0.8-1.5) mm. | 1 | |
| Steel corner 50x32x4 (40x40x4) mm, total length 1000 mm. | 1 | |
| Steel strip 50x4 (40x4) mm., Total length 1500 mm. | 1 | |
| Grizzly grate 300x200 mm. | 1 | |
| Furnace door 250x210 mm. | 2 | |
| Blowing door 140x140 mm. | 1 | |
| Asbestos fabric 2000 mm long, 40 mm wide. | 1 | |
| Felt 800x1000x10 mm. | 1 | |
In addition to all this, you will need a few more bricks in order to install the oven on the pre-furnace plate and 3 bricks (refractory) for lining the bottom of the oven. You will also need bolts: M8 or M6which you will use to attach the oven doors (appliances) to the fuel block fittings.