To create a comfortable temperature in a small room, such as a garage or outbuilding, you do not have to run to the store for a heater. You can get by with minimal expenses if you build a sawdust oven with your own hands. For its construction, you can use the materials at hand. It is able to provide a warm microclimate on an area of 50 m² at a minimum cost of resources.
The sawdust oven will be a profitable invention
general information
Long-burning designs have certain differences from conventional furnaces. But the principle by which they work is the same. It consists in the generation of thermal energy during the pyrolysis process - the impact on wood with a small amount of oxygen under high-temperature conditions. As a result, a situation arises when the fuel (sawdust or wood chips) does not burn, but simply smolders. This keeps the number of downloads to a minimum.
The main product generated during the operation of the furnace is hot gas. It contains: methane, hydrogen, carbon monoxide, etc. Thanks to it, the walls of the structure are heated, from which heat is transferred to the ambient air in the room. The result is a comfortable atmosphere.
More details on how to make the stove burning 24 hours on one load:
Main characteristics
A long-burning wood chip stove is a completely independent equipment, effective for heating rooms of a small area.
For its use, you can use a wide variety of solid fuels:
- Firewood.
- Coal.
- Sawdust.
Their cost is low and affordable for everyone. For this reason, it is these types that are usually loaded into the ignition systems of these installations. To create a smoldering process, the sawdust must be carefully tamped. This is necessary to keep the amount of air between the particles to a minimum.
In a conventional stove, the combustion process is intense with a large amount of oxygen. In this case, heat is released in a large volume. As a result, the consumption of firewood increases markedly. As a result, you have to resort to additional fuel loading. In this case, there is no saving of resources. Excess heat will simply go through the chimney. If the object is heated with the help of a long burning structure, then the thermal energy arises as a result of the smoldering process.
How to make an economical long burning stove:
The principle of operation of sawdust ovens
Such a furnace belongs to long-term combustion units, that is, the sawdust in it will not only burn, but smolder. At the same time, enough thermal energy is released, which is enough to heat one or two small rooms. But in order to create a decay process, it is necessary to bring the wood fuel to a dense state, when there is no air between its particles.
An excess of oxygen will lead to the fact that the entire mass will begin to burn intensively, releasing a huge amount of heat. The fuel will run out quickly and you will have to reload it. In this case, you need to forget about saving, and the amount of energy released will be so large that its surplus will go not for its intended purpose. That is, the efficiency drops sharply.
This means that in order for the sawdust to burn for a long time and evenly generate heat, they must be well tamped. Based on this principle, we will build a furnace, or a boiler, on sawdust.
Installation device
Such equipment includes a special shutter. With its help, the dosing of air entering the combustion chamber is carried out.When sawdust smolders, flue gas is generated and a large amount of heat is generated.
There are two types of long-burning equipment:
- The first involves the rise of the furnace gas during the combustion of fuel upwards through the compressed sawdust with subsequent ingress into the chimney.
- Its other type differs in that the gas, as it rises, turns out to be in the external circuit. It is there that it cools down, after which it is disposed of through the same chimney.
A typical long-burning furnace model includes a specific set of components. Thanks to them, efficient heating and fuel economy are provided.
The most significant in its composition are:
- Fuel tank. It is equipped with a damper with which it is possible to regulate the flow of primary air into the ignition chamber.
- Afterburner chambers. They have holes through which secondary air enters the firebox.
- Chimney.
Thanks to these features of the device, the process of smoldering sawdust is ensured. When creating the installation, the option with top loading of fuel is optimal, which provides ease of use.
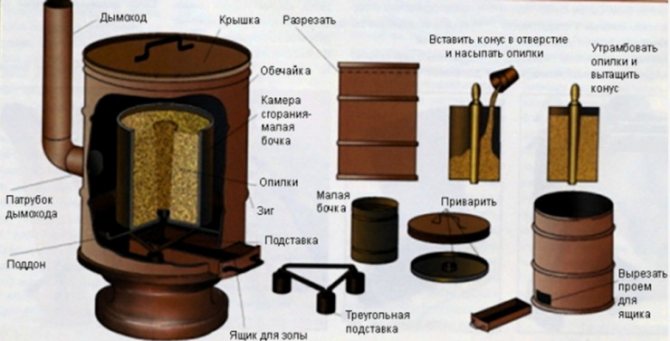
Self-production in stages
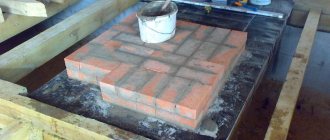
Owners of a country house or, for example, a garage can make a sawdust oven with their own hands, but before installation work, you should equip the foundation - this will ensure the fire safety of the unit. After installing the equipment, it must be lined with refractory bricks or a water circuit must be installed. For installation work, the following materials will be required:

- a barrel with walls at least 10 mm thick (the desired barrel volume is about 200 liters);
- two metal pipes;
- refractory bricks and cement.
From the tools you will need a channel, a welding machine, a grinder (plus cutting wheels), a hammer, a hacksaw for metal.
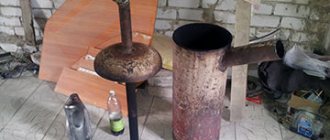
Fuel tank preparation
The upper part of the barrel, from which the fuel tank is made, is cut off with a grinder. You can, of course, use a hacksaw for metal, but the trimming process will be delayed. Cut off the top of the barrel only after the correct marking, otherwise the workpiece will be damaged.
During work, you need to ensure that the grinder disc does not overheat, and also cut it off exactly along the marked line. You do not need to throw out the rest - it is suitable as a cover for the stove.
Installing the pressure plate and supply pipe
When preparing the pressure circle, it should be taken into account that its diameter should be slightly smaller than the diameter of the fuel tank (a barrel with a cut out top). A hole is cut out in the central part of the circle, the diameter of which must correspond to the diameter of the supply pipe. The channel must be cut into 4 parts with a hacksaw and welded directly to the clamping circle - this will make the structure more durable.

Then, the supply pipe and the circle are combined with a welding machine. The pipe must be equipped with a damper for better regulation of the air entering the furnace - an easy-to-manufacture damper is a metal circle equipped with a steel handle.
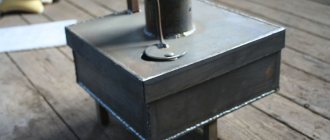
Installation piping and cover
To remove smoke from the unit, a discharge pipe must be connected to the firebox. To do this, cut a special hole in the upper part of the fuel tank and attach the pipe itself by welding. It is connected to the main heating system using a clamp. It is optimal to use the previously cut top part of the barrel with welded handles as a lid. The furnace must be reliably protected from overheating, for which a reflector is welded to the outside of the tank. It is made of metal.
Such a design will give a long burning, and this will solve the problem of providing housing with heat. Moreover, in the independent manufacture of such a furnace, fairly inexpensive materials are used.
Features of use
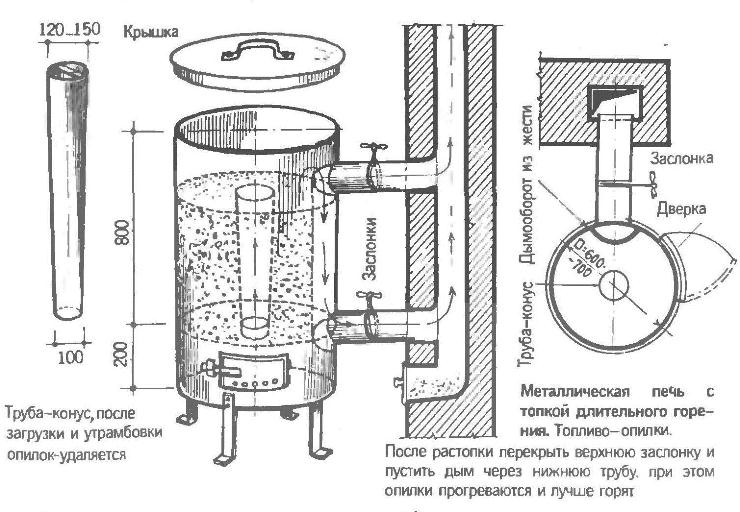
In order to load fuel into the design of the heater, it is necessary to remove the cover and the pressure ring together with the pipe. Sawdust should be poured to the bottom to the level of the chimney. After that, tamping must be performed. Twigs should be laid on top of the fuel, and paper on them.
Next, a clamping circle is installed on top, and then the structure is closed with a lid. When the combustion process starts, the air damper closes. The oven can then be safely left for 6 hours. After this time, the next fuel loading is performed.
Furnace drawing:
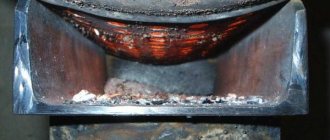
When the process of smoldering sawdust is started, it is forbidden to throw in the next portion ahead of time. Until complete combustion has taken place, it is impossible to fill in new fuel. If this recommendation is disregarded, the combustion force may increase or decrease. In this case, the process of heat generation will also change. Combustion starts at the bottom of the equipment and gradually spreads to the sides. As the sawdust burns out, they will sink to the bottom.
Diy drawing for making a sawdust oven
Certain requirements are imposed on the fuel used in such equipment. The main thing is to ensure thorough pressing of the sawdust in the combustion chamber. During the manufacture of the installation, its dimensions are selected with an orientation to the time of fuel smoldering. If you load sawdust into a stove with a diameter of 30 cm, then the need to add a new portion will not arise for 6 hours. The amount of heat generated during combustion is largely determined by such equipment parameters as:
- Stove depth.
- Diameter of the structure.
If the article is tall and narrow, the combustion will be faster compared to the article, which has a large diameter. In such a design, the process will be longer, and the amount of heat generated will be greater.
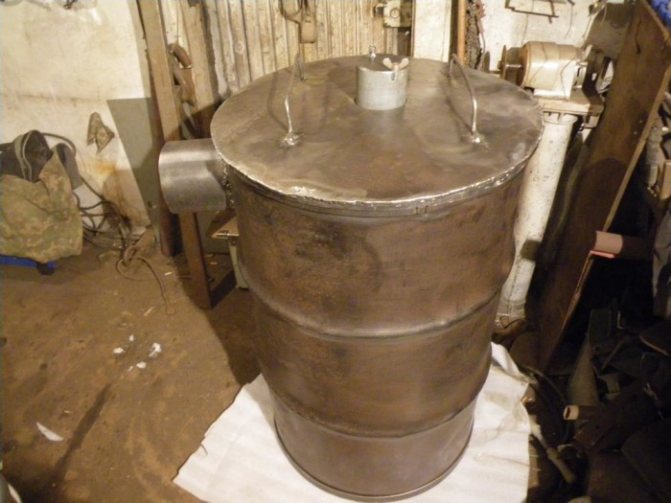
Making a furnace from a barrel with a capacity of 200 liters
A stove with long burning on sawdust with its own hands is made in a cylindrical shape. Suitable for this:
- wide pipe;
- gas cylinder;
- can;
- barrel with a capacity of 200 liters.
The best option is a metal barrel. We will talk about this option in more detail.

To work you need to have:
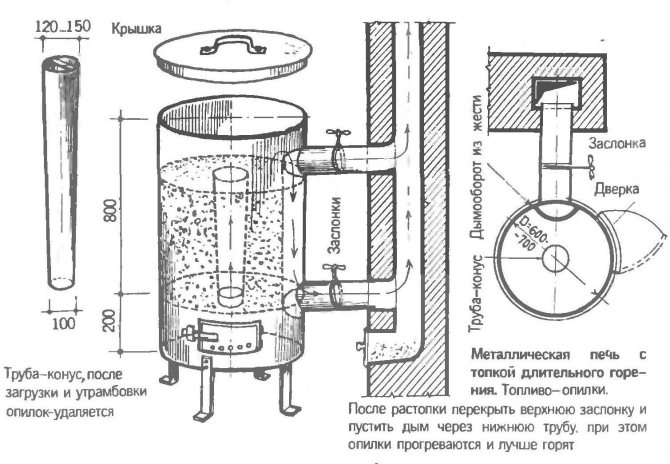
- A barrel with dimensions of 860x600 millimeters.
- Steel cylinder, 500 millimeters in diameter.
- Chimney - diameter over 150 millimeters.
- Steel sheet.
- Metal corner.
It is very good if the barrel has a removable lid. You don't have to make it yourself. In a solid barrel with a drain hole, one edge is cut off. Subsequently, a cover for the stove is made from it.
To create a combustion chamber, you need to stock up on a metal, barrel-shaped container with dimensions:
- height - 600-700 millimeters;
- width - 500 mm;
- wall thickness - 3-5 millimeters.
At the bottom of the container, a special ventilation hole is made, measuring 100 millimeters.

For the manufacture of a tapered tube, you can use a thin metal sheet. Cone dimensions:
- bottom edge - 100 millimeters;
- the upper part is 120–150 millimeters.
Then the ash pan of the stove is made. This work can be done in several ways:
- A side opening is made at the very bottom of the barrel. An ash box is inserted into it. For such a design, it is also necessary to make a pallet, which will be placed under the chamber, inside the barrel;
- The ash box can be installed directly under the barrel. A hole is made right in the middle of the bottom of the barrel, 100 millimeters in size. Through it, ash will fall into the box. The barrel is placed on its legs. They can be made from a metal corner or other available material.
Equipment advantages
This type of furnace equipment has certain advantages. It is thanks to them that it is still in demand.
Its main advantages are:
- Significant operating time of the stove on one tab. Depending on the model used, the combustion process can take 6-20 hours.
- Autonomy of work. When heating a room using such a structure, constant monitoring is not required.
- Small size and light weight.
- When placing the unit, there is no need to create a foundation.
- Prolonged downtime of the device does not affect the service life in any way. This is especially true if it is used in the country.
- Complete combustion of fuel and minimum amount of ash.
- During the operation of the equipment, smoke is generated in a minimum amount.
- The ability to make a structure with your own hands from available materials. Often, there are enough available tools to get such a useful product at your disposal.
In this video, you will learn how to make a long burning stove:
If we talk about shortcomings, then there are no serious disadvantages for long-burning stoves. However, there are conditions in which they are not the best choice. Such devices are not suitable for large houses. Their main purpose is to create a warm atmosphere in buildings of a small area.
Manufacturing process
For manufacturing, you can use pipes, metal sheets (welded into cylinders) and barrels. One of the most budgetary and simplest options is a chimney stove.

Simple option
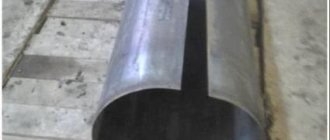
For manufacturing, you need a pipe made of thick walls (at least 4 mm) with a diameter of 40 cm.You can use a metal sheet of equal thickness, from which you need to weld a cylinder with the same diameter:
- Using a grinder, cut a hole for the chimney in the large pipe with a grinder. The optimum distance is 100 mm from the top.
- Make the bottom. Cut a circle about 0.6 cm thick from the sheet, the diameter of which will correspond to the pipe. Weld the cut out circle to the base, it is advisable to use electric arc welding. Cut a 50 mm hole in the center of the bottom.
- Make perforation cuts on the pipe at a distance of 0.3–0.5 cm from each other, and weld it to the bottom. The length of the pipe should be 15–20 cm higher than the firebox.
- Cut the lid out of a sheet similar in thickness to the bottom, only 2 cm larger in diameter. The edges must be tightly bent with a hammer along the entire diameter so that the lid fits snugly.
- In the center of the lid, cut two holes: for the chimney (according to the size of the fitted pipe) and the plug.
- For the strength of the chimney from the inside, you need to weld the pipe and fix the chimney with clamps. Then they are sealed with heat-insulating material and tightly twisted with wire.
- Attach the legs. You can use corner pieces of the same height, which are welded to the base.

In addition to the advantages, this option also has serious disadvantages. So, the stove is only suitable for heating a small area, the walls are very hot, which excludes being at a close distance from it and the possibility of being left unattended.
Long burning boiler
The optimal material for such units is metal barrels, which can also be used as smokehouses:
- Cut off the upper part of the barrel from which the lower chamber will be constructed.
- Make cylinders out of steel so that one fits perfectly into the other. Attach the cover to the top (narrow) edge of the cylinder.
- Remove the bottom of the barrel and cut out a circle of the appropriate diameter from thick steel. It is also used for the boiler lid.
- Make a 100 mm hole in the bottom for the combustion cone.
- Weld the profile pipes inside the barrel. The height of the pipes should be slightly less than the height of the barrel so that the lid and ramming cone tightly cover the structure.
- Cut holes in the cap and cone for round pipes.
- Drill holes in the casing at the height of the pipes, into which the pipes for supplying water (cold and hot) and the chimney will be inserted.
- Construct the ignition chamber from the previously cut off part of the barrel.The door can be purchased or made of steel. You can provide traction by using several holes that need to be drilled in the chamber.
If the boiler will be used to heat a living space, then it is better to cover it with bricks. It will be safer and the heat will last longer.
DIY making
Quite often, a do-it-yourself sawdust stove is made from a steel barrel with a volume of 200 liters. There should be no traces of rust on it. You can also use a propane cylinder or a piece of steel pipe to create the installation. In some cases, it is permissible to make it from an old fire extinguisher. For blanks, the most important parameter is the wall thickness. It will largely depend on it, what will be the life of homemade equipment.
In addition to the basis for installation, other materials are required:
- If the base is round, then you need material for the legs: pipe trimming or a regular channel.
- Two steel circles. They should be identical in size to the diameter of the barrel. Their wall thickness should be 5 cm.
- Finished door.
- The tube is 15 cm longer than the barrel and has a diameter of 100 mm.
- Pipe 5 m long with a diameter of 100 mm. It will be used for the chimney device.
Of the tools for creating a stove, you will need: a grinder, a welding machine, a hammer. You also need a tape measure and a level.
A do-it-yourself sawdust furnace should be made only on the basis of a previously created drawing. You must carefully read it before the start of the event. Only after that you can proceed to active actions.
A prepared drawing will make the work easier
The manufacturing procedure begins with the preparation of the tank for loading fuel. It is necessary to trim the top of the barrel. Before that, it is worthwhile to conduct an accurate marking. Then the risk of spoiling the workpiece will be eliminated. Before cutting out the bottom, the markings are also required. The bottom should not be thrown away as it will then be used as a lid.
In this video, you will learn how to make a do-it-yourself oven:
The next step is to manufacture the bottom of the future installation from steel sheet. It must be cut to the diameter of the firebox. A hole should be made in the center, which should correspond in diameter to the supply pipe.
Making a pipe through which oxygen will be supplied to the combustion zone is the next stage of work. To do this, you need a workpiece that exceeds the length of the firebox, and in diameter it should be similar to it. With the help of a grinder, you should cut longitudinal lines in the pipe or arrange perforations. To perform the operation, you must use a drill. A total of 50 holes need to be made.

Such a furnace will be able to operate on a wide variety of fuels.
Next, the perforated pipe must be inserted into the middle of the bottom, and then welded thoroughly. The next step is to cut out the cover. You need to make a hole in it, located in the center. It must be adapted to the pipe diameter. An additional hole should also be arranged near the edge. With its help, draft and air access will be controlled. At this point it is necessary to install a movable flap. For ease of use, this part should be equipped with arcs.
The chimney structure is made of a pipe and a branch pipe with a diameter of 200 cm. They are connected to each other using a clamp. The branch pipe must be fixed in the upper part of the firebox next to the side outlet. After completing this work, a pipe should be put on it.
Then the stove must be installed on the supports. For their manufacture, a metal profile is used, which is welded to the body.
During the operation of the equipment, it becomes very hot. For this reason, the stove should not be installed near materials that are classified as combustible.The device can be serviced by putting on gloves beforehand. Also, you should not allow violations of safety rules.
Furnace ignition
Fill approximately 75% of the fuel chamber volume with sawdust. The sawdust should be pressed as tightly as possible around the tapered pipe. After firmly compacting the sawdust, remove the pipe, close the stove with a lid and open the damper on the chimney.
Place the wood at the bottom of the stove. They can be loaded through the blower. Light up the wood. Under the influence of the heat of combustion of firewood, sawdust will begin to smolder slowly.
Now you have the information that will allow you to independently assemble the sawdust oven and make its operation as comfortable and safe as possible. Follow the recommendations received and everything will definitely work out.
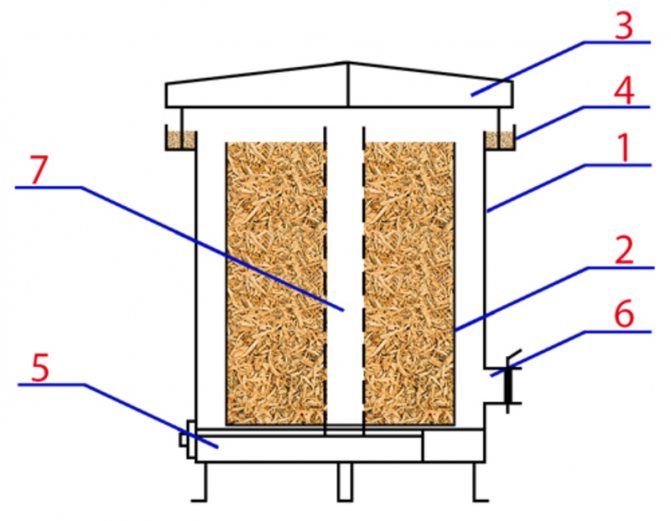
Sawdust boiler with a register for connecting to a radiator heating system
Cover with blower
Happy work!
Important points
When working on the creation of a long-burning furnace with your own hands, you need to know about the individual nuances of this process.
Furnace collection algorithm
Professionals with experience in this matter are well aware of them:
- When assembling the chimney, it is necessary to act in the opposite direction to the movement of the combustion products.
- Arrange a structure that can be easily disassembled for cleaning from deposits.
- Before starting operation, the sawdust stove must be tested in various modes. It is necessary to find out the most suitable temperature mode for use, as well as the optimal amount of fuel that can be loaded into the ignition chamber.
- The procedure for the manufacture of such equipment is not very difficult if the necessary materials are available, and there is also some experience in such work.
In order to obtain an installation that will last a long time, you should observe dimensional accuracy during its manufacture and use high-quality materials. When using the device, you need to remember that it is fire hazardous, so you should not arrange various experiments with it.
A do-it-yourself long-burning sawdust stove is perfect as a heating device in a garage or workshop. When making the installation yourself, the costs are minimal. Even with the help of materials at hand, you can create effective heating equipment. You just need to follow the order of the work, and the event itself should be carried out, focusing on a pre-developed drawing. In this case, you can get a potbelly stove that will provide a warm indoor climate with minimal fuel consumption.
How to build a stove
Furnace diagram (Click to enlarge)
It is quite easy to make a stove on sawdust of long burning by yourself. It will be irreplaceable if there is sawdust, then there is no need to buy more expensive fuel (firewood, coal, gas).
To make a long burning oven, you need to find the following items:
- a piece of pipe with a wall thickness of 1 cm and a diameter of 40 cm;
- a tin barrel, can, tube of a suitable size, or an empty gas cylinder;
- to build a blower, a pipe 7.6 cm in diameter is suitable;
- the cover can be made of a sheet of metal, 1 cm thick or not less;
- a chimney can be built from a pipe with a diameter of 10 cm.
First, you need to weld a plug to the pipe (40 cm in diameter), it will be the bottom of the structure.
The cover must be cut out of a sheet of metal and a hole must be made in the center for a pipe with a diameter of 76 mm. On the side at the top of the boiler, a pipe branch (10 cm in diameter) must be welded. Next, it is necessary to make a blower, for this a piece is cut from a pipe (with a diameter of 76 mm) with a length equal to the height of the device.
From the bottom, 4 legs are welded from pieces of reinforcement in order to raise the blower of the stove by 10-15 cm. Insert the blower into the firebox with the pins down until it stops in the bottom. Then you need to compress the sawdust and load it up to the chimney.A DIY stove works best when the fuel is well compressed.
The blower should be slightly swayed when pressing and loading fuel. This is done so that there is a small gap between the blower and the compressed sawdust. If you do not do this, you will have to wait longer for the sawdust to flare up. Now you can start burning the created device.