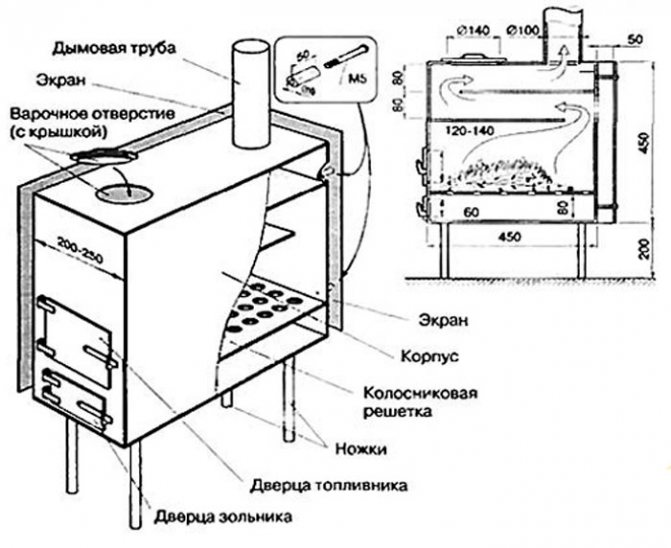
Many people light up with the idea of making a stove from a gas cylinder with their own hands.
Such a heating device does not require large financial investments, but it will be able to heat a technical room, a greenhouse or a barn.
Cylinders are different. For work, it is best to take a 50 liter container. Its diameter is 30 cm, height is 85 cm. The thickness of the walls is optimal.
There are even more thick-walled industrial cylinders for 40 liters. The diameter is 25 cm. The balloon will have to be cut in height, and the thick walls contribute to a longer heating, but also to the subsequent retention of heat.
What ovens can be made from a gas cylinder and how to do it right.
Potbelly stove from a bottle or eggplant.
This type of furnace can be made directly, both from a solid metal sheet, but also from any heat-resistant device, for example, a barrel, flask, pipe or propane gas cylinder.
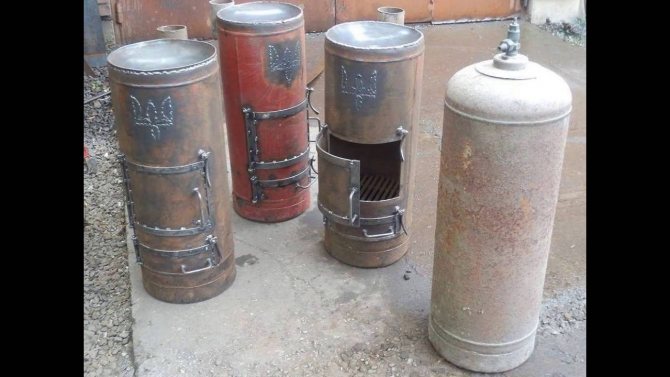
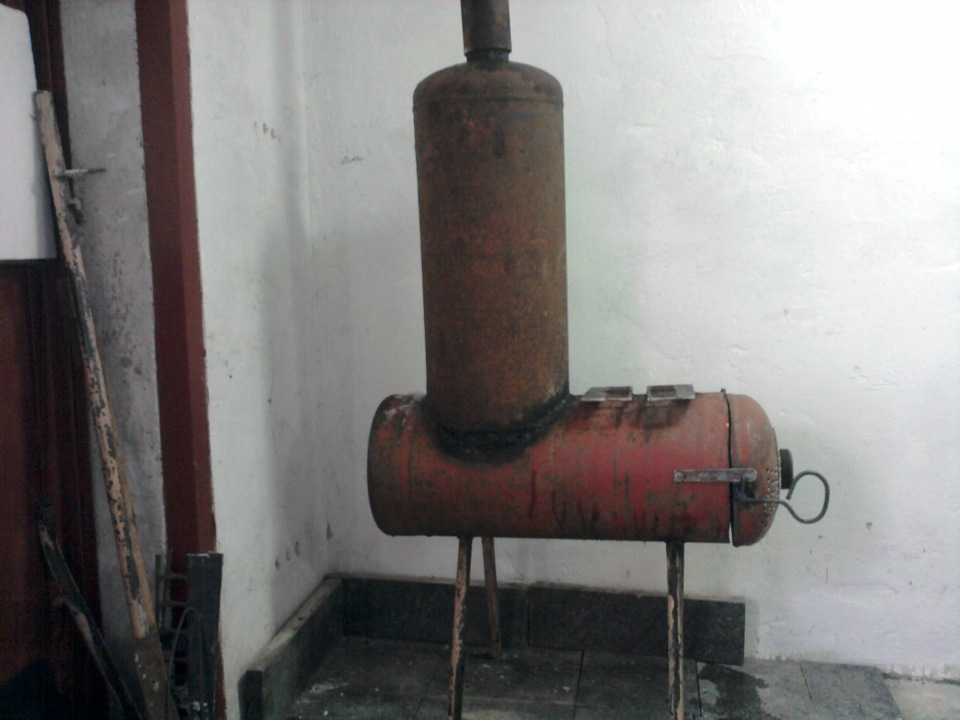
Long burning gas cylinder furnace can be made in different ways and have different positions - horizontal or vertical. In some cases, two cylinders can be used at once, one cylinder is vertically placed on the other in a horizontal position.
There are more than enough models of such an application of gas cylinders, and after considering all the options, you can choose exactly the one that turns out to be the most acceptable for you.
Of course, in order to complete this device, you need to have the necessary materials and tools at hand, and it is also a good idea to acquire at least a little experience in this segment.
Solid fuel stove
How can you make a stove from a gas cylinder? The first question that arises even before starting work: how best to position the balloon - horizontally or vertically?
If you want to use the oven for cooking, you will have to place the cylinders horizontally.
In the vertical version, grate bars will have to be installed inside the cylinder, in the horizontal version this is done at will.
But in a horizontal structure, you will have to weld a pan for collecting ash, and in a vertical one, when installing the grate to a sufficient height, the ash pan can be omitted.
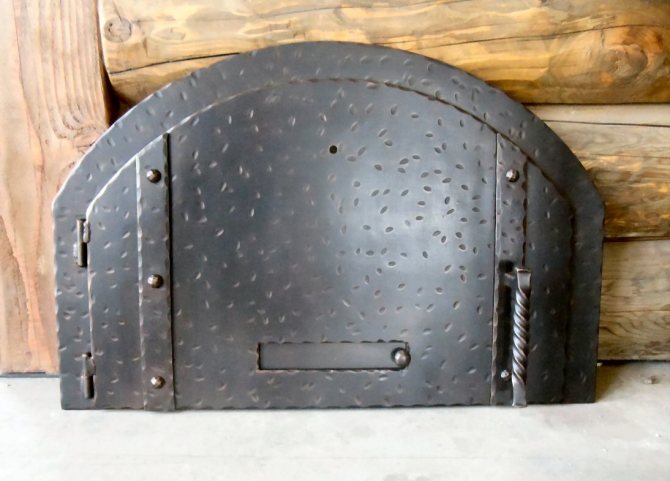
For a stove, you will need cast doors for the blower and the fuel chamber.
Craftsmen make them on their own from a piece of metal cut from a cylinder when making a hole for the combustion chamber.
In this case, you only need to purchase hinges and a latch handle. For a purchased door, you will have to weld a frame welded from the corners to the cylinder around the perimeter of the holes, and fix the fittings on it with bolts.
Before you start cutting or welding metal, you need to free the container from gas. The balloon is filled to the top with water, then it is drained and only after that they begin to work.
Stages of manufacturing a horizontal potbelly stove:
- cut off the upper part of the container with a grinder;
- a grate made of bent reinforcement is installed inside the cylinder;
- the fittings are welded to the container;
- cut out a circle from steel with a thickness of 4 mm, equal to the outer diameter of the cylinder;
- holes-rectangles are cut in the circle - the first under the firebox, the second under the blower;
- weld on a steel circle;
- fix the doors;
- glue the doors along the contour with asbestos cement;
- they begin to re-equip the rear of the furnace - cut a hole for the chimney equal to the diameter of the pipe;
- a chimney is welded from a thick-walled pipe.
When the cylinder is positioned vertically, a structure will be obtained that takes up a minimum of space.
Such a stove from a cylinder is suitable for a bath, a small living space, it can be put in a garage.
Stages of manufacturing a vertical potbelly stove:
- cut off the top of the cylinder with a grinder;
- a large hole is cut out on the front of the future furnace for the firebox, below - under the blower, through which the structure will be cleaned of ash;
- a grate made of reinforcing rods is lowered into the cylinder and welded to the walls;
- a border is welded onto the holes for the doors and pasted over with an asbestos-cement cord;
- weld on the top - it was cut off only in order to put the grate;
- a chimney hole is made from above or from the side.

Materials and tools
Materials for this work:
- A sheet of metal with an approximate thickness of 3 millimeters, it is used in making a place for cooking and an ash pan;
- Smoke exhaust pipe;
- A cast-iron door, already pre-made, or you can make it yourself, using a sheet of metal or a piece of a cylinder;
- A corner or strong rods of reinforcement for making legs and, in the absence of a finished one, for making a grate.
- One or two cylinders are also needed, for this purpose, both gas cylinder containers and small ones can be suitable.
- Tools for making a potbelly stove:
- Welding machine 200 A;
- Grinder or grinder with discs of the required diameter, about 180 millimeters;
- Electrodes;
- Cutting and grinding wheels for metal;
- Hammer for cleaning slag from welding;
- A brush for performing metal work;
- Meter or tape measure, chalk or marker for marking;
- Drill with drills of the appropriate diameter;
- Hammer, chisel, pliers.
In order for the stove to be comfortable and accessible to use, as already mentioned, it can be positioned horizontally and vertically, to determine which is better, the size of the room must also be taken into account.


Simple potbelly stove from a can
The simplest do-it-yourself potbelly stove is made from an ordinary can. There is no need to talk about the durability of such a structure, but it is quickly built, easily assembled and gives enough heat.
All work consists in the installation of the legs, the arrangement of the outlet pipe and some cosmetic operations. To work you need:
- Can
- Chimney pipe
- Grate wire
- Welding machine
- Tools
Getting Started
- We set the can horizontally and mark where the blower will be, which has the shape of a rectangle or a sickle. Place it under the lid
- A hole is cut in the wall or bottom of the can, equal to the diameter of the chimney pipe
- To make a grate, you need to stock up on steel wire. It is bent, carried through the lid into the inside and gently unbent so that the zigzag is in the desired position, while it remains convenient to lay chips, firewood, etc.
- The can must be fixed on legs that are cut from tubes or corners and welded
- The chimney is welded
A reflector can be mounted on the outside of the tank, thanks to which less heat generated will escape. Having welded the handles from the sides, the structure can be transferred to any other place.
Pros and cons of homemade bourgeois
Among the many advantages of such a nondescript, but useful installation, there are:
- Complete autonomy and energy independence
- Work on any solid fuel, including plant residues - this saves a lot of money
- Versatility of design, which can not only be installed in various rooms, but also used for cooking
- A simple design that you can build yourself from the materials available in the garage
- There is no need to erect a monolithic foundation and install a capital chimney
But despite the significant and numerous advantages, there are a number of disadvantages of bourgeois:
- The high thermal conductivity of the metal leads to rapid fuel burnout and cooling of the furnace
- If the wall thickness is insufficient, they will soon begin to burn out and the furnace will fail.
- You need to watch the combustion process and throw up firewood in time, control the traction
- Tarry and damp logs cause stubborn soot in the chimney
Video - another option for making a furnace
A homemade potbelly stove is a reliable and effective assistant in a cold workroom or your own garage. Its manufacture is not difficult, and there is no need for large material investments to start work.
Good material has been collected in your article. I thought for a long time to buy a finished one or to make it myself, nevertheless I made up my mind, I did it myself. I used a 200-liter barrel of fuels and lubricants as a raw material. I was guided by a detailed drawing that I found at https://kamin-maker.ru/pechi/pechka-burzhuyka-iz-bochki/ I will not say that the potbelly stove from the barrel is very good, there is also a drawback, such as a thin metal, this implies a service life of no more than a year, but a huge plus is a very cheap and not complicated production of this unit. Based on my experience, such a furnace perfectly heats a room of 80 m2, I use pressed sawdust as a raw material, one bookmark is enough for me for at least 6 hours. Long resisted to do or not, but in vain, a great thing!
5bdedcb7ed5bd81554f3482ed13711bc.jpe


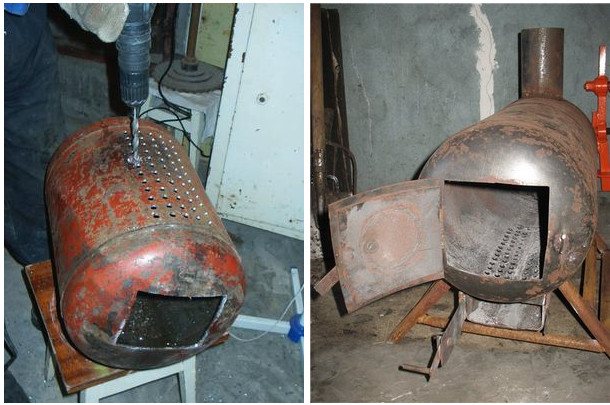
Balloon preparation
At the beginning of all work, it is necessary to carry out the correct processing of the cylinder for further use, especially if it is a gas cylinder. Because if the gas was recently present, then its particles could remain and when cutting metal due to a spark, the container may explode.
To this end, you first need to do a procedure that requires time and attention: open the valve and release excess gas. For this purpose, it is better to put the container overnight on the street or in a room with high ventilation, and it is even easier to fill the balloon to the brim with water.
Further, the container is freed from condensation in an inverted form, which also smells unpleasant, which means that such actions are carried out outside the living quarters.
The washed container becomes safe and can be safely attached to processing.
Choice of cylinder and materials
The furnace body is made from an old empty gas cylinder. For effective work and high heat transfer of the structure, you need to determine the size of the container. A small room can be heated using a five-liter cylinder. Small stoves with low power are built from containers with sizes from 12 to 30 liters.
The industrial (40 l volume) has thick walls, and the diameter of the inner surface is too small to load a sufficient amount of fuel. The best option is a 50-liter propane container 85 cm high and 30 cm in diameter.
Potbelly stove of vertical type
When making a potbelly stove with this type of position, the cylinder is placed in the standard placement for it, everything is removed from the neck and the markings are made using chalk and a meter. Next, an entrance for the firebox and blower is cut out, for this purpose a grinder is used or, if available, gas, plasma cutters are used.
The next step is the grate, since it is practically not available in the finished form of the required dimensions, then the reinforcement of the required length is cut and welded between the firebox and the blower at a previously marked place.
Doors - for this purpose, for do-it-yourself manufacturing, the required sash size is cut out of metal pieces and attached to the hinges previously welded to the furnace blank.
In order to securely fix them when using the oven, latches or latch are welded onto the door.
If necessary, you can equip a hob in the upper part of the stove, on which hot drinks are heated or a light lunch is prepared; for this purpose, metal sheets are also used.
You can build not only a cooking surface, but a device similar to a samovar for heating water, where the pipe coming from the firebox will pass through a special reservoir with water.
All seams of joints must be sealed.
The chimney is installed either at the top of the stove, or in the side and leaves the room through the roof or wall of the room. This type of stove placement is very economical, as the result is a compactly placed heating device that is ideal for a small room in the country or for heating a garage and does not take up much space.
Potbelly stove made of metal sheets
Here are the features of making a stove from metal sheets that use different raw materials for heating: mining and firewood.
Working furnace
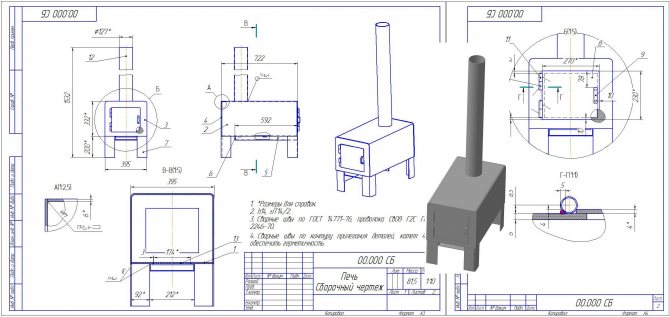
To start working with your own hands, a metal sheet of about 5 mm is harvested (it is this width that allows the stove to quickly warm up and effectively heat the garage) and pipes (needed for the chimney and some other elements). For a more accurate understanding of the manufacturing principle, see the drawing:
Drawing of a potbelly stove for processing
Getting started:
- According to the given dimensions, it is necessary to cut out the elements from the sheet, from which the furnace will be made. Try to clean cut edges as much as possible.
- A part is being prepared for attaching the components of the stove - a pipe with holes.
- The parts of the upper tank are prepared for the installation of the chimney. To do this, you need, according to the data shown in the drawing, to make a hole offset to the left in relation to the cent. Also, at the bottom of the tank, another hole is made (shifted to the right) - it is intended for installing a connecting pipe.
- The constituent parts are welded to each other and a finished tank is obtained.
- The lower tank is welded in the same way. Only a hole is made to install the pipe in the center. You also need to make another hole with a slight offset - processing will be poured into it. A special sliding cover is made over the filling hole.
- The lower tank is attached to the upper one (they are welded to the connecting pipe). The structure should be strengthened using brackets.
- Do not forget to weld the legs to the lower tank.
- To increase the service life, the oven is cleaned and painted.
You attach a potbelly stove to the chimney and try to heat the garage. To do this, pour fuel into the lower tank and set it on fire. When it has caught fire, the recycling hole needs to be closed with a sliding lid.
Rectangular stove on the wood
Drawing of a rectangular potbelly stove
This option is suitable when you need to heat the garage or sauna rooms intended for relaxation.
The features of the model, the manufacture of which we will describe with our own hands, is high heat transfer and the ability to adjust the traction force.
Our oven will measure 45x45x80. These dimensions are enough to heat an average room. Long wood will fit into it and is easy to move.


In this case, we will not give a specific drawing, and will try to explain as much as possible in words. Before starting work, we buy:
- Steel 3-4 mm thick. A sheet one and a half by two meters will be enough.
- A piece of pipe. Choose from a diameter of 90 to 100 mm. Length: 0.4 m.
- Rebar 16 mm. You need exactly 6.2 m.
- Five kilograms of electrodes.
- Four door hinges.
- A rod of steel, half a meter long and about 10 mm in diameter.
- Seven meters of corner with 40 mm shelf. The walls should be 5 mm thick.
When everything you need is prepared, we start working with our own hands in the following sequence:
- Future walls of the structure are cut from the sheets.
- The corner is welded in such a way that a frame is obtained. When performing this and the first point, you need to remember the above dimensions of the stove (45x45x80).
- The reinforcement is cut and welded to the frame at 2 cm intervals.
- The finished frame is scalded with tin.
- Along the diameter of the smooth bar in the section of the pipe that will be the chimney, you need to make 2 holes.The pipe is welded to the frame (before that, you need to make a hole under it).
- A curved bar is inserted into the chimney holes. It should be in the form of a right angle. A piece of round tin is welded to it, slightly smaller in size than the inner diameter of the chimney - it will be used for adjustment.
- The potbelly stove must have doors. They are cut straight out of the body. Loops are welded onto the removed piece of metal, with which they are attached to the furnace.
- Bolts and handles are installed on the doors, which can be made in any convenient form. The main thing is that they guarantee the maximum fixation of the door (if you do not want to burn the garage).
- When the work is finished, you can check the result of the work with your own hands and start heating the garage.
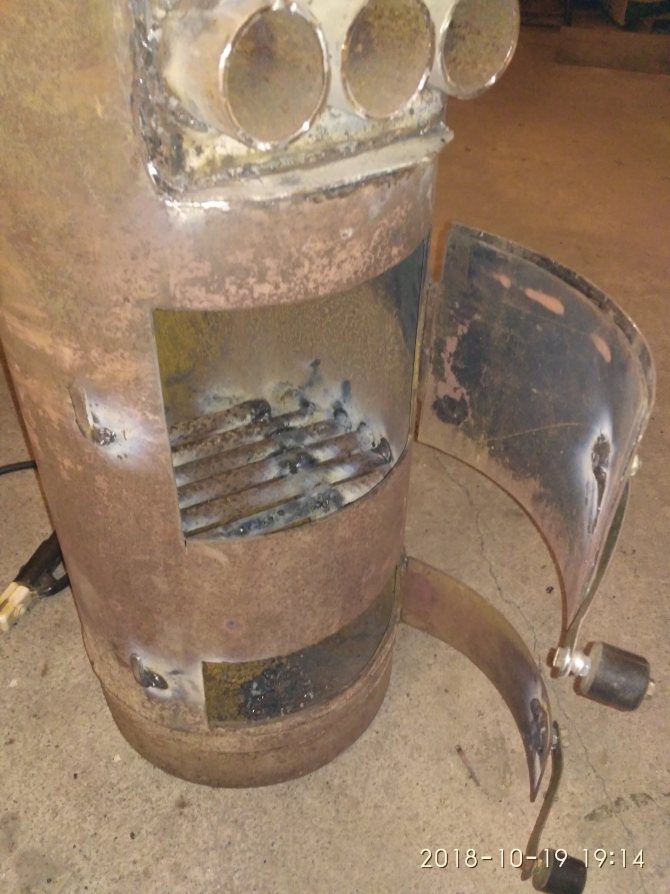
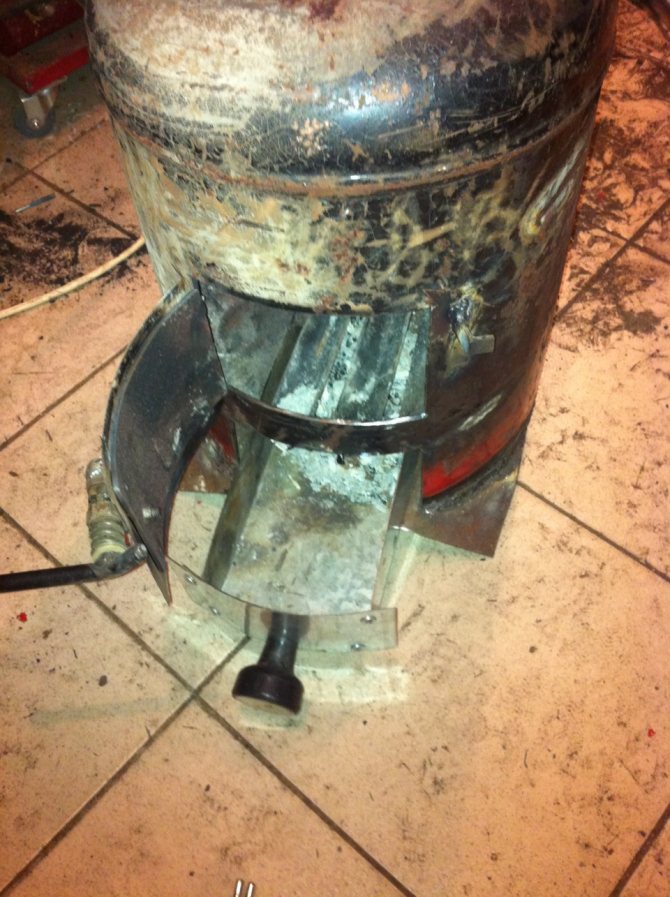
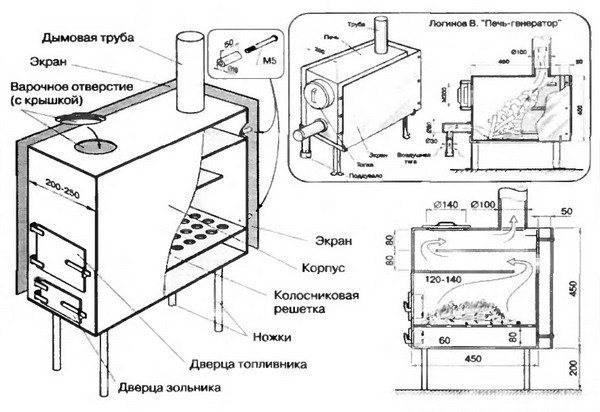
Horizontally equipped oven
The next option for placing the oven is horizontal and it also has its advantages as a large hob where you can cook a full meal.
For the stability of the horizontal stove, after the completion of all work on the manufacture of the stove, it is fixed on a securely standing stand, welded from the corners, using spot welding.
In this case, all activities begin with marking, after which a square hole is cut for the door and a round one for the chimney. Cutting a round hole can be tedious in the absence of a cutter, since the grinder is not an assistant here. First, you need to cut holes in a circle, then a chisel and a hammer are used, and in the end everything is brought to the desired result with a file.
The role of the grate will be played by a hole cut in the bottom of the furnace, and the box welded under it will become a container for ash. The same box plays the role of a blower, and therefore a door is welded onto it in order to regulate the inflow and outflow of air in order to achieve the necessary thrust.
The door can be made independently using part of the cylinder, or you can purchase a ready-made one with a frame and a ready-made latch, and this option, of course, is much easier.
After fixing the door on the hinges of the oven, the device is fixed on a stand while fixing it securely, or you can weld legs of the required length to it.
Next, a branch pipe is fixed to which a chimney pipe is connected, which in turn will come out through the holes in the wall or roof of the room.
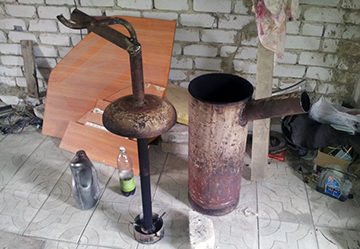
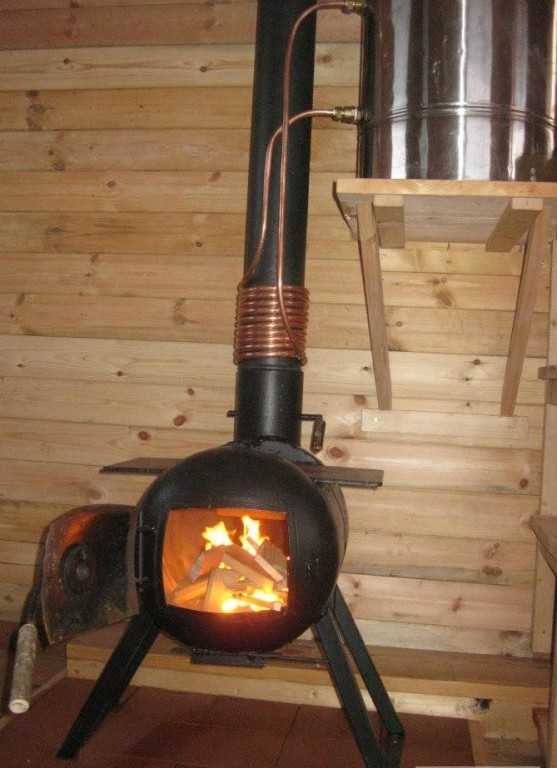
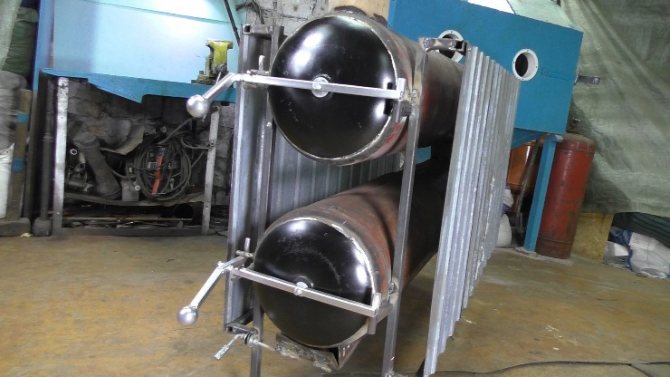
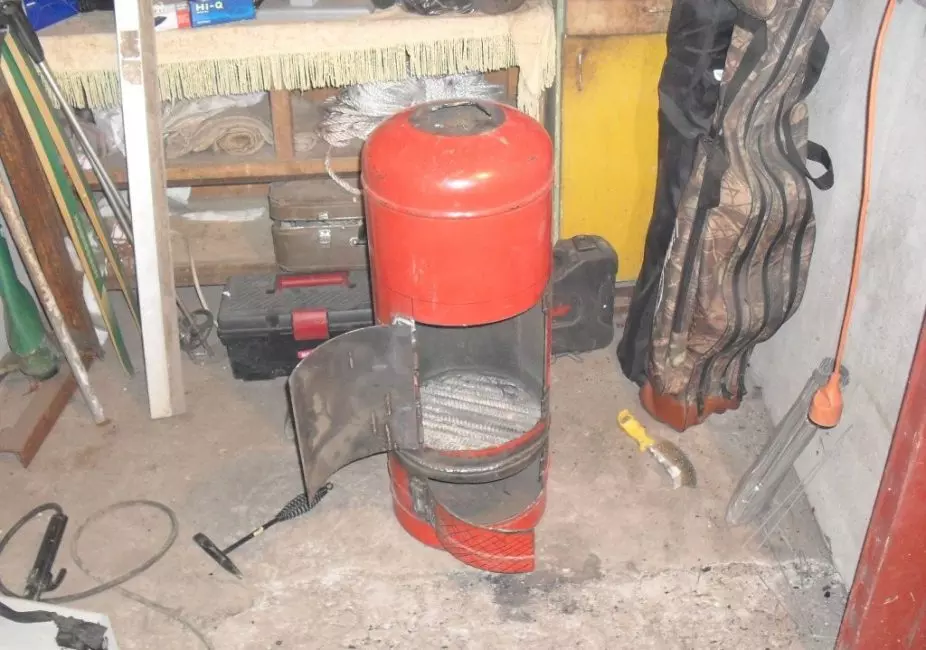
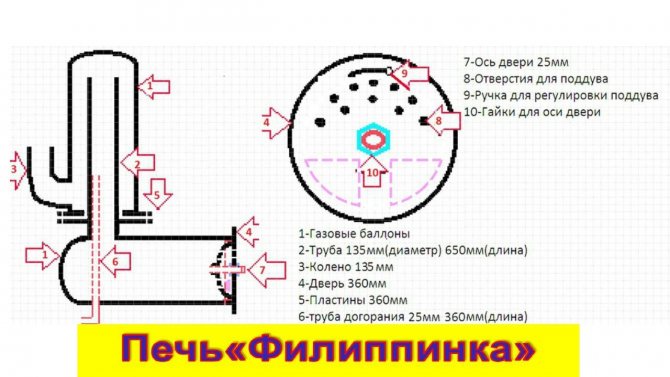
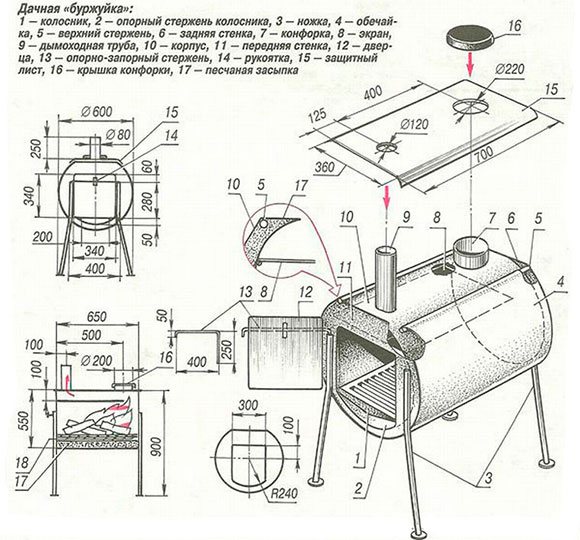
Do-it-yourself long burning stove from a gas cylinder
Although the "slow" boilers have a pyrolysis process, they are still not pyrolysis (the latter exceed them in efficiency by 10 percent, have a different structure, complete combustion of fuel, higher environmental friendliness and cost).
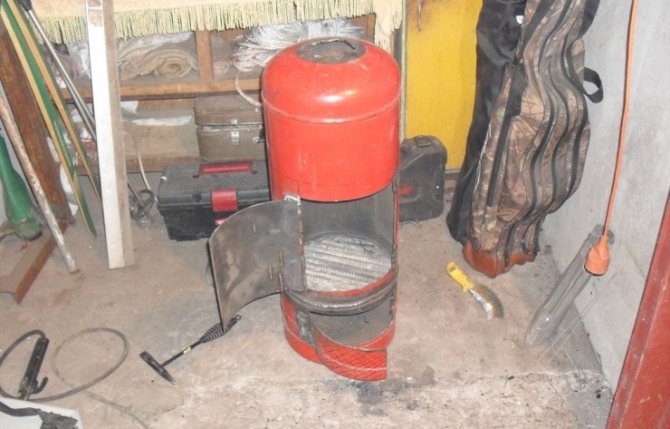
But the Bubafonya stove does not need a fan turbocharging and it can be made from a gas cylinder with your own hands.
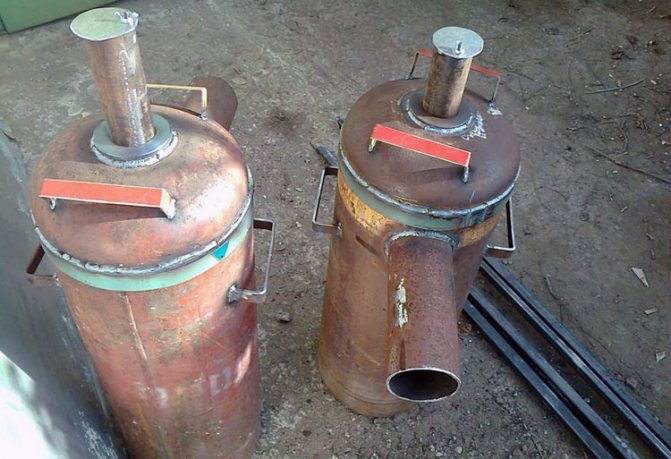
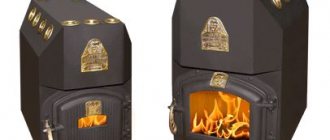
Ready stove Bubafonya
Principle of operation
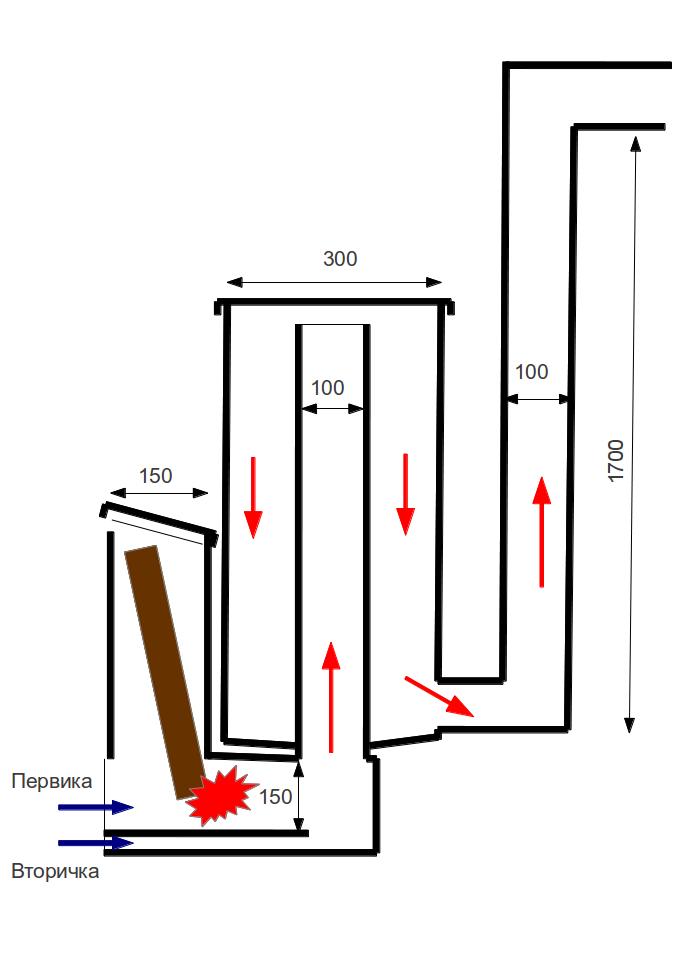
Consider how a gas oven works for a summer residence with a cylinder (on a cylinder).
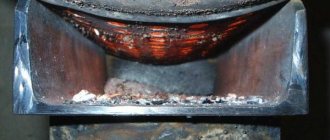
The entire lower part of such units is tightly filled with fuel. Combustion takes place in a thin upper layer. Efficiency is achieved due to the afterburning of pyrolysis gases. In Bubafon, pyrolysis takes place under yoke, which presses the fuel and falls as it burns.
Oxygen is supplied through a pipe welded to this pancake for the combustion process. There are ribs on the oppression pancake, the curved shape of which distributes air.
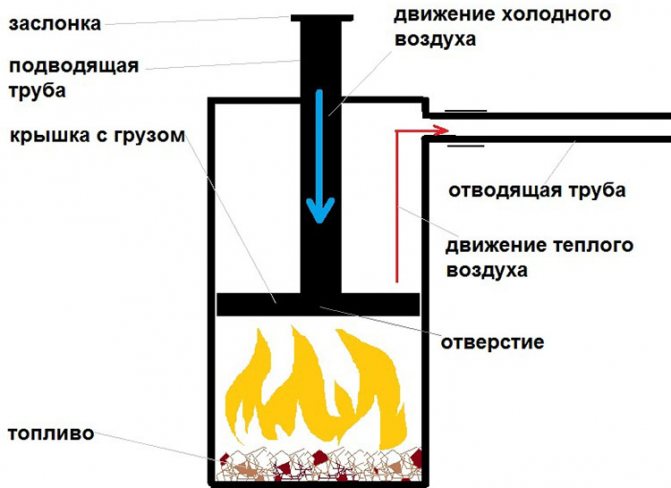
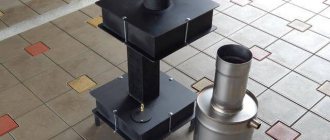
Diagram of the Bubafonya furnace
The diameter of the tank for loading Bubafoni fuel must be from 30 to 80 cm! It turns out that the balloon, with its 30 cm, is the minimum limit.
The efficiency of the stove does not even reach 40%, however, the stove is very easy to assemble, therefore it is still popular. Potbelly stove from a gas cylinder on wood - design features and assembly instructions.
Read recommendations for making a decorative plasterboard fireplace in this topic.
Assembly
The procedure for making a furnace:
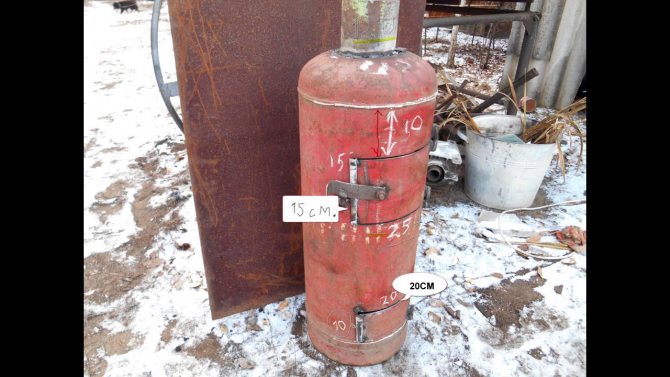
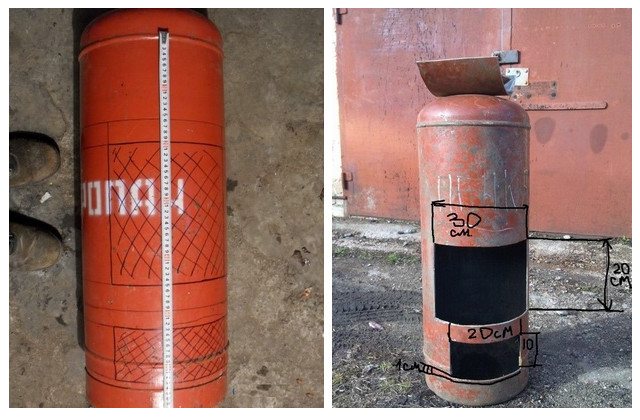
- With a diameter of 30 cm, the boiler height is supposed to be 90 cm, but the entire cylinder is 85. There are two options for solving the problem.First, you can cut off the entire vaulted part and add the missing height with a fragment from another balloon. Secondly, you can turn this vaulted part into a cover. The upper cut is made where the straight part of the body begins.
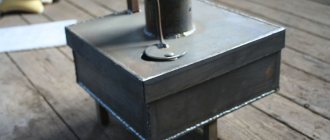
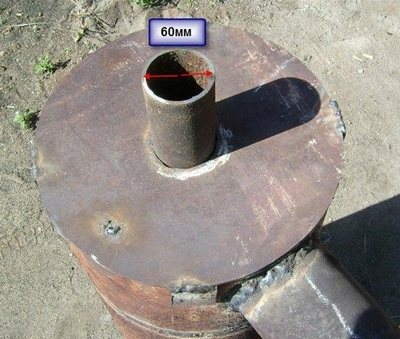
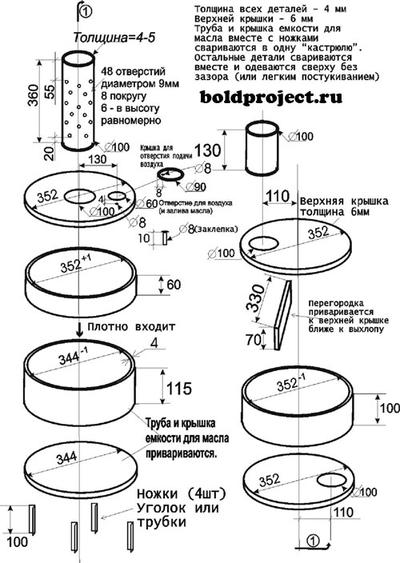
- A press is being made. A circle with a diameter of 27 cm is cut out of metal (6-10 mm thick). A hole is made in the center according to the size of the duct pipe.
- The ribs are made 4 cm high. They are slightly bent and welded onto the pancake so that the bend goes clockwise.
- A door is cut in the lower part of the body - an ash pan 17 cm wide.
- Grizzlies. The grate can be welded separately from metal rods. The legs welded to it will help to place the grate at the desired height. Their height is taken based on the height at which the ash pan door ends.
- Air duct pipe. Diameter 7.5 - 8 cm. Its lower edge should protrude from the pressure sheet (reach the edge of the ribs). The top edge is 15 cm higher than the collar welded onto the lid. The pipe is welded to a ribbed round press.
- A damper is made on the upper edge of the air supply pipe, with the help of which the intensity of the air supply is regulated. A bolt is welded along the outer wall of the pipe along the axis, and a hole is drilled in the valve. The damper is rotary.
- Cap. Should dress tightly. To do this, you can weld a collar ring along the outer edge of the case. It will be convenient if the cover and body are equipped with handles.
- In the center of the straight cover and at the top of the vaulted one, a hole is made through which the air duct will exit. Its diameter is equal to the outer diameter of the duct + the minimum gap that will ensure free passage of the pipe (no more than 2 mm).
- A collar is placed along the perimeter of the hole. Its height is the size of the gap increased by 80 times.
- Chimney. A piece of pipe (40 cm or more long) will be located horizontally and docked with a vertical chimney (10-12 cm in diameter). Having stepped back from the lid 1 - 2 cm downward, a hole is cut out equal to the diameter of the chimney, a short pipe is welded to it. This is the final stage of making the furnace in the workshop. Further work is carried out after installation on site.
- Part of the chimney falls below the junction with the pipe and a device is made in it for collecting and draining condensate, which is inevitable in such furnaces.
- The chimney is led through the roof and welded to the stove.
It is not advisable to heat a homemade stove with coal. The heat from this fuel is the strongest, and as already mentioned, the steel of the cylinder is not heat-resistant. And when the maximum heating from the wood occurs, it is better to close the damper almost completely.
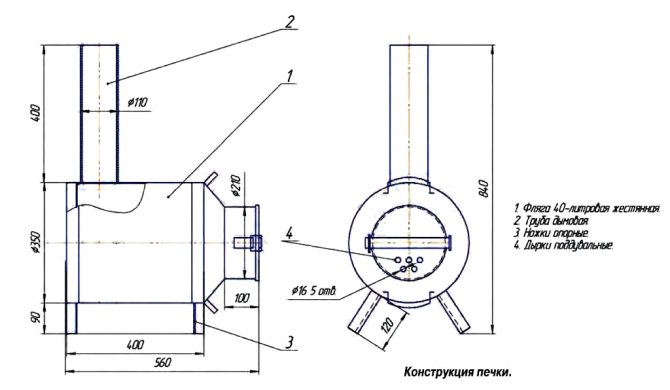
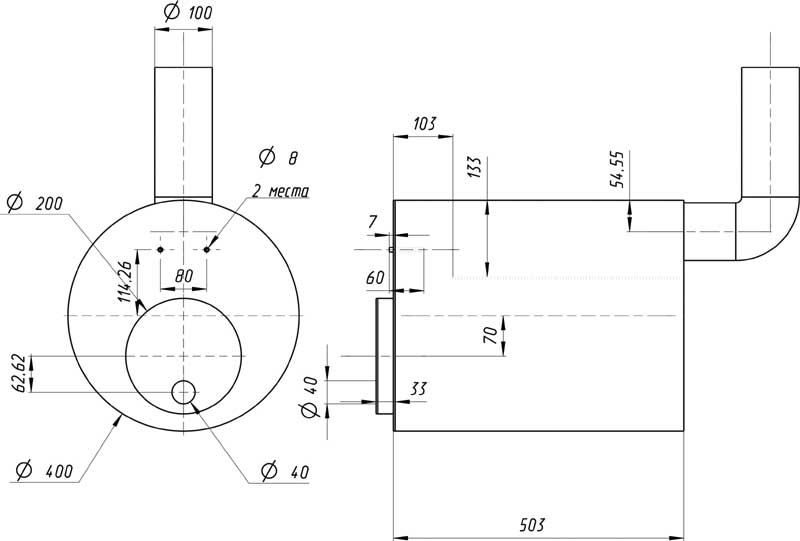
Calculation of basic parameters: drawing and recommendations
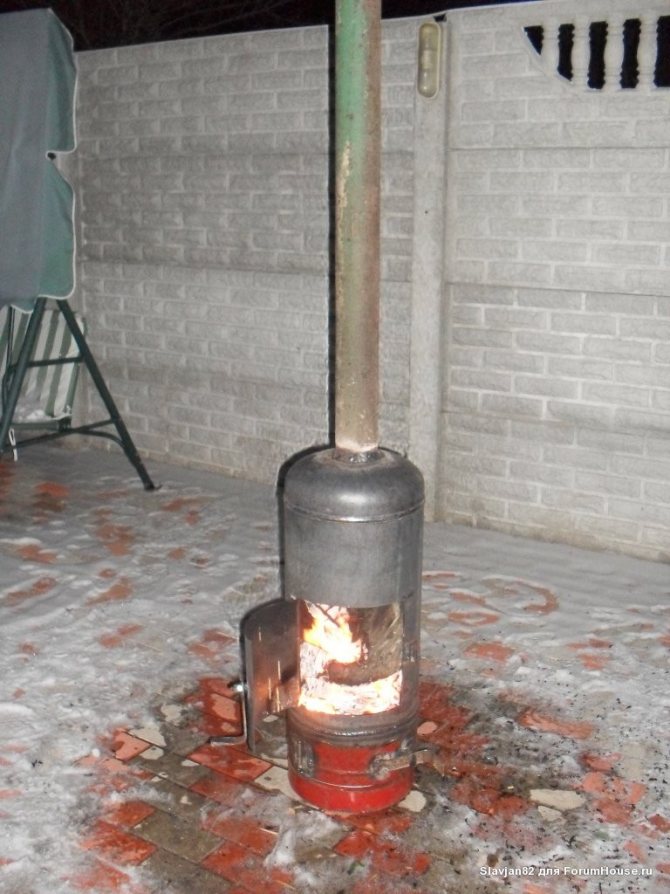
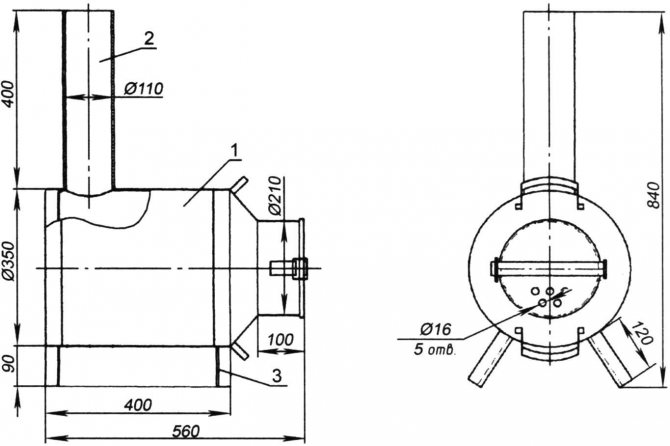
For the manufacture of an optimally efficient potbelly stove, an all-metal cylinder with a volume of 50 liters is suitable.
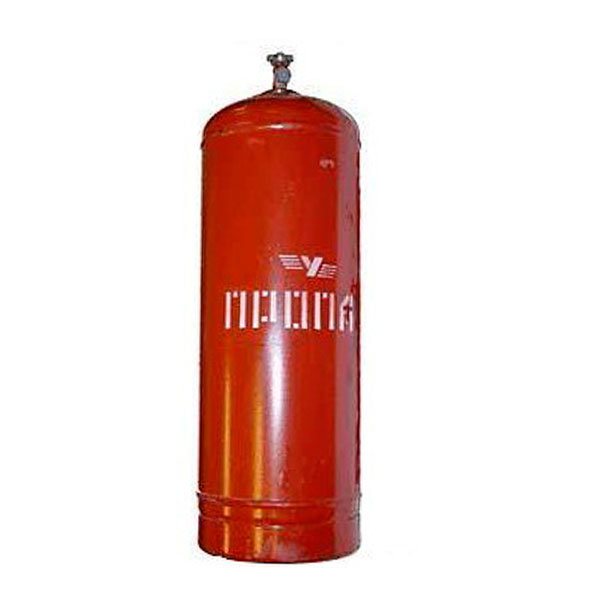
A standard 50 liter bottle will suffice
The 50 liter gas cylinder has standard dimensions: diameter 300 mm and height 850 mm. The metal wall thickness is 4 mm, which is optimal for solid fuel combustion processes.
Finding such a balloon is usually not difficult. They are often used in the household and industry.
To equip such a furnace with a chimney, a pipe with a diameter of 100–125 mm and a thickness of at least 3 mm is used to make a chimney pipe. The chimney itself should be positioned vertically, but deviation from the axis is also allowed (a slope of no more than 30 degrees). The slope is made for greater efficiency of heat transfer from the chimney pipe. Although the location of the pipe directly depends on the local conditions for installing the stove.
Related article: Homemade sandbox for children to play on your site
For ease of use, the compartments of the firebox and ash pan are equipped with doors with a locking mechanism. When the doors are closed, the combustion process is improved and the risk of fire-hazardous particles falling into the room is reduced. And also by adjusting the gap with the ash pan door, you can adjust the intensity of air supply to the furnace.
Doors are made of any shape. The main thing is to take into account the standard size of firewood and the convenience of loading them.
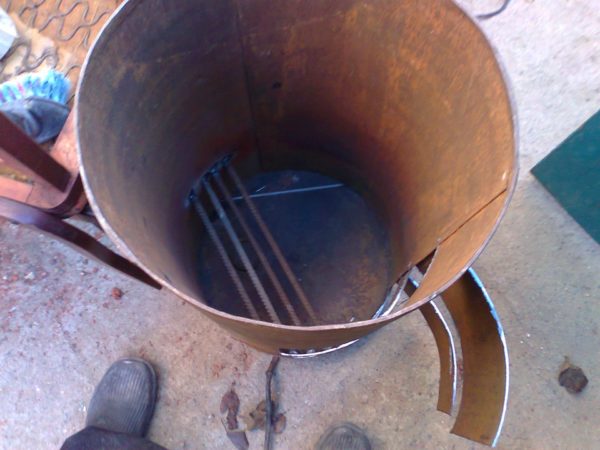
An important part of the potbelly stove is the grate. The grate serves to support the fuel (wood) and at the same time helps to separate loose combustion products. The grate is undergoing a combustion process. Therefore, the metal from which the grate is made must be sufficiently strong and resistant to high temperatures. It is better to make a grate from reinforcement rods with a diameter of at least 12 mm. Such rods are cut according to the dimensions of the inner part of the cylinder (width) and assembled into a lattice with a gap width of 10-15 mm. The rods are connected by welding.
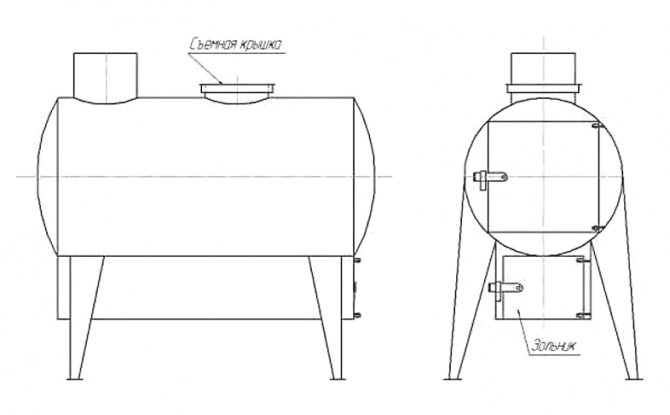
Potbelly stove from a cylinder
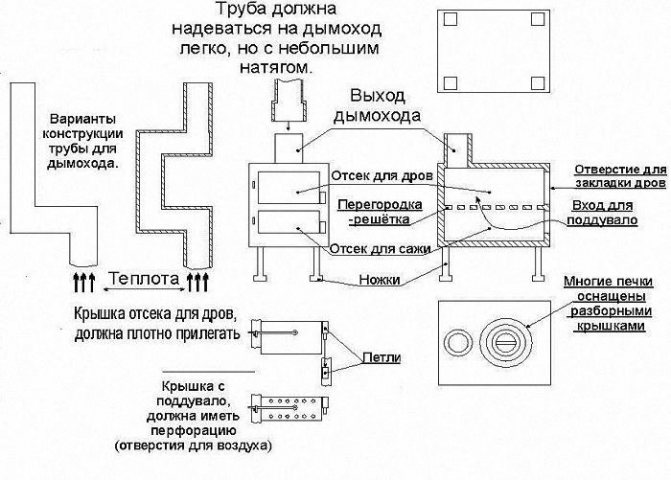
An approximate assembly diagram of a horizontal solid fuel stove is applicable to a gas cylinder.
The diagram is applicable for a gas cylinder
The main disadvantage
The big minus of such handmade stoves is that they are uneconomical. A decent part of the heat goes away with the smoke through the chimney. This drawback can be perfectly handled by afterburning gases in the upper part of the stove (which is shown in an excellent way by the Bubafonya stove).
You can do without it. Extension of the chimney in the room can serve as a good option for keeping warm. To do this, you need to make a pipe with the maximum length, but avoiding the inclination of the pipe to a horizontal level. Also, you should not make the pipe too long - there will be no air draft and it will burn badly. For those who have several cylinders, you can build the following structure: to the main cylinder-potbelly stove made with your own hands, at the point of joining the chimney, you need to weld another cylinder, where the gases will be burned out.
Small stove from a small cylinder
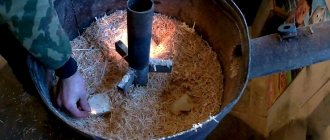
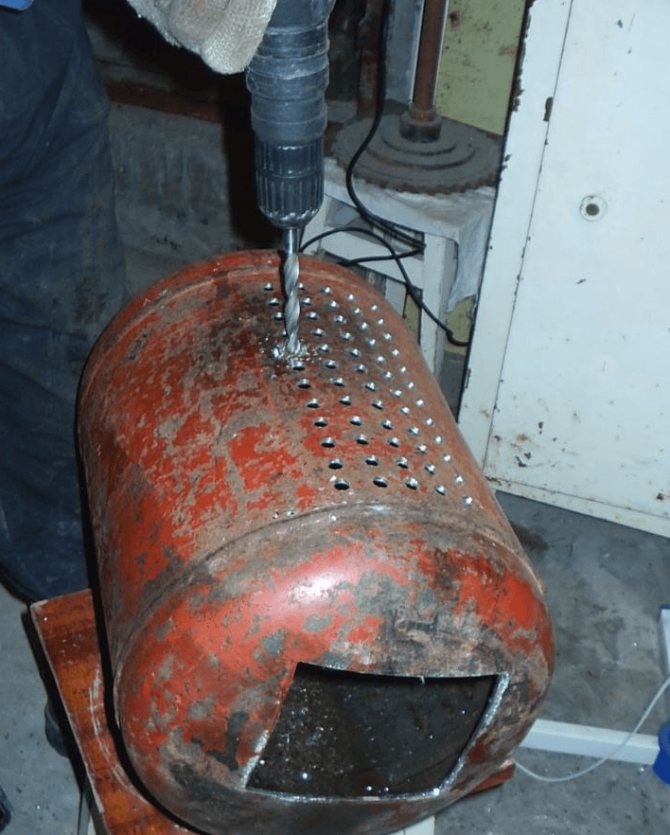
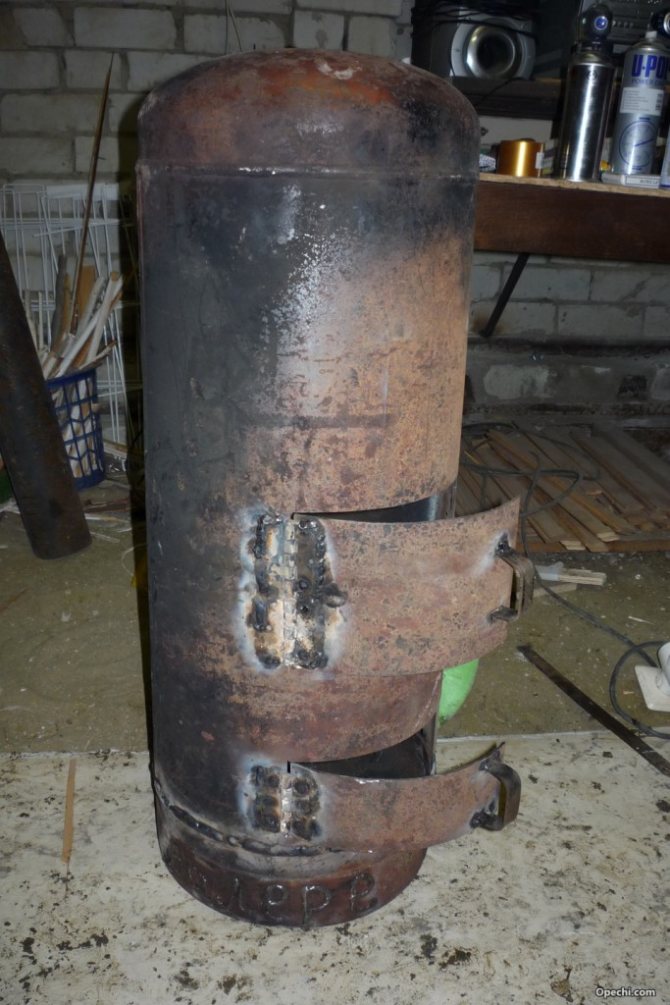
For a small steam room with a volume of 8-10 cubic meters, it will be enough to make a stove from a small gas cylinder. Usually 27 liter cylinders are used. The wall thickness at the bottom is remarkable - 6 mm. Without a crane, their height is 500 mm, diameter is 300 mm. It turns out to be a wonderful little stove.
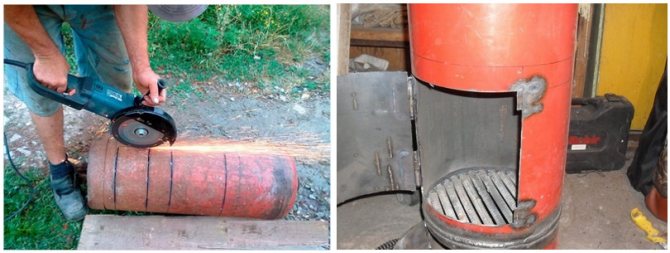
First, the remaining gas must be removed from the cylinder. For this, water is poured into it. Water gradually displaces all residual gases. After the cylinder is filled, you can cut off the tap and start making the furnace.
Grate

Furnace device diagram
The grates may not be used for this oven. This applies to cylinders with a small volume. In this case, the stove looks like this: legs are welded to the cylinder, one door is made, a hole for the chimney in the upper part and a pipe. The blower can also be welded separately if the volume of the horizontally placed cylinder is small enough. For this, a rectangular structure is separately welded.
It is ideal to use cast iron factory grates as grates, but they do not always fit in size, so you need to weld the grates yourself. You can make them with your own hands from thick reinforcement rods, having made measurements in advance. They are made in the same way as cast iron, that is, they should look the same. Grizzlies made from fittings burn out quickly, especially if coal is used as fuel. If you use firewood, the grates will last you a little longer. In view of this, the grates should be removable so that you can replace the old ones with new ones at any time.
Preparatory work before assembling the oven
The preparatory work includes a very important stage - the removal of gas residues from the cylinder. This stage should be considered in detail, since without its correct implementation, further work is extremely dangerous.
First of all, it is necessary to unscrew the cylinder valve to remove the gas under residual pressure in the cylinder. The valve is completely dismantled from the body. After removing the gas, the cylinder is inverted to remove the condensate.
The gas contained in the cylinder contains a certain percentage of moisture. Moisture accumulates inside it in the form of condensate (liquid).
Turning the balloon over, we eliminate moisture in a natural way. It is better to collect condensate in a disposable container. Condensate often has a specific unpleasant odor. Therefore, it is better to immediately discard the container with the collected condensate.
Then the balloon is turned over again - set in a vertical position. For complete cleaning of gas residues, water must be drawn into it. The water drawn up to the edges of the cylinder will completely displace the remaining gas from it. Thereafter, the balloon is emptied of water and is considered cuttable.
Related article: Household concrete mixers - what even masters don't know about! (+ 3 videos)
For greater clarity, a video of the preparation of the cylinder for cutting is shown.
The video is taken from Youtube. Used for informational purposes only and does not constitute advertising.
Preparing a gas cylinder for safe handling with a power tool: video
Preparation of the tool (power tool) includes its inspection for damage, establishing the degree of its suitability for safe work.