When thinking about making ceramics, it is likely that you may not have the time or resources to start doing it in a professional studio. If you are someone who spends a lot of time at home, babysitting or the like, then home is often the best and only option. If so, you should consider making pottery at home, and this article will show you how to figure it out, as well as tips and tricks to get you ready quickly and efficiently.
The advantages of making clay products at home

There are several advantages of making pottery at home, which determine the popularity of this craft:
- It is cheaper in the long term as you do not need to rent a studio.
- All stocks of materials are always at hand.
- This saves time, no need to travel anywhere.
- Requires minimal investment.
- Allows you to do this in the comfort of your home.
There are also several disadvantages of doing this at home:
- You won't have a teacher to help you.
- You have to learn everything yourself.
- You may not have the super professional instruments that studios have.
- You may be limited in the choice of products you want to make.
If you are just learning how to make pottery, you need to work on the technique first, and doing it at home is a good way to create a comfortable space and learn the basics of the craft. But if you don't have a home studio, then it's also worth trying to work in a dedicated studio, especially if you don't have your own materials. This will allow you to quickly learn the basics of technology and see if you can create a more comfortable environment in your home.
Firing rules at home
You can burn the clay at home. First you need to dry the product, and then burn it in the oven. In this case, you need to gradually increase the temperature within two hours to 200 degrees. Clay figurines can be placed in a skillet or cast iron pot. It should be noted that a full-fledged roasting in the oven is impossible, because the temperature is insufficient, it cannot harden it, but only dry it.
How to determine if a product is ready?
Very easy in terms of color, weight and sound. If the color of the fired clay is black, then the figurine is overheated. If the color has not changed, it means that the product is not burned enough. The fired colored clay should be red in color.
Clay selection
One detail you'll want to figure out for sure is the types of clay. If you were working in a studio, we would say just take regular clay that is used for firing depending on the temperature of your kiln, you can even work with porcelain.
Clay and ceramics are different materials that are widely used in pottery. However, the main difference between the two materials is that clay is a natural material that is naturally mined. On the other hand, ceramics are different groups of substances that are added to clay to harden it when heated.
Since ceramics contain metal oxides, when heated, they change the molecular structure of the clay. Therefore, all clays can be considered as ceramics, but not all ceramics are considered as clay. While there are various types of ceramic clays, the main uses for pottery are porcelain, potting and stone clays.
The ratio of clays to elevated temperatures
When heated to 110 °, the clay gives up all mechanically mixed water, all the rest of its properties remain unchanged.
Further heating to 250 ° also does not cause any noticeable changes in the clay. At 250 °, a very slow, gradual removal of constitutional water from clay matter begins. At 425-450 °, most of the chemically bound water is released from the clay substance, and the molecules of the clay substance disintegrate. Remnants of constitutional water are removed at about 900 °.
After firing at 450 °, clay easily dissolves even in slightly dilute acids and alkalis, which is explained by the decomposition of clay substance molecules and the loss of the chemical bond between aluminum oxide and silicon oxide.
Heating up to 900 ° makes alumina and silica again insoluble in weak acids and alkalis. For this reason, the firing of ceramic products is carried out at temperatures not lower than 900 °, otherwise they will not be sufficiently stable both with respect to weathering and with respect to the action of water, dilute acids and alkalis.
A further increase in temperature in some clays already causes sintering.
High temperatures create fire shrinkage in clays (shrinkage during firing). At the same time, the porosity of the body decreases. A high-fired dense shard is called sintered.
In practice, sintered is considered to be a product with water absorption of less than 5% of the weight of the dry fired shard.
Sintering in some clays is observed already at 900 °. The highest possible sintering temperature for clays is 1400 °.
At temperatures close to 900 °, there is no reason to talk about the melting of the constituent parts of the clay in noticeable quantities. Therefore, the sintering phenomenon here must be attributed mainly to an increase in the forces of attraction between the particles.
It is in this temperature range that clay products show the greatest mechanical strength under load at the moment of firing. This confirms the assumption about an increase in the mutual attraction of clay particles during firing within 900 ° and slightly higher.
It is clear that more plastic clays also show lower sintering temperatures, due to smaller particle sizes and higher attractive forces.
Less plastic and thinner clays show sintering at higher temperatures - up to 1400 °. The hindered sintering is explained in this case by the relatively large size of the particles and the lower values of the forces of mutual attraction.
A further increase in temperature causes the clay to melt.
Clay, melting, turns into a homogeneous substance. Individual particles in the molten mass disappear, everything merges into a dull, opaque glass. The transition to such a homogeneous state is associated with the gradual softening of the clay, which, melting, becomes soft like dough.
All impurities to the clay matter (with the exception of aluminum oxide) lower its melting point, and this decrease can be quite significant. The most vigorous decrease in the melting point of alkali (sodium and potassium oxides), then iron oxide, lime (calcium oxide) and, finally, magnesium oxide.
The most fusible clays already melt at about 950 °. The porosity value of the clay shard after firing is very important. The higher the clay firing temperature, the lower the porosity. The amount of porosity is determined by the ability of the fired product to absorb water until full saturation.
The decrease in porosity is associated with an increase in shrinkage and mechanical strength.
Clays of increased plasticity show lower porosity at the same firing temperature than low plastic clays. Low-plastic clays, with an admixture of a large amount of sand, after firing give a shard of insufficient strength. A shard from a light blow with a hammer makes an indistinct, rattling sound.
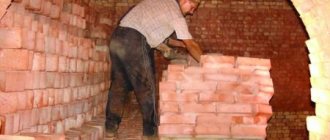
In the production of bricks and tiles, clays are used, which after firing up to 900-1100 ° C show water absorption from 8 to 20% by the weight of an absolutely dry shard.Clays showing water absorption after firing below 8% are unusable: the brick does not bond well with mortar in the masonry, and has high thermal conductivity. A building built of such bricks will give off a lot of heat outside in winter. Clays that give a shard with a very high water absorption after firing are also unsuitable: such a brick or tile will easily collapse in winter from freezing in a state of saturation with water, that is, it will not be frost-resistant.
In brick and tile production, the raw material molded from clay is fired until the chemically bound (constitutional) water is completely removed from the clay substance, that is, up to 900-1100 ° C. These temperatures coincide with the beginning of the melting of the constituent parts of the clay. After firing to these temperatures, the raw material of suitable clays acquires sufficient strength, resistance to water, weak acids and frost resistance.
In ceramic production, a very important role is played by the gap (interval) between the sintering and melting temperatures. A large temperature gap makes it possible to bake the product before sintering, if necessary, without fear of damaging its shape. In industrial furnaces, temperature fluctuations in different places reach 100 °. Therefore, such a temperature gap for clays fired before sintering must also be at least 100 °. The larger this gap, the easier it is to burn the clay in industrial furnaces.
Depending on the melting point, clays are divided into refractory and non-refractory. Clays melting above 1580 ° are considered refractory.
Among the clays, in their relation to high temperatures, there are still refractory and low-melting ones.
Refractory clays show melting points in the range of 1350-1580 ° and are used for irresponsible refractory supplies and for products with a sintered shard: clinker, sewer pipes, Metlakh tiles. The operating conditions of these products (for example, low-refractory supplies) require the stability of the mass at temperatures of 1350 ° and above.
Low-melting clays have a melting point below 1350 ° and are used in the production of bricks, tiles, drainage pipes, tiles.
Stone clay
The color of such ceramics ranges from dark brown to buff. The color difference arises from the presence of impurities and the iron content of the clay. Stone clay has coarse particles that are fired at 1200 ° C. The result is a denser, more durable material that is inherently waterproof. This clay does not require any glaze. While these are the best ceramic clays used for pottery work, if you are a beginner and are just getting started with pottery, then you can start with self-hardening clay... It is very flexible, which allows you to create a wide variety of pottery. You can read more about materials for ceramics in our separate article.
Firing clay products at home
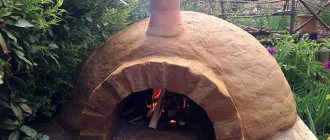
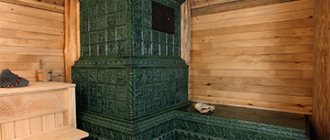
Burning clay, of course, is more difficult than sculpting from it. If possible, clay products can be fired in a muffle furnace. It allows you to change the value of the thermometer at your discretion. After the procedure, the oven is turned off and the product is allowed to cool down. But what if there is no access to such a furnace? There are the following ways to bake clay with your own hands:
- Roasting in the oven. For him, a cast iron frying pan and clean sand are taken. The pan is placed inside. A product is placed in it and covered with something fire-resistant. The process cannot be left unattended. Ventilate the kitchen frequently. They roast in the oven for one hour at a thermometer value of about 200 degrees. But it should be borne in mind that this method of firing is available only for small objects. For example, for beads, small cups, souvenirs, etc.
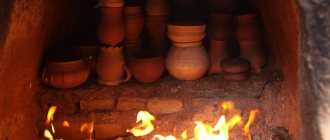
- Roasting in a Russian oven. Quite a difficult task, since difficult to control the temperature value.To avoid the influence of strong temperature changes, the product must be placed in a cup with sand. The craft remains inside until the furnace completely burns out and then cools down.
- Firing on an electric hot plate. A small frying pan is taken for the procedure. Sand is poured into it and the product is placed. From above, this is all covered with earthenware. The heating temperature does not rise immediately. The smallest heating is turned on for half an hour. Then the temperature rises to the maximum for 5-6 hours.
- A bonfire can also be used for firing. This method works well for small crafts. For the procedure, a tin can is taken, a toy is placed in it. To prevent the products from darkening in the process, small holes are drilled in the jar. Next, the container is put on fire. For this, space is freed up in the center. To prevent the toy from cracking from extreme heat, it is better to warm it up a little before that. Of course, the result will not be the same as in the oven, but what we have is already better than nothing. To keep the flame temperature stable, it is better to breed it inside the brickwork. Then, from above, the structure of bricks is closed with something to allow the fire to burn out and cool down.
If you decide to start making your own pottery, we invite you to familiarize yourself with our line of pottery equipment
What else is important to know
If the time is short, the firing can be carried out in several stages, increasing the maximum temperature over and over again. After basic firing, the craft can be treated with a special mixture and fired again. With this method, crafts are covered with glaze. It should be borne in mind that in the process of moisture loss, the product may become smaller than expected. Therefore, you need to sculpt in advance so that the size is slightly larger. Don't forget about safety. During the firing process, chemical compounds evaporate. Therefore, when firing clay products at home, the room must be constantly ventilated. Remember that you are dealing with high temperatures that can cause burns if not attended to. It is also worth remembering the possibility of explosion of crafts.
Proper firing of clay at home can only be achieved with experience. Do not be upset if the desired result did not work out the first time. Constant training will lead to success, and beautiful figurines or pottery will delight the eye for a long time.
Choosing clay at home
However, at home, things can be a little different. You can choose from three different types of clay:
- Fired in a kiln.
- Polymeric.
- Air dry.
Each has its own pros and cons. Burnt has several advantages and disadvantages that you need to consider:
- Usually withstands higher temperatures.
- Better for ceramics used in consumption.
- Generally more durable.
- The biggest drawback is that it is more difficult to work with.
Air-dried clay also has advantages and disadvantages, namely:
- You don't need an oven or heat source.
- As a rule, you can create most products from it.
- The disadvantage is that it is usually not as strong as kiln-fired.
- Takes forever to dry
This option is usually less similar to the actual pottery making process, but it is sometimes used when you just want to make something in the simplest way.
Finally, there is polymer clay, which has advantages and disadvantages similar to the second option:
- This is a great clay for beginners.
- Allows you to work with the form.
- As a rule, durable, but not as much as fired.
- Not the most malleable compared to the other two.
- Usually used for molding and nothing more.
The ideal situation would be if you had a kiln and specialized clay, but if you are on a budget and do not want to invest a lot of money in expensive equipment yet, then these are your options.
Firing types of ceramics
There are the following types of firing:
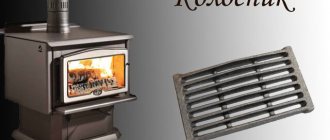
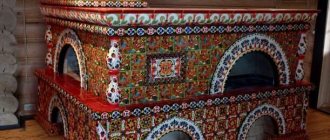
- Using a muffle furnace.
This is the most common method, the clay mass is placed in a special electric oven with a temperature control mechanism. A huge advantage of this furnace is the presence of automated programs, an extensive window for visualizing the inner chamber and dimensions. With the help of such a device, craftsmen have the opportunity to burn not only small items, but also tall sculptures, figurines and other pottery items.
- Using a fire or a standard stove.
This method is used extremely rarely, the fact is that in this case it is impossible to control the temperature regime, and it is quite difficult to sit by an open fire for more than two days. However, some craftsmen still use the fire as a firing of ceramic toys and whistles, while the product is placed in a flask with sand, which smooths out sudden changes in temperature.
- On a gas or electric stove.
The temperature for firing clay at home starts from 200 degrees for a couple of hours, then it is increased to 1000 for 6 hours. This method allows you to maintain a uniform figure and prevent the appearance of spots. It is worth noting that this method is quite dangerous, and you can use it only in the presence of a knowledgeable master. During firing, it is necessary to constantly monitor the process and repeatedly open the window for free air access to the room, so as not to saturate the air with poisonous gases.

Roasting in the oven and oven
Oven firing is an option if you are working with fired clay. But, if you're willing to spend a little more money, you can buy an inexpensive stove.
Benefits of roasting in the oven:
- It's cheap since you already have it.
- Usually creates decent ceramics.
- The resulting products are quite durable.
But if you want to take it more seriously, then you need an oven, because your home oven will not give the desired temperature. It has many advantages over the oven:
- Your products can be more varied.
- You will be able to create the right atmosphere for work.
- You will be able to work with a wider variety of glazes and clays.
- The process is easier to manage as it is slower.
- Allows the use of high-temperature (biscuit) firing, which makes ceramics stronger.
An oven is a good place to start if you are going to learn how to do this at home. But we advise you, as soon as you learn a little, consider buying a kiln or firing one in a studio nearby.
Firing ceramics in a wood-burning oven. Part 1
Firing in a wood-burning oven. Part 1
I found very good master classes about firing in muffle furnaces, how to make these furnaces yourself, etc. But it absolutely did not suit me. I live in gardening in the Crimea. Our electricity is not very good - insufficient voltage, surges, etc. In addition, I will not make the oven myself, and the one that is ready to buy is too expensive. Therefore, firing in a wood-burning stove is a necessary measure. Having searched the Internet, I realized that there is not enough information about wood burning. I had to gain experience myself through trial and error.
In chats about pottery, they indicated a control temperature at which clay turns into stone - 1000 degrees. Firewood will not give this temperature.
There was information about oven baking, but this is fine for beads. Conducted an experiment - not satisfactory. I could not burn even a very small and thin-walled thing. You can just dry it. Suitable for children's creativity. It is only necessary then to cover with two layers of PVA, diluted with 1x1 water. You need to cover the outside and inside. This will prevent the clay from absorbing excess moisture.
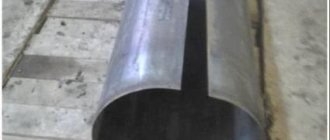
So.We came close to wood burning. 1. Firing clay requires a high temperature. And we know from the school physics curriculum that the maximum temperature is at the flame in its upper part. Therefore, the products must be placed at a height of 20-30 cm from the burning logs. 2. Clay requires gradual heating and gradual cooling. To do this, we make an interlayer in the form of an iron sheet (in my case, 2 baking trays from an old stove, nested one inside the other) and an iron grate (again, from an old stove).
It should be good thick iron, stainless steel does not fit. The old stoves had good iron for the racks and trays. For us women, this is clearer and easier than buying, cutting or boiling iron sheets. In addition, the iron grate allows moisture to evaporate freely from the clay workpiece. I tried different options: either the product remained damp, or the bottom flaked. 3. For the reason stated in point 2, we must line the fired products with bricks. On the sides and top. To do this, we lay out bricks around the perimeter, cover with a sheet of iron (another baking sheet), lay bricks on the iron. This will allow you to gradually heat the items and cool them slowly.
I put this whole structure in a brick brazier. This provided additional thermal insulation and resolved the chimney issue. Yes, there are very unpleasant moments in wood burning - smoke and soot. Therefore, such ovens should be outside.
I have seen such ovens made of iron barrels lined with broken bricks inside. But that didn't work for me. The small size of the chamber and the fragility of the design. I want to try to build a similar structure from an old gas stove. But this is in the summer, when the grill will be needed for barbecue.
About wood for burning.
1. It turned out to be important. I tried to burn the firewood that we buy for the stove (acacia), but the products were not baked (more on this in another part of the article). A pine tree was perfect (I burned old frames and waste boards). 2. Firing must last at least 4 hours. At the same time, a flame should be blazing. This is a big inconvenience, because all this time you cannot leave the oven. 3. In the oven at the same time there should be 2-3 pieces of wood, they should be the length of the entire pallet. The flame should "lick" the bricks from all sides. I don’t saw window frames and other planks, but simply advance them as they burn. It is very fire hazardous, so you must be sure to be at the firing site. 4. I let the products cool until the morning.
How to check product readiness in Part 2.
How to make ceramics at home
How do you work with ceramics in such a tight space? It's actually quite simple, and we'll talk about how you can use different techniques depending on the environment you are working in.
First, let's talk about creating a clay mold, for this we start with the following:
- Take the clay and roll it out.
- Cut to the desired length and width.
- If using sculpting, roll the clay into a ball.
- Choose a technique for further work.
If you create ceramics without a potter's wheel, then this is hand sculpting. Hand sculpting is, in our opinion, the best way to make ceramics as it is simpler and requires fewer materials.
Let's look at three hand sculpting techniques:
- Modeling from clay plates
- Spiral molding
- Modeling from a whole piece of clay
You can start by sculpting clay plates. For this:
- Roll out the clay.
- Cut it to your desired length / width / height.
- Set aside and repeat.
- Once all the pieces have been cut out, work on the joints by smearing them with liquid clay and then joining the pieces together.
- Smooth connections.
- Repeat these steps on each side.
For spiral sculpting with bundles, you do something similar at the beginning, but the process involves a lot more detail:
- Roll out the clay cylinder until it has the desired thickness and consistency.
- Lay it around the bottom plate.
- When you get to the end, cut off the excess and then squeeze the ends together.
- Smooth each ring as needed to even out the walls.
- Make sure everything is straight and there are no two joints ending at the same point, as this will create holes.
When it comes to pottery, ring sculpting is handy for making bowls, cups, and the like, and if you are working with fired clay this is a great option as it is easy to work with and you can do a lot.
And finally, sculpting from a whole piece of clay, which is perhaps the easiest for a beginner, but the pieces can be more uneven compared to other types of sculpting.
- Make a clay ball.
- Pressing from the center, reach the bottom of the ball.
- Continue to squeeze from the bottom to the desired width and height of the bowl to be made.
- Make all the walls as straight as possible.
All of this can be done at home using your own simple materials, so you end up with a stunning product that you can use.
Product shaping
Whichever way you mold products from MKF-2, remember that the wall of the product should be thin (no more than 1 cm) and the same over the entire surface of the product! There should under no circumstances be a difference in thickness. It is in these places that you will lay tensions in your products, when the thicker part will pull the thinner over itself during drying and, depending on the degree of drying, the product will either bend or it will simply crack right in the raw.
Generally speaking, this rule applies to absolutely all clays, but MKF-2 is especially intolerant of such molding defects.
Using a potter's wheel at home
You can use a potter's wheel, although we do not recommend starting with this. Let's talk about some tips that will make this task easier for you.
- First, you need a potter's wheel that can hold at least a kilogram of clay.
- You'd better consider the electric potter's wheel as it is easier to use.
- Make sure you know how to use the clay you are working with to keep it moist, dry it and burn it.
- Knead and roll the clay into a rope to prepare the piece.
- Remove all air bubbles to prevent cracking in the oven.
- Stick the resulting lump of clay onto the circle and center it.
- Moisten your hands and keep them wet so they glide over the clay.
- Start the circle, increase the speed and pull the clay up, smoothing the walls.
- Wrap your arms around the clay and pull it out from the center.
- Rinse the bottom, stretch the clay to get the desired shape.
- Keep the walls as flat as possible.
Ultimately, this is all you need to do to mold a piece of clay on a potter's wheel.
Firing clay
What is it needed for clay firing? Yes, so that your product or craft would be stronger and serve longer and delight you. After firing, if possible, the product can be decorated with glaze, or you can simply paint it with acrylics. Firing is a very complex process. Roasting is not about baking pies in the oven. It is much more complicated and cannot be done in an hour or two. And ordinary kitchen ovens, and even more so microwave ovens (as many people think) are not intended for this. For firing, special muffle furnaces are used. In them, the temperature rises to 950-1200 degrees. But before firing the product, it must be dried. That is, the newly sculpted cannot be immediately put into the oven and burned. It should be left to dry for a few days. All moisture should evaporate from it. It is necessary to dry the product away from drafts, and not in the sun. Otherwise, it will dry out unevenly and cracks may appear on it. Also, a product with uneven drying can "lead" and, if, for example, it is a whistle, then after drying it may stop whistling well.In general, there are many different nuances in working with ceramics. All of them cannot be described at once. Knowledge of them gradually accumulates with work experience. And clay is a kind of material. Clay is a great variety. They differ from each other not only in color, but also in plasticity, melting point, shrinkage and many others. Speaking of shrinkage. Shrinkage is when a product shrinks in size during drying and firing. The product is placed in the oven already dried. During firing, the temperature in the kiln is raised gradually. On some - they make a stop. All this is due to the fact that the product goes through several stages during firing, and at the same time complex processes take place inside it at high temperatures. At the first stage, up to 300 degrees, the clay product loses its physically binding water, and the temperature at this stage is raised slowly. So that the remaining water evaporates. Otherwise, the product may rupture. Then, at temperatures up to 600 degrees, recrystallization begins. And here you have to stay for 40-60 minutes. At the final stage, up to 850 degrees, you also need to linger. Sintering occurs at these temperatures. Only after sintering will the clay product become strong and acquire the correct ceramic color. In short, everything happens smoothly and slowly during firing. It takes me almost 7 hours. But even after firing, one should not rush, and the oven is not immediately opened, but allowed to cool down to about 200 degrees. Otherwise, when the temperature changes, cracks will appear on the products. And now the final stage is opening the oven. This long-awaited exciting moment brings great joy and other indescribable feelings. And having experienced this for the first time, it is clear that all that the previous one was not in vain. And modeling with a painful creative process, and slow drying and troublesome waiting during firing - all for good reason. And there will be a desire to pick up the clay again and again go all this way from a shapeless cool piece to a finished product.
Can I add some decorations?
Yes you can! There are several ways to decorate clay products:
- Counter-relief stamps. They can be found in specialized stores. Use them on slightly damp clay to make markings that work great for designs or even signatures.
- Tools: forks, knives, needles, combs or the like that can create amazing designs and textures that your ceramics will benefit from.
- Prints: leaves, stones, twigs, or the like. Press them gently against the clay to create an imprint before burning or drying.
The decoration really looks good, and if you are not creating pottery that requires glazing, then these little decorations will make your pottery even more attractive.
Firing clay in a country stove.

I have been asked more than once if it is possible to do clay firing at home. I promised to write as soon as I get to the dacha and I can photograph the whole process of this very firing clay... But still it is impossible to get to the summer cottage stove. Actually, the photos are needed here only for reliability, but take my word for it that everything works out.
With the advent of my muffle stove, I stopped burning clay in the country, but all my first toys, whistles, beads were burned there. And I dug my first clay from local quarries and the Neva banks.
It is most convenient to engage in roasting in the fall, when it gets colder. At this time, the stove is heated for a long time, especially if you need to heat the house for the night or cook dinner. In my dacha, I actually have not a stove, but a stove - outside it is metal, inside it is lined with bricks. For firing in the oven, you need a tin can of such a size that the products to be fired are placed in it. To prevent ash and coals from getting to work, I cover a can of a second, larger diameter. You can, of course, make the lid just from a piece of iron. The main thing is that it does not fall during the heating.Probably it is possible to burn the work without this kind of capsule, but I did not try it, because I wanted to get clean toys for painting. All this construction is placed in the farthest, hottest, part of the firebox. We drown without giving the maximum heat at once. We drown for three hours, no less. The work cools down together with the stove.
A few more comments. The work must be well dried before firing. Dry at first slowly, practically dry work can be dried in a warm place. It's good if the work is made from a single piece of clay: I have had cases when the anchored parts fell off during the firing process. This is not the worst problem - you can glue the details to the toy with good glue. Worse, if the toy is underdried - such work can be scattered during firing into small parts.
Firing clay in the country stove does not give a shard, dense enough for full-fledged dishes, but toys are obtained pretty well. After all, in the past, in folk crafts, toys were often fired in a Russian oven, and dishes - in specially made forges.
The shard in the described firing turns out to be rather porous. But the pores can be closed by producing another, milk one. burning. This firing will give the product a beautiful brown color. Milk roasting will be my next article.
Also on this topic you can read Clay Extruder
Children draw Filimonov's toy. Cockerel.
Firing clay. Cancer.
Clay drying
If you are not working with an oven, then most likely you are going to dry the clay by air drying or baking in the oven. There are several ways for each of them.
For baking in the oven:
- Preheat the oven to the desired temperature.
- Place the clay blank on the tray.
- Bake for the required amount of time.
- Check the hardness of the product.
It's simple, but again, the heat isn't strong enough for porcelain or earthenware.
For air drying:
- Place the product in a safe place.
- Wait. This can take up to 24 hours.
- Check the product for hardness and give it more time if necessary.
- If you're air drying, use a fine-grain sandpaper to remove any minor irregularities before moving on to painting.
Pottery takes time to dry, but you can benefit from it with the right technique.
Clay drying and firing

To give additional properties to clay products, they are subjected to high temperatures - firing. But the technology for firing clay is quite complex and resource-intensive, so I will try to talk about some of the nuances that you may encounter.
Preparation for firing
Before firing the product, it must be thoroughly dried for 2 - 7 days, depending on the size of the product. You need to dry the product away from heating devices, direct sunlight, drafts - that is, to exclude any sudden changes in the environment in which the product is located. At room temperature and in a dark dry place, the product will dry evenly.
If it dries unevenly, the product may crack and its small parts will simply fall off. Insufficient drying will result in firing defects. It is impossible to overdry the product.
After the product has dried, you need to carefully examine it for cracks. If there are any, you can try to cover them with liquid clay, but this does not guarantee the safety of the product during firing. The best option is to prevent cracks from appearing, and this is obtained with high-quality molding and competent clay preparation.
Be sure to check the sound of the whistle - if it disappeared or became deaf, then it is not too late to try to fix everything.
In some situations, during shrinkage, a spider may settle in the products (there was a case when he took a fancy to one of my whistles), in which case he needs to be moved to a safe place .
The final stage of preparation will be grinding the product.When sanding, fingerprints, various crumbs and bumps may disappear, and the product will acquire a noble appearance. Sanding can be done with small-sized sandpaper.
Firing conditions
Temperature. The most important thing in firing is a gradual increase in the firing temperature and a gradual cooling of the product after firing. In the first two hours, the temperature should not exceed 400 degrees. The temperature range should be between 300-900 degrees Celsius. At lower temperatures, firing will be insufficient and the product will not acquire the required properties. At high temperatures, the product can be completely destroyed.
Duration. Depending on the size of the product and the method of firing, the duration of the process can vary from 8 hours to several days. Very small items can be burned in a minimum time.
The composition of the material. The firing technology largely depends on the composition of the clay. Natural clay has an admixture of sand and the less sand, the lower the firing temperature. In my practice, there have been cases when powder purchased clay at 750 degrees literally boiled and dried up in the form of a porous sponge. In this case, the product was completely destroyed. The clay should not contain stones and air. If the material is not homogeneous, rupture will occur. Since materials of different densities will expand with temperature changes in different ways.
The quality of the sculpting. The main requirement for sculpting is the absence of air bubbles in the product. As the temperature rises, the air will expand and look for a way out, tearing the product. Therefore, when covering up cracks and fastening parts of the product, exclude the possibility of the formation of air capsules.
Firing methods
Firing in a muffle furnace. There are several methods of firing clay products, but the most common is firing in a muffle furnace. This is an electric oven equipped with a temperature control mechanism.
Modern furnaces have automatic programs for firing products of various types, a window for viewing the status of products and other options. Another important characteristic of a muffle furnace is the volume of the chamber. Some swords have a cylindrical chamber in which only small items can be placed, while there are large kilns for firing pottery and sculptures.
Firing on a fire or in a non-electric oven. Quite a non-trivial task associated primarily with the fact that there is no way to fully control the temperature. In addition, the stove is rarely heated for eight hours, and it is difficult to sit around the fire for a third of the day. However, if you are still thinking - place the product in a container with sand - this will smooth out the sharp rise in temperature.
Staining clay products
You can paint the clay with acrylic or latex paint if it is air-dried. It is important that you follow certain rules here as well.
Some tips for coloring:
- Make sure that if you are firing clay, the paint is designed for use in the oven.
- Some paints do not require firing, which can sometimes be a convenient option.
- Choose a paint that is suitable for the required temperature, as air-dried clay cannot be fired.
- Apply paint with brushes, sponges or other methods.
- Let the paint dry according to the paint instructions.
- If you intend to fire utensils for food and liquids in the oven, use paint and sealant first, and then start firing after drying.
- If you are using an oven, then also use a glaze to completely cure the paint.
Painting adds a touch of uniqueness to your artwork, and while it may not be necessary in the first steps, you can really benefit from it if you have interesting painting ideas. Some also prefer to color the products after baking in the oven, you decide for yourself as you like best.
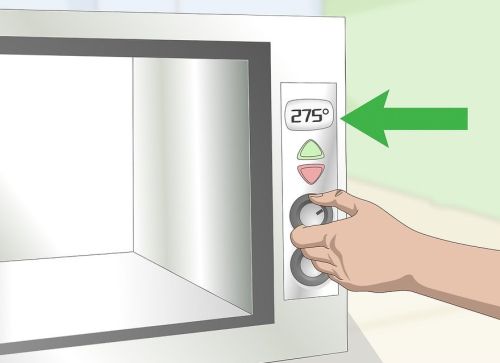
Using a regular clay oven
Preheat oven according to clay instructions. The type of clay will determine how the oven should be heated, so refer to the instructions on the package. Typically, Cernit, Fimo, Premo, Sculpey and Souffle clays should be baked at 275 ° F (135 ° C). Kato clay must be fired at 300 ° F (149 ° C) and Pardo clay must be reheated at 325 ° F (163 ° C).
Open windows to prevent clay fumes from remaining in your kitchen.
Precautionary measures
Remember to take some precautions:
- Review the instructions for materials and equipment.
- Remember that the oven you are using is hot and you need to be careful with it.
- Be careful when molding the clay to avoid injuring yourself.
- Learn what chemicals are in everything you work with.
Many people enjoy making ceramics at home, and in this article we have tried to show you how to do it. If you want to get into pottery and are worried about whether what you are doing will make the right impression on someone, then just don't think about it. Improve your technique and always create at the maximum of your capabilities, and you will get unique clay products that will create coziness and comfort in your home, add color and festivity to your everyday home environment, and emphasize your individuality.
Firing ceramics in muffle furnaces
Hello to all lovers and professionals of ceramics and those who are just taking their first steps in mastering this craft!
In my professional practice, I have often encountered the problem of firing. Often not understanding the principles and significance of this technological operation and not attaching great importance to it. I "stepped on a rake" and worst of all, that on children))) and more than once.
And if you, who are reading this article now, "creators" and "virtuosos" of ceramic art, do not want to make the same mistakes, I suggest you read this article to the end and like and leave a comment.
Go….
It is worth noting that all the recommendations that will be given in this article refer to firing in electric muffle furnaces. Today in Russia (meaning small production workshops and training centers) this is the most common type of furnace.
- 1. Loading (loading) products into the oven.
The furnace should be loaded in such a way as to maximize the use of the furnace chamber space. For this, it is possible to carry out preliminary placement of products on a special table. At the same time, you can easily determine the height and number of refractory racks required to support the flaps (refractory shelves).
I would like to note that during the first application, it is necessary to cover the flats with kaolin (dilute the dry kaolin powder with water and brush the shelves with a brush), this will help to increase the service life of the stove accessories.
The density of unglazed items is higher than glazed items.
Heavier products should be put down, and lighter ones should be placed above.
During firing, unglazed products can touch. You can also stack one item on top of another.
The tiles are placed on edge or on top of each other if they have a thick shard. Large flat and thick-walled bowls, fired on the ground, are best fired upside down on a refractory shelf, and thin small cups - also upside down, but on special damp discs (bomzes) in order to avoid even slight deformation around the circumference.
Products must be installed in the furnace at a distance of at least 2-3 cm from the spirals or walls of the muffle furnace. Too close placement can lead to deformation. The same rule applies to placing items near a thermocouple. DO NOT CLOSE THE THERMO COUPLE !!!
Glazed products are placed at a sufficient distance from each other so that during firing they do not come into contact with each other, with the walls of the furnace, spirals and do not stick to the ladders (it is better to install the products on special supports).
- 2. Firing
Initially, the firing temperature is raised slowly. In the first two to three hours, there is a process of "final drying", the evaporation of physically bound water. They try not to raise the oven temperature above 150-200 ° C until the moisture disappears. In this case, the technological holes in the furnace must be open so that moisture can escape through them.
Stage 1: 1-1.5 hours to a temperature of 150-200 ° C with an exposure time from 30 minutes to 1 hour.
After preheating, the temperature can be increased to 300-500 ° C faster. However, when reaching a temperature of 600 ° C, care should be taken, since if even completely dried products are heated too quickly, they can burst due to too high pressure of water vapor formed as a result of the dissociation of clay matter (removal of chemically bound water). At a temperature of about 600 ° C, vapors begin to evolve intensively. In addition, quartz expands sharply at about this temperature.
Stage 2: 2-3 hours to a temperature of 570-600 ° C with an exposure time of 20-30 minutes.
At the last stage, the speed can be as high as possible, but when the set temperature is reached, it is important to take a hold so that the heating throughout the entire working space of the chamber becomes uniform.
Stage 3: heating rate 150-200 ° C with exposure for 20 minutes.
- 3. Cooling the oven.
To avoid cracking, products should be cooled as slowly as possible. In addition, furnace wear is significantly reduced if cooling (“chilling”) lasts approximately the same time as heating.
In all cases, one must adhere to the rule: cooling in the first hours should be slowed down until the temperature drops to 450-400 ° C.
It is especially important to slowly cool large items and sculptures. In this case, it is better not to open the oven door at all until the temperature drops to at least 220-200 ° C, and then not open it completely; unloading is not recommended until the temperature drops to 120–100 ° С. It is best to unload the oven at a product temperature of 50-60 ° C. This precaution is even more important for glazed products.
It should be noted that there are special cases when firing can be carried out according to a completely different scheme.
Get inspired, experiment, create.
Peace for everyone!