How to choose insulation
There are several types of insulation on sale. They can be divided into 2 categories:
- Permeable. Allow water vapor to pass or escape outside;
- Moisture resistant. Completely cut off the surface from contact with humid air.
The basement is an underground facility. The depth of immersion in the ground requires reliable insulation of vertical, horizontal surfaces, otherwise mold and condensation are inevitable. The selection criteria will be:
- Steam and moisture resistance;
- Strength;
- Ability to withstand temperature changes;
- Rigid form.
The best solution is the installation of penoplex. It is designed for use in conditions of high humidity and cold. The usual foam plastic is somewhat worse, since the technology of its production is rarely followed in full.
It is impractical to use permeable types of heat insulators (mineral wool, expanded clay), they will become saturated with moisture and cease to perform their tasks.
Step-by-step work plan
The procedure for warming the cellar in the garage is carried out in stages. First, it is necessary to provide waterproofing of horizontal, vertical surfaces (walls, floor, ceiling).

The most effective means are bituminous mastic and impregnation with special compounds. It is recommended to apply a layer of antiseptic to the concrete walls, excluding the formation of unwanted microflora.
High-quality preparation will ensure the effective operation of the heat insulator, will not allow the penetration of moisture from the soil. Attempts to do without preliminary work lead to failures - the insulation gets wet, a fungus appears. Please note that only one wall, ceiling or floor cannot be insulated. Installation of insulation is carried out on all surfaces, including the hatch, and other elements.
Insulation of the caisson for the cellar
Insulation of a concrete or brick cellar is not difficult due to the optimality of their shapes and resistance to mechanical damage (brick, concrete walls can be drilled, fixing the dowel-umbrella or treated with hot mastic to ensure waterproofing).
Insulation of the caisson for the cellar
But with modern caissons for cellars, the situation is somewhat different, since thermal insulation measures can damage the tightness of the tank.
Nevertheless, their insulation is also important, because the walls easily let through both heat and cold. Since the caisson is a one-piece construction, it does not need waterproofing. From the point of view of the material used, the caissons for the cellar can be (types):
- plastic (made of polymer materials);
- reinforced concrete (made of concrete rings);
- metal (steel).
It should be borne in mind that materials have a different rate of heat loss.
In this case, the caisson cellar can be in the form of a cube or a cylinder, which leaves an imprint on the choice of a heat insulator. To insulate the caisson for the cellar, you can use bulk, rigid and sprayed insulation. Let's consider how to use them in descending order of popularity:
- hard insulation. They are used in cases when the caisson has the shape of a cube, square, rectangle with smooth walls. The insulation is glued to the surface of the caisson. The caisson is placed in the ground, the distance between it and the soil is filled up;
- bulk insulation: soil, expanded clay, sand, peat soil. In this case, the caisson is placed in the ground, and the distance between its walls and the soil is filled up;
- sprayed insulation - polyurethane foam. Provide the most effective thermal insulation.But the lack of polyurethane foam insulation is a high price and the need to attract craftsmen with special equipment.
The indicated types of thermal insulation materials are suitable for insulating a metal cellar, as well as insulating a cellar made of plastic. A cellar made of plastic with insulation is presented on the construction market, which eliminates the need to do insulation work with your own hands, it is enough to correctly perform the installation.
Floor insulation from freezing
Many owners prefer to insulate the floor with expanded clay. You can get the desired effect, but you have to pour a concrete screed over the heat insulator layer.
A multilayer pack is created, which includes:
- Leveling sand bed 5 cm;
- A layer of waterproofing film or geotextile;
- Backfill with expanded clay 10-20 cm;
- Steam-waterproofing film;
- Reinforced screed 5-8 cm.
Instead of expanded clay, you can lay several layers of foam. It is not recommended to use one row of thick sheets, as moisture will gradually enter through the gaps and crevices. Insulation of the garage floor is one of the most labor-intensive stages, since the work is carried out in difficult conditions.
What materials exist
The choice of consumables depends on the degree of soil freezing, the type of construction and the depth of groundwater flow.
Naturally, heaters must meet important requirements: to maintain water resistance, heat and protect against fungal infection. Heat insulators are different for walls, ceilings and floors.
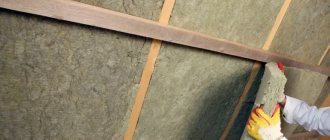
Mineral wool
Mineral wool is an excellent thermal insulation material that, in addition, allows air to pass through. For insulation of walls and ceilings indoors, you can use plates of medium and soft hardness. This material does not burn and adheres easily to the surface.
Basalt wool, which has higher thermal conductivity and sound insulation properties, has proven itself especially well. It is important to remember that additional vapor barrier will be required to prevent moisture build-up.
Expanded polystyrene
It is a high quality thermal insulation material that is perfect for a basement. It is highly resistant to mold and decay.
Its important characteristic is its almost absolute water resistance. In addition, the material has a long service life.
Styrofoam
It is often used for thermal insulation of the cellar. It differs from expanded polystyrene in manufacturing technology and a higher vapor permeability indicator. Has the following distinctive characteristics:
- does not allow moisture to pass through and does not change shape under its influence;
- weighs little and does not create additional load;
- affordable.
Reflective heat insulator
Reflective insulation is a new material.
In its production, special rolls are used, which, on the one hand, are made of foamed polyurethane foam, and on the other, from polished foil.
Such insulation effectively saves the area of the room, since its thickness is 3-5 mm.
Glass wool
Glass wool today is used less and less. But it has one indisputable plus. It's cheap.
When working with such material, it is worth stocking up on protective gloves, and you also need to protect your eyes. It is necessary to additionally insulate with foil or foil.
Warm plaster
This material performs both decorative and heat-insulating functions.
Plaster can be used as an independent raw material, or it can be combined with other thermal insulators. In any case, it must be applied in a very thick layer.
Expanded clay
The basement floor can be insulated with expanded clay. It is an inexpensive option, very easy to use and effective.The thickness of the expanded clay layer depends on the expected load.
It is recommended to choose two types of expanded clay with fractions of 5-20 mm, this will save the floor from subsidence. The fill layer should not be less than 10 cm.
Sand and crushed stone
The construction of sand, crushed stone and screed is also quite effective.
First, we deepen and level the floor. The first layer is crushed stone, 10 cm thick, then sand 5 cm thick. After thorough tamping, pour hot bitumen and make a reinforced concrete screed. This is a traditional and inexpensive option.
Application of polyurethane foam
The decision is often made to insulate the basement room with polyurethane foam. This material will not only protect it from cold and moisture, but also prevent biological and chemical effects, which is very important for vegetable storage. Warming with polyurethane foam suggests some features in the process of work. You will need:
- carry out surface preparation;
- make insulation, that is, apply a layer of insulation;
- if necessary, make the finishing.
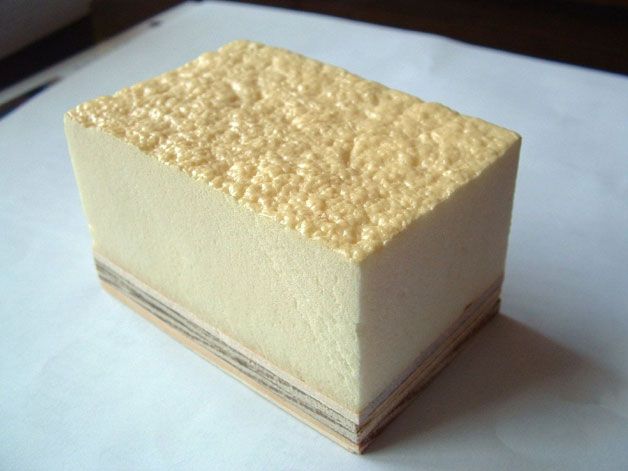
Polyurethane foam in a cut.
Preparation includes careful surface treatment. It is necessary to align the walls, lay all the necessary communications and provide ventilation in the garage and basement. After that, you can install the crate, which will later serve as the basis for shelves and racks.
The process of applying polyurethane foam is quite complicated, so it is better to entrust it to professional builders. To work with this thermal insulation material, expensive equipment and certain construction skills are required.
Professionals will be able to insulate your cellar quickly and will not make mistakes. In addition, most firms carry out such work with a guarantee. You can be sure that basement insulation will function perfectly for many years. If you want to save money, you can independently complete the work on the basement by finishing and arranging it.
There are many ways to insulate a cellar in a garage. Using the recommendations, you can independently turn the basement in the garage into a functional vegetable store.
How to make ventilation in a garage with a basement
Basement in the garage with your own hands
Basement insulation with foam
Astratek
Astratek material is a liquid consistency.
Benefits:
- Ease of use;
- Non-flammable and non-toxic liquid;
- Used in various premises;
- Has water-repellent and weather-resistant properties;
- The internal area of the room is preserved;
- Complex forms of coating are available.


Polyurethane foam
A frequently used thermal insulation material is polyurethane foam (abbreviated as polyurethane foam). Its popularity is explained by such advantages as biological neutrality, ensuring the tightness of the equipped room, and high-quality protection from moisture.
Since polyurethane foam is applied to the surface in a monolithic layer, the resulting coating quickly hardens, has no visible joints and seams. Even in the case of direct moisture ingress on this insulation, it does not lend itself to mold and is resistant to decay processes.

Polyurethane foam can be used for interior and exterior work. PUF has one drawback, which is the way it is applied. The fact is that its installation requires expensive equipment operating under high pressure. Construction companies can afford it. But this disadvantage is insignificant in comparison with the obtained effective result.
Insulation of the cellar in the garage
The peculiarities of the garage cellar insulation include the fact that with normal garage insulation, the basement also turns out to be insulated from the outside, which does not allow freezing.The main difference from other rooms is that high humidity occurs in the garage cellar, and therefore the presence of waterproofing is important.
Internal waterproofing of the premises is most often used. When applying thermal insulation materials in the garage, there is a difference compared to other rooms. The most important thing is that there is an increased fire hazard in the garage, and therefore, when choosing and applying material, it is necessary to pay attention to the combustibility of the insulation.
How to insulate the cellar in the garage, choose only the owner, but taking care of his safety, of course, is necessary. In addition, you must remember to insulate all communications if they pass outside. And the electrical wires must be carefully insulated so that if moisture gets in there is no danger of short circuit and fire.


Types of cellars for a private house
When deciding how to insulate the cellar from the inside or outside, first of all, the type of cellar is taken into account:

Ground cellar
Ground cellar
A free-standing room with a depth of up to 0.5 m. It can be free-standing or wall-mounted (one of the walls of the cellar is the wall of an outbuilding or garage). From the point of view of insulation, this is the simplest option, since it is possible to insulate the walls and roof from the outside and from the inside.

Recessed cellar (semi-underground)
Recessed cellar
The lowest point of the building is located at a depth of no more than 1.5 m from the ground surface. In this case, in addition to warming, one should also think about neutralizing the action of groundwater and frost heaving of the soil.

Underground cellar (bulk)
Underground (bulk) cellar
It is distinguished by the location of the floor at a level of 2-3 meters underground. With proper waterproofing, this is the most advantageous cellar from the point of view of operation, which perfectly keeps a positive temperature, approximately constant, throughout the year.
Despite the differences in construction, the design of the cellar is not very diverse.
Standard cellar design:
- walls - with dense soil - ground, with moving - brick or stone;
- the floor is absent, or rather it is unpaved;
- ceiling - reinforced concrete or wood.
Accordingly, the insulation of the ceiling, walls, floor is carried out. Those. all surfaces of the cellar through which heat loss is possible.


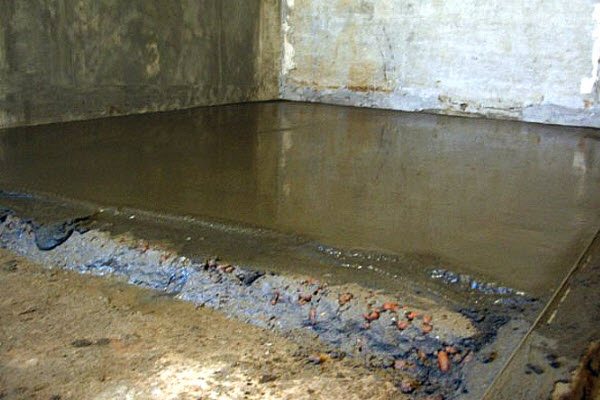
Insulation of the floor and foundation
First of all, you need to insulate the floor and basement foundation. For this, waterproofing is required. It will help with the raising of groundwater, which occurs in the spring due to melted snow. The most commonly used floor and foundation material is concrete. A sand cushion, as well as crushed stone, should be located under the concrete base, and all this must be tamped as carefully as possible.
Then you can fill everything with bitumen, and then make a concrete screed on a reinforced mesh.
After the floor is poured with concrete and it hardens, you can leave it that way, or you can apply decorative material or additional crate with wooden beams.
We insulate the floor along the ground
Initially, the earthen floor is leveled with sand.
How to insulate the floor in a garage if ordinary, bulk soil acts as its basis? The work is carried out according to the following scheme:
- surface preparation;
- organization of a hydro-barrier;
- lag installation;
- laying insulation;
- second hydro-barrier;
- finishing coating.
Any insulation work will reduce the height of the room by 30-60 cm. To compensate for such losses, it is proposed to organize a pit, if the overlap between the garage and the basement allows it.
Surface preparation consists of leveling the soil and tamping it. Unconsolidated soil can sag over time.
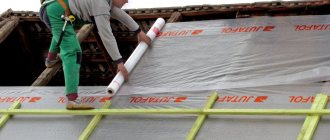
This will disrupt the geometry of the insulation cake. It loses its integrity, and hence its performance.Waterproofing prevents the penetration of moisture from the ground to the insulation material and frame. A polyethylene film or roofing material can act as a waterproofing. These are all budget options. The modern market offers geotextiles. It does not allow moisture to pass through, but also does not interfere with air exchange. Regardless of the type, any hydro-barrier is laid with an overlap at the joints and on the walls. All joints are glued with construction tape.
A wooden or metal frame is installed on top of the hydro-barrier. It is assembled from cross and longitudinal beams. If this is a tree, then choose a bar 200 mm high, 100 mm wide. It must be impregnated with an antiseptic. Wooden beams at intersections are connected with steel corners. They will give the structure strength.
Thermal insulation is placed in the cells of the frame. Before insulating the floor in the garage with your own hands, you need to calculate the required thickness of thermal insulation. This is not difficult to do based on building codes. Mineral wool slabs, polystyrene, expanded polystyrene are used as thermal insulation. You can use spray insulation. The installation of the slab material is carried out in spite and without internal gaps. The slots between the slabs are potential cold bridges where condensation will accumulate.
At the end of the installation of the thermal insulation, the installation of the second layer of the hydro-barrier is started. It should not fit snugly against the insulation. There must be a ventilated gap between them. Waterproofing fasteners are carried out with a construction stapler. This is followed by a rough flooring made of a 50 mm thick board and a topcoat.
We insulate the concrete base
Scheme of floor insulation in a garage on a concrete base.
How to insulate a concrete floor in a garage? The main thing here is to choose insulation with increased density and compressive strength. Only dense and durable insulation will withstand not only operational loads, but also the weight of the finished floor covering. Experts pay attention to C-25 grade foam and polyurethane foam. They have all the required characteristics. Also read: “Heaters for the garage: mineral wool, polystyrene, etc.“.
The work is carried out in the following order:
- surface preparation and leveling;
- laying insulation on glue;
- organization of girdle isolation;
- laying of fiberglass-based reinforcing mesh;
- rough finishing of the floor based on cement;
- finishing coating.
The disadvantage of such insulation is the long ripening period of the cement stone. It is 28 days. During this period, it is necessary to spray the cement.
Thermal insulation of the floor with sand
To insulate a bulk or traditional cellar, it is recommended to choose sand as insulation for the floor. It has a relatively low cost, but at the same time it has remarkable qualities for heat retention. To achieve the best performance, the composition is evenly distributed, and the top is covered with a finish or film.
External insulation of a bulk cellar
The most time consuming part of the work, the implementation involves the implementation of a number of actions:
- the soil surrounding the roof and walls of the cellar is removed.
Note. Excavation is sometimes not possible. For example, when the cellar is dug into the ground, and the resulting slopes are finished with bricks. Such walls can collapse. In this case, users are advised to remove the soil at a distance of 100-150 mm. from the wall, and then gradually remove the rest.Additional protection from moisture will be provided by arranging a crushed stone-sand cushion at a depth of 200-300 mm. from the base of the wall.
- plates of rigid insulation are mounted or polyurethane foam is applied;
- all defects from the surface of the walls are eliminated;
- for further work, it is necessary that the roof and walls are absolutely dry. Therefore, work is stopped until the walls are completely dry.As you can see, it is better to perform work in the warm dry season;
- roof insulation is, in fact, the overlap of the cellar with insulation. The technology provides for laying roofing material over the ceiling, filling the roof on top with a clay-straw mixture. The height of the fill on the roof is 0.4-0.5 m. The mixture is carefully rammed and covered with a dense film. The edges of the film are folded onto the wall with an overlap of 150-200 mm.
- the wall is waterproofed. In this case, priming will not help much. It is better to use a solution of bitumen with diesel fuel (1: 3), mastic, roofing felt or a special film;
- the joints between the sheets are blown out with polyurethane foam;
Some masters advise to tighten the insulation with a polymer mesh to ensure the integrity of the sheet. Roofing material will more successfully cope with this task. But often the distance between the wall and the soil is simply covered with expanded clay, soil with a high clay content or a mixture of soil, sawdust / straw and clay.In the absence of ventilation in the cellar, it is advisable to take care of it at this stage.
- the resulting hill is covered with a layer of fertile soil 100-150 mm high. with the subsequent planting of herbaceous plants, which will protect the cellar from the sun's rays, and strengthen the soil with their roots.
Related article: Do-it-yourself potholders made of fabric with patterns: mittens and a butterfly, original patterns, knitted mittens, cross-stitch, felt heart for the kitchen, photo gallery, video instruction
Wall insulation
When insulating the walls of the garage basement, you need to pay special attention to carrying out various kinds of communications. Walls are insulated most often when the room should not be used for storing cans with conservation, but, for example, as a billiard room or a gym. Styrofoam is best suited for this.
Before applying the insulation, it is necessary to level the walls, cover up all the cracks, and also treat them with an anti-mold and mildew agent. The first step is to properly size and cut the foam sheets. A material with a density of 25 is well suited for this. Then we fix the insulation on the wall using special glue. From above, apply a screed to the reinforced mesh.
If the basement is very wet, then you need to apply another layer of waterproofing, and on top - a decorative layer. For this, tiles are suitable or something that will look elegant in the room, depending on its purpose.
It is very important to avoid unnecessary joints when installing thermal insulation. If there are cracks, then moisture will penetrate and heat will go away. If a crate is used for the installation of thermal insulation, then you need to fill all the cracks and inconsistencies with foam so that there are no unnecessary gaps.


Principles and procedure for warming the cellar
Cellar insulation is divided into external and internal.
External insulation
An external version of insulation is required for detached premises. It has many advantages: it protects against moisture penetration, freezing, does not affect the change in the cellar area. Procedure:
- Perform waterproofing with bitumen mastic or upholstery with roofing felt.
- Apply a special composition for pasting walls with panel material. This is usually cold mastic. It is applied to a layer of stone wool, expanded polystyrene. Press firmly against the wall.
- The voids are sealed with polyurethane foam, the remains of which are then cut off.
- Lay a layer of penofol, fixing it on the mastic.
- Sewn on top with a galvanized profile or clapboard.
Insulation plates must be laid out from below, retreating from the ground.
External insulation should be carried out during construction. If the cellar is already ready, then the work is more difficult to complete, since the old casing will have to be removed. In this case, it is advisable to entrust the work to specialists.
Internal insulation
How to insulate a cellar from the inside from freezing depends largely on its type.In general, the order of work includes thermal insulation of the ceiling, walls, floor, ventilation and entrance lobby. All work includes a preliminary stage of cleaning the base, laying the frame for the ceiling and horizontal surfaces. Next comes the laying out of the insulation and finishing.
Ceiling insulation
By insulating the basement ceiling, you provide heat to the garage floor. This will keep the garage in good condition for many years. For insulation, you will need a crate. It can be made from a bar or from a metal profile. Wood lovers should understand that before installation, it must be protected from moisture with a special compound. When the base is ready, you can lay the insulation material. It is imperative to install a vapor barrier on top so that the floors in the garage are not damp due to the basement. The next step can be to fix decorative material such as plastic.
Insulation technology depending on the type of cellar
The inside of the cellar is insulated for all types of cellars, and the outside is for detached buildings.
Insulation of a ground cellar
Insulation of this type of cellar is carried out mainly from the outside. It is important to insulate the roof and walls. For wall insulation, the following stages of work are observed:
- To a depth of 200 to 300 mm, soil is sampled and the roof is cleaned. For finished buildings, this stage is complicated by the fact that the walls are already finished with bricks or other material. It is undesirable to touch it. You will have to carefully make a recess to the possible depth.
- In the place of excavation, a drainage cushion is made from a layer of rubble and sand.
- They make waterproofing from bituminous mastic (this stage is performed only on new walls).
- Heat insulation is laid on the wall, slightly retreating from the sand and crushed stone pillow. Slabs are coated with cold mastic and glued to the wall.
- From above, penofol or film is attached to screws or dowels.
- Cover the wall with a profile or other finishing material.
Insulation of a ground cellar
The roof of the ground structure is insulated using roll materials. Penofol is spread on the roofing material and roofing material is placed on top again. The final layer can be corrugated board or slate.
Insulation of a buried room
In this type of cellar, the walls are half in the ground. For the production of thermal insulation, it is necessary to excavate the soil as much as possible in order to protect the wall from freezing. In the recess, drainage is made from a cement-sand cushion. Roofing material is laid on top. Walls can be waterproofed with mastic, on which a slab insulation can be glued. It is closed with roofing material, shooting it with dowels.
When insulating the roof of the cellar, work is carried out as follows:
- The roof is filled with a clay-straw mixture to a height of up to 0.5 m. The components are thoroughly mixed beforehand until homogeneous.
- Compaction is performed. To ensure its quality, there is a special hand roller.
- Cover with dense polyethylene, wrapping it on the wall with an overlap of up to 20 cm.
- Cover the roof with roofing material or coat with a mixture of bitumen and diesel fuel in a ratio of 1 to 3.
- This layer is covered with fertile soil 15 cm high. Then the roots of the plants will act as additional reinforcement for the roof.
As a result, the building will be a semi-buried hill, which is reliably protected from the sun and frost. The temperature in such a cellar optimally meets all the requirements for storing vegetables and preparations.
We insulate the underground cellar
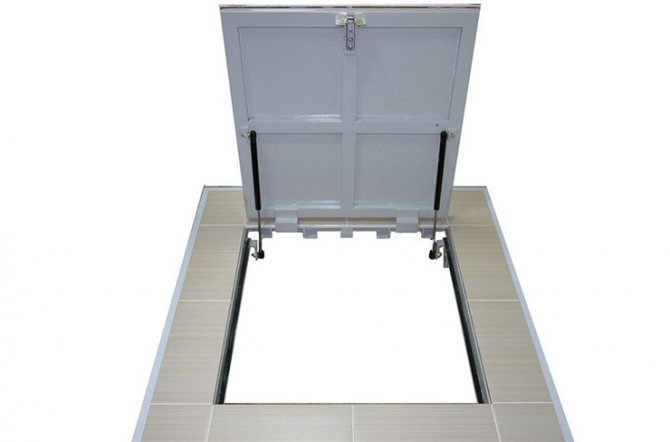
Warming of a cellar in a garage, basement or on the street is carried out outside and inside. It is carried out both outside and inside. The hatch is thermally insulated outside, the description is presented below. From the inside, a circular insulation of the floor and walls is carried out as described above.
Ventilation
In order to maintain a normal balance between temperature and humidity, ventilation is required in every basement. The garage cellar is no exception. The ventilation system can be different, it is important that it is efficient and effective. It is advisable to install ventilation while the garage with a basement is just being built, but you can do this later.
For a garage, ventilation is necessary not only due to the creation of a microclimate, but also due to the presence of exhaust gases and toxic substances, which, in the absence of an exhaust hood, will accumulate in the room, including in the garage basement.
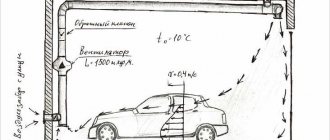
Ventilation can be natural or forced. With a natural ventilation device, two pipes are required, which are at different heights. Sometimes it is enough to just make holes in the basement in order to ensure adequate ventilation.
For forced ventilation equipment, additional mechanisms will be needed, which must be assembled strictly according to the manufacturer's instructions. Such a complex includes fans that help draw air out of the room. In addition, just before the harvest season begins, regardless of the presence of ventilation, you need to ventilate the garage room, open the outer doors and the cellar lid.
What are the nuances of building a hatch in the cellar to be considered
In order for the door to turn out well the first time, you need to take into account all the nuances of its construction. First you need to decide exactly where to place the cover for the basement. To do this, you need to pay attention to the following factors:
- Do not place the hatch close to the wall, as there must be room for opening the door.
- If the basement is located in the kitchen, then the entrance to it should be in a free space, where the kitchen furniture will definitely not stand.
IMPORTANT! Measure the distance from the hatch to the kitchen unit and other objects so that the door does not touch them.
By adhering to these recommendations, you can make an excellent basement room with a reliable and safe entrance.
In this video, you will learn more about the basement hatch:
Equipment of the hatch from the inside
The hatch insulation procedure is one of the most laborious. It is necessary to ensure the tightness of the lid abutment to the shaft, to carefully fill all the gaps. The main task is to exclude the ingress of external air, which causes freezing, condensation and ice formation.
It is most convenient to work with rigid materials, and the maximum effect is obtained from spraying liquid polyurethane foam. During the installation of the heat insulator, it is necessary to keep a cylinder of polyurethane foam at hand in order to immediately close up the detected cracks.
Many people prefer expanded polyethylene, which can be used to wrap the hatch shaft from the inside. This is convenient if the walls are made of wood - the material is fixed with a stapler. Before work, you must perform thorough preparation - apply an antiseptic, abundant waterproofing.
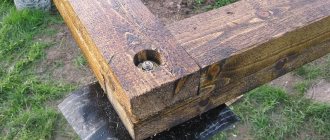
DIY wooden door
Usually, wood is used for the manufacture of a structure, if the house has a wooden floor covering. Using this material, we make a so-called hidden hatch: visually, the subfloor will be almost invisible.
IMPORTANT! Natural wood provides not only masking of the door in the floor, but also reduces its weight. Often, wood is used for a hatch under a laminate.
To work quickly, you need to have all the necessary materials and tools at hand, namely:
- floorboards;
- slats for lathing;
- support bars;
- plywood sheet;
- screws, nails;
- drying oils;
- thermal insulation film;
- shock absorber, sash hinges;
- handles for the cellar hatch;
- chalk, pencil.
You can make the door yourself
Consider making an entrance measuring 80 by 80 cm.With such measurements, the door should be smaller in size so that it fits well to the floor and a gap of 5 mm remains. Next, we follow the instructions:
- Making a "draft" of the flooring: you need to nail in 4 beams for support.
- We cut out 79 cm blanks from the floorboard.
- We take a plywood sheet and cut out a 79 by 79 cm square. A 1 cm gap between the floor and the hatch is needed so that high humidity or sudden temperature changes do not deform the door.
- To make the lathing of the inner part, you need to cut the slats into 79 cm lengths.
- The last step is to cover each element with linseed oil, which protects against moisture and fungus.
The construction is done in several layers. The first layer is plywood with battens. The second layer is made of thermal insulation to insulate the hatch. The third layer is the imposition of the board.
IMPORTANT! To make the basement door invisible, the top boards must be nailed parallel to the floor.
Metal sash
Unlike wood, a metal hatch is more reliable and durable. This option is good to use when the basement is located in the garage. Again, we stock up on everything you need:
- sheet steel with a thickness of 1 and 3 mm;
- a corner of 3-4 mm made of metal;
- loops;
- anchors;
- gas closer;
- foam or other insulation material;
- primer;
- rubber seals;
- other tools: tape measure, knife, screwdriver, welding and angle device for disc grinding.
To make the design correctly, we again refer to the instructions:
- We take a metal sheet 80 x 80 cm.
- We turn the workpiece over and weld the metal corner.
- Next, you need to insulate the door.
- Cover the insulating layer with a 1 mm thick sheet of steel. The edges must be fixed with self-tapping screws.
- Now you need to mount and weld all the details of the cellar hatch. We carry out installation of the frame at the entrance. We weld parts of the steel corner.
- We fix the frame to the concrete using anchors.
- To reduce heat loss and protect the structure from damage, it is recommended to seal the exposed edges of the metal rim with shims.
- The cellar door is attached to the frame using reinforced hinges. To conveniently open the door, you need to equip it with a gas closer.
A steel hatch can be made both in the garage and in the house, you just need to cover it with wood or the material from which the floor in the room is made.
Laz into the cellar under the tiles
A material such as tile is most commonly used in the kitchen. Therefore, if your basement is located exactly there, you can make this type of hatch under the tiles. The production of such a structure takes less time than in the two previous versions. We will need:
- steel corner;
- steel sheet 3 mm;
- solution;
- tile;
- fittings.
The work takes place in several stages:
- We cut out the bottom of the hatch from steel of the same dimensions as the entrance to the basement.
- We weld the corners by making the sides. We fix the reinforcement in the form of cells inside.
- We make the entrance frame of the basement from the corners and fill it with concrete.
- We fasten the sash and support with reinforced hinges.
- Put the tile on top on the previously mixed solution.
Conducting communications
It is better to conduct pipelines, power wires, and other communications into the basement before insulation.
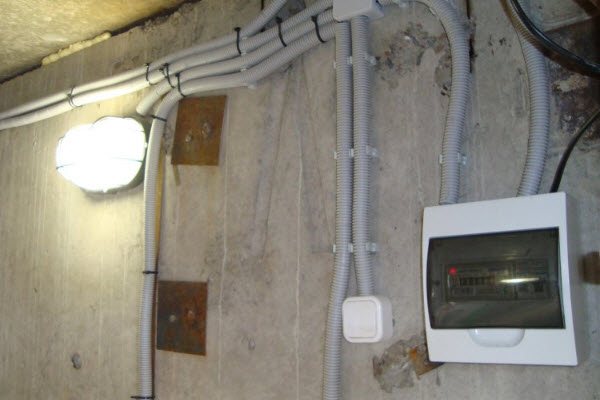
The cables must be pulled into a protective corrugated sleeve. Ventilation pipes are fixed to the walls or ceiling plate, ensuring the tightness of the passage sections.
After fixing the heat insulator, it is not recommended to lay communications.
Thermal insulation of the caisson
We are talking about separate storage facilities that are being built on the territory of the sites for the subsequent storage of vegetables and conservation. To protect this building from frost, it is recommended to do the following:
- Perform reliable work to isolate the room from the cold outside (this requires the use of dense soil).
- Create high-quality waterproofing, since it is moisture that often becomes the main cause of freezing.
- Perform reliable protection of internal structural elements from cold air penetration through the walls.
- Also, if necessary, a special vestibule is created at the entrance, which contains a thermal insulating air cushion.
Earlier, we looked at how to insulate the ceiling in a cellar, which is directly related to a heated building. It should also be clarified that when improving the caisson, it is necessary to do the same series of works, but choose denser materials for this.
Important. Gardeners and gardeners are often faced with the question of whether it is necessary to insulate the walls of the cellar and other structural elements. Here, an amendment should be made to the climatic conditions in the region, as well as the purpose of the storage. If it is necessary to maintain a comfortable temperature, thermal insulation is necessary. If the presence of a low temperature is required, then internal insulation is not always advisable.
How to insulate a cellar from the inside from freezing
To protect the inner space of the room from freezing, they carry out the insulation of its walls, ceiling, floor and door, that is, all surfaces of the structure through which heat loss is possible. At the same time, materials such as expanded clay, roofing material, rigid insulation are used.
Let us consider in more detail the features of the insulation of various internal surfaces of the storage facility.
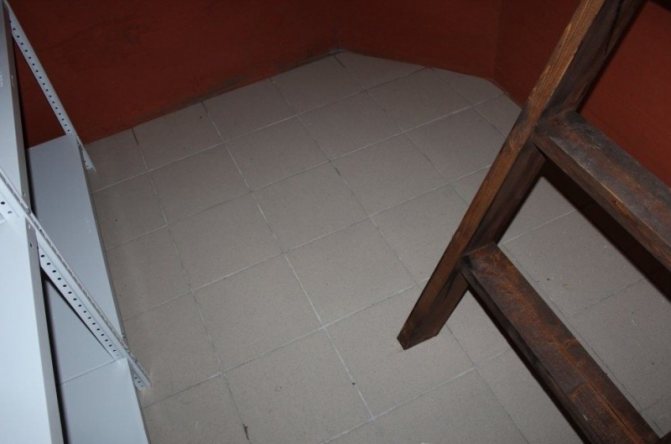
Insulation of the floor in the cellar
Practice shows that the best option in terms of value for money is floor insulation using expanded clay.
The technology includes several steps (picture 3):
- The frozen concrete floor with exposed beacons is covered with a layer of expanded clay gravel with a fraction of 5-20 mm (the thickness of the layer depends on the expected load on the floor).
- A layer of expanded clay is covered with a vapor barrier film with its exit to the inner wall. In this case, the height of the overlap must correspond to the height of the backfill.
- Beacons begin to be installed along the film, the first of which should be located at a distance of 30-40 cm from the wall, and all subsequent ones - at a distance that corresponds to the length of the rule with which the screed will be aligned.
- A reinforced screed is poured over the installed beacons, the thickness of which is determined by the expected load.
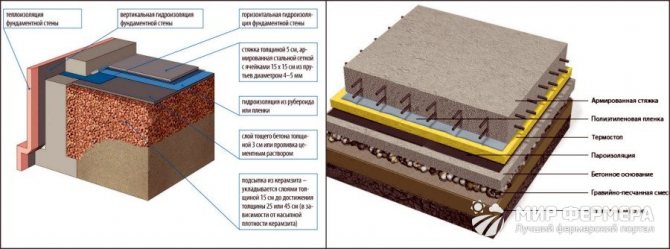
Figure 3. Scheme of floor insulation in a home basement
Sometimes the bulk floor is insulated with sand and gravel. In this case, the floor is first filled with hot bitumen, which acts as a waterproofing. Then a crushed stone-sand pillow is laid on it and carefully rammed. In this case, the layer of crushed stone is 10 cm, and the layer of sand is 5 cm. Then the surface of the pillow is covered with rigid insulation (foam, expanded polystyrene sheets), which is poured with a reinforced concrete screed.
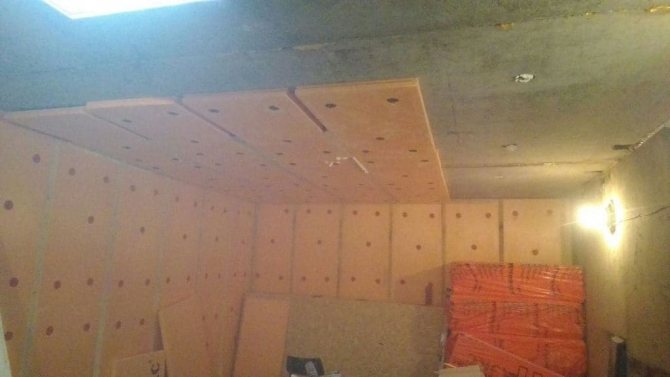
How to insulate the ceiling in a cellar
Since the ceiling of a buried cellar is considered the most vulnerable place in terms of heat loss, it is recommended to insulate it in two layers.
In this case, thermal insulation work is carried out in the following sequence (Figure 4):
- Ceiling plaster;
- Treatment of concrete floor slabs or wooden beams with a penetrating waterproofing primer;
- Installation of a layer of rigid insulation;
- Covering the heat-insulating layer with a mounting mesh.
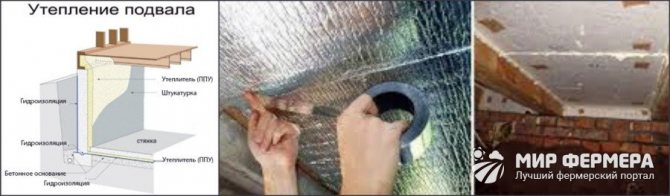
Figure 4. Features of ceiling insulation in the basement
At the final stage, the ceiling must be whitewashed with lime with the addition of a small amount of copper sulfate.
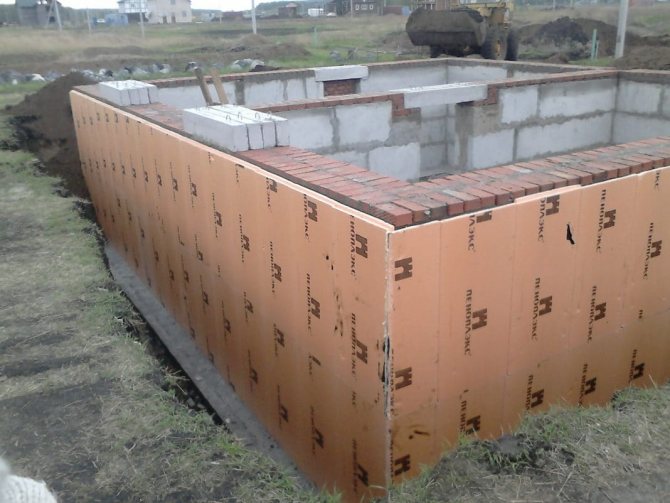
Wall insulation
Insulation of the basement walls is a rather laborious process, since it involves preparatory work (Figure 5). So, first of all, the room must be freed from its contents, as well as dismantled all the shelves and racks. Then you need to inspect the walls for defects and eliminate all protrusions and cracks by knocking or foaming them.Such preparatory work must be carried out carefully, since the remaining irregularities significantly affect the quality of the installation of the insulation.
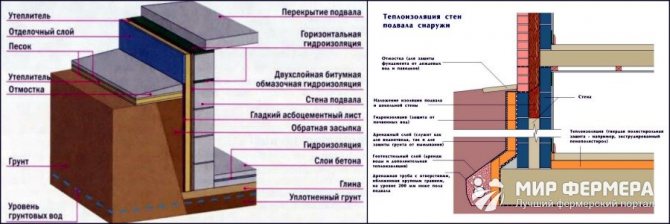
Figure 5. Diy wall insulation scheme
After leveling the walls, work is carried out to waterproof them by applying a special mastic. Only then can you start installing the foam with dowels or glue. You should know that the fastening of the insulation starts from the bottom row, moving upwards. In this case, in each next row, the foam is displaced by half of its sheet. The joints of the sheets are blown out with foam, the insulated surface is covered with a polymer mesh and plastered.
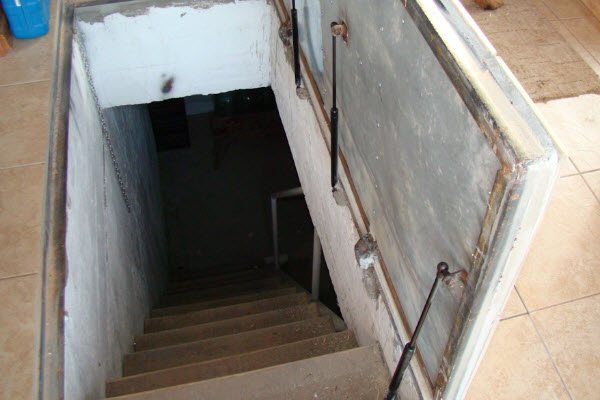
How to make an insulated door to a cellar
If the door to the cellar is in the open air, it must also be insulated. The thermal insulation procedure is carried out using modern rigid heaters, which are fixed on the door and sheathed with natural wood, plywood or plastic.
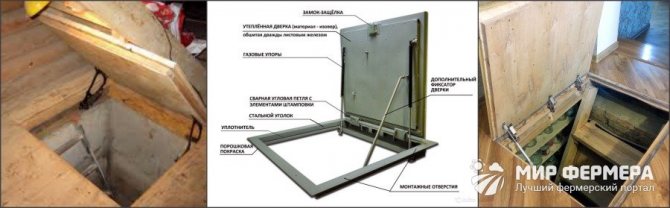
Figure 6. Methods of insulating the cellar lid
Be sure to pay attention to the presence of gaps between the door and the door frame. You may need to install a special door seal. In addition, check if the door can open spontaneously, because in this case all your attempts to keep warm will be in vain.
A warm cellar under the garage - is it possible?
To organize a warm cellar, it is not necessary to lay a heating system there. It is enough to increase the thermal resistance of its enclosing structures and floors. How and how to insulate the cellar in the garage? Insulation works can be carried out outside if the building is still under construction. In an already finished cellar, only internal work is possible. As a heater, it is most convenient to use a panel material with a low moisture absorption coefficient and high strength. Foam and extruded polystyrene foam are suitable for these requirements. They are mounted on the basement walls and under the wet floor screed.
To reduce heat loss through the basement ceiling, the concrete floor in the garage is insulated along the logs. Here, expanded clay (subject to its additional waterproofing), mineral wool, and polystyrene can act as a thermal insulating material. More details about the organization of the insulation layer on the garage floor are described in the video:
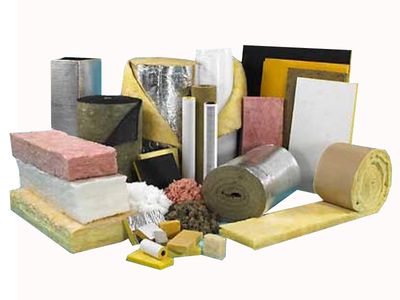
DIY basement insulation materials
The choice of insulation material is very important for high-quality basement insulation. Since the modern construction market is oversaturated with all sorts of materials, we will talk about the most popular among them, which are acceptable not only in quality, but also in price (Figure 7).
Styrofoam
The most popular insulation is polystyrene, which has been used in construction for a long time and is appreciated for its cheapness, simplicity and quality. However, despite all the advantages, polystyrene is not relevant for warming basements, since it is unable to qualitatively protect an underground room from cold and moisture. In addition, moisture that gets on the foam and freezes on its surface destroys this material. Therefore, the use of foam in basements is impossible without the use of hydro and vapor barrier films.
Based on the above, we can conclude that foam as an insulating material can only be used to insulate ceilings in underground storage facilities.
Mineral wool and fiberglass
One of the most popular building materials is mineral wool. Possessing a large list of advantages, this material is also available because it has a low price. Mineral wool is fire-resistant and non-hygroscopic, vapor-permeable and environmentally friendly. It has low thermal conductivity and high sound insulation. This building material is durable and durable, easy to install on any surface with different configurations.Therefore, it can be recommended for thermal insulation work.
When working with mineral wool, care should be taken to protect the respiratory system, because small particles of this material rise into the air like dust. Inhalation of such dust by a person is not at all good for his health. In addition, mineral wool releases phenol, which is also harmful to the human body. Therefore, when working with mineral wool, it is recommended to use a respirator, and cover the surface insulated with it with a vapor-proof film made of polyvinyl chloride.
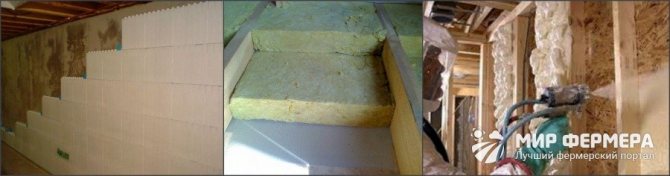
Figure 7. Types of heaters for the cellar: foam, mineral wool, polyurethane foam
Glass wool is a type of mineral wool. It is an elastic and sufficiently strong material consisting of fragile glass threads. These threads, breaking, dig into the skin and eyes, wounding them. Therefore, when working with glass wool, precautions should be taken: wear gloves, glasses, a respirator, work clothes with long sleeves.
Polyurethane foam
The most popular thermal insulation material is polyurethane foam (PPU). It gained high popularity due to its advantages, including: complete protection from moisture, guaranteed tightness of the room, biological neutrality.
Since polyurethane foam is applied to the surface in a monolithic layer, which hardens quickly, it has no seams and joints. Even with direct contact with moisture, this material does not lend itself to rotting and mold. Polyurethane foam can be used for both indoor and outdoor use.
The only drawback of using polyurethane foam is the way it is applied, since this requires a high-pressure unit, which only construction companies can afford. However, this disadvantage is insignificant in comparison with the achieved effect.
Advantages and disadvantages
The work performed on the improvement of cellars, as a rule, has a number of positive qualities, as well as some of the disadvantages:
- An optimal atmosphere for storing preserves and vegetables will be constantly maintained inside the storage facility.
- You can protect the structure from freezing, which negatively affects the structural elements of the extension.
- Subsequently, it is possible to operate the premises not only as a storage facility, but also for other purposes.
- Thermal insulation will avoid periodic heating of the cellar space.
- After the insulation work, there will be no increased humidity inside the storage facility.
- The performed thermal insulation will protect the storage from the penetration of rodents and other pests.
However, despite the positive aspects, there are also a number of disadvantages: the cost of integrated insulation is quite large, a higher temperature will be regularly maintained inside the cellar. In addition, when cladding is performed, the usable area inside the storage will be significantly reduced.
Important. Before proceeding with the thermal protection of the basement, it is required to understand the feasibility, since if the structural elements do not freeze at excessively negative temperatures, then this work will be inappropriate.
Common mistakes and useful tips
Before insulating the basement in the garage, it is necessary to carefully level the surfaces of the walls, floor and ceiling. Some people neglect this process and make a big mistake. After all, most coatings are applied to a hard, even surface using anchors or adhesive mixtures.
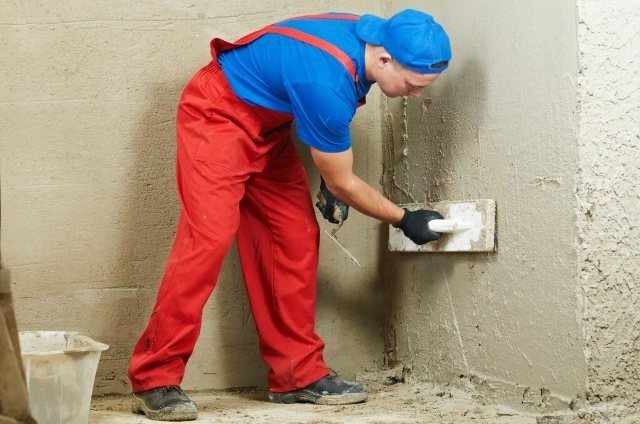
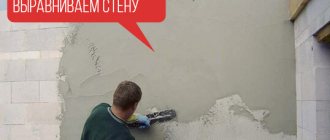
Leveling walls with plaster
For leveling, plastering is most often used, with the help of which:
- the durability of the installation is ensured;
- all inaccuracies of the structure are eliminated;
- surfaces acquire the required hardness.
Another common mistake is poorly designed electrical wiring.It is imperative to lay a cable or wire before plastering for the further installation of switching devices and lamps. The open method of laying, although in corrugated plastic or metal pipes, is still undesirable due to the fact that the room has high humidity.
Important advice! A dark and damp basement is great for the growth of all sorts of fungi. Before insulating the walls and ceiling in the garage cellar, they need to be primed.
Nowadays, there are many different materials on the market with antibiological additives that inhibit the development of mold and bacteria. In addition, primers contribute to the non-flowability of the plaster and its long-term preservation.
If the basement has just begun to be built, then the insulation is performed from the inside and outside. This process is complex and time-consuming and labor-intensive, but necessary. The cellar is dug around the perimeter and a layer of roofing material or bitumen-based material is laid.