We make a stove with a water heating boiler
No one will doubt that in a Russian bath the greatest comfort is achieved if a wood-burning stove with crackling wood, a pleasant spirit and tremendous heat from a live fire is installed. The only bad thing is that sometimes it takes too much firewood to melt the bathhouse and enjoy the cleaning process. A water heating boiler, which is built directly into the stove, can significantly speed up the heating of the room and the preparation of the bath. This tandem significantly increases the efficiency of the wood-burning stove and saves time and firewood. The main idea is that a built-in boiler provides colossal heat transfer even with small dimensions. Now let's talk about how to implement such an improvement in a wood-burning stove using improvised means in a short time.
Homemade water boiler made of cast iron radiators
A boiler that is excellent in its qualities and efficiency can be obtained from ordinary cast-iron heating radiators. As a basis, you can take the M-140 radiator. It is easy to find, because in large quantities they are taken out for scrap during the dismantling and demolition of most of the old five-story buildings. The capacity of each section of such radiators is 1.5 liters of water, while the surface area reaches 0.254 square meters. Assembled, when 12 such sections are combined, the volume of liquid is 18 liters and the total surface area is 3 square meters. m. Not every ready-made boiler, assembled from sheet metal, can boast of such parameters with similar dimensions. The performance of such a boiler from a radiator may be quite enough to heat a room with an area of up to 100 sq. m. So it is suitable for an ordinary bath, and the stock will also be large enough.
Before using the radiator, some alteration is required. First you need to get rid of the cardboard spacers between the sections. It is best to replace them with an asbestos cord impregnated with natural drying oil with an admixture of graphite. So you can protect the gaskets from burning out at high temperatures.
While the sections are disassembled, they should be rinsed from the inside with a solution of hydrochloric acid of 6% concentration, and then with a large amount of water. So they can be cleaned of a large layer of rust and dirt accumulated over many years of operation.
The procedure for assembling the radiator repeats the disassembly process, only in the opposite direction. To connect the sections, nipples are used, equipped with right and left threads on each side. Thus, the sections, both from the bottom and from the top, are simultaneously attracted by the twisting of the nipple. As soon as there is a gap of 2 cm between the sections, an impregnated asbestos cord is wound and the nipples are finally tightened.
After completing the assembly of the entire radiator and waiting for the drying oil to dry, you should check the tightness of the joints by supplying liquid under pressure to the radiator. This is the only way to protect yourself from possible leaks during operation at considerable furnace temperatures.
The connection of the supply and return pipes is best done diagonally across the radiator. This way, the water will flow evenly throughout the new boiler. The two remaining holes should be closed with plugs. Pipes are better to take inch. On one side of the radiator there will be a right-hand thread and there will be no connection problems. On the other hand, where the thread is left, it is better to use a nipple and a coupling with a squeegee.
Such a homemade boiler should not be located in the firebox where the wood is burning, but in the chimney chambers, which are located directly behind the furnace chamber. Since cast-iron radiators are used, they should be heated not with a flame, but with hot gases that are discharged from the firebox.
It is better to position the radiator so that the pipes come out of it perpendicular to the floor, and the return supply is also lowered below the floor into the underfloor space. This way you can achieve a better natural circulation of water during heating.
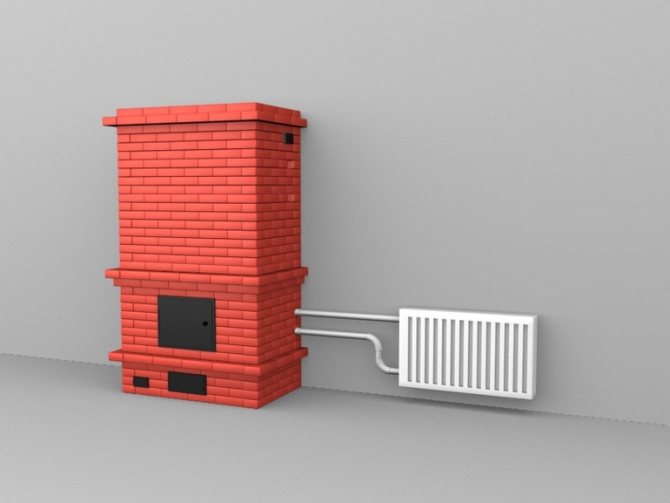
When assembling the sections, you can experiment to improve the design of the resulting boiler. The result should be something similar to the image shown below. So it shows examples of the location of the boiler and how to connect it. Again, do not forget that in the case of cast iron, the boiler should be placed in the chimney.

Installing a boiler for a brick oven
https://youtu.be/f2kPfaiW3A4
Simple rules for an efficient heat exchanger

The principle of operation of stove heating.
If the house has a ready-made brick oven, then organizing water heating with your own hands is a rather simple task. To do this, it is enough to place a home-made boiler in the form of a coil or any other shape in the firebox. The main thing to consider when doing this:
- Height difference between the liquid outlet from the heat exchanger and the inlet to it;
- It is necessary to provide the maximum possible surface area;
- The heat exchanger must not interfere with the loading and combustion of fuel.
If a do-it-yourself oven is being built, then a boiler for a brick oven can be made as efficient as possible. To do this, several important conditions must be met:
- The combustion products must come out of the chimney as cold as possible;
- The large heat transfer of the furnace gases inside the furnace increases its efficiency;
- The heat exchanger is best placed in the chimney and not in the firebox.
Perhaps these rules will seem somewhat strange, because, logically, the heat exchanger should be heated up on an open flame of the furnace. However, it is necessary to take into account other processes taking place in the furnace. From the point of view of physics, flames are burning particles of fuel. And if we take heat from these particles, then they will not burn completely, which will reduce the usefulness of the furnace.

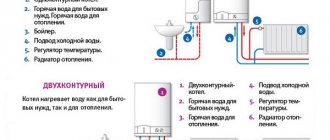
Diagram of connecting the boiler to the heating system.
In addition, for better heating, the coolant must move towards the heat flow. Only in this way is the temperature difference between different parts of the coolant maintained, increasing the heating efficiency and ensuring its better circulation within the system.
Another advantage of this arrangement of the heating tank is that less condensation forms on it, which contributes to the absence of corrosion.


How to place the boiler in the oven correctly?
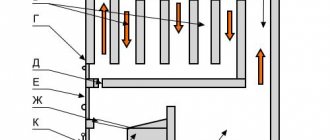
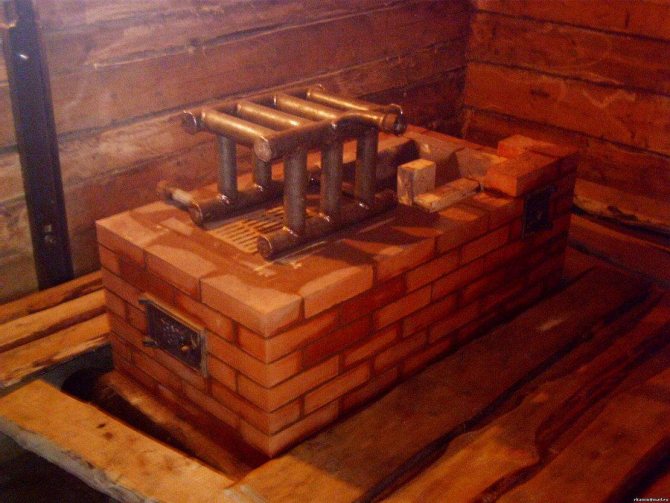
The most effective version of a water boiler is obtained when using pipes or sheet metal with a thickness of 3.5 to 5 mm as a material. In this version, the boiler can be placed directly in the furnace firebox and thus ensure maximum efficiency. The figure above shows a variant of the design of the heating water boiler itself and its schematic location in the firebox. When using pipes, it is better to give preference to seamless ones, but if there are no such at hand, then the existing seam should be additionally welded.
The hot water supply from the boiler to the heating system should be located exclusively at the highest point of the boiler. The location of the return inlet is not regulated, but it is most logical to place it at the bottom to improve water circulation.
When placing any boiler in the furnace, ensure that there is a gap between the outer walls of the boiler and the brickwork of the furnace. This is necessary to compensate for the thermal expansion of the boiler metal.
When welding pipes, it is imperative to cut the chamfer along the pipe shear contour.This allows you to fill the entire thickness of the pipe with a weld seam and securely fasten the parts without fear that they will disperse during operation.
When installing the boiler inside the stove, keep the horizontal level. However, it is possible to deviate somewhat from this rule in order to ensure the maximum height of the feed outlet point from the boiler.


Heat exchanger construction

Installation diagram of the heat exchanger and storage tank.
You can easily build an efficient boiler yourself. If it is made in the form of a tank, then high-quality steel is needed, which tolerates heat loads and corrosion due to the coolant well. In addition, the material of manufacture must have a high thermal conductivity in order to increase the efficiency of the system.
The thickness of the walls of the tank should be within 4-5 mm, which ensures its strength with simultaneous rapid heating. There is no standard size for such a heat exchanger, it all depends on the configuration of the existing or planned furnace. The main thing is that the height of the tank is at least 500 mm for better circulation.
If the heat exchanger is a coil or another pipe loop, then there are also some nuances. Pipes for the manufacture of such structures must be thick-walled and have no seams. If it is difficult to find a seamless pipe, then it is necessary to weld the existing seams in order to prevent possible leakage of the coolant.
The inlet pipe is best located at the top of the structure, and the return pipe is located at any convenient place. Pipes are not butt welded, but with bevels to avoid uncooked areas that will flow in the future. The minimum distance between the knees of the structure is 5-6 cm so that the heating of each knee is maximized. Before placing such a boiler directly into the furnace, it is necessary to fill it with water and check for leaks, which are promptly eliminated.
When placing the boiler directly in the furnace, it is worth adhering to the level, however, slight deviations are allowed.
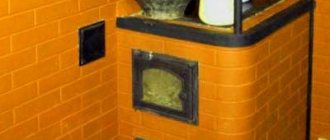
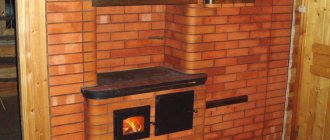
Installing a stove with a built-in boiler
The best option for a bath will be a stove, in which, obviously, even at the construction stage, a specially prepared water boiler is mounted. In this case, the furnace acquires its own specific features in terms of design, which greatly increases the efficiency of the entire system and its compactness.


Installation of such a furnace has the highest heat transfer efficiency.
The subtleties of installing a homemade sauna stove
A number of such tips can be distinguished:
- The approaches to the metal firebox should be covered with thermal insulation and sheet steel.
- It is strictly forbidden to place the stove near wooden walls and ceilings that are prone to fire.
- A homemade stove can be lined with bricks, which will increase operational safety, heat transfer and improve appearance. The wall thickness can be ½ brick.
- Before installing in the bath, the cooked stove must be idle to heat several times so that it takes on its final shape.
- The firebox should open opposite the front door.
- The chimney must be at least 50 cm above the roof. In the place where it goes through the roof, the chimney is plastered and covered with lime.
- In a horizontal firebox, firewood burns out without residue, so such a stove gives off more heat.
- It is advisable to use a thick pipe that is not prone to destruction and corrosion for welding the furnace into a bath.
- Recently, two-chamber furnaces for complete combustion of fuel have been quite often made. They are much more efficient and economical.
- The size of the stove must correspond to the dimensions of the sauna room.
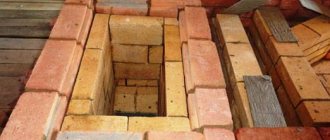
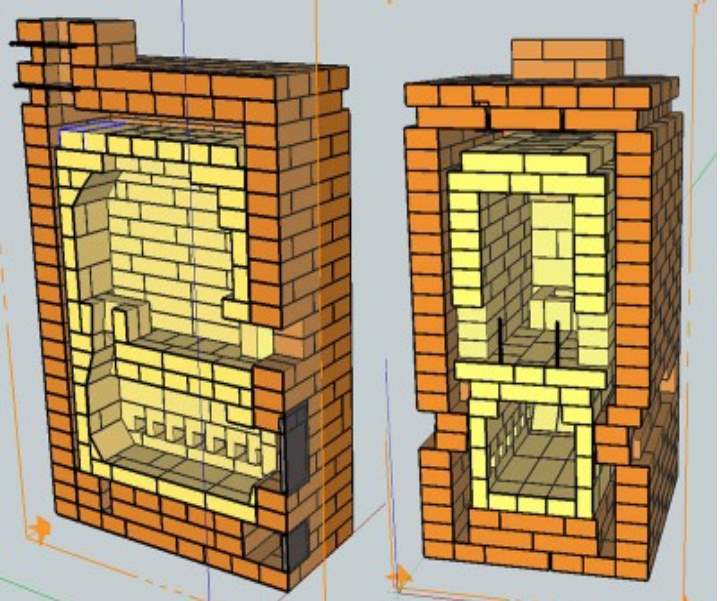
Bricklaying for a furnace with a water boiler
The laying of bricks for a furnace with a water boiler is carried out as follows:
- A concrete foundation with reinforcement is laid.
- For masonry, clay-sand mortar is used. It is best to soak the clay and sand overnight. Lumps of clay and sand are pounded. The next day, both components are mixed in the ratio: 1 portion of clay to two portions of sand.
- A layer of waterproofing in the form of roofing felt is laid on top of the foundation.
- A layer of mortar is distributed evenly and level over the waterproofing, after which you can start laying the first layer of brick.
- The first contour of the blower is formed and the door is installed for it. Further, on top of the laid out several layers of brickwork, a grate is placed separating the firebox and the blower, in which ash will accumulate.
- When forming the firebox, the size of the water boiler is taken into account with the mandatory gaps between its outer walls and the brickwork along the perimeter of the firebox. A rim is formed along the contour of the first row of bricks in the firebox for installing the corner. It is on the corners that the boiler will be fixed. In the side walls of the furnace, openings must be left for the outlet of return and supply pipes.
- The walls of the chimney are removed with the obligatory formation of channels for dissipating excess heat and dumping ash and burning.
- To top it off, the chimney is laid out. Upon completion of all work, you can connect the heating system to the boiler and check it in action.

Layout of bricks for a furnace with a water boiler


Drying the finished oven
It is impossible to proceed directly to the ignition immediately. This threatens with irreversible defects, distortions and boiler leakage. Proceed as follows:
- If the stove is laid out in the summer, then before the onset of the first cold weather, this is the ideal time to dry. All chambers open - ash pan, furnace, chimneys, ventilation and cleaning channels.
- Drying can be carried out at an accelerated but careful pace. For this, chips (not sawdust - they will clog the chimney ducts) are taken in the amount of several pieces or a small armful. It is placed on the grate and set on fire.
In this state, the oven is left for a long period - up to six months. Use a different type of heater on especially cloudy days.
All passages, including the ash pan, must be closed for this time, except for the common chimney. When the mass has burned out, the oven is opened on all sides and ventilated for half a day.
Then again put a portion of wood in the firebox and proceed in the same way. The process is long and regular - at least three weeks. But if everything is done correctly, then in the future the unit will pay off all efforts.
For subsequent operation, the owner needs to remember that garbage is burned in the furnace only when the combustion process is intensive. Otherwise, a strong thrust will pick up the junk and, without letting it burn, will carry it into the gas ducts, thereby reducing the efficiency of heat transfer. Foil materials should not be burned in the furnace - they do not lend themselves well to the process, stick to the sections, thereby creating hot spots - this leads to overheating and deformation of the boiler.
If the laying of the stove was carried out from a not very presentable material, then after checking all the working qualities of the unit, it is faced with clinker tiles, tiles, decorative bricks that can withstand high temperatures - there are a lot of proposals from manufacturers.
Home stoves with water heating, the scheme of which has been verified in advance, will serve their owners faithfully for many years, recouping the costs of their own design already in the first year of operation. It is only important to regularly subject the system to prophylaxis - change the fallen bricks, thoroughly clean the gas ducts and the common chimney, check the boiler surface for defects in the form of cracks. Usually, renovation work is postponed to the summer to enjoy the warmth and crackling of birch logs inside in winter.
Nikolay Kazakov
Author of publications on 1Drevo.ru with topics: Windows in a hip roof | Window shapes | Inset of a window into a log house | Small-size houses | Rounded timber | Domokomplekt | Cottages from cylindrical construction | Heating electric boilers | Polycarbonate canopy | Cordless Drill | Log cottages | Wood or brick | Gazebo for giving | Glued laminated timber cottage | Log cottage | Columnar foundation and others.
Selections of publications by topic:
Hot water heating stoves Stove with boiler
Was this publication helpful to you?
Save your bookmark on social networks!
Total score: 0 Voted: 0
Overview of alternative heating systems for a private house
How to make a solar collector heating system yourself
Recommended! - Encyclopedia of Wooden Houses - NEW
You can find out detailed and expanded information on the topic of the article from the book "Wooden houses", which reflects all the stages of building a house, from laying the foundation and ending with the installation of the roof. Book price = 77 rubles.
You may also be interested in other BOOKS on the construction of wooden houses with your own hands.
We recommend more posts on this topic:
Heating a private house on electricity - questions of economy
How to heat a frame house from vulture panels with electricity
Using diesel fuel for heating a private house
Do-it-yourself water stove heating of a private house
Expansion tank for heating - open and closed
Brick stove with water heating boiler
Boiler laying and installation of a horizontal heat exchanger in it
A do-it-yourself heat exchanger according to any of the options is installed in a brick boiler. The latter is laid according to the same principle as a brick oven.
When calculating, it is worth considering that you need to leave a distance between the inner surface of the firebox and the coil of at least 10 mm.
The dimensions of a solid fuel boiler must be proportional to the volume of the premises that must be heated by it. The values available in the article are given per house with an area of 90-100 sq. m. with 6 cast iron radiators and a wiring of 2 pipes (25-50 mm).
The choice and design of the boiler piping should be based on many factors:
- How many contours are in the system.
- How complex the system is.
- Is there any other equipment available.
The entire boiler must be on a solid reinforced concrete base. The size of the foundation is selected based on the dimensions of the furnace. When laying a solid fuel boiler, the heat exchanger must be positioned in such a way that the outlet pipe is the highest point. The difference in height must be at least 10 mm. This is necessary so that a plug of air does not form in the boiler during filling with water. Also, this slope will improve fluid circulation.
Brickwork is done with their own hands, observing the rules for bandaging the seams. The pipes should be about 2-3 cm lower than the brick wall itself. To prevent a decrease in efficiency, it is necessary to have a removable cast iron plate on top of the boiler for more convenient cleaning. The smoke is discharged into a separate or root pipe. The pipe can be brick or metal.
How to build a water stove at home
- There are three ways to carry out do-it-yourself stove heating with a water circuit:
- buy a steel furnace from a manufacturer whose services include the installation of the system;
- hire a master - a specialist will select the material, make the device, lay out the oven and install the boiler;
- do it yourself.
How to make such an oven yourself
The principle of the boiler for hot water heating
Can you make such a system yourself? Quite, just enough experience in welding and laying bricks during the construction of the furnace. First you need to prepare the boiler (register, coil, heat exchanger).
Such a device can be purchased or made by yourself using sheet metal and pipes.Since the complete process of work on the manufacture and arrangement of the water circuit cannot be summarized in a short overview, the following are basic recommendations.
Manufacturing options and recommendations
Water heating from a wood-burning stove - diagram
For the boiler, a sheet of metal with a thickness of at least 5 mm is used, and its design is made so that there is maximum water heating for further circulation. The boiler, welded from sheet steel, is easy to manufacture and operate - it is easy to clean.
But such a heat exchanger has a smaller heating area, in contrast to a pipe register. It is difficult to make a pipe register at home on your own - you need an accurate calculation and suitable working conditions, usually such boilers are made to order by specialists who themselves install the system on site.
The easiest way to use a solid fuel heat exchanger is a conventional potbelly stove with a built-in water system. Here you can take a thick pipe as a basis, then there will be much less welding work.
Attention! All welding seams must be made double, since the temperature in the firebox is not lower than 1000 degrees. If you boil ordinary seams, then there is a chance that this place will quickly burn out
Draw the register in accordance with the dimensions of the oven at home. The layout of the rooms of the house and the arrangement of furniture must also be considered.
Here it should be noted that it is better to choose a scheme with sheet boilers - they do not have pipe bends connected into one continuous circuit. Such a structure is not so troublesome to build.
It is also convenient because, after installation, you can use the hob without any problems, which cannot be said about some pipe boilers.
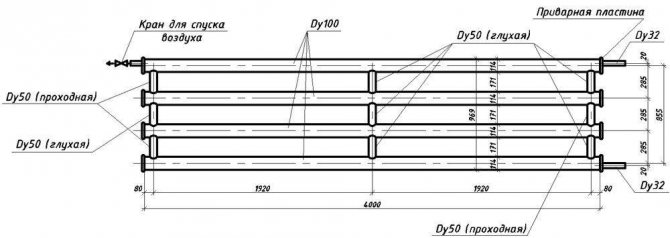
Smooth pipe register - drawing
When the coolant moves by gravity, then you need to raise the expansion tank higher, and use pipes of large diameters. If the pipes are of insufficient size, then you cannot do without a pump, since there will be no good circulation.
Boilers equipped with pumps have their pros and cons: you can save money by installing pipes of a smaller diameter and not raise the system so high, but there is one significant minus - when the electricity is turned off or the circulation pump burns out, the heated boiler can simply explode.
It is better to assemble the structure at home, on the spot, since the device, like individual parts, has a very large weight and dimensions.
Installing the system
Cast iron battery heat exchanger
- Before installation, a solid foundation is poured, on top of which it is better to lay a layer of brick.
- The grate can be laid at different stages: before the boiler, if a double structure, the lower part of which can be equal to or higher than the upper part of the grate, when the stove is low, and the system is placed a little higher, then the grate, doors, corner on the stove are usually placed after the boiler is installed ...
- The body is installed - usually it consists of two containers connected by pipes.
- The entire heat exchange system is welded to the boiler: the outlet pipe goes to the expander, goes in a circle, through the radiators and on the other side from below the return pipe is welded to the boiler.
Stove heating with a water circuit allows, firstly, to use firewood much more efficiently, and secondly, to evenly distribute warm air throughout the heated room.
Having conceived to independently make a heating system at home with a water circuit on wood, think over all the stages of work, and if you have doubts about a successful outcome, then it is better to contact the specialists.
Brick oven with hot water heating circuit
Brick ovens of this type do not involve particularly complex masonry. A stove with a water heating boiler has a fairly simple design: a cast-iron cooking plate, a cooking chamber, an exhaust duct, a hot water box, an oven.
Such a furnace is laid out of refractory bricks using the same refractory mortars.Doors: furnace, blower, cleaning, cooking chamber. Cast iron stove with hob, hot water box, oven, drying grate, grate. Wood stoves with a hot water heating boiler on brickwork have a similar design.
Installation of a brick stove
It is best to start construction work with the manufacture of a drawing of a typical project, where all the exact dimensions of the future heat exchanger will be indicated, and already based on its dimensions, the brickwork of the furnace device will be laid. As for placement, the unit can be installed in any place convenient for the owners, the main thing is the availability of open access so that it can be easily cleaned and, if necessary, repaired.
After the foundation is prepared, the ordering is started, but during the installation it is necessary to take into account the water circuit, the layout of the blower, combustion chamber, chimney, as well as the hob, if it is installed.
In the manufacture of furnace equipment, it is best to use refractory bricks that are free from cracks, chips or any other defects.
The construction of a stove with a water circuit is carried out according to the following instructions:
- At the very beginning, a furnace solution is prepared, which includes river sand, clay and water. It is not forbidden to use purchased formulations, but when stirring, it should be borne in mind that the mixture should not be too liquid or, conversely, thick.
- A layer of waterproofing material is laid on the dried out foundation, it can be a special film or roofing material.
- The prepared solution is evenly applied to the waterproofing and the first row of bricks is laid out. After him, acting strictly according to the prepared drawing, the remaining rows are laid.
- Having reached the level of the combustion chamber, a heat exchanger is installed.
- At the next stage, the ash pan and combustion chamber are mounted.
- Each new row is checked by the building level. If there are any irregularities, they can be easily removed. It is enough to press down on an uneven element with your hand, and then lightly knock on it with a hammer handle or other heavy object.
- Now it is necessary to install and fix the door in the combustion compartment, and after that lay out the stove roof and chimney. Rounded bricks are used to enclose the interior walls.
After the masonry work is completed, proceed to the installation of the water circuit. To do this, it is necessary to bring pipes to the heat exchanger, which are connected to the radiators. Then connect the expansion tank and fill it with water. The heating stove is considered ready. It remains to carry out finishing work, for this you can simply plaster the surface of the unit. Many owners of such devices decorate them with tiles.
Economical equipment that is equipped with a heating circuit can be made by hand. These are safe, practical and durable designs, which, in comparison with other similar devices, have a higher efficiency. Another advantage over other devices is independence from a centralized energy source.
In contact with