Water connection
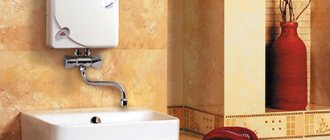
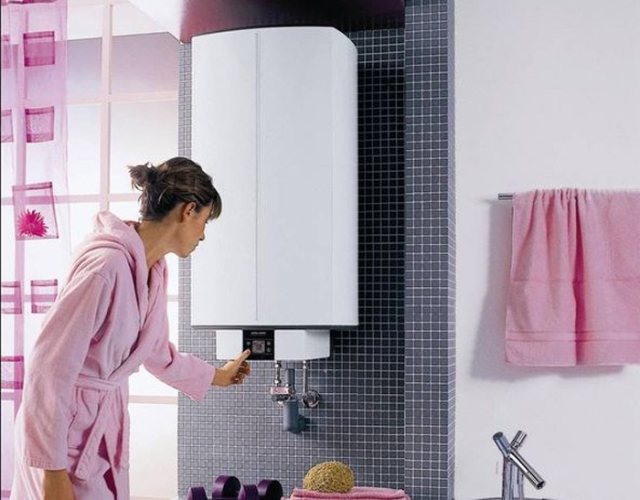
Installation of an instantaneous water heater.
We clamp a metal-plastic pipe into the water distributor and, using the holders, bring it to the inlet pipe of the water heater. The connection of the pipe to the branch pipe is made by means of an adapter, which must be included in the delivery set of the device. We seal the threaded connection with FUM tape.
We connect the tap to the outlet in the same way. It is desirable that the water be drained only along one line, so you will not have to mount various adapters.
Taps and diffusers with narrow openings are installed with a water heater. Conventional devices can also be connected, but in this case, the water will quickly pass through the water heater, so it will not be able to warm up enough. It will take a long time to deal with the adjustments, but it will be very difficult to achieve the desired water temperature. If a special diffuser is not included in the delivery of the water heater, then when purchasing it, you must consult with the seller about the selection of the appropriate parts for the most reliable package.
Stage three. Connecting the device to the electrical network
How to connect an indirect heating boiler with your own hands
Let's make a reservation right away that boilers need a standard 220 volt power supply, as well as a special grounding. For this reason, it is preferable to connect them to an already available outlet installed for the washing machine using a plug (of course, this is only possible if the outlet was run through an individual line and all requirements were met).

In the absence of such an outlet in the room, we advise you to contact an experienced electrician so that they can lay the electrical wiring efficiently. And there are a number of reasons for this.
- Certain knowledge and skills are required to work with electricity. After all, if you do not observe certain points during installation, this can lead not only to equipment failure, but also to electric shock.
- Also, you will not have any problems with the choice of machines and those or other wires for installation.
- Finally, in which case you will have someone to blame if the work was performed poorly. Of course, if a contract was previously signed with a reliable company.

It is also possible that this will force you to check the wiring throughout the house. It was a water heater connection diagram.
Basic rules for using a water heater
The boiler is a greatly enlarged copy of an electric kettle, which is found in almost every kitchen. The only difference is in the presence of an adjustable thermostat and branch pipes for connection to the water supply system. Let's get acquainted with the way of using the most common water heaters.
Thermex
Let's figure out how to use the Termeks water heater. Whereas other manufacturers have boilers only part of the range, Thermex has focused all its attention on them. The models offered by her differ in the execution of the control panel, on which the price depends.
Water heater Thermex Praktik
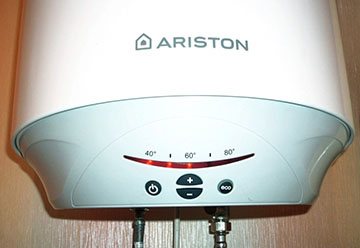
In the cheapest boilers, the temperature is set by turning the thermostat knob. In more expensive devices, the control panel is equipped with 3 buttons, by pressing which the heating mode (power) is set: economical, moderate and fast.
In premium water heaters, the settings can be set from the remote control, while the operating mode parameters are displayed on a digital display.
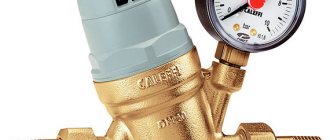
The maximum allowable pressure in the water supply network for Thermex water heaters is 6 atm. It is imperative to install a mesh filter with a mesh diameter of no more than 200 microns.
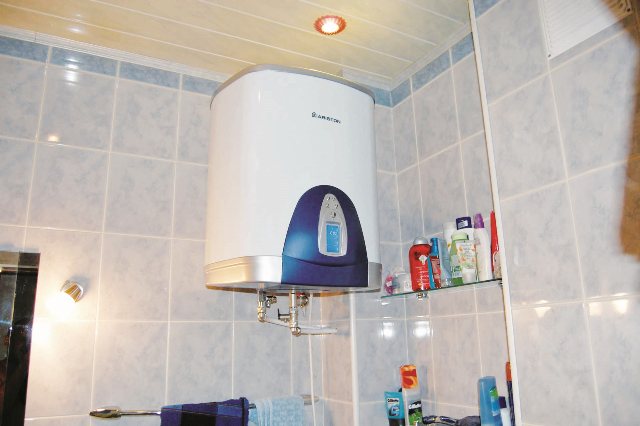
Ariston
How to use the Ariston water heater? Water heaters of this company have been recognized by users due to a number of advantages.
One of them is antibacterial protection, which allows increasing the quality of water in parallel with heating.
Protection against switching on without water turned out to be very appropriate - it saved more than one device from premature breakdown. The inside of the tank is covered with a special material that prevents the formation of plaque.
Boilers with a volume of 50, 80 and 100 liters are produced under the Ariston brand. Depending on the cost of the device, control can be mechanical (the thermostat is equipped with a rotating handle) or electronic (keys and touch buttons). All models are equipped with a drain valve to remove sediment accumulated inside the tank.
If the boiler is operating in standard mode, then, as a rule, it does not need to be emptied. But what if the water heater has not worked for a long time and the water in it has stagnated? Whether it is necessary to drain the water from the water heater, you will find out in the article.
How to make a solar water heater with your own hands, see this link.
A flow-through boiler requires a powerful electrical system. If your power grid is not powerful enough, then it is better to stay with the storage option. In this article https://microklimat.pro/otopitelnoe-oborudovanie/vodonagrevateli/kak-vybrat-nakopitelnyj-dlya-kvartiry.html you will learn how to choose a storage water heater for an apartment: selection criteria and the cost of the device.
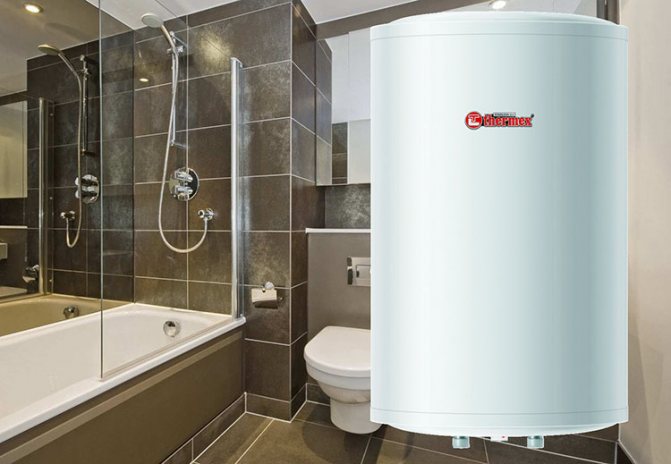
Bathroom zoning as a method for determining the location of the boiler
Diagram of connecting the water heater to the water supply in the apartment
Like any technique, water heaters in the bathroom can be located in certain areas. From the point of view of security, four zones are distinguished, in each of which it is possible to install household appliances with a certain degree of protection.
Based on the IP (International Protection) classification, all models of household appliances have a degree of protection against water exposure in the range from 0 to 8:
Bathroom zoning drawing.
- 7-8 - from immersion in water at a certain depth and for a certain time,
- 5-6 - from directed jets of water,
- 2-4 - from splashes at different angles,
- 1 - protection against drops falling vertically,
- 0 - no protection.
If electrical appliances are to be installed in zones 1 or 2, they must be appropriately protected, i.e. splash-proof. The degree of protection is indicated in the technical documentation and looks like this "IPX4", where X can be replaced by a single number. Any number greater than 4 is also acceptable, since it indicates a sufficiently high level of protection.
Scheme 1
| Zone 0 | Within the shower tray or the bath itself | IPX7 degree. Possibility of installing electrical appliances with voltage up to 12 V, with the location of the transformer outside the zone. |
| Zone 1 | Volume that is limited by a vertical surface within a shower tray or bath | IPX5 degree. Installation of water heaters only with degree of protection 5. |
| Zone 2 | The volume, limited by zone 1, at a distance of 0.6 m from it | IPX4 degree. These are lamps, water heaters, sockets with a degree of protection of at least 4. |
| Zone 3 | The volume is limited to zone 2, at a distance of 2.4 m from it | IPX1 degree. Sockets are allowed to be connected to the network using isolation transformers or RCDs with a tripping current up to a mark of 30 mA. |
The space under the bathtub is referred to as zone I if access is possible without the use of tools, i.e. the bathtub is not covered by a decorative panel, or this panel is installed using magnets or similar devices that do not require the use of a tool to dismantle the panel. But if the panel is fixed with screws and removed with a screwdriver, then the enclosed space does not belong to any zones.
What must be foreseen
- Provide easy access to the water heater
- The wall on which the water heater is supposed to be mounted must be strong and withstand double load
- Be sure to check the condition of the electrical wiring that can withstand the power of the water heater
- Check the condition of all pipes and risers, remove the points for connecting the water heater
Connecting an instantaneous water heater to the water supply diagram
The boiler is available, the conditions for the installation of the water heater are met, the place has been determined, we undertake the installation.

When installing a storage boiler in a bathroom or kitchen, the entire assembly and hanging system is divided into three phases:
- We fix the desired water heater on the load-bearing wall
- We supply water supply: cold and hot
- We connect the water heater to the network
Using a tape measure and a level, we outline the place of the proposed recesses for bolts or hooks on which it is planned to mount our boiler. We drill recesses of a certain size with an electric hammer drill.

We install anchor bolts into the prepared opening and, using an adjustable wrench, using force, we clamp all anchors. Unscrew the nuts from the bolts and install the tank. We tighten the nuts and tighten them tightly.
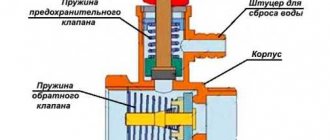
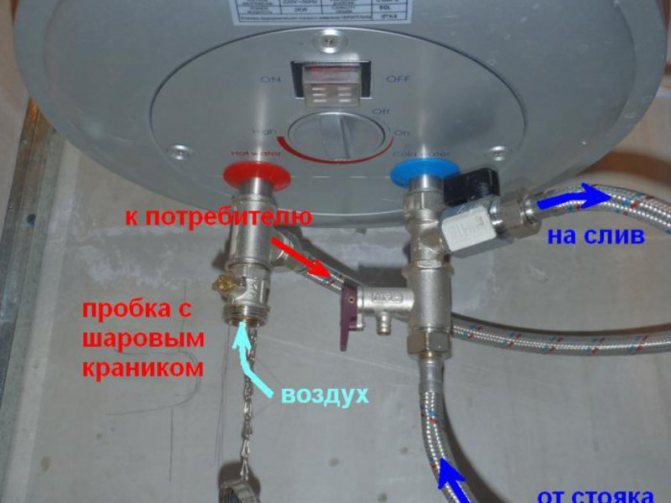
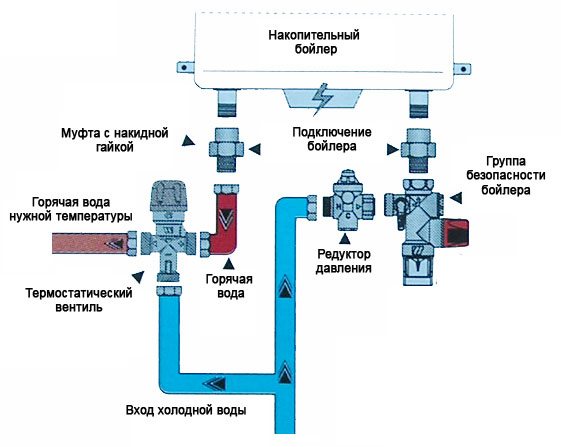
Entrance with cold water, marked with a blue marker, with hot water - red. Connecting cold water, we wind tow greased with unilak onto the fitting from the water heater, after which a tee is screwed on. A faucet is attached to the desired tee on the side in case of emergency drainage of water. In the lower section of the tee, a relief valve is also built in, as a safety valve against the possibility of overheating or excessive pressure. Install it with an up arrow. The shut-off valve is installed at the very end of the water heater. Next, we install the threaded adapter and connect it to the water supply.

When connecting hot water, we install only a shut-off valve, through a threaded adapter we connect it to the hot water supply of our apartment. Since a water heater consumes a large amount of energy, its connection must be approached with all seriousness. Be sure to use a cable with a cross section of 2.5 squares. We install a circuit breaker. We connect the heater branch to the electrical panel.
Modern water heaters are produced with a ready-made connected wire with an electric plug, but its connection must go to a specially prepared outlet.
The water heater is installed. We fill it with water, heat it up and start using it, from time to time carrying out its maintenance.
Reviews of ARISTON water heaters with a volume of 80 liters
For those buyers who decided and purchased an ariston water heater, the reviews remain purely positive. Below are some of them.
“Advantages: excellent“ worker ”. Disadvantages: not found.
Since we have a private house, but there is no gas, it was decided to purchase a boiler. Tired of constantly heating water on the stove to buy up and even just wash the dishes. We asked friends who already have experience with such units. Those, in turn, advised the ariston water heater. After reading more reviews, we opted for such a brand as ARISTON.

We bought a model with a volume of 80 liters. This is enough for the family to use. I really liked the presence of a sensor, with which you can always find out the level of the water temperature, so as not to "get into a hole")). This heater has served us for many years, it was even sad to leave (they took it off, since they had gas installed and a double-circuit boiler was connected). But during the service, this heater proved to be just excellent: it quickly "delivered" hot water and kept its temperature for a long time, consumed little energy. In general, the model is excellent !!! "
“Advantages: compactness, quick water heating, low electricity consumption, equipped with additional protection. Disadvantages: no.
Excellent water heater.We had to get to know him when a systematic shutdown of hot water began in the houses for an indefinite period. In order not to sit and wait for a "miracle", it was decided to buy a water heater. We bought a heater on the advice of the seller
Ariston SG-80, which did not have a high price. And outwardly we liked him. The place for the boiler was determined in the toilet, where it did not create any inconvenience to anyone. During use, we made sure that we took an excellent assistant: it quickly heats water (80 liters in 4 hours), consumes little - 1.5 kW, heats the water to an acceptable temperature - 75o, there is a safety valve and a magnesium anode. We were completely satisfied with the choice! "
“Advantages: simplicity, reliability, ease of use. Disadvantages: I did not reveal any special ones.
A water heater of the Ariston SG-80 brand came to our house back in 2013, we bought it at a discount and did not regret it. The husband did the installation himself, it turned out to be not so difficult. The heater serves the bathroom and sink. There is enough water with a head, despite the fact that we set the heating level to 50 °, it allows you to save a little. It takes an average of 2 hours to heat 80 liters at this temperature. I was very pleased with the quiet operation of this device. We were satisfied with the purchase. "
“Advantages: heating up to 75o, low energy consumption. Disadvantages: little essential, but the lid is ill-conceived.
Our small town is not connected to hot water supply. While we lived together, we got along. But after the appearance of the baby, we decided to buy a boiler. We chose models with a volume of 80 liters available by our means. We stopped at the Ariston SG 80 model, which suited us in all respects: energy consumption of 1.5 kW, volume, heating temperature, which reaches 75o and, of course, the price.
Having established, they themselves felt the merits. Everything worked with a bang. Created a little inconvenience when switching temperatures, when it was necessary to switch the lever under the lid. It was not quite convenient to crawl with a screwdriver to the right place. But this is not so important, because we had to change the temperature indicators only once. Overall, the model is excellent. I recommend to all!"
We advise How to choose a faucet for bathroom and kitchen: features, functions and manufacturers. Best mixers
Boiler connection

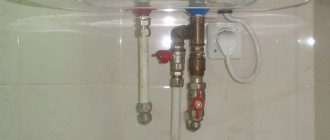
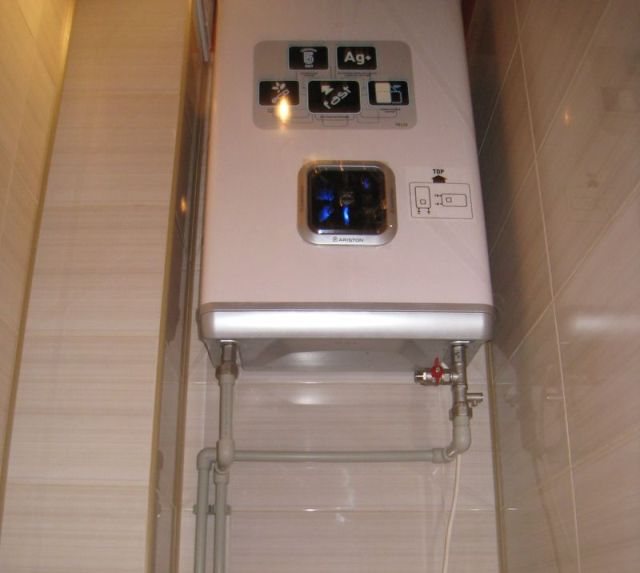
Installers advise that polypropylene pipes can be used instead of flexible hoses, but it will cost a little more and take more time. There are two pipes at the bottom of the boiler, one of which has a blue plastic ring. Accordingly, cold water is supplied through it. The second tube is marked in red and is intended to leave hot water from it.
According to the installer, a safety valve should be installed in the place where the cold water is supplied. Which is supplied with the boiler or purchased separately. The first step is to connect the safety valve. Do not forget to wind plumbing tape or sealing tape on the thread in advance.
Masters recommend at the next stage to screw one end of the flexible hose onto the safety valve. In this case, it is necessary to abandon the use of tape, since there is already a rubber gasket in the hose nut, which acts as a sealant. Well, the question of how to install a boiler in an apartment with your own hands is practically resolved. The next step is to screw one end of the flexible hose to the pipe from which the hot coolant flows. In this case, a sealing tape is also not required.
Now you need to start connecting the free ends of the hoses. So the end to which cold water will flow is connected to the water pipe. At this point, pre-install a valve or tap, which, if necessary, will allow you to shut off the water supply.Do not neglect this recommendation, as the boiler may fail during operation or require replacement of some spare parts. The free end of the other hose should be connected to the pipe that goes to the mixer.
Expert advice
In principle, it is not difficult to install a boiler with your own hands. But there are a lot of nuances during installation. And in particular, before connecting the boiler, it is necessary to remove the tees on the water pipes. Now you can do the electrical part. If we are talking about Thermex brand water heaters, then they have one feature, which is the presence of a cable for connection together with a plug in the kit. Moreover, this element is connected to the boiler. If this is not the case, then consumables will have to be purchased separately. And yet, so that everything goes smoothly and without a hitch, the masters strongly recommend observing safety precautions when working with electricity.
What else needs to be considered when carrying out work If you are faced with the question of how to install the boiler correctly, then you should know that the lid will not have to be opened if everything is already connected to the equipment. It is enough to install a grounded outlet in advance, which should be located near the equipment. A cold water tap should be turned on to check how tight and secure the connection is. If there are no leaks, the boiler plug can be connected to the socket. Now you know how to install a boiler yourself. If you did everything correctly, the indicator on the case should light up. After that, you can set a certain temperature using the regulator, which is usually located at the bottom. How to install a boiler in a bathroom
And in conclusion I want to say:
What is IMPORTANT to remember the main mistakes that are made when connecting the boiler with your own hands. In particular, before installing the boiler in the bathroom, the masters recommend taking care of the presence of a hot water supply system with circulation
This will minimize energy losses if there is constant hot water in the pipes.
How to properly operate an instantaneous water heater
It is convenient and simple to use an instantaneous water heater - just turn the tap in the kitchen or bathroom and the flow of warm water will never end. However, it should be understood that devices of this type have high power and are designed for high currents. That is why safety rules should be in the first place during the operation of the "protochnik".
Starting the instantaneous water heater
Even when installing an instantaneous water heater, it is necessary to take into account the proximity of the water intake points and the installation of additional equipment for water treatment with excessive water hardness. During operation, do not allow liquid to get on the boiler body.
You should use a flow-through water heater according to the following algorithm:
- Close the tap of the "hot" riser (only for appliances embedded in the hot water pipeline);
- Check the water pressure in the line. If the pressure is insufficient, the device may not turn on;
- At normal water supply pressure, adjust the flow rate to obtain a comfortable water temperature. It may be necessary to change the degree of heating by additional adjustment on the control panel (depending on the boiler model);
- To stop the water supply, turn off the device with the button on its body, and after a few seconds close the supply valve. This shutdown order will prevent the heater from overheating and will greatly increase its service life.
The boiler heating element should be periodically descaled. This process is necessarily described in the instruction manual for a specific model of a water heater.
Separate operational requirements
Most models of instantaneous water heaters are equipped with a shower head, of a special design, therefore, in the process of work, it is the complete product that should be used. This will help you get the water temperature you want with good pressure and will also reduce your electricity and water bills.
If the temperature in the room in which the "protochnik" is installed drops to zero degrees and below (for example, in summer cottages), then its operation is prohibited. At this time, it is better to disconnect the device from the water supply and drain the remaining liquid from it.
During operation, limescale may appear in the openings of complete hot water dispensers. This leads to a decrease in the head and an increase in the pressure inside the heating flask. Periodic cleaning of parts will help to avoid the consequences of the formation of calcium stone. A soft brush and special household detergents will help to do this correctly.
Correct operation of the water heater will not only greatly increase its service life, but also make the process of using the device safe. In addition, you will always be sure that your device will not let you down at the most crucial moment, pouring boiling water over you or forcing you to take an ice shower.
Features of connecting a flow-through boiler
The flow-through design of an electric boiler, as in the photo, is installed directly into the branch of the water supply system provided for supplying hot water.
- The water supply in the central pipeline is shut off.
- At the point of insertion of the heating device, the pipe is cut, forming a gap.
- At the ends of the gaps, shut-off valves are attached, which in the future will allow for repairs without blocking the central water supply.
- Hoses are wound on the inlet and outlet nozzles of the flow-through water heating system, connecting the boiler with shut-off valves.
When independently carrying out work on dismantling the heating equipment, instead of the central water supply, the tap installed at the inlet pipe is shut off and only after that at the outlet. Also, in the process of using a flow-through water heating device, first of all, water is turned on and only after that the heating device. If there is no need for hot water, then turn off the power supply, and then the water.
It is not so difficult to figure out how to properly connect the boiler, the main thing is to have a desire. But for greater confidence, you can practice on pipe scraps so as not to spoil the main elements of the system. This will allow you to gain experience and avoid stupid and unnecessary mistakes.
Examples of connecting the boiler to the water supply


Water heater operating rules
It is not difficult to extend the life of an ariston brand storage heater, you just need to install it according to the instructions and steadily follow the rules for using the device:
- The presence of water in the boiler should be monitored every time the device is turned on and off. Switching on is possible only when the tank is filled with water.
- If the power cord is damaged, it must be replaced with material of the same brand, which is better purchased at a specialized outlet.
- If the heater will not be used for a long period, especially in the cold season, then the water from the boiler must be drained, following all the rules prescribed in the instructions. After that, the cold water supply tap is closed. After carrying out these actions, the heater is disconnected from the electricity supply.
- The heater needs to be cleaned from dirt over time. To carry out this work, it is better to use the services of specialists.
We advise Water pressure in the water supply system: required indicators for domestic needs
Technical features of connecting the boiler
If the diagram of the correct connection of the boiler to the water supply system has been drawn up, it is time to start its execution. In this case, much depends on which pipes were used to create the water supply system.
Steel pipes can often be found in old houses, although they are often replaced with more fashionable polypropylene or metal-plastic. When installing the boiler, you should take into account the peculiarities of working with pipes of various types.
There are no special requirements for the material of structures connecting the boiler and the water supply system. They can be connected even with a sufficiently strong hose of a suitable diameter and length.
Regardless of the type of pipes, before starting any work on connecting equipment to the water supply system, be sure to turn off the water supply in the risers.
How to connect a heater to steel pipes
For this, it is not necessary to use a welding machine, since the connection can be made using special tees, the so-called "vampires".
The design of such a tee resembles a conventional clamping clamp, on the sides of which there are nozzles. Their ends are already threaded.
To install the vampire tee, first place it in a suitable location and tighten with screws.
Between the metal part of the tee and the pipe, put the gasket that comes with the device
It is important that the gaps in the gasket and the tee for mounting the hole match exactly.
Then, using a metal drill, you need to make a hole in the pipe through a special gap in the pipe and rubber gasket. After that, a pipe or a hose is screwed onto the opening of the branch pipe, with the help of which water will be supplied to the heater.

To connect a storage water heater to a steel water supply system, use a metal coupling with special nozzles equipped with threads, onto which a shut-off valve, hose or pipe section can be screwed
The most important point when connecting a water heater is the sealing of all connections. To seal the threads, FUM tape, linen thread or other similar sealant is used. There should be enough such material, but not too much.
It is believed that if the seal protrudes slightly from under the threads, this will provide a sufficiently tight connection.
Working with polypropylene pipes
If the boiler is supposed to be connected to a polypropylene water supply system, you should immediately stock up on the stopcocks, tees and couplings intended for them.
In addition, you will need special equipment: a device for cutting such pipes, as well as a device for their soldering.
To connect a boiler to a polypropylene water supply, the following procedure is usually followed:
- Shut off the water in the riser (sometimes you need to contact the housing office for this).
- Use a cutter to cut the polypropylene pipes.
- Solder tees in the branch points.
- Connect the pipes for connecting the boiler to the water supply.
- Install couplings and valves.
- Connect the boiler to the tap with a hose.
If the water pipes are hidden in the wall, you will have to dismantle the finish in order to gain free access to them.
It happens that access to pipes laid in grooves is still significantly limited. In this case, a special split-type repair coupling can be used.
The polypropylene side of such a device is soldered onto a tee, and the threaded part is connected to the water supply. After that, the removable part of the coupling is removed from the structure.

To connect a water supply system made of PVC pipes to a storage water heater, you can use a special adapter, part of which is soldered to the pipe, and a hose can be screwed onto the other part.
Connection to metal-plastic structures
It is not as difficult to work with metal-plastic pipes as with products made of polypropylene. Such pipes are very rarely laid in grooves, but they are connected with very convenient fittings.
To connect the boiler to such a water supply, you can use the following procedure:
- Shut off the water supply to the pipes in the house.
- At the installation site of the branch pipe, make a cut using a special pipe cutter.
- Install the tee in the cut.
- Attach a piece of new metal-plastic pipe or hose to the branches of the tee, depending on the situation.
After that, all connections should be checked for leaks. To do this, water is supplied to the system and it is observed whether a leak appears.
If the tightness of the connection is insufficient, the gap must be repaired or the work must be done again.
Useful tips on how to use the boiler
When the boiler was turned on for the first time, it must be given time to warm up the water to the maximum temperature. Open the tap on the mixer and check for leaks. If they are absent, then you can safely use the water heater.
The instructions for using the boiler regulate the correct operation of the device. It is important to follow all of its instructions.
After turning on the device, it is necessary to set the required temperature. Usually these parameters are defined by three modes: 35, 55 and 75 degrees. In some models, you can set the temperature to 10 degrees. This mode is called "anti-freeze".

Tips for using the boiler:
- It is not necessary to connect the water heater when there is no water in the tank. This will cause the heating element to break down. The safety valve is equipped with a check valve, which must be checked once a year.
- Setting the temperature depends on the wishes of the owner, but once every 2 weeks it is necessary to turn on the maximum temperature for a couple of hours. This will prevent the multiplication of pathogenic microflora.
- Cold water should be filtered with a strainer. Depending on the characteristics of the water, additional purification plants are installed.
Instantaneous boilers are also easy to operate. Turning on the device begins by unscrewing the hot water tap. The temperature is regulated by pressure.
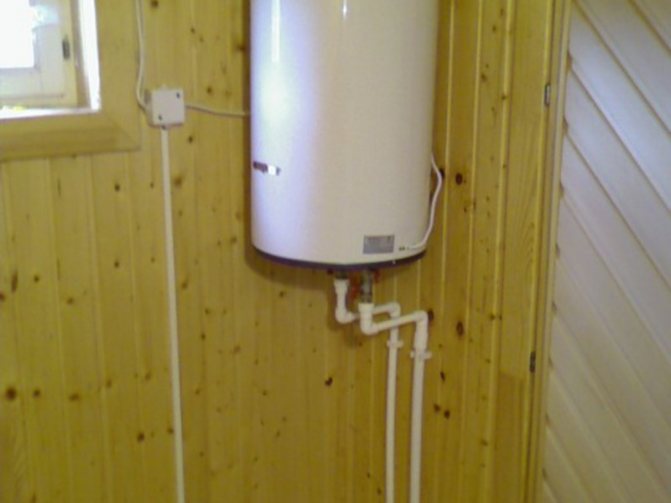
Electricity connection
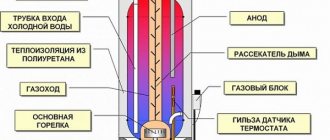
Diagram of an electric water heater device.
Many people mistakenly believe that it is easy to connect a storage water heater in the house - just have an outlet nearby. In fact, this is far from the case. For the storage boiler, it is recommended to run a separate cable that can withstand the power of the equipment.
A separate machine gun is placed on the dashboard. It is mandatory to use grounding, otherwise the storage equipment will have to be changed or repaired frequently.
Lack of grounding can be life threatening. If insulation breakdown occurs, stray currents and eddy currents can cause injury and even death.
An RCD is mounted on the panel, a special device for protecting the tank from short circuits and other problems that may arise during the operation of electrical equipment. If you are not confident in your own abilities to connect the boiler to the mains, then it is best to invite a professional electrician for this.
How to use a flow heater
It is important to understand not only the procedure for connecting an instantaneous water heater, but also in the peculiarities of its use. ... The main rule: an instantaneous water heater can be turned on only after the heater coil is completely filled with water.
The main rule: an instantaneous water heater can be turned on only after the heater coil is completely filled with water.
If the coil of the heater is covered with insufficient liquid, it will break and it will become impossible to use the device.

How to use a flow heater

Wiring diagram for a water heater in an apartment
Regardless of the option you choose to connect a flow heater, the use of such a device is carried out in the following order:
- the valve opens;
- cold water is transferred to the heater;
- after a while, cold liquid begins to come out of the heater watering can;
- you turn on the water heater;
- after 30-60 seconds, already heated water comes out of the watering can.
How to use a flow heater
Turning off the device is performed in a similar manner - you turn off the heater, wait until cold liquid begins to flow from the shower head, and only then turn off the water supply.
How to properly use an already operating water heater?
Example 3 of connecting an electric water heater.
You should be aware that the boiler must not be disconnected from the electric current during operation. If hot water is temporarily not needed, then the device can be turned off from the outlet. This will save you energy.
However, many experts argue that if the boiler is constantly filled with heated water, then it does not undergo destruction (corrosion). In addition, it is much easier for the device to set the required temperature than to start heating from zero. In order to prevent a fire hazard, be sure to ensure that the appliance is grounded.
Flow-through boilers have no restrictions on the amount of heated water. Usually they are used at a time only in one place (where they wash the dishes or take a bath). If you fully open the tap, the water in the water heater will not have time to heat up. In order to reduce heat loss, the boiler should be installed as close as possible to the place where hot water is used.
Related article: Cucumbers on the balcony: cultivation techniques
If hard water is supplied to the house, then it is necessary to install a water purification device, because otherwise the water heater will fail very quickly. If the device is installed in a sauna or bath, then you need to ensure that no drops of liquid fall on it. It is impossible to use a flow-through electric boiler in those houses where the air temperature often drops to zero.
Types of autonomous water heating boilers
Today in the construction market and in supermarkets of household appliances there is a wide selection of boilers - autonomous devices for heating water. At the same time, in order not to be mistaken with the choice of the best suitable device for a particular house, you need to understand the types of systems of this kind. In this case, the main parameter for distinguishing between boilers is their type.
- The design of the boiler can be accumulative - a metal tank with water heating elements as in the photo. Such equipment contains a fairly large amount of water, which heats up in it. Subsequently, this water is consumed as needed. At the same time, heating water requires a certain amount of time.
- Autonomous flow-through water heating design of the boiler, in which water is heated directly in the pipes. The convenience of such a system is the instantaneous availability of hot water when the tap is opened.
Also, the design of the boiler may differ in terms of heat carriers.
- The electric boiler is equipped with special heating elements that operate on an alternating current network.
- Gas boilers use the heat of a flame to heat water as in the photo.
I would like to note that you cannot do without the help of certified specialists to connect gas equipment to the trunk network, since independent experiments are prohibited by law. At the same time, for the commissioning of a gas boiler, special permits of the organization providing the gas supply to the consumer will be required.
If we talk about an electric boiler, then connecting it, perhaps, with your own hands. The principle of operation of such a system is very similar to the operation of a standard electric kettle, so its installation does not cause any difficulties. The most common models of boilers with electric water heating include storage devices, the connection procedure for which will be discussed in more detail.
How to connect?
Usually, the installation and connection of 50 liter Ariston boilers does not cause great difficulties. An instruction manual is attached to each device. Therefore, installing a boiler is a simple matter and doable with your own hands.

Installation of a mounted boiler is carried out as follows:
- it is necessary to carry out measurements on the wall, including determining the height of the unit;
- then a punch should make a couple of holes, which should be about 10 cm in depth;
- for fastening the boiler, strong anchors are used that can withstand the large weight of the structure;
- then the boiler is simply hung on the anchor with a special fastening strip, which is located behind the body.

One of the main points when installing a boiler is to correctly connect and carry out the first start-up of the device, using such rules as:
- first you need to open the valve to supply cold water to the boiler;
- then open the mixer from which hot water should flow; most likely, at the first start, it will produce loud and intermittent sounds, but do not be afraid - this is normal for the first start;
- then you need to wait a little while the boiler sets up cold water to heat it;
- after filling the boiler and heating the liquid, the water from the tap must flow steadily; it is advisable not to set a high temperature regime at once;
- after the first start-up, the water temperature can be easily adjusted using simple commands on the water heater.

Preparation before connecting the device
At the preparatory stage of installing an electric water heating system, a number of simple manipulations need to be carried out.
- Choose the right place for installing the boiler. It is advisable that after the installation of the structure, all the connecting elements have direct access, which will simplify the work in the event of repairs or during routine maintenance of the equipment.
- The wall on which the installation of the electric boiler will be carried out must have a sufficient margin of safety to withstand the total weight of the tank filled with water. The total weight of standard domestic boilers can be 100 or more kilograms.
- It is important that the boiler is located in the immediate vicinity of the cold water supply pipes. If this, for some reason, is impossible, then you will have to lay additional pipes for the water supply.
Electric boilers for heating water are equipped with heating elements - electric heating elements with a sufficiently large power up to 2 kW. Therefore, for safety reasons, the device must be connected directly to the electrical panel using a powerful cable of the appropriate section. However, experts recommend using a copper cable.
To install an autonomous electric water heater with your own hands, the following tool and consumables must be present in the homeowner's arsenal:
- standard construction tape and water level;
- a drill with a hammer function and a set of drills of different diameters;
- a set of wrenches for tightening the connecting nodes;
- tees-fittings designed for tapping into the pipeline;
- shut-off valves, which are installed on the inlet parts of the pipes supplying water to the boiler;
- sealing tape, tow or special paste for sealing the joints;
- connecting hoses for water drainage and intake;
- if the cold piping is located at a distance from the boiler, additional pipes of the required length may be required.
When choosing pipes, it is important to take into account that not all of them are able to withstand exposure to hot water. Therefore, when buying them, it is important to familiarize yourself with their main characteristics.
What you need to know about Ariston boilers
The main function of Ariston water heaters is to provide houses, apartments, summer cottages, cottages with hot water for household purposes.In order for an electric water heater to serve for a long time and efficiently, the the following characteristics:
- the inner tank is made of high quality anti-corrosion material - stainless steel, the inner walls of the water heating tank are specially coated to prevent the formation of deposits;
- TEN of high efficiency with reliable insulation;
- internal dividers that do not mix cold water with heated;
- intelligent control system;
- overheating protection using control sensors;
- high-quality thermal insulation allows you to maintain the water temperature for a long time;
- the presence of a professional antibacterial coating;
- ease of use.
It should be noted that the instructions for models of water heaters differing only in the system of different volumes of the same series are almost identical. There are two types of heaters according to the principle of operation: flow (the heat exchanger heats up the temperature instantly as soon as you open the tap) and storage (water is drawn into the tank and then heats up). Storage water heaters, or boilers, have compact tank, designed for different volumes - 30, 50, 80, 100 liters. Boilers are of direct heating (they themselves heat water using gas or electricity) and indirect (such devices are located near a heat exchanger, for example, a boiler).
The device must be installed by a specialist, otherwise your technician will lose the right to warranty service. After installing the electric water heater check the following:
- Are there any water leaks: to do this, disconnect the water heater from the network and turn on the filling with cold water;
- At the same time, we also turn on the hot water tap to see when the boiler is completely full. As soon as warm water flows from the tap, it means that the boiler is completely filled with water. Close the tap and check the boiler itself for dripping from the connections.
- Only after you are convinced that there is no leakage, insert the plug of the water heater into the network and select the desired heating mode.
About installing an electric water heater Ariston according to the instructions
Before installing the water heater, make sure the wiring can handle the added power. It is especially important that the outlet to which you are going to connect the device is grounded and not in contact with water. The power supply to the water heater must go from the shield on a separate cable... When choosing a place to install an electric water heater, take into account its three times its weight together with water and the strength of the walls.
For fastening, hooks of at least 15 mm are required. It is recommended to install a water heater in the immediate vicinity of the mixer, which will also reduce heat loss when supplying water to the point of analysis. The distance from the ceiling is at least 10 cm, the space around the device is within a radius of at least 50 cm for technical work.
In what conditions should the device not be installed
If the water is hard, it is necessary to additionally install a filter, otherwise the water heater will quickly fail. Do not install the device in rooms, the temperature regime of which may have a minus indicator, exclude the influence of factors dangerous for the device - dampness, frost, direct sunlight, dust and insects. Maximum exclude splashing water, steam on the body of the device, that is, it is not recommended to install it directly above the bathtub.
With low water pressure, it is necessary to set the maximum temperature regime, otherwise the device may not turn on at all.
Brand details only
All parts of the water heater must be in good working order during the first installation. This is especially true for the safety valve. If damage is noticeable, the part should be replaced with a similar one. Never use adapters or extension cords, do not replace the water heater plug with another. Separate power line is required to power the boiler.If the power cord is damaged, replace it with a similar one.
When disconnecting the electric heater, use a two-pole switch, the gap between open contacts is 3 mm or more. Also pay attention to the fact that the pipes to which the water heater pipes will be connected have withstood temperatures above 80 degrees Celsius and the maximum working pressure.
Precautionary measures
If you know you will not be using the appliance for a while, simply drain all the water from it. To do this, turn off the power to the device, close the cold water supply valve at the water heater, and open the hot water valve on the mixer. Open the drain valve on the tee. The magnesium anode, which will be used up over time, should be replaced with a similar one. The first start-up of the device should be done strictly according to the instructions.
How to install a boiler tips and video instructions
Installing a water heater with your own hands is quite simple. But this process has several nuances that must be followed.
Preparatory work
After choosing and purchasing a boiler, it is necessary to prepare the place of its installation and fulfill the conditions that are necessary for the safe and correct operation of the water heater.
- The appliance should only be installed on a load-bearing wall that can withstand the weight of a double load.
- It is imperative to check the water pipes and make sure they are in good condition. Otherwise, it is better to replace them with a plastic pipeline.
- The electrical wiring of the apartment must be able to withstand the full load. For a storage boiler with a power of 2000 W, a copper wire with a cross section of 2.5 mm2 is needed.
- Access to the device and control units must be free. This is necessary so that at any time it is possible to do the prevention of nodes or repair them.
After everything has been checked and prepared, you need to stock up on the necessary materials and tools to install the boiler with your own hands:
- perforator;
- a grinder or scissors for cutting pipes;
- tape measure;
- nippers and pliers;
- adjustable, gas and wrenches;
- shut-off valves (two for an instantaneous water heater and one for a storage water heater);
- screwdrivers;
- assembly paste, oiled tow and FUM tape;
- ½ inch tees;
- metal-plastic pipes;
- flexible reinforced hoses.
Now everything is ready - you can start installing the boiler.
We connect cold water and bring out hot
The scheme for connecting the device to the water supply is quite simple.
- The boiler must be connected after the water meter. For example, on the valve on the toilet cistern.
- The tee is cut only after the cold water is shut off to the entire room.
- A standard ½ ”fitting is installed after the valve.
- All threaded connections are packed with FUM tape or linen tow with assembly paste. They are wound strictly clockwise.
- The water heater must have a check valve, which is screwed onto the coupling and installed on the inlet fitting.
- The fitting, which goes to the inlet pipeline, is screwed onto the outlet fitting.
- An adapter is placed on the outlet with hot water.
- After all the fittings are installed by hand, you can install the water heater on the wall and connect pipes for hot and cold water to it.
- Pipes into fittings should be inserted all the way, without applying too much force when tightening the nuts. They can be tightened when a dripping is detected during the pressure test of the water supply system.
- It is best to use reliable ball valves at the inlet and outlet of the tank.
We connect the water heater to the mains with our own hands
- In most cases, a relay and a cord with a plug are included with the boiler. Not far from the tank, a grounded outlet is installed, where the water heater will be connected.
- A circuit breaker can be installed. Bowler terminals are color coded: blue for zero, brown for phase, and yellow for ground.
- All contacts are connected and voltage is applied. If the connection is correct, the indicator on the device will light up.
Now you need to fill the water heater and open the hot water tap to release air from the system. After that, the boiler is connected to electricity, and after about an hour and a half it will be possible to use hot water.
How to turn on the water heater "Termeks": model features
The installation of the "Termeks" water heater is carried out by professionals, and you will have to do it yourself by turning it on. But you need to know exactly how to correctly perform this action so that the device does not fail. The flow-through boiler is switched on according to the usual scheme: air is released, hot water is shut off, the necessary settings are set, and the system is turned on. The main difference between a flow-through boiler and water heating accumulative in time. The first option takes only 5-15 seconds, and the second - 2.5-3 hours.
Stages of turning on the water heater:
- The shut-off valves on the hot gutter are overlapped.
- Air is deflated. First, the tap opens with hot water, and then with cold water. The air is determined by a ragged stream, when the water is intermittent, and the faucet itself can "snort".
- When the water starts to flow calmly, then all the taps are closed. The boiler is connected to the network.
- Before the actual connection, it is necessary to set the required temperature.
The efficiency of the boiler is checked on the panel. Indicators, temperature are checked. If everything is in order, then after 15-20 minutes the temperature will start to rise.
A separate earthed socket is used to connect the boiler. Read about the installation of sockets in the article: https://homeli.ru/remont-i-otdelka/ustanovka-rozetki-v-gipsokarton
But there are times when the connection is quite problematic and the water heater does not turn on. In this case, power networks, sockets and other elements are first checked. Also, the reason may be a broken cable, which is checked with a tester.
Types of storage water heaters
One of the most important criteria for choosing a device is its type according to the method of connection. There are two types of such devices.
Type # 1: Pressure storage equipment
Used in systems where the water pressure is constant
In this case, the type of water supply does not matter, it is important that the pressure is maintained in the line. Pressure devices have many advantages:
- Constant availability of hot water, since the tank of the device is never empty. As the heated water is consumed, cold water is poured into its place under pressure.
- Good water pressure. It is determined by the maximum pressure in the pipeline and is usually quite high, especially in comparison with the free-flow analogue.
- Easy to connect to the mains. Considering that the device has a power of 3-4 kW, there are no problems with the electrical network.
The equipment also has disadvantages. The most significant is the rapid decrease in the temperature in the tank when a large amount of cold water flows in.
Low power does not allow the heating element to quickly heat up the water, so you have to wait for the device to cope with its task. This drawback is especially noticeable in small-volume devices.
For example, a 50-liter tank when using a shower with a flow rate of 3-5 liters of water per minute after 15 minutes. will be filled with cold water. To continue water procedures, you will have to wait a while.
This disadvantage is leveled by the correct choice of the volume of the device.
The device of ARISTON water heaters for 80 liters
The external simplicity of any water heater carries with it the same simple internal structure. The difference can be observed only in the external design and materials from which the heater is made.The outer structure of the body can be made in a cylindrical or flat form.

Any water heater has:
- Inner tank - a boiler that receives cold water. It is framed by an outer casing.
- The water that has entered the tank is heated by the built-in Heating element... For faster heating of water, two heating elements may be present in the boiler.
- Thermal insulation layer, which is present between the body and the boiler, acts as a thermos, which allows you to keep the water temperature longer.
- Water enters the tank through shortened branch pipe with splitter... The heated water is supplied by a discharge pipe.
- Magnesium anodebuilt into the ariston 80 water heater prevents the accumulation of mineral salts on the walls of the inner part of the tank. This element is replaced as needed.

- During heating, when the set temperature is reached, it is triggered thermostat, which automatically interrupts the supply circuit.
- If the heating element is turned on, and the water temperature indicators fell below the set ones, then the configured thermal relay.
- Controlling the operation of the water heater allows voltage indicator (indicator light).
- Built-in thermometer makes it possible to monitor changes in temperature indicators.

The ariston 80 storage water heater, which belongs to flat horizontal models, has the same typical internal structure.
We advise Water supply systems of an apartment building: types of networks and schemes. Hot and cold water supply