Features of insulation
First of all, it should be noted that there are two technologies for external insulation of wooden houses:
- hinged (ventilated) facade - the principle of this technology is to install the frame on the walls, which is subsequently sheathed with siding, clapboard or other finishing material. At the same time, the insulation is located in the space between the wall and the finishing material. This technology is the most preferable, since wet works are excluded. In addition, the facade is stronger and more durable;
- wet facade - in this case, the walls of the house are pasted over with insulation, after which they are plastered using a special technology.
Below I will tell you how to properly insulate a house in both cases.
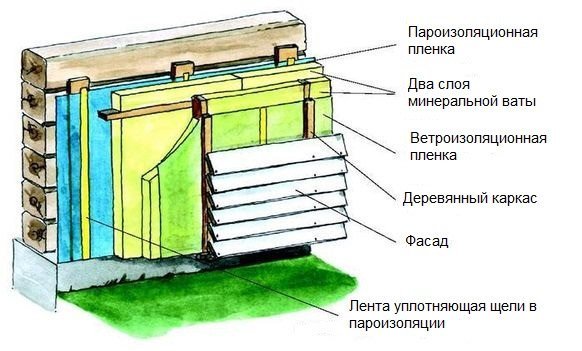
The scheme of the device of the curtain facade
Steam heating: how it works
Many people confuse steam and water heating systems. Indeed, outwardly they are very similar. In both cases, a boiler, pipes and radiators are required. But for a steam system, steam acts as a heat carrier, for a water system, water.
This is the fundamental difference between the two systems. The boiler does not heat, but evaporates the water, the resulting steam moves through the pipes to the radiators.
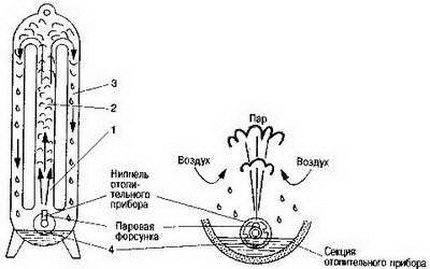
The principle of operation of the steam heating system is very simple: the steam obtained in the steam generator is used as a heat carrier.
Cooling and condensation of steam occurs inside them. In the process of condensation, a kilogram of steam releases more than 2000 kJ of heat, while water cooling at 50C will give only 120 kJ. It is clear that the heat transfer of steam is several times higher, which explains the high efficiency of this type of heating. Condensation formed inside the radiators flows down to the lower part of the parts and moves by gravity towards the boiler.
According to the method of returning the coolant that has turned into condensate, all types of steam heating systems are divided into two types:
- Closed. In this case, there are no breaks in the circuit, and the condensate flows through pipes laid at a certain angle directly into the boiler for subsequent heating.
- Opened. The system is distinguished by the presence of a storage tank where condensate from the radiators enters. From this tank, it is pumped back into the boiler using a pump.
According to the methods of assembly and distribution of pipes, steam heating circuits are divided into types that are absolutely similar to water systems.
Steam heating circuits are constructed according to the principle of water systems. The steam rises along the riser, moves along the highways to the heating devices. Only instead of the return flow, condensate is collected, formed during the transfer of thermal energy of steam to the consumer ()
According to the parameters of the absolute pressure, steam heating systems are divided into high pressure types with an excess of {amp} gt; 0.07 MPa; low pressure with excess pressure in the range 0.005–0.07 MPa; vacuum with absolute pressure {amp} lt; 0.1 MPa. If there are sections or devices in the low pressure circuits that are connected to the atmosphere, they are classified as open, if not, closed.
Frame construction
1 - bars; 2 - the gaps between the bars for ventilation; 3- bars around doors and windows; 4 - indent from the floor and ceiling for ease of installation of the lining; 5 - pegs for installing skirting boards
Correct fastening of the lining on the walls inside and outside the house presupposes the preliminary arrangement of a special lathing for it, which is the basis for the formed surface of the coating.Most often, such a base is made from pre-prepared and well-dried wooden beams, the section of which is selected depending on the type of finishing material (for finishing inside or outside).
Please note: The external lining differs from the same products for finishing inside the house only in characteristics, so that their difference cannot be detected in appearance.
If necessary, instead of a base made of beams, a frame made of metal profiles can be used. Installation of individual elements of the frame can be carried out both vertically and horizontally. Their orientation in space depends on which type of cladding you have chosen. With their vertical arrangement, individual bars or frame profiles must be fastened horizontally and vice versa.
The main elements of the steam system
The steam system includes several required elements. Let's consider each of them in more detail.
The heart of the system: the steam boiler
The main function of the heater is to convert water into steam, which subsequently enters the pipeline. The main structural elements of the device are manifolds, drum and pipelines. In addition, there is a container with water, which is called a water space. A steam space is formed above it during the operation of the device. They are separated by the so-called evaporation mirror.
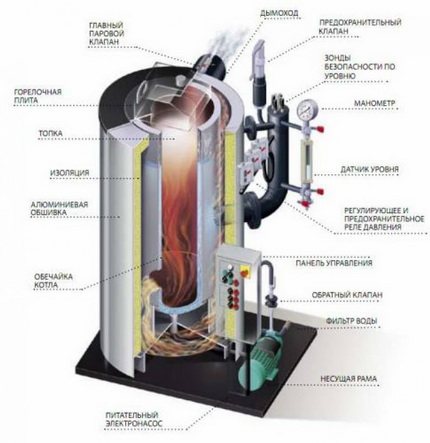
The figure schematically shows one of the varieties of a household steam boiler
Inside the steam space, additional equipment can be installed to separate the steam. The operation of the boiler is based on the principle of heat exchange of flue gases, water and steam. There are two types of steam heating devices: fire-tube and water-tube. In the first case, heated gases move inside the pipeline laid inside the container with water.
They give off heat to the liquid, which reaches a boiling state. Water-tube varieties work a little differently. Here, water flows through pipes laid inside the flue gas chamber. It warms up and boils. Water and steam inside the boiler can move either forcedly or naturally. In the first case, a pump is included in the design, in the second, the density difference between water and steam is used.
All types of steam boilers use approximately the same principle of converting water into steam:
- The prepared liquid is supplied to a reservoir located in the upper part of the boiler.
- From here, the water flows through pipes into the collector.
- The liquid from the collector rises into the upper drum, while passing through the heating zone.
- Steam is generated inside the water pipe as a result of heating, which rises upward.
- The steam, if necessary, is passed through a separator, where it is separated from the water. After which it enters the steam line.
A steam boiler can use a wide variety of fuels. Depending on this, certain changes are made to its design. They touch the combustion chamber. For solid fuel, a grate is set up, on which coal, firewood, etc. are placed. For liquid and gaseous fuels, special burners are used. There are also practical combined options.
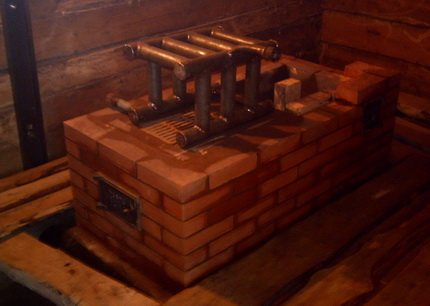
Among home craftsmen, the arrangement of steam heating using a stove is especially popular. The photo shows one of the possible options for reworking the furnace.
The power of the boiler is selected depending on the area to be heated. This can be done based on the average values:
- 25 kW for buildings up to 200 sq. m;
- 30 kW for houses ranging from 200 to 300 sq. m;
- 35-60 kW for buildings from 300 to 600 sq. m.
If more accurate data is needed, they use the standard calculation method, where for every 10 sq. meters account for 1 kW of equipment power.Keep in mind that the formula is used for houses with a ceiling height of 2.7 m or less. For higher buildings, you need to take more power. When choosing a boiler, special attention should be paid to its certification. Any steam heating system is potentially dangerous, therefore equipment testing is mandatory.
Heating pipes and radiators
The coolant temperature in steam systems ranges from 100 to 130C, which is much higher than in liquid systems, where it ranges from 70 to 90C. Therefore, it is strongly discouraged to use similar equipment for arranging systems. First of all, this applies to metal-plastic and polypropylene pipes. The maximum operating temperatures for these materials vary between 90-100C, so their use is strictly prohibited.

Ideal for arranging a steam heating system copper pipes. They do not corrode, withstand high temperatures, but are very expensive
For main pipelines of steam systems, three types of pipes are usually used. The most inexpensive option is steel. They can easily withstand temperatures of 130C, which is more than enough, and are quite durable. However, the condensate formed inside the parts quickly destroys the pipes, since the steel is susceptible to corrosion, and the aggressive medium formed by the steam only enhances this disadvantage.
Another disadvantage of steel elements is the need to connect by welding, which takes a lot of time and effort. Galvanized steel pipes are much more resistant to corrosion. They also withstand high temperatures well. To connect them, the threaded method is usually used, which greatly simplifies the process. The main disadvantage of galvanized pipes is their high cost.
Copper pipes are considered ideal. The material can withstand high temperatures, is sufficiently plastic and at the same time durable, does not corrode. Soldering is used to connect copper parts. Copper piping is very durable and strong, but the cost is very high. Thus, the most acceptable option in terms of quality and price ratio is steel pipes with an anti-corrosion coating or galvanized.
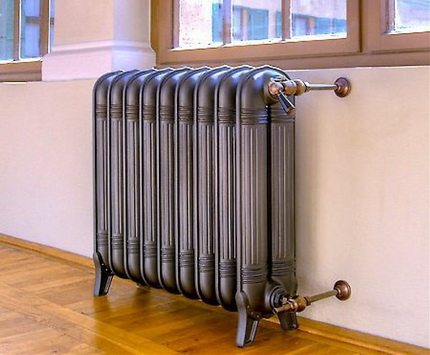
The best choice for steam heating is cast iron radiators. They will be able to withstand the severe stress caused by the presence of hot steam inside the batteries.
Radiators for steam systems are selected on the basis of durability. It is important that they can withstand high temperatures and are corrosion resistant. Based on this, massive cast-iron batteries can be considered the best option, steel panel batteries are the worst. Given the high efficiency of the system, in some cases, the use of ribbed steel pipes is quite acceptable.
Control and measuring equipment block
The steam heating system is characterized by increased emergency danger, therefore the presence of control devices is mandatory. The pressure in the system is monitored, if necessary, it is normalized. For these purposes, a gearbox is usually used. The device is equipped with a valve through which excess steam is removed from the system. For powerful installations, you may need not one, but several such valves.
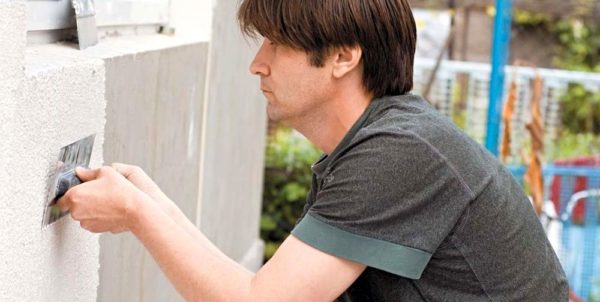
Wet facade
The main stages of installation of a curtain wall
Materials (edit)
| Materials (edit) | Features and purpose |
| Insulation | The optimal solution is mineral wool. I must say that people are often interested in whether it is possible to insulate the walls of a wooden house with foam plastic? In principle, the use of foam is allowed, however, it should be borne in mind that this material is quite flammable, moreover, it does not allow steam to pass through, which will negatively affect the indoor microclimate. Therefore, it is better to overpay a little, but still use mineral wool for these purposes. |
| Stands for the frame | As a rule, beams or even boards are used. You can attach them to the wall using metal corners or brackets.I must say that as an alternative to boards or beams, you can use a profile that is used for mounting drywall. |
| Vapor barrier film | Protects the insulation from getting wet. |
| Finishing material | It can be lining, block house, siding or any other facade material. |
| Mezhventsovy insulation | Jute tow is usually used, however, you can fill the gaps with special foam or other suitable materials. |
| Wood preservative | Protects walls from the negative effects of moisture, decay and other biological influences. |

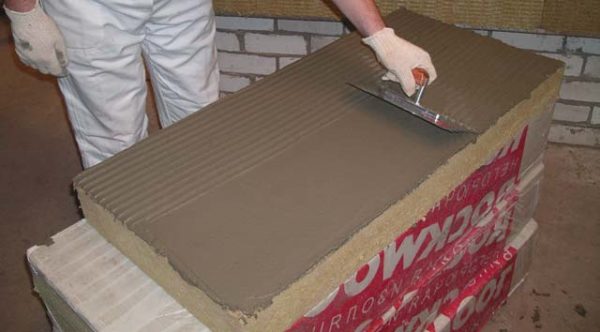
Mineral mats
Before making a purchase, you should calculate the square of the facade, and then calculate the materials. At the same time, keep in mind that they should be purchased with a small margin so that you do not have to interrupt work later.
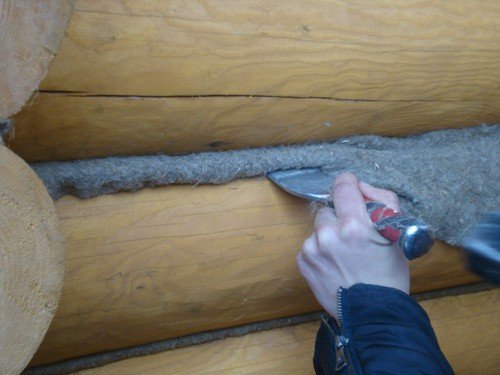
Filling the gaps in the house
Facade preparation
Before insulating a wooden house from the outside, carry out the following preparatory work:
- dismantle all attachments that can interfere with work - these are ebb, visors, window sills, antennas, etc.;
- then treat the walls with antiseptic impregnation;
- at the end of the work, it is necessary to fill with insulation all the gaps between the joints, if any.
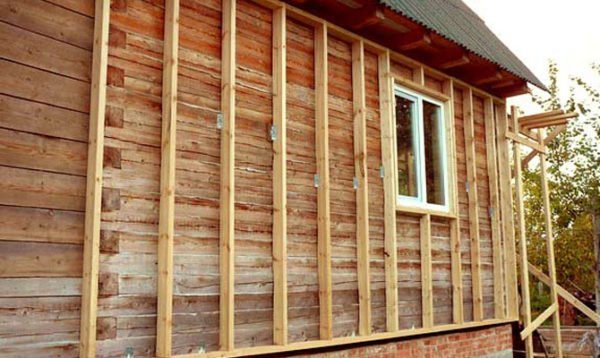
Wireframe example
The next stage is the installation of the frame. The instruction looks like this:
- start installation of the frame with the arrangement of the ventilation gap. To do this, attach boards about two centimeters thick to the walls. You can arrange them both vertically and horizontally, the main thing is that later you can attach racks to them;
- then a vapor barrier film is attached to the boards with a stapler. It must be overlapped and stretched so that a space forms between it and the wall. It is advisable to glue the joints of the film with tape. I must say that the network offers many schemes for wall insulation without a ventilation gap, however, in this case, moisture can accumulate in the space between the wall and the insulation, which leads to negative consequences;
- after that, the racks are installed. You should start with the installation of the two extreme racks, between which the ropes are stretched, which serve as beacons for the intermediate rails. The end posts are installed at the same distance from the wall, strictly vertically. If you use boards as racks, then fix them on the walls with metal corners and self-tapping screws, as shown in the photo above. After that, install intermediate slats, which are located in increments of one to two centimeters less than the width of the mineral wool slabs.
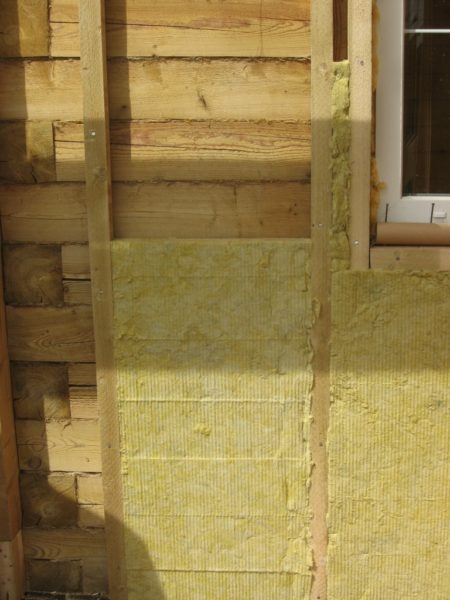
Laying mineral wool in the space between the racks
Then, heat-insulating material should be laid in the space between the racks. Mats should fit snugly to each other and to the racks so that no cracks form in the insulation;
- then a vapor barrier film is attached to the frame. As in the first case, it must be overlapped. The film can be fixed using horizontal slats, which will additionally hold the insulation;
This completes the insulation of the facade with your own hands.
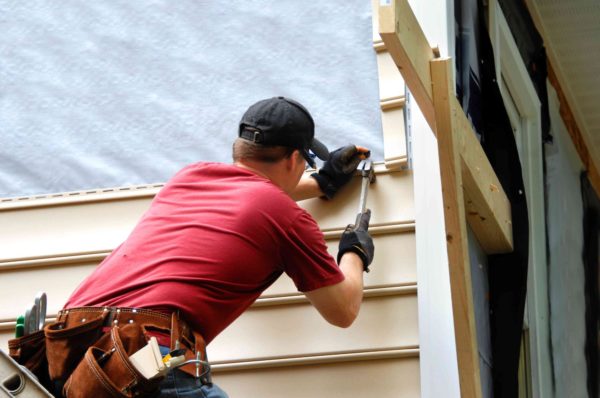
Siding installation
Frame sheathing
The final stage of the work is the frame sheathing. As mentioned above, there are several finishes. If you do not know what material is better to sheathe the facade, then focus primarily on cost, practicality, individual preferences, etc.
For example, the lining is an environmentally friendly material, moreover, it allows you to preserve the attractive appearance of a wooden house. Vinyl siding is more practical, easy to clean and requires no maintenance.
So, if you decide to use siding for cladding, then the work is carried out in the following sequence:
- Before attaching the panels to the wall, it is necessary to install a starting profile, which is located horizontally around the perimeter of the house. In this case, you should leave a distance from the ground or blind area to the profile of about 10 cm;
- then corner profiles are installed in the corners of the house;
- after that, the first row of panels is installed. The lower part of the siding is inserted into the starting profile, and from above it is attached to the crate with self-tapping screws;
- according to this scheme, the whole house is sheathed with siding;
- before installing the last panel, the finishing profile should be fixed;
- at the end of the work, additional elements are installed - slopes, ebb, etc.
This completes the siding of the facade. I must say that the lining is attached approximately according to the same principle, the only thing is that a profile is not used for its installation.
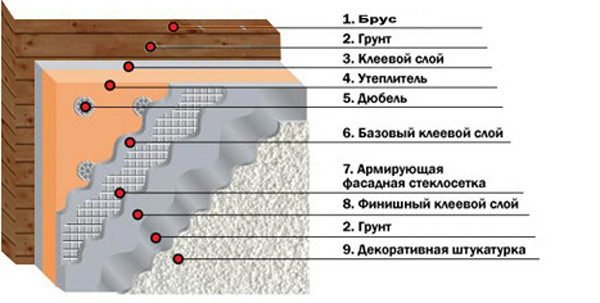
Wet facade device diagram
Installation of a wet facade
Let's take a closer look at each of these stages below.
When choosing what kind of insulation it is better to insulate the walls, in this case it is also better to give preference to mineral wool. Of course, in addition to insulation, some other building materials should be purchased:
- glue for mineral wool;
- dowel-umbrellas;
- fiberglass reinforcement mesh;
- perforated corners
- decorative plaster;
- primer;
- facade paint.
After preparing all these materials, you can get to work.
Bonding mineral mats to the wall
Wall insulation
As in the previous case, the work begins with the preparation of the facade. This procedure is performed according to the scheme described above.
Then the walls are glued with mineral wool for plaster:
- first of all, you should prepare the glue, according to the instructions on the package;
- then apply the adhesive to the mineral mats with a notched trowel. If the walls are uneven, the mortar should be applied with "blobs", which will allow you to adjust the position of the slabs relative to the wall.
Applying glue to mineral wool
In the process of gluing mats, use a building level, and also stretch the beacons so that all the plates in each row are in the same plane;
- according to this principle, all walls of the house are pasted over;
- then the mineral wool is additionally fixed to the wall with umbrella dowels. To do this, drill holes in the wall directly through the insulation and hammer the dowels into them with a hammer. Umbrella caps should be slightly recessed;
Installation of dowels
- after that, you need to paste over the window openings with mineral wool. This procedure resembles the installation of slopes - cut the cotton wool on the panels of the required dimensions and paste over the openings with them. Dowels are usually not installed on window slopes, but they must be installed on door slopes.
- then you need to check the quality of the work done by applying the rule to various sections of the walls. If there are bumps on the wall, they can be removed with a special float;
- then glue the perforated corners to all outer corners using the same glue;
- at the end of the work, glue all the dowel caps with glue so that in the end the facade has a smooth surface.
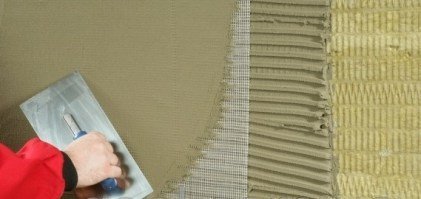
In the photo - gluing the mesh to mineral wool
Reinforcement
The next stage is reinforcement. In fact, this is a rough plastering. It is carried out in the following sequence:
- Prepare the mesh by cutting it into the correct size canvases. In this case, keep in mind that on the wall it should overlap about 10 cm;
- then cut the canvases for the slopes;
- then glue the mesh to the slopes. To do this, the glue should be applied in an even layer several millimeters thick on the surface of the mineral wool, and then immediately apply the mesh. To "drown" the mesh in the solution, draw a spatula over it from above, as shown in the photo above;
- after reinforcing the slopes, according to the same principle, the mesh is glued to the walls;
- after the surface has dried, the adhesive is applied again in a uniform thin layer. In doing so, use a wide trowel to remove any existing irregularities on the surface of the walls.This procedure is carried out according to the same principle as filling.
Decorative plastering
Drainage slope calculation
The free-flow principle of the drainage system is based on the location of the drainage pipes at a certain inclination to each other. Size matters. Large diameter pipes are discouraged. Water flows out too quickly along them, thick layers of silt form on the walls over time, leading to blockages and the need for a costly procedure for cleaning the pipeline.
Important! For each specific situation, the optimal drainage option is calculated and selected.
Optimal solutions for the construction of drainage on the site, the calculation of its slope, depth and length of trenches are in the normative documents of SNiP. In order to correctly calculate the slope of the drainage pipe, it is necessary to take into account the following mandatory parameters:
- the terrain on which the land plot is located, the degree of elevation differences;
- the size of the pipe section - the looser the soil, the larger the diameter;
- the type of drains used, for sandy soil - with geotextiles;
- the depth of the drains;
- type of soil layer of the site;
- coordinates of the location of groundwater.
Based on the data obtained, you can proceed to the installation of the drainage system on the slope. To select the correct slope of the drain, you must use the established regulatory standards:
| Pipeline diameter in millimeters | Slope in centimeters per meter length |
| 50 | 3 |
| 110 | 2 |
| 160 | 0,8 |
| 200 | 0,7 |
If the length of the branch branches does not exceed one and a half meters, then differences in their slopes relative to each other are permissible.

Storm trays.
In addition to the slope of the drain, it is important to calculate the height and width of the tray. This is done quite simply. As a rule, trays with a width of 20 cm or more are filled up to 80% high with water. According to such proportions, the design of the drainage system is calculated, taking into account the hydraulic pressure. For example, the height of the tray is 60 cm.It turns out that its width should be at least 80 cm.
Preparing the wooden base
To obtain a properly equipped frame made of beams, you will need to prepare the following consumables and tools:
- a set of bars with a section of 30 by 30 mm;
- trimming thin boards used as substrates for bars;
- a set of screws and dowels;
- hacksaw or jigsaw;
- screwdriver;
- electric drill;
- a set of chisels and screwdrivers;
- hammer (mallet).
In addition, you will need a tape measure, a corner, a set of plumb lines and a building level. It is recommended to start the installation of the lathing with the fastening of the extreme frame bars, after which all other bars are attached between them (with a step of about 50-60 cm).
You can properly prepare a flat surface by placing pre-prepared planks under the bars in the required places. The correctness of the frame is checked using a level and a plumb line. Stuffing of all intermediate beams is carried out taking into account the framing of window and door openings, which is necessary to fix the cladding elements.
Vapor barrier device
When installing insulation using fiberglass insulation, they use respirators so that flying small particles do not get into the respiratory tract
Before stuffing the lining elements, if desired, it will be possible to organize the insulation of the walls of the house (inside and outside) by laying mineral wool plates between the base beams. Insulation plates, pre-cut to the size of the cells of the frame, are simply placed between the bars (sometimes, for reliability, they are fixed with special brackets or glued).
Upon completion of the installation of the insulation plates, a special film is laid on top of it, used as a hydro and vapor barrier and avoiding the formation of condensation. The protective vapor barrier is fixed to the frame elements of the crate with a construction stapler.When installing it, make sure that the film to be laid is turned with a rough surface towards the wall.
The walls are preliminarily covered with a material that prevents moisture from entering the insulation from the inside of the house. As a vapor barrier, you can use plastic wrap or some other more modern analogue. In the event that the walls are thick and assembled from logs, the material can be fixed directly to them.
In this case, there will be enough free space between the crowns for effective ventilation. If they are knocked down from boards or made of timber, you will need to arrange an additional gap for ventilation. In this case, the film is stretched onto thin slats pre-fixed to the wall.
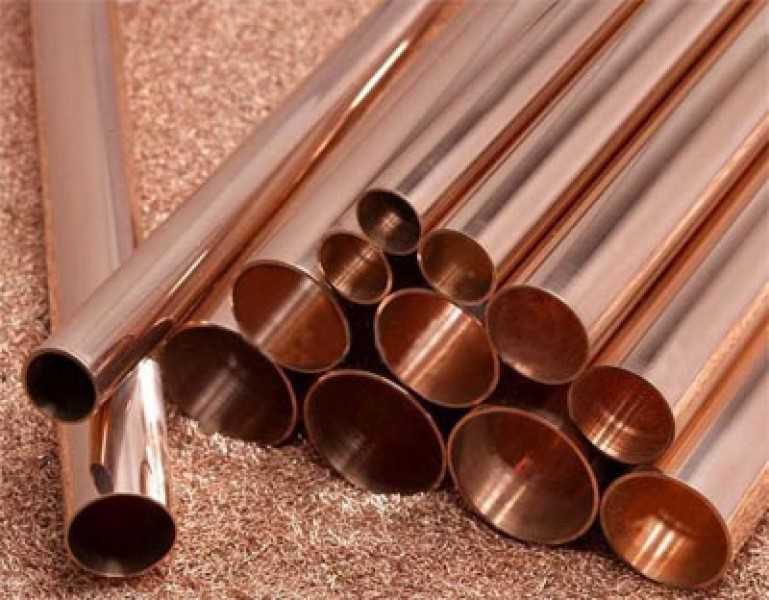
Copper products
More expensive, but also more durable and safer will be a steam heating system using copper pipes. Products have a bright red hue. What can be beneficial to complement the interior. Over time, the color changes, the surface is covered with a patina.
If the line distorts the overall design of the room, then the pipes can be hidden under the floor. The material is reliable. With the correct implementation of installation work, emergencies are extremely rare. What properties does copper have?
- The pipeline will last over 100 years. Copper is resistant to moisture and does not corrode. No salt deposits and scale remain on the walls.
- The material can withstand high and low temperatures: range from -200 0С to +500 0С.
- The pipeline does not deform under increased loads: steam pressure is more than 170 kg / m2, sudden pressure surges, at which a water hammer can occur. This is especially important with a one-pipe heating system. The correct product diameter must be selected.
- Smooth walls contribute to the unimpeded passage of steam: the frictional force is minimal, the speed of the coolant is high, and the heating is efficient.
We recommend: What are the features of steam heating "Leningradka"?
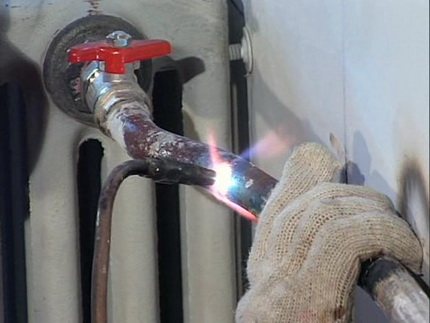
The pipes are connected by soldering or by means of fittings. When brazing, use hard solder. A certain skill is required to carry out the work. During installation, it is recommended to contact a specialist. An improperly formed seam can lead to an accident in the pipeline.
I choose fittings and adapters from the same material. Steel or aluminum products are not used. Brass connectors can be used instead of copper connectors.
It is recommended to conduct a trial soldering of metal products in order to select the correct solder. Soldering is carried out using a gas burner, which is capable of heating the material up to 400 ° C. Be sure to pressurize the seams in order to identify flaws in the seams, the air outlet.
Instead of soldering, you can use a collet connection: choose compression-type adapters. They have an inner sleeve that prevents material deformation at the joint. During installation, a union nut and a split ring are put on the pipe. The pipe is pushed onto the sleeve. The nut is screwed in until it stops: use an adjustable wrench. No soldering required.
In addition to soldering and collet connection of pipes, press assembly is used. To do this, purchase special press fittings made of copper. The joining process takes place using press tongs. The advantage of this technique is the reliability of the seam, but this connection cannot be repaired. In the event of a breakdown, you will have to cut out a section of the pipe along with the fitting.

Copper pipes
Self plating
Do-it-yourself wall cladding with clapboard should be made taking into account the chosen direction of laying the material, which can be mounted in the following ways:
- horizontally;
- vertically;
- diagonally;
- in a mixed way.
Fastening the lining horizontally is a classic version of its installation, traditionally used when decorating the interior of a house and allowing you to visually expand their perception.A significant disadvantage of this mounting method is the high probability of dust and moisture accumulating at the joints. To avoid this, the installation of individual elements of the decorative coating is carried out in such a way that the grooves in the joints of the boards are directed downward.
With vertical installation, it is possible to achieve the effect of visually raising the height of the room to be finished. That is why this method of fastening is most often used when decorating attic rooms with a low ceiling (installation is carried out from the most difficult corner).
The last two options for laying lining, despite their aesthetics, are considered quite difficult for independent execution and are used to decorate rooms and facades of buildings only in rare cases.
Scheme of mounting a lining on a wall from a bar
When laying horizontally, installation starts from the ceiling, and when they are placed vertically - from an angle that requires the boards to be adjusted to size (trimming them).
Special removal should be given to the installation of the first covering board (this requirement also applies to the installation of the outer lining), which determines the quality of the preparation of the entire decorative structure. It is set strictly in level, and then fixed on the base at several points.
To obtain a high-quality and solid coating, the boards or panels to be laid are best fixed on the beams using special clamps (that is, in a secret way). After installing the first panel, the next blank is inserted into its free groove, fixed on the base in the same way.
Before installing the last panel, it is sized using an electric jigsaw or a hacksaw. The gap remaining at the floor is subsequently closed with a plinth.
Structural joints and corners of the coating are finished with special decorative slats and corners.To control the correct laying of the finishing material, it is necessary to periodically use the building level.
Water heating

The slope for water heating should be 5 mm per linear meter
The popularity of hot water heating is due to its safety and great comfort. There are systems with natural and forced circulation. In the first, the movement of the coolant occurs due to the difference in the specific gravity of hot and cold water, in the second, it is provided by a circulation pump. One-pipe and two-pipe installation schemes are used.
With natural circulation, the slope is taken within 5-10 mm per linear meter of the pipe. The slope in the heating system is arranged in the direction of water movement, i.e. the pressure line is tilted from the boiler to the radiators, and the return line is tilted from the radiators to the boiler. The water heater must be located below the radiators, which may lead to the need to place the boiler in a pit. In a private house, this does not create problems. If a slope leads to a similar result when installing heating in an apartment, it is necessary to increase the height of the radiators and reduce the slopes of the pipes. It is necessary to decide what minimum slope in heating with natural circulation can be adopted without compromising performance. Practice suggests a value of 5 mm per running meter. More information about the regulatory requirements can be found in SNiP 2.04.05.-91 *.
Pumps are used to create the movement of water in complex systems. If the pump provides a flow rate of more than 0.25 m / s, there may be no pipe slopes. It is important that the air pockets move faster than the liquid and collect near the air valves located at the top of the system. During operation, repairs are possible that require draining the coolant. Therefore, it is advisable to make the slopes of the pipes so as to ensure complete drainage of the coolant.
What is the minimum slope adopted for water heating systems depends on the specific circumstances. It should not be less than 3 mm per 1 m.The angle of inclination of the single-pipe heating line is chosen based on the same considerations.


Types of panels for raw materials
In total, there are two main types of lining, depending on the raw material - wood and PVC. To talk about which option should be preferred, and how plastic differs from wood, you can only study their features.
You can also sheathe the house with plastic panels.
Features of plastic clapboard:
- long service life (no decay process);
- no need for care;
- external plastic lining is not affected by the environment.
Features of wooden lining:
- elegant design;
- high rates of sound insulation;
- thermal conductivity is low.
Lining made of wood
Lining made of wood, also known as lining for outdoor decoration, can be divided into a simple version and eurolining. The separation is based on the use of estimates for comparison with generally accepted standards.
The main standard for the production of this material is GOST 8242-88, abroad DIN 68126. At the same time, import indicators differ somewhat from Russian ones due to the external indicators of wood, more deliberate geometric properties, which cannot but lead to the fact that the price of the material is significantly above.
The manufacturer is obliged to indicate the conformity of products to regulatory documents
Why choose steam heating
It must be admitted that steam heating systems cannot be classified as very popular. Such heating is rather rare. Let's take a closer look at its advantages and disadvantages. The first, undoubtedly, include:
- Heating system efficiency. It is so high that a small number of radiators are enough to heat the premises, and in some cases you can do without them: there will be enough pipes.
- Low system inertia, due to which the heating circuit heats up very quickly. Literally a few minutes after starting the boiler, warmth begins to be felt in the rooms.
- There is practically no heat loss in the system, which makes it very economical in comparison with others.
- Possibility of rare use, since the system does not defrost due to the small amount of water in the pipes. Alternatively, it can be installed in country houses, where they come from time to time.
The main advantage of steam heating is considered to be its efficiency. The initial costs for its arrangement are quite modest; in the process of operation, it requires relatively small investments. However, even with so many advantages, the disadvantages of the system are very significant. They are primarily due to the fact that water vapor is used as a heat carrier, the temperature of which is very high.
Condensation of water vapor occurs inside a steam heating radiator. During this process, a large amount of thermal energy is released, which explains the high efficiency of the system.
Thanks to this, all elements of the system are heated up to 100C and even higher. It is clear that any accidental contact with them will cause burns. Therefore, all radiators, pipes and other structural parts must be closed. Especially if there are children in the house. The high temperature of radiators and pipes provokes active air circulation in the room, which is quite uncomfortable and sometimes dangerous, for example, in case of an allergic reaction to dust.
When using steam heating, the air in the rooms becomes too dry. It is overdried by hot pipes and radiators. This requires additional use of humidifiers. Not all finishing materials, which are used to decorate rooms heated in this way, can withstand proximity to hot radiators and pipes. Therefore, their choice is very limited.
The most acceptable option in this case is cement plaster painted with heat-resistant paint. Everything else is questionable.Steam heating has one more disadvantage that affects the comfort of those living in the house: the noise that steam passing through the pipes produces. The more significant disadvantages include poor controllability of the system. The heat transfer of the structure is almost impossible to control, which leads to overheating of the premises.
Steam heating belongs to potentially hazardous systems, so the choice of equipment must be treated very responsibly. The pipes for the system must be made of metal only.
There are solutions. The first is the installation of automation, which will turn on the boiler when the premises cool. In this case, those living in the house will be quite uncomfortable from the constant fluctuations in temperature. A more "gentle", but time-consuming method is the arrangement of several parallel branches that will need to be launched as needed.
The main disadvantage of steam heating, due to which it is little used, is its increased emergency danger. You need to understand that when a gust occurs from a pipe or radiator, hot steam will beat under pressure, which is extremely dangerous. That is why such systems are now banned in apartment buildings and are less commonly used in production. In private houses, however, they can be arranged under the personal responsibility of the owner.
Preparing the wooden base
Before you start choosing a material for cladding, you should study a few rules:
- To avoid further deformation of the material, which occurs as a result of shrinkage and leads to the formation of cracks, you should choose the type of lining, the moisture content of which will lie in the range from 10 to 15%;
Checking moisture with a moisture meter
- Be sure to inspect the material for wormholes and foreign spots;
- The number of knots in the selected material should be minimal.
Conifers are preferred
Installation stages
- Vapor barrier fasteners;
- Installation of the frame itself;
- Installation of thermal insulation;
- Waterproofing;
- Erection of the frame of the second;
- Clapboard exterior.
Vapor barrier fasteners
Initially, you should choose a material that will act as a vapor barrier, usually roofing material, aluminum foil or even ordinary plastic wrap are used for these purposes.
Upholstery with vapor barrier foil
A prerequisite is the presence of ventilation of the facade of the house, for which the vapor barrier layer is nailed directly to the slats nailed to the wall. The slats should be fixed at a distance of one meter, and their width should be about 2.5 centimeters. For additional ventilation, holes (20 mm) are made at the bottom and top between the slats.
Installing the frame
The frame can be made with your own hands from the boards, fixing them to the wall of the building in an upright position. The thickness of the boards should be in the range of 40-50 mm, and the width is about 10 centimeters.
The distance between the boards must be left less than the width of the insulation sheets by 1-2 centimeters.
Thermal insulation placement is a further stage, which requires finishing the house with clapboard outside.
It happens through the following steps:
- Installation of layers of mineral wool occurs without gaps between them;
- To achieve this, it is necessary to lay two layers of mineral wool at the same time, thickness 50 mm;
- The main feature of the masonry is that the joint of the lower slabs is covered with the middle of the upper layer, while, due to natural elasticity, additional fasteners are not required, which can be seen from the photo.
In the photo - the use of waterproofing materials
- In order to prevent moisture from entering the house, a waterproofing film should be installed, which is mounted on top of the thermal insulation layer;
- Fastening of the film is carried out by means of construction brackets to the boards;
- Leaving an overlap of about 5-10 cm, you should glue it with tape, which will allow you to get the best effect.
According to the steps described in the instructions above, then you should start installing the second frame.
- The slats should be nailed onto the boards of the first frame on top of the hydrofilm. Their thickness should be 2-3 cm, width 0.5 mm. This enables additional ventilation and removal of condensate on the hydraulic film;
Timber frame for panels
- To prevent rodents and insects from entering the space below, it should be sealed with a metal mesh.
The final stage is the external wall cladding with clapboard:
- The process begins with the preparation of the boards of the required length, it should start from the bottom, while the starting board is placed with the grooves up, a prerequisite is the use of a level to ensure its even position;
- After making sure that the board is secured, you should fasten it with nails (clamps). The workpiece must be leveled before fastening;
Installation on clamps - kleimers
- Next, the second lining sheet is installed according to the standard groove-tenon system. In order for the spike of the upper board to fit tightly into the groove of the lower one, a wooden hammer should be used;
- After securing the second board, you should insert the rest.
Some installation secrets are shown in the photo.
After the lining on the outside has undergone complete installation, proceed to the vertical fixation of the boards at the corners of the boards. Here, a mandatory moment is the presence of an overlap when one comes over another.
Window platbands are formed along a similar path, the pediment is sheathed most often by horizontal fixing of the boards. Only after completing the entire sheathing process should you start painting.
Steam heating installation technology
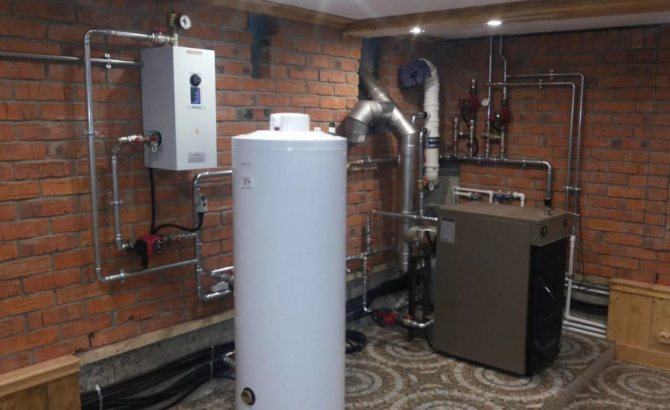
Work begins with the installation of a heating boiler. It is mounted in a pre-prepared room on a concrete base. In some cases, a separate small foundation is prepared for the equipment. The device is installed on the base strictly horizontally, the correctness is checked by the building level. Any errors noticed are eliminated immediately.
The boiler placed on the base is connected to the flue gas system. The connection must be solid and completely sealed. The next step is to hang the radiators. To do this, in the places indicated on the installation diagram, special hooks are driven into the wall, onto which the batteries are attached. If the use of finned tubes is supposed, then they are fixed.
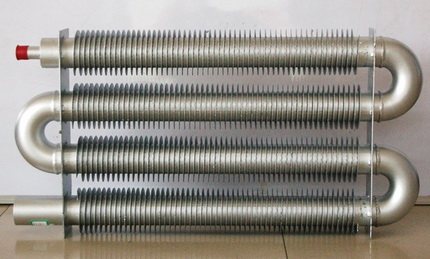
Finned pipes can be used in steam heating systems instead of radiators. The high heat transfer parameters of the system will be significantly enhanced due to the increased area of the heat-conducting surface
The strength of the fixing of the heat emitters is checked. Next, you can start arranging the expansion tank. It is fixed at the highest point at a short distance from the heating boiler, it is best to keep this distance as minimal as possible. You can now set up a group of control devices. They are installed at the outlet of the boiler. At a minimum, a pressure gauge and a relief valve should be located here.
All installed equipment is connected to each other by pipes. The connection method depends on the material from which they are made. In any case, the correctness and reliability of the connections should be carefully checked. For open systems, a condensate collection tank is installed at the end of the line and a pump is installed. The branch pipe that goes from it to the heating device must have a smaller diameter than the rest of the pipes.
The steam boiler is connected to the heating circuit. In this case, all the necessary shut-off valves and filters must be installed, which will retain large particles of dirt that may be contained in the water. If the equipment runs on gas, the fuel line is connected. In this case, it is forbidden to use flexible hoses - only rigid liners.
All connections are made exactly according to the standards in order to avoid an emergency situation later
Then you can carry out a test run.For this, water is poured into the circuit, after which the equipment is put into operation. At first at the minimum operating temperature, then it is gradually increased, while monitoring the correct operation and integrity of the system. When the slightest shortcomings are revealed, the equipment is stopped and all malfunctions in its operation are eliminated.
What materials will be needed
Mats made of stone or mineral wool are most in demand as insulation for wooden houses. It is not recommended to use polyfoam for insulating wooden structures, since it does not have vapor permeability and does not remove moisture vapor from the surface of the log house. Stone wool or mineral wool mats come in a variety of thicknesses and densities.
The denser the insulation, the easier it is to install and the longer it retains its performance. Soft and loose mats often slide down, disintegrate, forming dust harmful to health. Therefore, you should not save on high-quality insulation. Other advantages of stone or mineral wool include its incombustibility and unpopularity with rodents, in contrast to foam.
Mineral wool is an excellent tool for home insulation
In addition to insulation, two layers of film are needed: one is waterproof and protects the frame from moisture penetration. It is laid on a protected wooden surface. This film must be vapor permeable and remove moisture from the log house through the insulation to the external environment. The second is wind and water protection, it is attached over the thermal insulation.
From the outside, the insulation is closed with any facing material with the obligatory arrangement of a ventilation gap. This cladding is called a ventilated facade. Thanks to the circulation of air between the cladding and the walls, the formation of fungus and mold is excluded, moisture is successfully removed from the insulation and all conditions are created for a long service of the log house and the entire building.
Laying structure of layers for insulation
In order to perform high-quality insulation of wooden walls, you will need to prepare:
- A bar with a section of 50 x 150 mm for the crate. Another option can be used. In this case, it all depends on what thickness the insulation is chosen. Its slabs must be completely recessed into the crate.
- Mineral wool is an excellent answer to the question of how to insulate wooden houses from the outside. The slabs must be sufficiently rigid. This will negate the risk of slipping in the future.
- Vapor barrier and waterproofing films. These materials are necessary to protect the heat insulator from getting wet from the outside and from the inside.
- Bars 40 x 40 cm. They will be used to attach the waterproofing film.
- Siding, block house or lining. These materials are just perfect for upholstering a wooden house.
- Means for treating walls from fungus. It is also advisable to purchase a composition that increases the fire resistance of wood.
Galvanized products
In liquid and steam heating, the temperature of the coolant is different. The temperature of the water leaving the boiler can be 90 ° C. It gives off heat in the main line, the indicator decreases to 60-70 0С. The outlet steam can have a temperature of 150 ° C. In the system, this parameter is reduced to 120-100 0С.
When installing the heating system, these indicators must be taken into account. For heat supply with a steam heat carrier, only galvanized and copper products are used.
Heating from plastic pipes is used if the heat carrier is a liquid: most often it is water or a mixture with antifreeze. Steel products will not work. The material is rapidly oxidized; after a short time, the line will become unusable. What is the characteristic of galvanized pipes?
- Galvanized steel has increased strength. The line, with the correct calculations of the diameter, can withstand the force of a water hammer, which is very important for steam heating. The crackling in the pipes should alert the household.
- The material has sufficient elasticity to withstand significant loads: elevated temperature and pressure.Pipes do not deform with constant exposure to steam that enters the pipeline.
- Products undergo a galvanizing process from both the inner and outer surfaces. The material is resistant to corrosion: does not react with water and salts.
- Zinc has antiseptic properties, which is the advantage of galvanizing.
- The products are lightweight and easy to install. Welding skills are required when using hot-dip galvanized pipes.

Galvanized pipes
Galvanized steel is used for making water, gas, electric-welded, profile pipes. Only seamless products are suitable for steam heating. Wall thickness 5.5 mm. For their production, alloy or carbon steel is used, which makes them durable and reliable. There is no risk that the seam may break at high loads. The service life is more than 50 years.
We recommend: How is a steam-heated stove arranged?
During installation, pipes are cut, special devices are used. When joining parts, welding is not used. The high temperatures that are reached during welding have a negative effect on the zinc plating. It is burned. In addition, zinc vapors cause severe poisoning.
The connection is made with fittings, couplings, and tees are installed. All parts must be galvanized. Otherwise, they can rust. FMU is not used as a sealant; tow, a dye with heat-resistant properties, is used.
For steam heating, it is recommended to choose pipes with thermal diffusion galvanized. The coating is applied with zinc vapor. For this, special techniques and equipment are used.
The vapors distribute the substance evenly over the entire surface of the product. This creates a protective layer of increased strength. It does not burn or deform when exposed to high temperatures during welding: it can withstand, without any changes, a temperature of 470 ° C.
Pipes have high thermal conductivity, quickly give off heat, but they also cool down in a short time. It is necessary to maintain a certain temperature of the coolant in order to create a comfortable temperature in the room. Steel heats up quickly. This means that the heating system will warm up in a short time.
Insulation of windows and doors
The question of how to insulate a private house comes down, among other things, to the insulation of openings. Of course, there should be no gaps between window frames and walls. Otherwise, the effect of rather expensive work on the insulation of the building itself will be reduced to zero. If there are gaps, they should first be sealed with concrete mortar.
The same goes for the door jamb. The canvas itself will also be nice to insulate. You can buy a ready-made door with a built-in insulator. By the way, the same goes for windows. There are always microcracks in old cracked wooden frames, through which precious heat leaves the house. Therefore, if funds allow, it is worth buying and installing new euro windows. In this case, the profile can be used wooden or cheaper PVC "woodgrain".


Steam heating in a private house with your own hands: diagram, instructions
A steam boiler operating on any fuel must only be installed in a specially equipped room. The standards developed for standard steam devices with a pressure of up to 0.07 MPa, generating steam with a temperature of 120-130 ° C, provide a number of requirements for such boiler rooms:
- the distance from the walls to the heater cannot be less than 100 cm;
- the height of the room must be at least 220 cm;
- the minimum level of fire resistance of doors - 30 minutes, walls - 75 minutes;
- the presence of high-quality ventilation;
- the presence of doors and windows facing the street.
It is best to equip the boiler room in a separate room, but partitioning of a suitable room is also allowed. Inside, it must be finished with non-combustible materials. Ceramic tiles are best suited for these purposes.
The walls in the boiler room should be finished with non-combustible materials, for example, ceramic tiles.
Steam heating is a very simple and economical way to heat your home. Many are attracted by its minimal heat loss, high efficiency and low operating costs. However, it must be remembered that steam heating is potentially dangerous, and an emergency situation in this case can lead to serious injury. Therefore, its calculation and arrangement should be taken seriously.
More and more people are convinced that an autonomous way of heating an apartment or house is more economical than a centralized one. Do-it-yourself steam heating is one of the difficult tasks, but quite doable if you have basic skills in working with a power tool. Even before installation work, it is necessary to make calculations and purchase the necessary components.
Essence of the question
Water heating
Some are confused and believe that in fact the correct name for such a system is water heating, and the prefix "steam" has remained from the past, when heating was carried out at the expense of industrial boiler houses that produced large volumes of steam. In fact, even today there are boilers that provide heating of premises by converting liquid into two states of aggregation. The strengths of this solution are:
- double heat transfer - by convection, as well as infrared radiation;
- minimum losses in the heat exchanger when transferring energy from the source;
- high reliability;
- there is no danger of defrosting the system during the cold season;
- the ability to use at any time of the year;
- long service life without failures.
Some of the disadvantages are:
- relatively high temperature of pipes and radiators;
- serious consequences in case of a breakthrough;
- some difficulties during installation;
- high susceptibility to corrosion.
The essence of functioning and high efficiency is that steam, passing through the main, condenses and settles, while a large amount of thermal energy is released. With the same fuel consumption, such a system will be much more efficient than a water system of a similar length.
Usually, in order to ensure the safety of users, certain restrictions apply in modern boilers. For example, the maximum temperature to which steam is heated is 130º C, and the highest point that the pressure reaches is 6 atmospheres.
All types of systems are divided into single-circuit and double-circuit. In the first variant, the entire boiler power is used to warm up the medium, which will take part in increasing the air temperature inside the room. In the second version, there is an additional heat exchanger in which running water is heated, which allows it to be used for domestic needs.
Different heating systems
By the way of circulation of the carrier, as in the case of water systems, they are distinguished:
- Natural circulation or closed. In this case, after condensation, the water under the influence of gravity, by a natural current without a pump, returns to the boiler, where it is again converted into steam and used.
- Forced circulation or open circuit. In this case, water does not immediately flow back into the heater. At first, it is collected in a special tank, from which it is supplied with the help of a pump for further conversion into a gaseous state.
By the level of pressure inside, there are:
- Atmospheric. In them, the pressure value is several times higher than atmospheric pressure, which in case of an accident can cause serious injuries. In addition, in such a system, the emitters are heated to a high temperature, and the deposited dust burns up and an unpleasant odor is emitted.
- Vacuum. To implement this option, the entire line must be sealed. With the help of a special pump, a vacuum is created inside. The result is the conversion of water to a gaseous state at lower temperatures, which increases safety.
According to the method of pipe routing, there are:
- One-pipe. Steam moves continuously through one pipe. In the first half of the journey, it gives its energy to the radiators, gradually turning into a liquid state. In this case, the temperature of the radiators that are closer to the boiler will be higher than those that are at the end of the circuit. In this case, large diameter pipes will be needed so that no obstacles arise.
One-pipe heating system
- Two-pipe. Steam is supplied through one pipe, and condensate is returned through the other. In this case, the carrier reaches all devices, practically without losing temperature. This option will be relevant for large houses with several floors. If the premises are small, there is no point in it, this will only increase the total cost of the project.
Two-pipe heating system
Vacuum systems are still in the testing phase. When using them, the constant availability of electrical energy will be required, because the vacuum pump runs almost continuously.
Boiler selection
Boiler selection
In order to choose the right heating device, the first step is to calculate the area that will be warmed up. To do this, you need to calculate the area of each individual room by multiplying the width by the length. After that, all the results must be added, the final figure will be the desired value. It is important to remember that this is true for a ceiling height of up to 3 m, if it is greater, then it is necessary to make an additional headroom.
- For a total area of up to 200-300 m2, a capacity of 25-30 kW is sufficient.
- For 400-600 m2 - 35-60 kW;
- 600-1200 m2 - 60-100 kW.
Read more: DIY recuperator: drawings, reversible recuperator
The next step is fuel selection. Steam boilers easily operate from the following sources:
- Liquid. This can be, for example, diesel fuel or waste oil. When using this option, it will be mandatory to place the unit in a separate room. This will help to avoid inhaling harmful fumes and their negative health effects.
- Solid - firewood, coal, peat and anything that can burn with the release of a large amount of heat.
- Gaseous. Usually it is natural or liquefied gas.
- Electrical.
In some cases, solid fuel solutions are significantly cheaper, but it is worth considering not only the cost of fuel, but also the time that will be spent on kindling. In this case, it can reach several hours, while it is necessary to constantly replenish the furnace in order to maintain the temperature at the proper level.

Some manufacturers combine different fuels. For example, they combine a furnace for loading solid fuel and provide a heating element. At the same time, the efficiency does not decrease, but it turns out to save on costs, and therefore on payment.
Choice of pipes
Types of pipes
When choosing, a lot will depend on the planned budget. What can be said unequivocally is that polypropylene pipes are by no means used for systems of this type. This is explained by their instability to high temperature conditions. You will need to choose from the following options:
- Steel tubes. For their installation, you will need a welding machine. They are resistant to high pressures and temperatures. Affordable price and prevalence are also on the positive side. The disadvantage is high susceptibility to corrosion.
Longitudinal steel pipe
- Galvanized pipes. They include all the advantages of steel, plus the lack of corrosion instability is compensated for here. Joints are made with threaded connections, so no welding is required.
Galvanized pipes
- Copper. Are ideal. But they are much more expensive in cost, in addition, their installation will require special skills in soldering this material.
Copper pipes
During installation, pipes can be hidden in walls or floors.But it is important to take into account that the building material is resistant to thermal influences.
Additional nodes
Cast iron batteries
In addition to the boiler and pipes for the mainline, mandatory elements will be required, which cannot be dispensed with:
- Radiators. These can be cast iron batteries, steel products, or ribbed pipes. It is better to install them under windows. Thus, a heat plug is formed, which cuts off the cold air. This will also prevent the formation of condensation on the glass.
- Fitting. Various connecting elements: couplings, angles, bends, adapters that will be required when installing the pipeline.
- Reduction and cooling unit. Carries out the conversion of steam into a liquid state.
- Reducer. Designed to regulate the pressure in the system.
- Expansion tank. Better to use an open type element. If there is a desire to put a sealed tank, then it must be equipped with a pressure gauge and a pressure relief valve. If this is not done, then this can lead to its failure.
- Condensate collection tank.
- Circulation pump. For systems with forced fluid movement.
- Hydraulic shutter. It will be necessary when you need to drain the system to repair it or replace any components.
- Filter. It will be necessary to remove solids before water enters the boiler. This is necessary so that nothing degrades performance.
- Mayevsky's cranes.
An indirect heating boiler can be installed in the steam heating system. In this case, you will need a valve for three inputs. It connects to the thermostat and redirects the movement of the coolant.
Insulation of the foundation
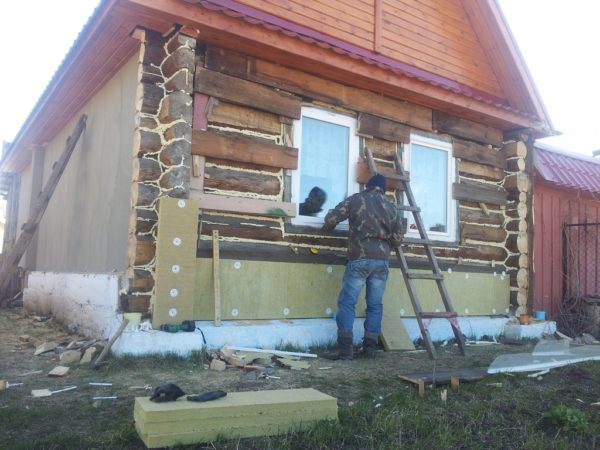
How to insulate the walls of a wooden house, we will consider a little below. First, let's figure out what needs to be done before that. Of course, the first step is to expand the base of the house. The cake of the walls should rest against something from below. Otherwise, the heat insulator will start to slip. For expansion, reinforcing bars are drilled into the main foundation.
Further, formwork is installed along the perimeter of the house. Sand is poured onto the bottom of the resulting "trough". Next, a footing 5 cm thick is poured. Reinforcement is installed on it and connected to the rods drilled into the main foundation. Then the filling is done. After the concrete has hardened, the formwork is removed. From above, the new part of the foundation should be waterproofed with two layers of roofing material.
In order to make the house as warm as possible, the foundation should be insulated before the walls are insulated. A very good solution would be to use polyurethane foam for this purpose. This material is quite expensive, however, since it retains heat much better than other insulators, it will be needed much less. For a fairly effective insulation, a layer of 3 to 10 cm is needed.
Of course, you can also use expanded polystyrene for this purpose. However, in this case, it is better to purchase products from trusted manufacturers. For example, the foam insulation of the Penoplex brand, the price of which is not too high (100-300 rubles), tolerates the effects of aggressive substances dissolved in the soil very well.
Insulating the walls: preliminary stage
So, let's start to figure out how to insulate a private house, or rather, its facades. First of all, all surfaces must be cleaned of dirt. Further, the timber or log is treated with a means that prevents the appearance of fungus. It is also worth smearing them with compounds that increase fire resistance and destroy insects.
Further, all the available slots and grooves are sealed with tow. Caulking should be done in dry weather. Instead of tow, you can use jute or hemp. These materials are pushed into the cracks using a special tool - caulking. After that, you can start actually doing the work on assembling the cake of the walls.
What you need to know about a heat insulator
You already know how to insulate wooden houses outside.Why basalt wool? This material is considered the best choice because the foam or expanded polystyrene practically does not allow moisture to pass through. Even in the presence of ventilation gaps, a lot of it accumulates under these materials. As a result, the cake loses some of its thermal insulation properties, and the log or timber begins to rot.
Even high-quality foam insulation is not suitable for cladding wooden walls. For example, the same Penoplex. The price of mineral wool is lower than that of it. Consequently, the owners of the house do not lose anything in any case. Instead of basalt, you can use glass wool.
Installation of slabs
So, we found out how to insulate wooden houses outside. How to install the plates correctly? The insulation is mounted on top of the vapor barrier film between the beams of the assembled sheathing. Unfortunately, wooden walls are often a little uneven. Therefore, gaps may form between the slabs and the battens in some places.
It is allowed to seal them with materials such as basalt, jute or flax. To prevent the slabs from falling out and slipping, it is worth additionally securing them with special plastic dowels with wide caps. If the lathing is mounted vertically, sheathe the walls with cotton wool from any corner. If the bars are horizontal, installation is carried out from the bottom up.
Usually insulation is done using a material 5 cm thick. In this case, the installation is carried out in two layers. In this case, the joints of the second are located above the center of the plates of the first. The bottom of the cake will need to be covered with a metal mesh so that mice and insects do not enter it.
Technology - youth 2002-02, page 26
Scientific consultant - Academician of the National Academy of Fire Safety Sciences, Honored Scientist of the Russian Federation, Professor, Doctor of Technical Sciences Mikhail Dmitrievich BEZBORODKO. Collective Consultant - Academy of the State Fire Service of the Ministry of Internal Affairs of the Russian Federation
Such a simple name was a rather complex machine designed to extinguish fires. This unit was first in the world created by English engineers Brighton and Erikson in 1829. Outwardly, it was very much like a steam locomotive, but it provided a water supply up to 10OO l / min. The steam filler pipe (PZT) was taken by horses to the fire. In it, as in the locomotives of those years, a water-tube boiler was used. In it, the liquid moved along pipes located in the firebox flame, the condensate formed in them was collected in a steam collector, where steam was separated from it, which entered the cylinders of the steam engine. Heat engine and water pump pistons were often connected by rods. The firefighters immediately liked the novelty, but the engineers continued to improve it.
First of all, the boiler was placed vertically, and the whole structure was transformed: the PZT became more compact. The first mastered the serial production of these units on and "Merrivetter" in England, and a little later - on in the United States. reached 3000 l / min, and the range of water jet supply exceeded 40 m. In 1862, one such machine was purchased for the Nevsky Mechanical Plant. In Russia, the PZT was built in Moscow (in Soviet times it was called "Red Torch"), in St. Petersburg - "Lanzenzipena" and others. In addition to horse riding, this technique was installed on railway platforms and river vessels, and in factories and plants - in separate premises.
The main disadvantage of the PZT was the prolonged start-up after arrival at the fire. It was required to light a fire in the furnace, toss up coal, bring it to a strong combustion, boil water. This took up to 15 minutes. During such a time, it happened that the object burned out, and there was nothing to save from the fire.
The task of accelerating the start-up of PZT has captured the minds of many innovators. It was radically solved by the Russian engineer and industrialist A.I. Shpakovsky. In 1867 he invented the nozzle. Fuel came from it in atomized form, it was set on fire, and it burned steadily. The encouraging news of a new unique device quickly spread all over the world.The glory that had surged did not turn the head of the stubborn innovator. Continuing his research, he is said to have done a comparative analysis of the efficiency of burning charcoal, oil, and turpentine in the PZT furnace. The latter gave the best results. Our inventor is on his own. Its curb weight did not exceed 3.2 tons. In 5 minutes after launch, the performance of the novelty reached 600 l / min, the range of the water jet was more than 30 m. This miracle of technology cost only 2,000 rubles.
But the main feature of the novelty was that the boiler heating could be turned on immediately when an alarm was received.
STEAM FILLING PIPE
and continue while moving towards a burning object. Often on the PZT, in the wagon train for first aid, the nozzle, while waiting for a call, burned in a weakened mode, maintaining the water temperature in the range of 30 - 35 ° С. In case of an urgent departure, the fuel supply to the nozzle was increased, the water heated up intensively on the way, and upon arrival at the fire, the car was ready for action.
In 1868, Shpakovsky's masterpiece brilliantly withstood a serious test, when two steam filler pipes made at his plant worked continuously for two days and delivered more than 12 million liters of water to a fire. The cost of the valuable materials saved was estimated at many hundreds of thousands of gold rubles, and the payment for the spent turpentine did not exceed 400 rubles. Phenomenal!
The ideas of A.I. Shpakovsky, who soon replaced turpentine with cheaper kerosene, was picked up and developed by designers of fire fighting equipment in different countries of the world. And some firms continued to produce steam pipes with boiler heating with solid fuel: charcoal, coke, wood. The brainchild of our inventor was used in fires, and it proved itself impeccably many times.
... At 03:39 pm on June 2, 1914, the Exemplary team of the Russian capital of St. Petersburg received a signal that the stables were on fire at 37 Obvodny Canal. A minute later, a first aid wagon drove to the scene, arriving at the indicated address after the same period ... The flames had already engulfed several neighboring houses and were growing. The PZT was launched and connected to the city water supply network. People fleeing the fire with things and household utensils prevented the firefighters from unrolling the folding sleeves. When they began to extinguish the flame, it turned out that the "Obraztsovaya" could not cope with the fire on its own. Therefore, at 3 hours 51 minutes, three fire brigades were summoned to help at once, at 4 hours 30 minutes, fireman A.V. Litvinov gave signal No. 5, which meant a general gathering of all the fire brigades of the capital, and half an hour later they asked for help from the suburbs. In the fight against the fire, 18 professional fire brigades and the Volkovsk volunteer fire brigade took part. Basically, water was supplied with the help of PZT, which was delivered by horseback, and only one - by the steamboat "Trubnik", which entered the Obvodny Canal. In addition to them, hand pumps and even an auto-pump installed on a car worked.
There were too few fire hydrants in the disaster area. Therefore, part of the PZT was located on the embankment of the Obvodny Canal in order to take water from it. Most of the PZT and pumps were connected to the water supply network in the neighboring quarters and behind the Obvodny Canal. Flap sleeves were laid along the streets and the bridge. The capacity of the PZT was enough to pump water over a long distance (often more than 100 m). The flame was washed down from 50 barrels, most of which were powered by RHT. Thanks to the abundant supply of water, the fire was contained by 9 p.m. and extinguished by midnight. It burned down about 50 different buildings. If the fire was extinguished only by hand
pumps, he would have captured a much larger part of the city. To illustrate the article, the so-called "large" steam filler pipe was selected from various RZPs (for technical reasons, the figure shows not three views of the product - from the side, top and front, but the so-called trimetric projection).
This is how this masterpiece of technology was arranged.In the center of the chassis with the turntable of the front wheels was a steam boiler standing upright. It was crowned with a chimney with a spark arrestor. In the front part of the platform there was a locker into which fire-fighting equipment was folded: pick-up and discharge sleeves, trunks, splitters, etc. Firefighters sat on it, driving this tricky crew at full speed to the fire site, and the driver and fireman had to stand in the "stern" holding on to the special handles. After arriving at their destination, they controlled the operation of the car from the rear platform. To the right of them was a coal box.
A steam collector was fixed near the upper part of the boiler, next to it was a steam engine, under it was a water pump, and between it and the boiler was an air receiver, into which water was intermittently pumped. Being in the lower part of this vessel, it experienced constant pressure from above from the air compressed above it, due to which it was evenly squeezed down along the discharge sleeves. The water level in the steam boiler was monitored using a water meter. If it dropped unacceptably, then the driver turned on the injector, which provided the boiler with water replenishment. Controlling the operation of such a unit was not easy, and this art was specially trained.
At the beginning of the XX century. produced PZT of various systems: with horizontal and vertical boilers, stationary and mobile, with coal, kerosene and other types of heating. Therefore, outwardly, such machines, made at different factories, were different. However, their principle of operation remained the same.
The advantage of the PZT over hand pumps was its higher performance. Yet these machines were heavy to transport. On the PZT it was not possible to carry the staff of firefighters necessary to fight the fire, the necessary supply of fuel, the necessary equipment (ladders, crowbars, hooks and other tools). The main defect of RZT consisted in their prolonged start-up. That is why steam filler pipes left the firefighting scene as soon as the world embarked on the path of continuous motorization. And, nevertheless, they were exploited until the mid-30s.
At least two steam filler pipes have survived in Russia. One, made in 1862 in English, is kept in St. Petersburg, it is shown at the Exhibition of fire-fighting equipment. And the other, made in 1912 by a Moscow one, is “registered” in Chelyabinsk. This miracle of technology, covered with a transparent protective film, flaunts in front of the entrance to the building of the Fire and Technical Exhibition. ■
OlegKURIKHIN, Institute of the History of Natural Science and Technology of the Russian Academy of Sciences
TECHNOLOGY-YOUTH 2 2 0 0 2
26
Installation of waterproofing film
So, the best insulation for a wooden house is mineral wool. What material should be chosen for a waterproofing device? In this case, it is worth using a special superdiffusion membrane. This material will protect the walls not only from rain, but also from the wind. For wooden houses, it is allowed to use a waterproofing material with a vapor permeability of at least 1400 g per m3.
The film is attached directly to the batten using 40 x 40 mm blocks. This will create a ventilation layer between it and the finish. Lay the film perpendicular to the location of the battens. The overlap between the individual strips should be about 10 cm. Sometimes the joints are additionally glued with construction tape.
Calculation of the pipe diameter
For the line, you need to select pipes with a certain diameter. The indicator depends on many parameters: heat transfer of the material, the rate of passage of the coolant, the power of the heating equipment. It is difficult to calculate the pipe diameter yourself. They turn to specialists. For the calculation, certain tables are used.
According to the tables, 1 kW of boiler power is required to heat 10 m2. With an equipment power of 10 kW, metal pipes with a wall diameter of 40 mm are chosen. With a boiler power of 35 kW, the pipe diameter is 76-80 mm. For condensation, use a smaller diameter wire. Plastic is not considered for steam heating.
If you choose a product with a smaller diameter, then under steam pressure, the material may deform, the seams will not withstand a strong load and will break. If too large a diameter is selected, with a low boiler output, incomplete condensation of steam may occur. The coolant will be used ineffectively.
We recommend: Features of a steam heating device in a private house
YouTube responded with an error: Access Not Configured. YouTube Data API has not been used in project 268921522881 before or it is disabled. Enable it by visiting https://console.developers.google.com/apis/api/youtube.googleapis.com/overview?project=268921522881 then retry. If you enabled this API recently, wait a few minutes for the action to propagate to our systems and retry.
- Similar posts
- Pros and cons of steam heating without a pump
- Features of steam heating in a bath from the stove
- Features of a steam heating device in a private house
- How does a low pressure steam heating system work?
- How to make steam heating in the country?
- Which wood stoves are suitable for steam heating?
The basics of choosing eurolining
The finishing material is attached to the counter-lattice obtained after installing the waterproofer. There are only two main ways of fixing the lining: nails and special clamps. The first method can be considered the simplest. However, in aesthetics, such a cladding of the one made in two other ways loses a lot. After all, the heads of the carnations will be clearly visible anyway.
Therefore, the lining is often fixed on the crate with clamps. These fasteners are first put on the lamella groove flange, and then on the timber. In this way, a very beautiful coating can be made. In the same way, a block house is attached to the crate.