Seeing that water is flowing from a gas boiler, do not postpone the solution to this problem on the back burner. After all, you do not want to change the entire boiler because of a small crack in the heat exchanger, do you? Let's say right away that coolant leaks occur for other reasons and in other places. How to detect and eliminate them is the topic of our article.
We will tell you how you can quickly identify a leak. We will show you which structural components are most susceptible to loss of tightness. Our recommendations will help you quickly identify the cause in order to eliminate it without waiting for irreparable breakdowns.
Places of water leakage
Leaks can occur along the entire water path. If a double-circuit gas boiler is flowing, the problem may be in the following nodes:
- heat exchanger;
- pipes;
- expansion tank;
- places of detachable connections.
The level of complexity of the upcoming repair largely depends on the location of the water leak.
The easiest way is to eliminate leaks at the points of detachable connections. It is more difficult to repair a leaking pipeline inside the equipment. The most time consuming process is the repair or replacement of the heat exchanger.
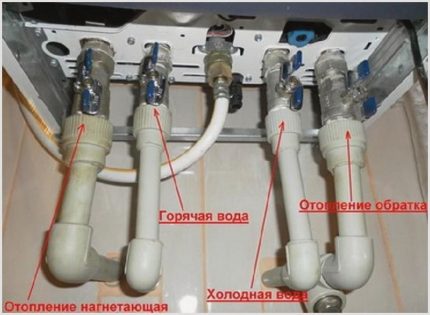
The double-circuit boiler is equipped with connections for connecting 4-pipes through which water is transported. In case of insufficient sealing of their joints, a leak of coolant, cold or hot water occurs
Repair leaks as soon as possible after they occur. Loss of heating medium can lead to automatic shutdown of the boiler.
An attempt to compensate for the loss of the coolant by periodically adding a new portion is fraught with accelerated wear of the boiler. The water is saturated with oxygen, which accelerates the corrosion of metal components, which shortens the life of the heating equipment.
How can you tell if a boiler is leaking?
Leaking heating medium reduces the hydraulic pressure in the heating system. Let's say right away that pressure can also change for other reasons, for example, due to a change in the density of water. But if the arrow of the pressure gauge stubbornly falls down or the display shows a notification about the lack of water in the system, you must definitely check for leaks.
Inspection of problem areas is carried out: first of all, detachable connections, including taps. But it is not always possible to determine the place of the leak visually, because the coolant will not necessarily flow in a continuous stream, flooding the floor. More often than not, it just drips. Drops evaporate on hot surfaces.
Therefore, you need to pay attention not only to damp places, but also to traces of drips, rust spots. It is better to look for leaks with a flashlight; inspect hard-to-reach areas with a mirror. Place wipes under the possible leaks. Their wetting will serve as confirmation that there is a coolant leak here.
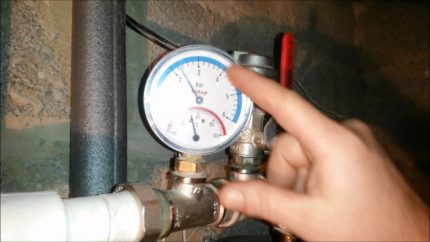
A mandatory element of the heating system is a pressure gauge that measures hydraulic pressure, a pressure drop may indicate a coolant leak
If only a pressure drop indicates a leak, it may not be in the boiler, but in other elements of the heating system, including radiators, which also need to be checked.
It can be done as follows: water is drained from the circuit and air is pumped in with the help of a compressor. It will come out of the leak with a characteristic noise. If pipes are laid under tiles or in concrete floors, you will need to use a phonendoscope to hear the sound of the air coming out. Also in this case, leak detection can be performed using a thermal imager.
How to fix a leak
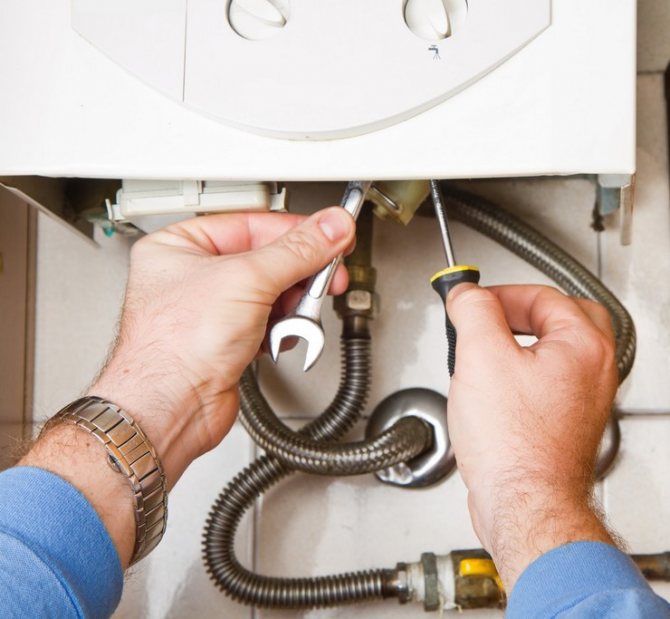
If a breakdown is found, it must be eliminated. Even a small drip, if left unattended, can develop into a solid leak that can damage the entire heating system. The elimination of the boiler leak can be done by means of a soldering. To do this, it is necessary to remove water from it and wait for it to cool completely. After that, markings are made, the device is disconnected from the network and the places where water leaks are sealed with a gas burner. When the leak is eliminated, water is again poured into the boiler and the device starts up.
In order to repair the boiler as rarely as possible, or perhaps not at all, it should be carefully examined at the time of purchase for the fact of detecting defects or marriage. Pay particular attention to the quality of the knocks and connections. Only by fully checking the purchased unit, you can be sure of its quality and serviceability.
What to do with condensation?
A puddle of water under a boiler is not necessarily a sign of a leak. Perhaps this is condensation, that is, water formed during the condensation of steam.
When the boiler is started, air containing moisture enters its combustion chamber. When a gas-air mixture is burned, this moisture turns into hot steam much faster than the heat carrier heats up. The vapors come into contact with the still cold surface of the heat exchanger and settle on it in the form of condensate.
When condensation occurs, the vapor settles on cold surfaces in the form of water droplets, which contain a small percentage of acids that corrode metal surfaces
After heating the coolant to 60-70 degrees, the condensate evaporates. To speed up this process, when starting the boiler, you can set the adjustment knob to the appropriate division, and then, if necessary, reduce the heating to 40-50 degrees.
The formation of condensation when the boiler is operating for a long time with a coolant temperature above 60 degrees may indicate an improper organization of the heating system. It is worth checking again whether mistakes were made in the design and installation of the piping.
The problem of condensation cannot be underestimated, since prolonged exposure to an acidic environment on metal surfaces leads to their corrosion. Wet surfaces attract soot to them, which deteriorates the thermal conductivity and reduces the boiler efficiency.
Condensation also settles on the inner surfaces of non-insulated chimneys, which leads to accelerated pollution and wear. Chimney insulation helps to solve the problem.
Main reasons
Condensation occurs when the smoke cools, which contains water vapor and various chemicals. When too much moisture accumulates on the inner walls, it collects into droplets that begin to flow down. If there is a severe frost outside, the resulting condensation freezes, and when it thaws, water begins to flow through the passages.
The reason may lie in the following:
- Lack or insufficient thermal insulation of the chimney. If in the attic or the part of the chimney protruding above the roof freezes, the smoke in this place will condense due to the sharp temperature drop.
- Incorrect design. Excessively long or narrow passages, a large number of turns or other gross mistakes made at the design stage contribute to the fact that air masses with combustion products pass through the chimney for a long time and have time to cool down in the process.
- Excessively strong or weak cravings. If the draft is weak, then the combustion temperature is low, which means that the smoke comes out at a lower temperature. The dew point is then in the fume extraction system and not outside of it. With strong draft, part of the air passes through the pipe, bypassing the combustion chamber or not participating in the combustion process.Moisture in the air also condenses.
Also, the problem can arise due to pipe clogging, the use of wet fuel and other factors. In any case, if water flows from the chimney, it is not worth postponing the solution of the problem, since this can turn into sad consequences.
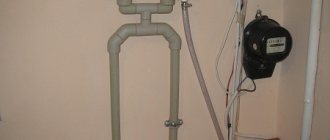
Does it flow through threaded connections?
The boiler heating circuit is closed. The heated coolant flows from the heat exchanger tube to the supply line and then to the radiators. The coolant returns through the return pipeline, entering the heat exchanger again and then continuing to circulate in a circle.
The heating circuit pipes are connected to the supply and return pipelines by means of threaded (detachable) connections using connecting parts - squeegees with union nuts, or otherwise American.
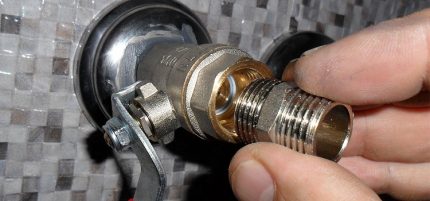
With the help of American women with union nuts, expansion tanks, shut-off valves and other elements of the heating system are connected to the highways
Threaded connections are sealed with elastic heat-resistant seals in the form of rings. If they are worn out or if installed incorrectly, water leakage occurs. Poorly tightened nuts lead to the same consequences.
If you see water dripping at the threaded connection, you should first try to tighten the nut. Excessive zeal is useless here, since if the nut is tightened too tightly, it can break. If, after tightening the nut, water continues to leak, the seal must be replaced.
Turn off the gas and water supply in advance, drain the water from the heat exchanger. Unscrew the union nut, replace the seals and reinstall the nut.
Manufacturers of heating boilers seal detachable joints with gaskets made of rubber, silicone, paronite or other elastic materials. They are easy to use, durable and always commercially available. Often come complete with clamps. When choosing gaskets, take into account the size of the thread.
You can also use sanitary flax as a sealant. Regardless of the presence of leaks, the seals are changed every time the water lines are disassembled.
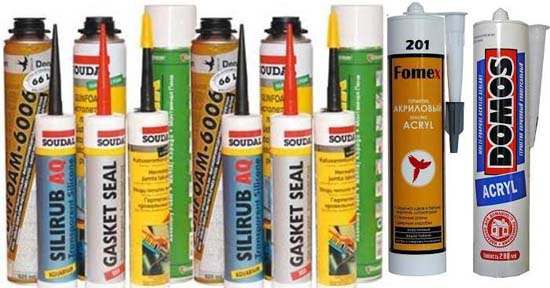
Types of sealants
In today's everyday life, a large number of agents with sealing properties are used.
According to their chemical composition, sealants are divided into the following main types:
- acrylic - unstable, do not tolerate temperature changes;
- polyurethane - elastic, have high adhesion to metals, resistant to corrosion and temperature;
- silicone - the most common type of universal sealants, retain elasticity and moisture resistance in a wide temperature range, are durable.
When sealing leaks in the metal elements of the heating system with silicone sealant, it is permissible to use only its neutral variety, but not acidic, since the acetic acid contained in the acid sealant will cause active corrosion of the metal.
Heat-resistant sealant for heating pipes is used for metal and polymer materials. This tool regularly fulfills its purpose - to prevent moisture penetration from damaged elements of the heating system. The sealing substance, which is a viscous mass, quickly hardens at the application site and subsequently withstands high temperatures.
To seal threaded connections in modern heating networks, instead of linen tow and FUM tape, anaerobic adhesive sealant is used. The environmental friendliness of such a sealing agent allows it to be used not only in heating, but also in plumbing systems.
A sealant for heating boilers serves to eliminate gaps in places where the material's temperature resistance up to 1500 ° C is required.
With this tool, it is possible to close cracks in heat exchangers and chimneys of boilers and furnaces. After hardening in the seams between surfaces made of different materials (metal, brick, concrete), the substance retains its tightness.
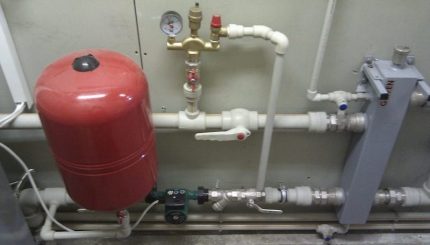
Expansion tank problem
The volume of water in the heating circuit varies depending on the heating level. As the temperature rises, the volume of water increases, which entails a change in the hydraulic pressure inside the closed heating system.
At this moment, the elements of the heating circuit would undergo an increased load, fraught with their breakdown. But this does not happen, since the design of the boiler is complemented by a safety system, which includes an expansion tank that receives the resulting excess water.
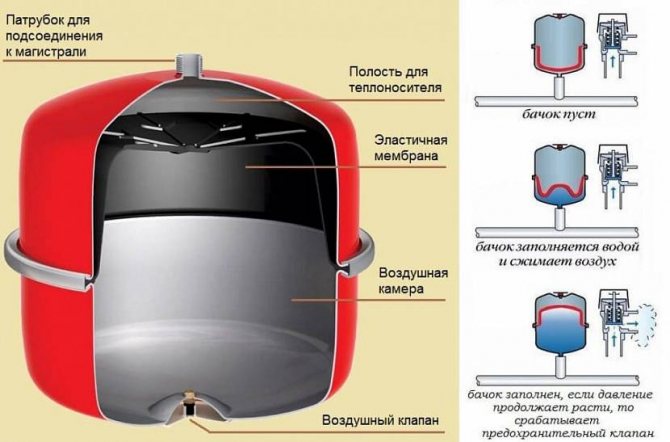
The device and principle of operation of the expansion tank, divided by a membrane into two chambers, the location of the air valve and the branch pipe for connection to the water main
For installation on heating pipelines, open and closed expansion tanks are used. Open tanks are installed outside boiler rooms, for example, in attics, and are supplied with a whole system of pipes for connecting expansion, circulation, signal, overflow pipes.
All models of wall-mounted, both double- and single-circuit boilers are equipped with built-in expansion vessels. They are of a closed type, have only one branch pipe and two internal cavities, separated by a membrane. To ensure the standard pressure in the expansion tank, there is air or an inert gas, for example, argon, in its upper cavity, and there is an air valve with a nipple.
Excess coolant flows through the pipe into the lower cavity. The membrane bends, the air is compressed in the upper cavity, and the coolant takes up part of the internal space of the expansion tank.
The excess coolant generated during heating is discharged by the safety valve of the boiler itself or the heating system. If necessary, the liquid is replenished through the boiler make-up valve.
In open and closed expansion tanks, leaks occur at the threaded joints of the pipes with pipes. To eliminate them, tighten the union nuts or replace the gaskets, as mentioned above.
The metal bodies of the expansion vessels are subject to corrosion due to the presence of oxygen bubbles in the water mass. Corrosion leads to the formation of fistulas (holes), which become the place of leakage of the coolant.
The more often you have to pump a new portion of water into the system, the higher the risk of damage to the expansion tank housing and other metal components. If there are fistulas, the tank is changed to a new one.
Steps to eliminate leakage with liquid sealant
Before sealing a leak in a heating boiler or in a heating pipe system, it is worth preparing a certain tool. It can be a welding machine or a thermal imager. To eliminate the leak, use the following instructions:
- It is best to "illuminate" a hidden leak with a thermal imager. Such diagnostics will allow you to find the place of breakdown with high accuracy and prevent minor fistulas that can become a problem. Elimination of the problem area is carried out by replacing the emergency section of the heating main or by tightening the docking element.
- If the integrity of the membrane in the expansion tank is broken, repairs are not performed. In this case, you need to buy a new product from the store.
- A crack in a heat exchanger is one of the most difficult problems to diagnose. If you have experience in welding, you can try to weld a fistula yourself. However, it is better to seek the help of a qualified technician or take the heating equipment to a service center.
- An unclosed tap is the most innocuous reason, which is often forgotten to check. Eliminated by a complete audit of all locking valves.They are stretched and set to the required value.
Of course, it is possible to eliminate the heating boiler leak without welding. In this case, it is necessary to act depending on the location of the breakdown. The first thing to do is turn off the entire system and let the coolant cool down. After that, you need to drain all the liquid from the system. If a leak is detected in an open section of the heating main, a plumbing clamp with a rubber gasket is applied. The leak on the heat exchanger can be sealed with liquid welding.
The increased thermal stability of some special sealants makes it possible to use them for the prompt repair of heating boilers
It is not always possible to use external agents to repair heating. What to do, for example, if the place of leakage cannot be found, because the house had hidden piping and a heated floor was installed? Are you going to have to break down walls and rip up floors? No, you don't have to! In such situations, a relatively new method of eliminating leaks is used - by pouring liquid sealant for heating pipes into the system. Such a sealant is also suitable for heating batteries, when it is impossible to put a clamp on the leak.
The fundamental difference between liquid sealants for a heating system is their ability to eliminate leaks not by applying to the damaged area from the outside, but directly from the inside.
In an emergency, it is permissible to fill the heating system with a sealant intended for car radiators
The essence of this method is that in a mixture with a coolant, the sealant remains liquid, and only when it comes into contact with air entering the system does it polymerize. Gradually hardening, clots of sealant are sealed from the inside of the cracks in precisely those places where the integrity of the system is violated.
We offer you to familiarize yourself with the boiler in a water heating furnace with your own hands
Several types of liquid sealants for heating are produced, each of which is adapted to specific conditions of use, in particular:
- the coolant is water or antifreeze;
- gas or solid fuel boiler;
- heating or water pipes.
You should not try to look for any one universal sealant for your home heating system. It is better to purchase a specialized compound for the specific parameters of your heating system.
The best known among consumers are liquid sealants for heating systems produced by the German company BCG. The use of these products is considered an ideal solution for eliminating hidden coolant leaks. When used correctly, the liquid sealant does not pose a danger to heating boilers and does not damage the circulation pump and measuring instruments.
The pipe and radiator sealant must remain in the system for a long time. Once you add this sealant to the heating system, you can forget about leaks for several years.
Sealants for closed heating systems eliminate pressure losses associated only with leaks in pipes and radiators, but are powerless in cases where the membrane in the expansion tank is broken.
Before starting to seal possible leaks in the heating system, you must make sure that the expansion tank is in good working order.
The procedure for using liquid sealants to repair a home heating system can seem daunting. In some cases, clots of sealing liquid cause partial blockages and impede the movement of the coolant. Therefore, in order not to harm the heating equipment due to your inexperience, it is better to invite a specialist. In any case, you need to study the instructions for using a specific type of sealant for heating batteries and strictly follow it.
Once you decide to use a liquid sealant to fix a problem in your heating system, you need to make sure that:
- the reason for the drop in pressure is precisely the leakage of the coolant, and is not associated with a malfunction of the expansion tank;
- the selected type of sealant for heating systems corresponds to the type of heat carrier in this system;
- the sealant is suitable for the given heating boiler.
German sealant liquid type BCG-24 is used to eliminate leaks in heating systems
When using liquid pipe and radiator sealant, it is important to maintain the correct concentration. On average, its values are from 1:50 to 1: 100, but it is desirable to determine the concentration more accurately, since the effectiveness of eliminating leaks can be influenced by such factors as:
- coolant leakage rate (up to 30 liters per day or more);
- the total volume of water in this heating system.
We offer you to familiarize yourself with the Brick oven with a water boiler
If the volume does not exceed 80 liters, 1 liter of sealant will be sufficient to fill the heating system. But how can you more accurately calculate the volume of water in the system? You need to calculate how many meters of pipes and what diameter were laid in the house, and then enter this data into any of the online calculators. To the resulting volume of pipelines, it is also necessary to add the passport characteristics of the volumes of all radiators and the boiler.
- Dismantle or cut off all filters with taps so that they do not get clogged with a viscous solution of sealant for heating systems;
- Unscrew the Mayevsky tap from one radiator (the first in the direction of movement of the coolant) and connect a pump to it (of the "Kid" type);
- Start the heating system and let it warm up for an hour to a temperature of 50–60 ° C at a pressure of at least 1 bar;
- Open all valves on pipelines and radiators for free passage of sealant through them;
- Remove air from the entire system, including radiators and circulation pump.
- It is possible to pour liquid sealant into the heating system, including using a hand pump for crimping
Drain about 10 liters of hot water from the system into a large bucket, of which use most of it to prepare the sealant solution, and leave a few liters for subsequent flushing of the pump;
- Shake the canister (bottle) with a sealant for radiators and heating pipes, then pour its contents into a bucket;
- Rinse the canister thoroughly with hot water so that all the sediment remaining in it gets into the prepared solution.
Solutions of sealants for heating systems must be prepared immediately before use so that the liquid does not come into contact with atmospheric air for too long.
Filling with sealant
Liquid sealant for heating systems must have time to mix with the coolant before it reaches the boiler, so it is more expedient to pour it into the supply:
- Introduce a liquid sealant solution into the system using a pump;
- Pump the remaining hot water through the pump so that absolutely all the sealant residue gets into the system;
- Release air from the system again;
- Raise the pressure to 1.2–1.5 bar and maintain the operating cycle of the system for 7–8 hours at a temperature of 45–60 ° C. This period is needed for the complete dissolution of the sealant in the coolant.
We offer you to familiarize yourself with the Two-pipe heating system: diagram
Safety valve leaks
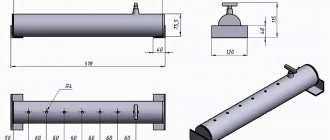
An important element of the safety system is a safety valve, which is necessary to "back up" a closed expansion tank. In boilers for individual heating systems, spring-loaded safety valves are usually installed.
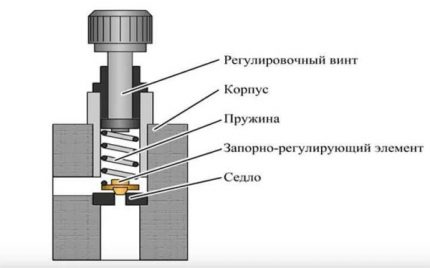
Spring Type Valve Diagram showing major functional parts including down spring, poppet, seat
There is a metal spring in the body of such a valve, which presses on the stem, and this, in turn, holds the support plate in a position when it is tightly pressed against the seat.
If, when the pressure in the heating system rises, the expansion tank for one reason or another does not cope with its functions, the coolant increases the pressure on the plate. The spring at this moment is compressed and lifts the plate over the seat. Through the resulting hole, the excess coolant rushes into the drain pipe and further into the sewer.
If the expansion tank is selected incorrectly and its volume is insufficient to accommodate all the incoming water, the membrane may rupture and water will fill the entire upper cavity. With a further increase in pressure, the safety valve is triggered, through which the formed excess coolant is removed.
The safety valve is also triggered if the diaphragm is torn due to wear, when air leaks through a faulty nipple, or if the control automation malfunctions
If the connection of the valve branch pipe to the drain pipe is not tight enough, the coolant will not be in the sewer, but on the floor. To prevent this from happening, during a technical inspection, they pay attention to this area and, in the presence of the slightest leaks, they are sealed.
The safety valve, installed outside the heating boiler, has a similar design and can also leak, requiring urgent repair
Be sure to determine the cause of the valve actuation. If necessary, a new expansion tank is installed taking into account the volume of the coolant in the system, a worn membrane, a faulty nipple or a tank assembly are changed, and problems with settings and control are solved.
An emergency situation for a heating boiler is standard for the safety valve itself, because it is needed precisely in order to reduce the damage from the consequences of an accident. But the valve can fail itself, causing the coolant to leak.
Most often, the breakdown is associated with the spring, which is constantly under stress and, as a result, loses its elasticity, which leads to leaks even during normal operation of the system. The defective valve is replaced with a new one.
When choosing a valve, its technical parameters are taken into account:
- nominal diameter of the nozzle bore (DN);
- size of the threaded connection;
- response pressure.
Requirements for safety valves for heating systems are regulated by GOST 12.2.085-2002.
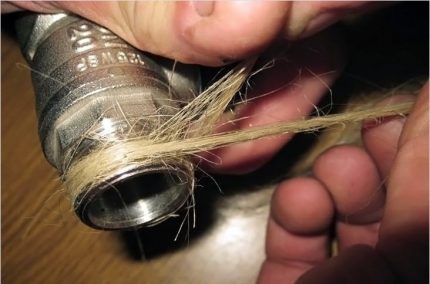
The traditional material for sealing threaded connections is sanitary flax (tow); to increase the reliability and durability of sealing, flax is impregnated with a special compound
But what if the gas boiler is leaking due to the breakage of a recently installed valve? This happens when a grain of debris, such as rust from an expansion tank, gets between the plate and the saddle. In this case, the valve is removed, rinsed under running water and installed in place.
The valve is installed so that the spring is vertical. An arrow is shown on the body indicating the direction of flow of the coolant. Heat-resistant elastic gaskets or sanitary flax are used to seal threaded connections.
Damage to the heat exchanger and pipes
If the heat exchanger of a gas boiler is leaking, the wall may have burnt out, a crack or fistula may have formed. According to the material of manufacture, heat exchangers are divided into copper, steel, cast iron.
Metal cracks are formed by thermal stress and hydraulic pressure. Corrosion processes lead to the formation of fistulas. Repair is carried out by soldering.
The main stages of the process:
- dismantling the heat exchanger;
- cleaning and degreasing the area around the leak;
- soldering using flux and solder;
- test;
- installation.
In the event of a leak in an easily accessible place, complete dismantling of the heat exchanger for repair is not necessary. It is enough to remove the casing, shut off the gas and water, turn off the electrical wires, drain the rest of the water.
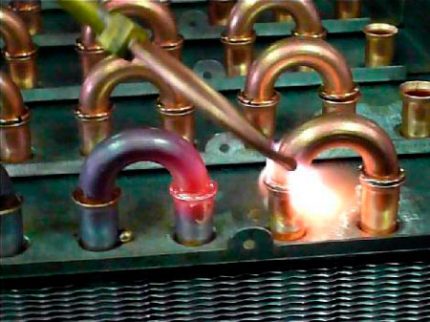
For soldering, a solder is selected that corresponds to the material of manufacture, for example, copper-phosphorus solder containing silver is suitable for copper heat exchangers, the temperature regime must be observed at the soldering point
The soldering point is cleaned and degreased with a solvent. Soldering is carried out using a soldering iron or a gas torch. The heat exchanger is installed in place and communications are connected to it.
The tests are carried out by pressing. The circuit is filled with water, the pressure is increased to the test value and monitored with two pressure gauges for at least 5 minutes. If no pressure drop is recorded, no leaks are noticed during visual inspection, the repair can be considered complete.
In case of severe damage, the repair of the heat exchanger is impractical. They just change it to a new one. It is also impossible to solder many Chinese-made heat exchangers, since they are made of thin sheet alloys that cannot withstand soldering.
How to stop a leak with your own hands
How to fix a leak - the algorithm for eliminating a leak is the same both on solid fuel boilers, such as Don, KChM, and gas boilers, for example, on AOGV, Alixia 24, Ariston (Ariston), Daewoo, Arderia, Electrolux.

- Turn off the device.
- Drain the water.
- Wait until the boiler has completely cooled down.
- To remove the heat exchanger, we will describe how to do it below.
- Solder, eliminate the fistula.
What a heat exchanger looks like - it is a metal or cast-iron body, heated by a burner flame and transferring thermal energy to the liquid that is inside it.
To disassemble it and solder it yourself, you need to remove the front panel, protective casing and combustion chamber protection using a long screwdriver. Then disconnect the sensor wires and pipelines suitable for the heat exchanger, try not to damage the pipes and pipes, hold them with a wrench.
In order to then connect everything correctly, you should first take a picture of the insides of the heat generator. Then disconnect the fan and smoke detector. When removing the heat exchanger, do not use force or make sudden movements, do everything very carefully.
If you find a breakthrough between the circuits in the tube, it is impossible to close such a hole, you will have to change the heat exchanger. It is impossible to weld the heat exchanger, you should use a gas torch soldering.

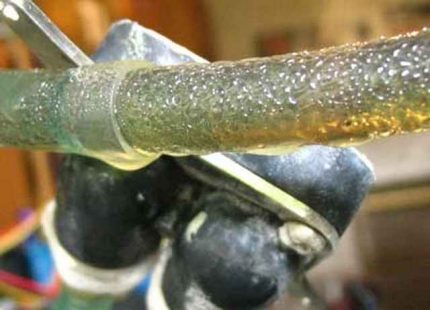
Brazing the heat exchanger
In order to do the soldering with your own hands, you must first clean up the place where the fistula formed. This can be done with fine sandpaper. Soldering is performed with a gas-oxygen mixture with a solder containing the same chemical elements from which the heat exchanger is made.
It is impossible to use tin in this case, since such repairs after a while will again lead to the formation of a fistula. After soldering, a protective coating, such as a layer of aluminum, should be applied to the problem area.