Which brick to choose for masonry?
For each section of the furnace, use its own brick. The highest temperature in the firebox. The material must be able to withstand this load. Only fireclay bricks are suitable here.
All chimney ducts and the firebox area are also subjected to a temperature test, albeit not so high. Here we will use refractory ceramic bricks. It is cheaper than fireclay and is able to withstand the load.
As a base, we will use frost-resistant brick that can withstand high pressure. The weight of the entire structure will be distributed on it.
General recommendation - we use brick:
- corpulent;
- qualitative;
- with good heat dissipation and heat capacity.
The bricks must be of different sizes. Before buying, it is necessary to clarify under which order the order is calculated. Below you will find step-by-step instructions for laying a brick stove with your own hands. There you can use a brick with a size of 250x120x65. Also, it was he who was taken into account in the order in photo # 2 (below, in the section “Laying the stove”).
If desired, you can use various decorative types of bricks for cladding. This will give the stove a more aesthetic appearance.
In our case, you will need 60 pieces of refractory ceramic bricks and 35 pieces of fireclay bricks (taking into account possible losses).

Option one - reliable and efficient brick
An orderly scheme of laying bricks in a simple stove for a garage
A brick wood-burning stove for a garage is a traditional reliable heating option. Compared to metal boilers and potbelly stoves, a brick is safer, but such a furnace heats up longer and cools down too.
In order to fold a brick wood-fired oven with your own hands, you will need the following materials:
- refractory bricks;
- high fat clay for masonry mortar. It is easier to buy a ready-made refractory mortar for laying refractory bricks, it contains all the necessary additives.
Advice. We check the fat content by rolling a ball out of wet clay. If such a ball, thrown on the floor, cracks, then the clay is not suitable - low elasticity (fat content). It is necessary to soak the clay for masonry for at least 24 hours before mixing the mortar.
- cement M300 and sand for the cement foundation of the stove;
- doors for the blower and firebox;
- grate material;
- asbestos thread for sealing;
- chimney valve;
- chimney pipe - asbestos or two-layer stainless steel.
Advice. If you make the chimney removable, then in the summer you can use the hole as additional natural ventilation.
We choose a place for the stove so that the chimney does not come into contact with the roof overlap, and the stove does not interfere with movement.
The sequence of laying a simple brick stove for a garage, dimensions 60x60 cm, this is quite enough for a standard garage:
- the foundation for a small furnace should not be made powerful, 50 cm is enough. If a high furnace is planned, then additional reinforcement of the foundation cement screed can be performed.
Note. If there is a concrete cement screed in the garage, then the foundation for the stove need not be poured.
- after the cement hardens, it is necessary to lay 2 layers of waterproofing (roofing material) and you can start laying the furnace;
- solid base of the furnace - two solid rows of bricks;
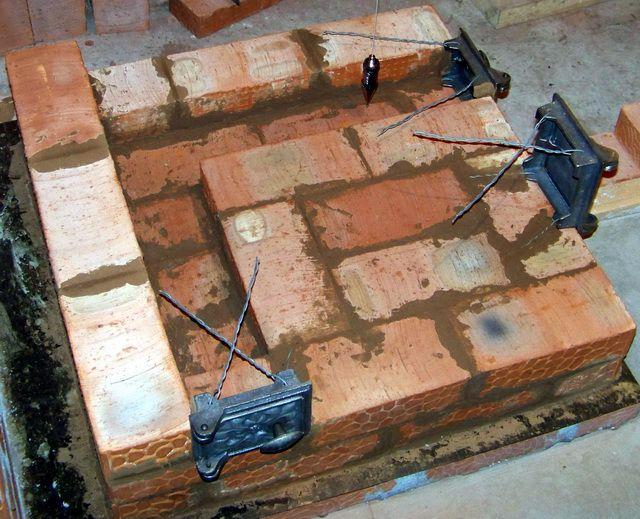
- we expose the ash pan door, fixing it with wire on four sides for rigidity. The wire is fixed with a masonry mortar;
- ordering a brick oven for a garage - the order of masonry is easier to understand by watching the video material.
In the process of laying, we check each row with a water level, it is important to observe the horizontal and vertical. Installation of the grate additionally requires sealing with asbestos thread.
It is possible to modernize a brick oven of the "rocket" type, in this case the heat transfer is doubled by using the heat of the chimney pipes.
When a brick oven is built with your own hands, you cannot immediately test and melt it. It is necessary that the masonry is completely dry.
Preparation of the solution
Let's start by preparing the solution. For masonry work, we use a special ready-made mixture. Sold in hardware stores. It is a yellow-gray powder in 25 kg bags. It remains only to dilute with water in the correct ratio and mix. Detailed instructions are always indicated on the packaging, you need to follow it step by step. This solution is the best choice. He has only one drawback - the high price.
You can prepare a solution for masonry yourself. For this we need clay and sand. To begin with, we will determine the quality of the available clay and the content of impurities in it. Follow the instructions below:
- We roll the clay into a tourniquet. Thickness - 10-15 mm, length - 150-200 cm.
- Take a rolling pin with a diameter of 50 mm and wrap the tourniquet around it.
- The tourniquet should stretch smoothly and tear, stretching about 15-20%.
Expert opinion
Pavel Kruglov
Stove operator with 25 years of experience
If the tourniquet stretches more - the clay is "oily", it breaks earlier - "skinny". In the first version, the solution will shrink greatly under the influence of temperature, in the second it will crumble.
The next step is to prepare the sand. First we sift it through a fine sieve. The cell should not exceed 1.5x1.5 mm. Then follow the instructions:
- with the help of a holder and burlap, we arrange a kind of a net;
- pour sand into it and begin to rinse it under running water;
- rinse until the flowing water is clear.
Thus, we have rid the sand of impurities.
We do the same with clay. Now it should be soaked. To do this, pour clay into a previously prepared container. Pour water so that the entire surface of the clay is covered. Mix thoroughly after 24 hours. We repeat the process until the clay is similar in consistency to toothpaste.
There is no universal proportion for mortar. Everything is established by trial and error, depending on the characteristics of the materials used. The main thing is that it is convenient to work with the solution.
To increase strength, experts recommend adding a little cement or salt.
Expert opinion
Pavel Kruglov
Stove operator with 25 years of experience
Here is a basic recipe for a masonry mortar:
We take 2 parts of clay. Add one sand to it. Using a construction mixer, mix until a homogeneous thick mass. We need about 40 liters of solution.


Installation of a stove stove for a garage made of metal
The main advantage of this design is that it can be made from any metal blank. In this case, you can use:
- metal box;
- 40 liter can;
- metal flask;
- old gas water heater.
In this case, there will be the following order of work:

The principle of operation of the stove stove.
- A small gap is punched in the workpiece. This can be done with a chisel. If a milk can is used, a gap is made below the neck.
- A hole is made in the bottom with a grinder.
- The chimney is pushed onto the branch pipe.
- A grate in the form of a snake is made of steel wire, installed inside the stove through the neck and the wire is stretched.
- Supports are made of small pipes and fixed on the sides of the stove.
- Metal legs are welded to the bottom of the structure.
In this case, you will need to carry out all the work on installing such a structure in the correct sequence, and also know some of the nuances.
It is necessary to place the potbelly stove far from the window.
Care should be taken to keep the pipe long. This will make heating more efficient. In order to be able to save fuel and increase the cooling time of the furnace, it will be necessary to revet the manufactured structure with high-quality bricks.
How to properly fold the stove stove?
Even a beginner can independently fold a brick stove-stove correctly. To do this, you need to know and follow the simple rules that pechnoy.guru provides below.
Scheme and drawing
Below we will consider how to fold a brick stove with your own hands. The drawing and dimensions can be seen in photo # 1:

Photo number 1 - do-it-yourself brick stove drawing
The orderly layout of the bricks of the stove-stove from is shown in photo No. 2:
Photo No. 2 - ordinal layout of bricks (diagram)
We have decided on the materials and design of the furnace, the solution is ready. Such a construction does not require a foundation device. For comfortable and safe work, the heating must be placed in compliance with all fire safety standards. Having chosen a place, we stele two layers of waterproofing. From above we make a preparation of sand, 10 mm thick. Let's start laying:
- On top, without mortar, put a brick (see photo # 2, first row). We strictly control horizontality using a level.

- Install the blower door. We fix it with a wire and wrap it with an asbestos cord.
- We continue laying (see photo # 2, row # 1).
- Next comes fireclay brick (see photo # 2). The grates will be installed above it.
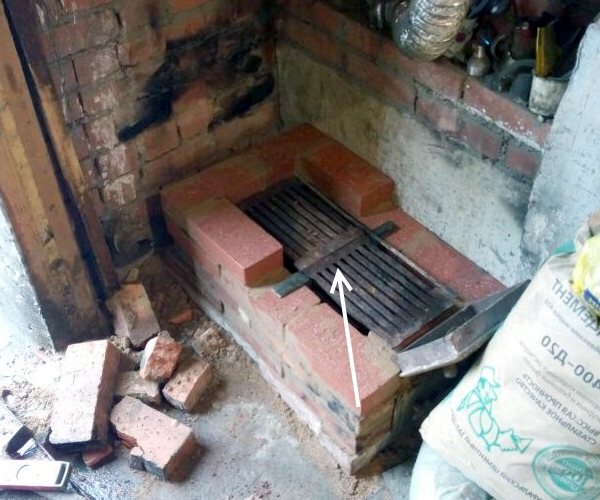
- We put grates directly above the blower.
- We put the next row on spoons. We put the wall behind without mortar (knocked out bricks).
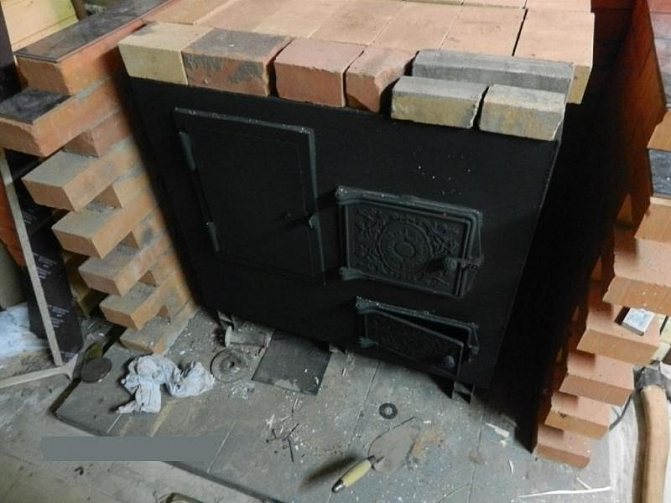
- Install the firebox door. We fix it with wire and bricks.
- Put a row on top of the bed along the contour of the fourth.
- The next one is back on the spoons. We put 2 bricks at the back.
- From above, the row should overlap the fire door and end 130 mm above it.
- We continue laying, slightly shifting the bricks back. Before that, we lay the asbestos cord, on which we will install the hob.
- Let's start the formation of the chimney from the next row. The design provides for the installation of a casing pipe made of sheet or corrugated aluminum. The pipe should not be heavy. Otherwise, the center of gravity may shift.
- On the eleventh row, we put a valve to regulate the air flow. Do not forget to seal it with an asbestos cord and cover it with clay.
- Next, we put the chimney in the quadruple, which we join with the metal one. The pipe should be strictly vertical and not deflect to the side. For greater stability, it should be covered with three rows of bricks.
- We remove the knockout bricks that we put on the 4th row, we clean the chimney from debris.
- The oven should now be whitewashed. Any lime will go. Experts recommend adding some blue and some milk. So the whitewash will not darken and fly off.
- We install a metal sheet in front of the firebox.
- Install the skirting board.


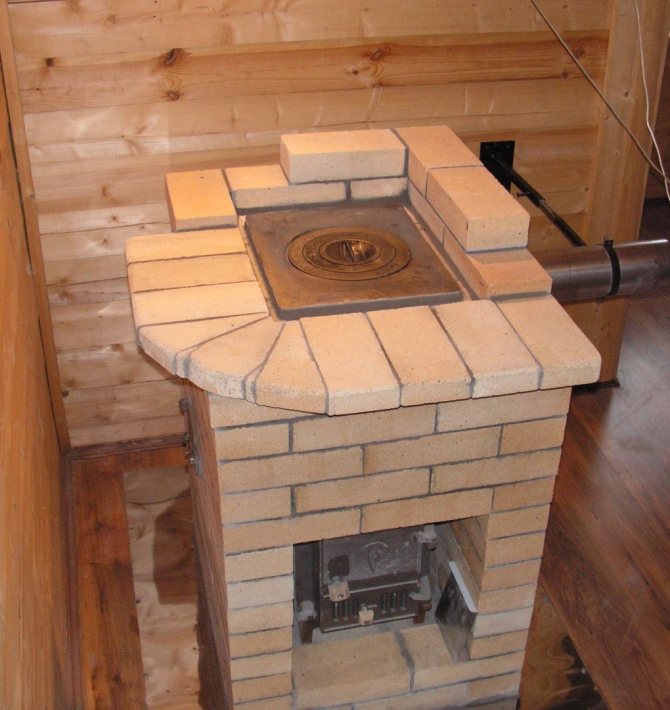
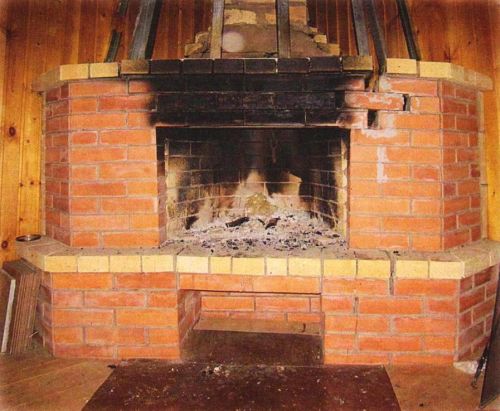
An example of a finished brick stove
Drying
The reason for the appearance of cracks is excess moisture in the bricks, so the oven must be thoroughly dried. There are two stages of drying: natural and forced.
- Natural drying lasts at least five days. All doors must be fully open. To increase the intensity of the process, put a fan in front of the firebox or put it into it and turn on an ordinary electric incandescent lamp (only not energy-saving). It will not be possible to completely dry the oven with this method, so we move on to the next step.
- Forced drying is performed by burning dry wood. Such a furnace is carried out once every 24 hours.You should only heat with small dry logs. Open the blower door and open the cover halfway.
When the wood burns out, cover the blower loosely. And close the top plug, leaving 1-2 cm. When the coals burn out, open all the channels. Carry out such a furnace within a week. On the first day, about 2 kg of firewood is burned. Then add 1 kg every day.
Making a door for the firebox
This element is the most difficult in the whole design. The following table shows the standardized dimensions of the oven doors:
| The size | Blowing, cleaning doors, mm | Openings for furnace doors, mm | |||
| length | 25 | 25 | 25 | 30 | 25 |
| width | 130 | 130 | 250 | 250 | 250 |
| height | 70 | 140 | 210 | 280 | 140 |
We manufacture the firebox door according to the drawings shown in photo # 3:

Photo No. 3 - drawing of the door for the firebox and cleaning chamber
Metal cladding
A brick stove can be additionally sheathed with metal. We get a metal potbelly stove with all the pluses, but no minuses (except for the weight). This design will protect the oven from cracking and chips. This will greatly increase the service life. This will require sheet metal, 4-6 mm thick. The process is not particularly difficult. The metal sheet is marked, the necessary parts are cut out with a grinder or a cutter. Then the facing is carried out and connected by welding and a metal corner.
This design is not only durable, but also safer. However, it requires additional costs and labor costs.
Fire safety rules for the installation and use of a potbelly stove
Compliance with fire safety rules when using a stove will protect all residents from possible unpleasant consequences:
- the fuel should only be dry, no flammable mixtures should be used;
- ignition is carried out by opening the combustion damper, laying the required amount of combustible material and, directly, igniting;
- sufficient ignition of the fuel makes it possible to regulate the power level of the furnace device by closing or opening the ash compartment;
- cleaning the furnace from the accumulation of ash is carried out with complete cooling of the body, by pulling out the ash drawer and discarding the contents.
We recommend that you familiarize yourself with the material on our website: "How to make your own stove stoves for a bath."

[Photo 6 Only after the furnace body has cooled completely can the ash drawer be cleaned.]
- the first use of a potbelly stove will be accompanied by the smell of melting paint, but in the future this episode has no place to be;
- things that have an easily flammable composition should be located at a distance of 1 m from the stove;
- within one load, it is impossible to put more than 3 kg of dry fuel into the combustion compartment, while the door must be closed;
- it is strictly forbidden to use a potbelly stove when fixing any malfunctions in the operation of the chimney;
- it is forbidden to leave the heater in working order unattended with the presence of children in the room;
- during operation, the body of the potbelly stove becomes very hot, so you cannot touch it;
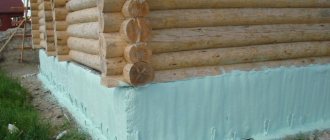
- the installation of the furnace structure is carried out only on a special base (pedestal), which has non-combustible properties.

[Photo 7 To install a stove structure in a wooden house, you will need to make a base that is not exposed to high temperatures.]
Installation and connection
When installing the furnace, you must strictly follow the fire safety rules:
- The distance to walls and surrounding objects must be at least 800 mm. Walls can also be covered with ceramic tiles.
- All parts of the chimney must be tightly connected.
- The room must be equipped with a supply and exhaust ventilation system.
The chimney is installed as follows:
- We fix the first section of the pipe over the chimney opening.
- We build up the pipe bends to the level of the overlap.
- In the overlap we make holes with a diameter of 170 mm.Remove the layer of thermal insulation around the hole in order to exclude fire.
- First, we mount the through glass, then insert the pipe into it.
- Next, we connect the pipes to the external chimney.
- We apply bitumen to the pipe and insulate it.
If you need to heat a large area, you can connect the stove to the heating shield. This will increase the flow of heat and allow it to be stored longer.
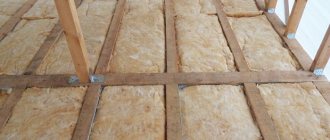
Ovens
Nowadays, there is a huge variety of oven types. The main advantage of the change house, in terms of heating, is its limited space. With the correct design of the change house (insulated block container), it is possible to organize full-fledged heating using low-power ovens.
In addition to power, the choice of a furnace is made based on criteria such as:
- The size;
- Fuel type;
- Chimney placement;
- Cost;
- Operating costs (maintenance costs).
According to these criteria, the best option is a conventional wood-burning stove, such as "potbelly stove". They cost a little, and fuel, with a successful coincidence of circumstances, will be generally free. Operating costs are also minimal.
On the other hand, it is recommended to place such stoves in metal block containers, since an open fire in a wooden shed can become a source of serious problems.
Installation
When choosing a change house for yourself, give preference to standardized options. In this case, it will be much easier for you to install the oven.
So, the installation begins with determining the location of the furnace. It is desirable that this be the corner of the change house, since the stove should not interfere with the movement of people. However, the distance from the oven to the wall must be at least 300 mm. In addition, you should not place it near sleeping places, if any.
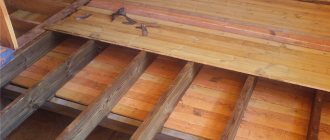
The oven must be installed on a base. Its function can be performed by a steel sheet on which bricks are laid. Thanks to this, the bottom of the shed will not be exposed to excessive thermal stress, which will eliminate the risk of burning out.
The best version of the chimney is a vertical one that goes out through the ceiling of the change house. However, you can also do horizontal, if the design of the furnace implies exactly it. In both cases, it will be necessary to cut a hole under the chimney. It is recommended to protect the cut edges from external factors by edging with thin stainless steel strips.
If the chimney has connections, then they must be sealed with special heat-resistant sealants.
A Few Tips
To be sure that the oven is installed correctly, consider purchasing a container block with the oven already installed. It offers excellent cabins of this kind. The factory installation guarantees compliance with all technical standards, and saves you the risk of damaging the change house during the chimney outlet.
It is advisable to fix metal sheets with a reflective surface on the walls closest to the furnace - this will speed up the heating of the room.
It is impossible to leave the burning "stove" without supervision, especially when the firebox is "at night": either warm up the room in advance, or organize a watch.
Check the condition of the chimney systematically: it must be tight and free from blockages.
Naturally, the change house should provide for the possibility of quick evacuation.
Heating stoves Talcomagnesite properties
Features of operation
Expert opinion
Pavel Kruglov
Stove operator with 25 years of experience
The operation of such a stove is similar to that of a conventional brick stove. Although it does not retain heat as well. Therefore, a brick stove made with your own hands will have to be flooded again within 4-6 hours after the last coals have burned out.
This indicates the unprofitability of using such a design for constant heating. However, for heating a garage, summer residence, etc. periodically, it may well be used.
Such a furnace works only on solid fuel. This is another drawback.
At the same time, the structure is easy to manufacture and operate. This explains its popularity.
Special design features
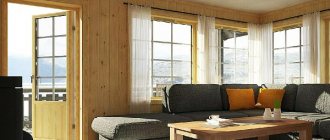
The word potbelly stove has long ceased to be associated with a not aesthetically pleasing stove, the design designs are quite diverse, so you can choose a model based on the style of the room. This kind of stove already plays the role of not only a heater, but also a certain stylistic note, complementing the overall picture of the interior. This heater can operate on any type of solid fuel, for example, wood, the length of which is no more than 20-25 cm.
The potbelly stove installed in the country is intended for the following purposes:
- heating;
- decorative;
- the ability to use as a stove.
Possessing many positive qualities, while having a compact size, the potbelly stove is a worthy competitor to fireplaces. Connecting such an oven is not a difficult process, and if necessary, it is possible to move the structure to another place, including outside, in order to prepare meat dishes.

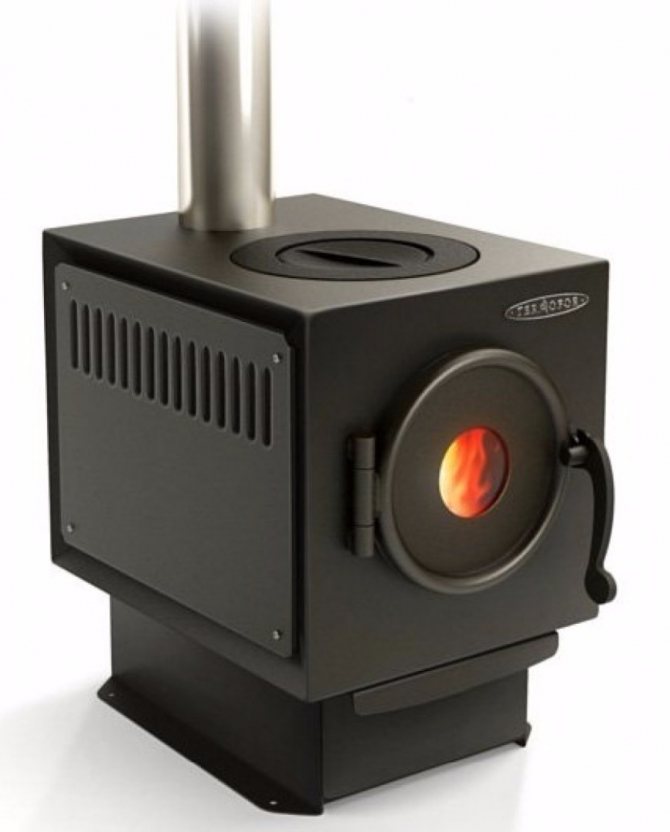
[Photo 4 The modern model of a potbelly stove copes well with the decorative role in the interior.]
If you plan to change the location of the stove, in this case, the model should have a collapsible design. In such stoves, it is easy to remove the top cover, which acts as a surface for cooking, legs and a chimney assembled from several sections connected in series. The small dimensions of the furnace make it possible to consider the device mobile, which is easy to move.
The use of a potbelly stove is absolutely safe for people in the room, because combustion products leave through the chimney. The safety characteristics, as well as the power level of the device, fully depend on the correct installation of the chimney.

[Photo 5 Dismountable cast iron stove model.]
Output
It is quite possible to make a brick stove made of brick yourself. Such a furnace increases the efficiency from 50-60% to 70-75%. However, it is still not cost-effective enough to fully replace stove heating. Although it is more efficient than iron, it retains heat, but for constant use it requires the connection of a heating shield.
As a temporary source of heat, a brick stove made with your own hands in a garage or greenhouse fully justifies itself.
The design can be further improved by revealing it with metal. This will increase the service life and protect the stove from damage.
Features of the
Since it is somewhat more difficult to lay a chimney out of a brick than to install ready-made pipe segments, you need to understand what are the pros and cons of such a design. This will allow you to clearly understand whether such a structure is needed in the house.
Dignity
- Durability. With regular maintenance, a brick chimney will last much longer than any other.
- Aesthetics. The appearance of the brickwork can be an addition to the interior style.
- Resistant to high temperatures. Clay brick can withstand up to 800 C 0, and fireclay up to 1000 C 0.
- High efficiency. Brick retains the accumulated heat much longer than other materials.
disadvantages
- Price the brick chimney is quite high, even if it is self-built.
- Complexity of installation. Brickwork is much more difficult than assembling a chimney from ready-made segments.
- There is some difficulty in cleaning regularly. Therefore, it is important to provide for several technical windows in the design.
- If a brick chimney began to deteriorate over time, it is quite difficult to rebuild or restore it.
Step-by-step instructions for laying a potbelly stove in the garage
- Brick laying is carried out according to the ordering scheme.Such a diagram is a horizontal section of the kiln, which displays the number and location of bricks in each of the rows of brickwork.
- The first row of bricks is placed on the edge, carefully checking the horizontal position. The second row is also solid, but the brick is already on the other side.
- To check the verticality of the furnace from the ceiling to the corners, we attach plumb lines. They will not allow the masonry to be diverted to the side and create a skew of the structure.
- The next few rows of bricks are laid in such a way that the walls and the space between them are formed. This space is for collecting ash and ash. The grate will be laid on top. And on the front side there will be a metal door (blower) designed to regulate the draft in the furnace and the convenience of cleaning the furnace from fuel combustion products. The door is made of sheet steel of sufficient thickness by welding canopies (hinges) and a handle to it. Fasteners are made by pinching metal fasteners - legs with bricks and clamping with them the metal wire holding the door.For tightness, an asbestos cord is fixed on the inner side of the doors.
- The grate can be purchased ready-made or made by hand if you have a welding machine and some fittings. A mesh is assembled from longitudinal and transverse metal rods, which is laid inside the furnace (row 5), without fixing with mortar. The longitudinal holes in the grate should be directed towards the door.
- After the grate is laid, the furnace space is laid. If the firebox is small, then firewood or coal will have to be thrown up more often. The firebox is closed with a door. Its manufacturing and installation process is similar to that of the ash chamber door (rows 7-9).
- Next, the roof of the furnace is laid out (instead of the brick roof of the furnace, you can lay a sheet of cast iron and use it as a stove in the garage) and a thick-walled metal pipe is brought to one of the walls of the firebox, which will heat the garage. The pipe section is inserted into the brickwork, fixing it with mortar. If the pipe is not one-piece, the sections are connected with couplings (clamps) with a heat-insulating layer or by means of a welding machine. The tightness of the seams is very important. If the tightness is broken, smoke will enter the garage, and heat transfer will be disrupted.
- We bring the pipe through the roof or one of the walls of the garage to the street, making it high enough to ensure normal traction. To reduce heat loss, the outer part of the pipe is wrapped with a layer of heat-insulating material (for example, glass wool) and another pipe of a larger diameter is put on top. To protect against precipitation and dirt, a metal cone (fungus) is welded to the top of the chimney.


Drovnitsa
A potbelly stove in the garage is heated with coal, wood or fuel briquettes. All of these fuels need a storage location. It is important that the fuel is dry, otherwise, during its combustion, condensate will be released, settling on the pipes and soot, and the thermal energy will not be spent on heating the room, but on moisture evaporation.

Firewood boxes are made of cast iron, steel and even leather. The storage capacity can be a spacious tank, a metal box or a large leather bag. The volume of the firebox depends on the frequency of use of the stove and the amount of fuel stored in the garage.
Firewood boxes located outside the premises should protect firewood from moisture and dirt, rodents. Inside the garage, the firebox is located at some distance from the stove, its function is to compactly store firewood and reduce dirt and debris from them.
Do-it-yourself firewood boxes for a garage are made from a set of welded rods, mesh and metal sheets, cut and bent according to individual sketches. Read about how to properly heat the stove with coal in the following articles.