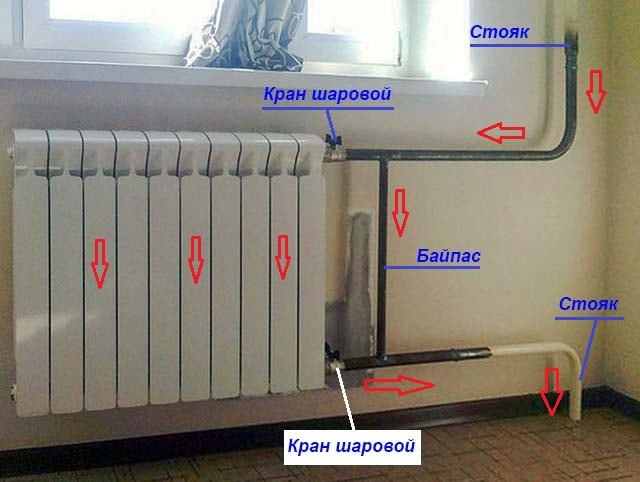
A bypass (jumper on the radiator) is a pipe that connects the inlet and outlet pipes of the radiator. Next, we will consider what a bypass for heating is needed for.

Typically, apartment buildings use a one-pipe heating system. Typically, hot water goes up the riser, and then down, passing through the heating batteries. That is, first, the coolant enters the radiators of the upper floors, and then to the lower floors. There are houses where the coolant moves in the opposite direction (from bottom to top) - but the essence of the system does not change. The main feature of a one-pipe system is that the battery in your apartment is directly connected to the battery in the apartment from the bottom and from the top. The question arises: what will happen if someone turns off the battery - all the neighbors in the riser will be left without heat? This will be the case if the bypass (jumper) is not installed on the heating battery. If there is a bypass, the coolant will go further along it, bypassing the blocked battery.
When is a jumper not needed?
If there is no tap on the battery with which it can be shut off, then the bypass on the heating radiator is not needed. After all, there is still no way to shut off the battery without disconnecting the riser.
In cottages and some new buildings there is a two-pipe heating system. In this case, each radiator is independently connected to two pipes - supply and return. The jumper is not used with this scheme, since the batteries are independent of each other. The temperature in two-pipe systems is usually automatically controlled.
Purpose and scope
What is a bypass? It is a bulkhead in the form of a pipe segment, the diameter of which must be less than the cross-section of the supply pipes. The bypass is installed parallel to the main pipeline through which the coolant circulates. Depending on the location, it can perform the following tasks:
- regulate the amount of working environment. In case of an excess of the coolant, the jumper allows you to reduce its volume and return the excess to the vertical riser of the heating network. Adjustment of the flow of the working medium is in demand in two-pipe heating systems and can be carried out manually or automatically;
- improve heating efficiency. In single-pipe heating systems, the radiators are connected in series, which makes it difficult to control the temperature of the coolant and provides uneven heating of the premises. Why do you need a bypass in such networks? It allows you to create a workaround for the working environment and makes it possible to maintain its temperature within the specified limits using a thermostat. In addition, thanks to the jumper in the form of a pipe segment, individual radiators are turned off for repair and replacement of pipeline fittings.
Why else might you need a bypass? It is in demand in autonomous heating systems of private houses, the design of which provides for the movement of the coolant under the influence of a circulation pump. In the event of a power outage, the power supply to the equipment is cut off, and the forced movement of the working environment becomes impossible. The bypass allows you to establish natural circulation of the coolant and ensures the uninterrupted functioning of the heating network. Heating system switching can be carried out manually or automatically.
Rules for installing a bypass in the heating system
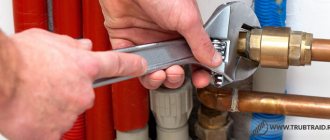
It is advisable that specialists take care of the installation of the bypass on the heating battery.They will mount all equipment according to the established rules and standards, carry out pressure testing of the system, and check for defects. But if a situation arises when you need to put the jumper yourself, use a number of rules that will help you do this.
- The decisive role in the installation of the jumper is played by the correctness of the calculations. The bypass diameter must be one size less than the pipe diameter. You can take a ready-made jumper, or make it yourself.
- If you have not previously mounted such elements, it is better to take a ready-made jumper. This will keep the chance of errors to a minimum.
- The bypass must not be placed directly on the riser. Move it closer to the radiator. However, it must not be installed end-to-end, as this can lead to improper operation of the heating system and overheating of the return current. As a result, the effect of installing the jumper becomes minimal.
- After installing the bypass, it is necessary to carry out a pressure test with a pressure 1.5 times higher than the calculated one and check the system for leaks.
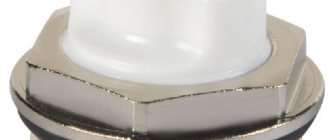
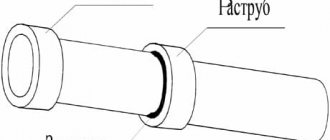
Why do you need insulating joints (IC) on gas pipelines
It is advisable to install the IS:
- on newly constructed gas pipelines, if necessary, their cathodic polarization in accordance with the norms;
- on existing gas pipelines, if their cathodic protection works ineffectively or they are subject to major repairs.
The IS should not have a harmful effect on adjacent underground structures or on “cut off” sections of the gas pipeline:
- decrease or increase in absolute value the minimum and maximum values of protective potentials on adjacent metal structures with cathodic polarization;
- cause electrochemical corrosion on adjacent underground metal structures that did not previously require protection.
Installation of IS is required in the area of the ECP:
- inlet and outlet of the gas pipeline from the ground;
- inlet and outlet of the underground gas pipeline from the hydraulic fracturing (SHRP);
- the entry of gas pipelines into the building, where contact of the gas pipeline with the ground is possible through grounded metal structures, utilities of the building and zero conductors of the building wiring; putting a gas pipeline into an industrial enterprise;
- putting a gas pipeline into an object that is a source of stray currents.
The IS is also installed for sectioning gas pipelines and electrical isolation of separate sections of the gas pipeline from the rest of the gas pipeline. If the resistance to spreading of the grounding contour of the hydraulic fracturing or underground LPG tanks is more than five (5) Ohm, it is allowed not to install the IC on the gas pipelines. When transitioning from an underground gas pipeline to an aboveground one, it is allowed to use electrical insulation of gas pipelines from supports and structures with insulating gaskets instead of installing IS.
It is forbidden to install the IS on the sections of gas pipelines laid under doorways and balconies. When laying the inlets of gas pipelines along the outer walls of brick buildings, ISs are installed on branches to individual consumers (risers of entrances of residential buildings). When laying gas supply pipelines along the outer walls of reinforced concrete buildings or when laying gas pipelines along supports, bridges or overpasses, ICs are installed at the entrances and exits of the gas pipeline from the ground.
The installation of IS should be provided for above-ground sections of gas pipelines (at the inputs to industrial and municipal enterprises, buildings, as well as on supports, bridges and overpasses). The IS is allowed to be installed on underground inputs in special wells. The well must be well waterproofed and dry.
When placed in wells, the IC must be bridged with a permanent detachable electrical jumper. Jumper contact connections should be provided outside the well.Magnesium and (or) zinc protectors can be used as a down conductor, which, in addition, protect the gas pipeline in the anode zones at the insulating joints and protect them from breakdown in case of high voltage hitting the pipeline.
Is it possible to put a tap on the bypass?
Some apartment dwellers use a faucet on the lintel to increase their temperature control capabilities. However, in the case of an apartment building, this is a serious violation. The valve can interfere with the flow of liquid and interfere with proper circulation throughout the riser.
Even with a valve, the battery will not get hotter. And instead of improving the microclimate in the apartment, you can turn off the bypass tap and forget about it. As a result, you will have to deal with neighbors from frozen apartments.
Bypass Installation Options
When we have defined what a bypass line is, consider the question of why it is needed and where it is installed. Depending on the problem to be solved, the element takes the form of a bypass pipeline or a straight section connecting the supply line with the return one.
Reference. The English word bypass literally means "bypass", "bypass".
There are several options for installing bypasses in heating systems:
- On radiators of closed and open one-pipe systems.
- Parallel to the circulation pump operating in a gravity (otherwise - gravitational) heating network.
- A jumper between the supply and return, which forms a small circulation loop for heating a solid fuel boiler.
- In various mixing units.
In apartment buildings, where heated towel rails are connected to a common hot water pipe, a bypass line is also used, acting by analogy with a radiator (item 1 of the list). Why it is needed there, we will tell you further.
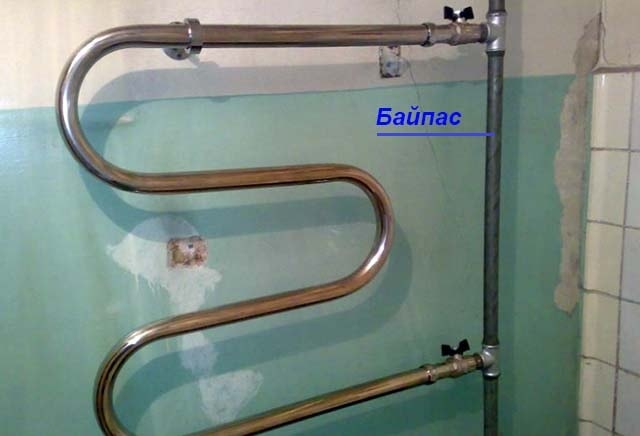
Towel dryer pipes have a large diameter and throughput, a jumper is needed only for easy removal of the coil
The first two options are well known to owners of private houses and apartments. Unfortunately, some owners, who consider themselves great specialists, "improve" bypasses or put jumpers where they interfere with the normal operation of the heating system. We will also consider accidental and intentional errors.
Single-pipe radiator bridges
In most Soviet-built multi-storey buildings, heating is organized using single-pipe vertical risers that run through all apartments. The principle of operation of the scheme is to distribute the coolant among the batteries on the 5-16th floors due to the high flow rate and increased pressure.
For reference. Old cast-iron radiators and steel finned convectors were distinguished by large diameters of internal channels, whose connection to the riser was designed without any bypasses. We are talking about new generation devices with high heat dissipation and lower throughput.
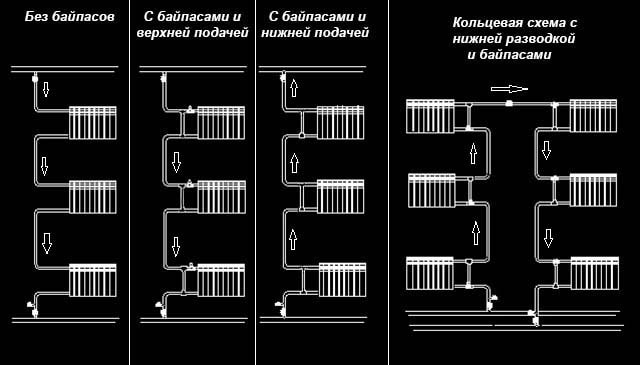
Options for one-pipe heating schemes for multi-storey residential buildings
Note that the radiators are connected to a single line by both connections, between which a bypass is embedded. The pipe bulkhead is specially displaced away from the axis of the riser, otherwise the water will not flow into the battery, but will move along a straight path down or up, depending on the direction of supply. Ideally, the circuit works like this:
- Having reached the fork of the first heater, the flow of hot coolant is divided approximately in half - one part flows into the radiator, the second rushes into the bypass.
- Having cooled down by 1–2 ° С, the first stream mixes with the bypass one and returns to the main line. The temperature of the resulting mixture becomes 0.5-1 ° C lower than the initial one.
- The process is repeated in the same way on the following heaters. To ensure that there is enough heat for all consumers, district heating pumps pump a large amount of coolant through the highways, reducing the temperature difference between the first and last battery.
In a private two-storey cottage, a straight section is placed on the upper batteries
Note. Similar schemes are found in two-story private houses. And although the vertical riser supplies only a couple of radiators, it is advisable to install a bypass on the upper heater, since the performance of a domestic circulation pump is much lower than that of an industrial "brother".
If you remove the direct bypass line, then the entire volume of water will flow through the heater and cool down by 1-3 ° C. Due to the large temperature difference, each subsequent apartment will receive significantly less heat. The room with the last radiator will become as cold as in a doghouse.
That is why, with a vertical one-pipe scheme, an uncomplicated piece of pipe on a battery plays an important role. In two-pipe systems, the hot and cooled coolant goes through different lines, so a bypass is not required.
Here the role of the bypass line is played by the distribution pipeline itself.
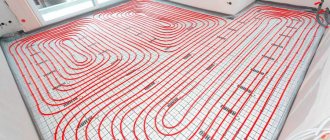
In country houses, the low performance of the circulation pump is compensated by an increase in the diameter and throughput of pipelines. This is done in the horizontal one-pipe system shown in the photo. The bypass is the main line, where about 2/3 of the coolant flows, and the third part enters the batteries.
Circulation pump bypass
In most modern water heating systems, the pump unit cuts directly into the supply or return pipe, which is described in detail in another publication. In this case, you do not need to install a bypass:
- in the event of a power outage and stopping the pump, the coolant will still not be able to circulate on its own due to the small diameters of the pipes;
- in order to remove the pumping unit for repair or replacement, it is enough to shut off 2 taps and unscrew two American women, provided that the unit is assembled correctly;
- since water is unable to move along the lines without forced induction, the bypass bridge will not help keep the system working during the pump service.
This circuit can operate in forced and gravity mode.
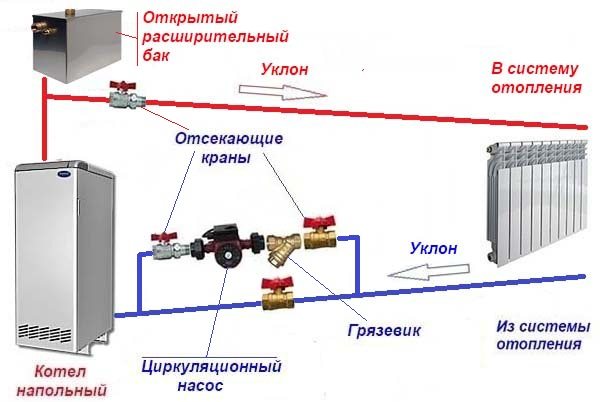
The only case when you need to make a bypass branch for a circulation pump is a gravity heating system. Firstly, the unit with DN 25-32 connection nozzles must not be cut into the Ø50 mm pipe used in the gravitational heating network of private dwellings. Such a narrowing of the diameter will stop any gravity.
Secondly, heat supply should work according to a universal scheme. The main mode is forced from the pump, in case of a power outage - the transition to the natural gravity of the coolant due to convection. To organize such a heating operation, the pump unit must be installed on a bypass.
There are 2 methods of mounting this unit:
- A ball valve is cut into the straight line, and the heating pump is brought out to the bypass line along with a strainer - a mud collector and shut-off valves.
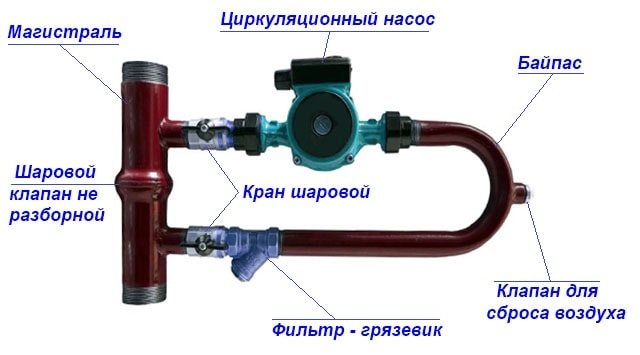
- A ready-made bypass unit with a pumping unit and a check valve is placed in the line break.
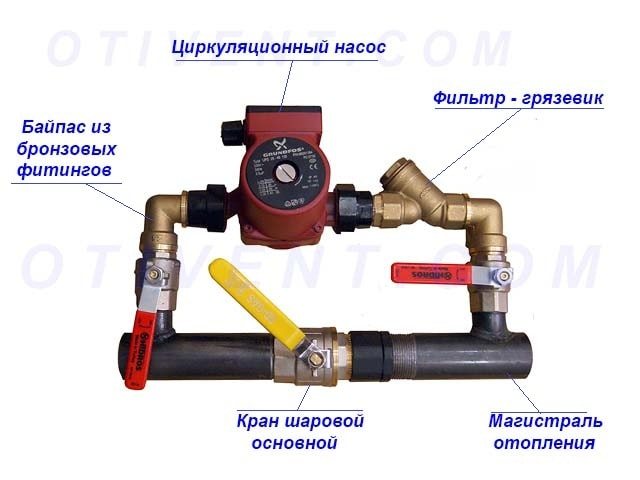
Arrangement of a pumping unit with a shut-off valve on a straight line
In the first variant, the transition to the gravity mode is done manually. When the power supply is cut off, someone from the household must go to the boiler room and open a large tap on a straight section. Otherwise, without water circulation, the boiler will stop heating, the building will get cold and you will freeze.
In the second case, after a power outage, an automatic check valve will open, which is in the closed position during pump operation. But not everything is as rosy as it seems at first glance:
- Some ball valve models cannot be disassembled.If the element becomes dirty, rusty and starts to stick, the entire unit will have to be thrown away (except for the pump unit and filter).
- The U-loop products shown in the photo serve as an additional air trap. They are equipped with a manual air vent valve, which must be used periodically. In addition, the sump is upright, which is wrong.

U-shaped finished assembly with one-piece valve
Hence the conclusion: do not install ready-made automatic bypasses with a valve and a pump. Better do it yourself with a shut-off valve assembly. The house will start to noticeably cool down in 30-40 minutes after shutdown, which is quite enough to open the main highway.
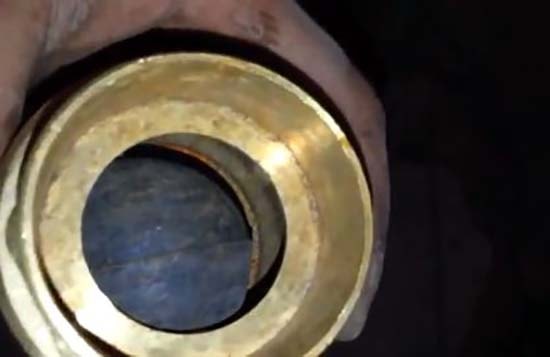
The rubber ball rolls freely inside the chamber and closes the passage under the pressure of water
Option two: assemble the bypass assembly from separate parts using a brass check valve with a loose rubber ball not pressed down by a spring. How such an element looks like, look at the photo and in the video:
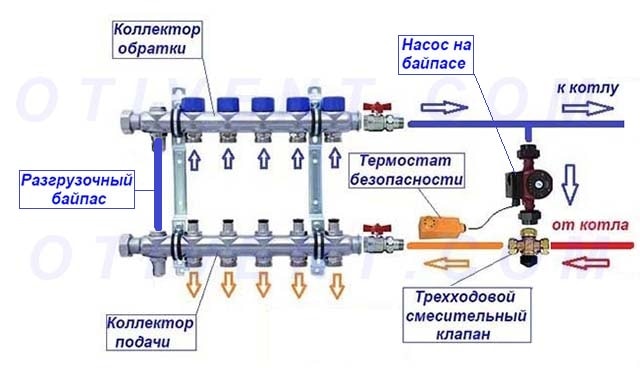
Mixing nodes
These elements of heating systems consist of a three-way thermostatic valve and a bypass connecting the return pipe to the flow. The bottom line is this: the bypass branch helps to collect the coolant from two lines in the valve chamber, and at the outlet to get water of the required temperature.
The principle of dismounting with the use of a lintel and a 3-way valve is used in various sections of the heating network:
- small circulation circuit of a wood-fired boiler;
- piping of a buffer tank or heat accumulator;
- a collector that distributes the coolant along the heating circuits of a water-heated floor.
For reference. The scope of application of mixing nodes is quite wide. Controlled lowering of the water temperature by stirring is used in air heating units (air heaters) and other climatic systems.
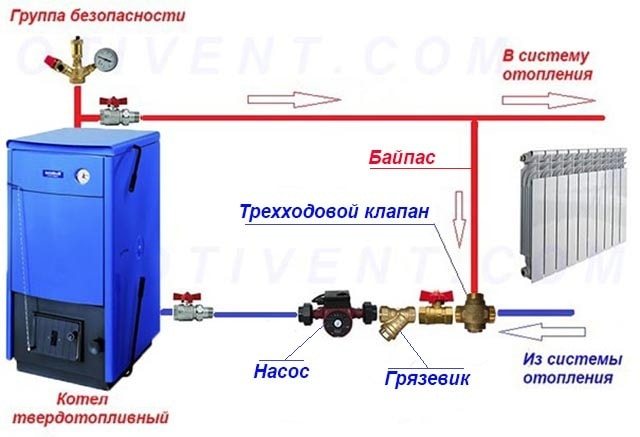
Diagram with a boiler circuit that protects the heat generator from condensate
The bypass shown in the diagram with a three-way valve, forming a small circulation loop, protects the solid fuel boiler from condensation during the heating phase. The process flow looks like this:
- When lighting the wood and turning on the pump, the valve remains closed on the side of the heating system. Leaving the jacket of the heat generator, the water turns into the bypass line and returns to the boiler.
- As it heats up, the temperature of the looped heat carrier rises. When it reaches the threshold of 50-60 ° C (depending on the setting), the thermoelement of the valve is triggered, gradually opening the duct from the side of the radiators.
- The more the water heats up in the boiler circuit, the wider the passage for the cold coolant from the system opens. Mixing takes place in the valve chamber, but the outlet flow temperature does not drop below the set threshold until the fuel has burned out.
In the piping of TT boilers with a cast iron heat exchanger, the bypass mixing unit plays the role of a safety element. Situation: the heating works to its full potential, the wood is on fire, and suddenly the light goes out. If there is no safety net in the form of a UPS or an electric generator, and the power supply resumes after 30 minutes, the water in the batteries has time to cool down.
A relief line with a relief valve is not always found on factory manifolds, but it will extend the life of the pump
Note that the boiler will not have time to cool down within half an hour - the furnace is full of heat and firewood. As soon as the pump turns on, a cold coolant is pumped into the boiler jacket and the cast-iron section bursts from a temperature shock. Therefore, in this case, you cannot do without a bypass.
A similar mixing principle by means of a lintel and a valve is used in the underfloor heating distribution manifold. When the temperature in the heating circuits has reached the norm (35-45 ° C), the 3-way valve closes the supply side of the boiler, and the pump drives the coolant through the bypass along the inner ring.
Note.In case the automatically controlled circuits close together, the comb is equipped with an unloading bypass. Thanks to him, the pump "turns" the water through two collectors, and does not mix it inside itself, which reduces the resource of the unit.
The use of a connecting jumper in the piping of the buffer tank is identical to the previous versions and is shown in the diagram.
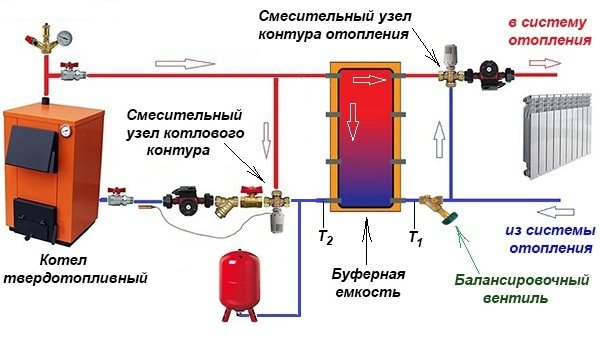
When tying a buffer tank with a solid fuel boiler, 2 bypasses are used


What should be the bypass for this to be super reliable?
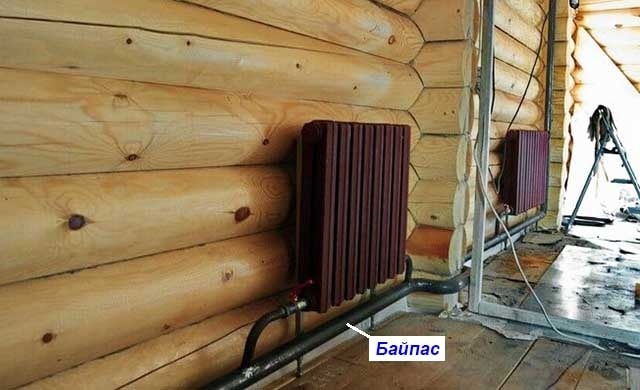
The only way to avoid possible causes of lintel breakage is to make it out of steel pipe. Then the metal-plastic will be only between the battery and the valves. You just need to find a plumber with an informal approach to their work, who will agree to make a bypass from a piece of steel pipe. In this case, installing a heating radiator with such an unusual jumper will save you two extra fittings.
Here is what I saw in my friend's room - this is the final version of the work done:

I will tell you right away that for this work you in any case need a plumber, since there will be nuances of installation when you alone cannot cope. The second point is to try to persuade the plumber to do such an unusual job for him, because he knows how to mount a jumper, fittings and a battery, but your steel pipe will obviously surprise him.
In total, 4 difficulties await you, about each of which in order.
What is a bypass for?
What exactly does the bypass installation allow to do in reality? For example, if there is a bypass for an individual water meter, then this will allow it to be replaced without shutting off the water supply of the house or apartment. The same can be said for circulation pumps integrated into the heating system. The presence of a bypass allows you to switch to natural circulation in the event of a power outage when the pump stops working. If a bypass with an adjustable thermostat is located next to the radiator, then this allows not only setting the required temperature regime, but also replacing the heater in case of failure, without switching off the heating system completely.
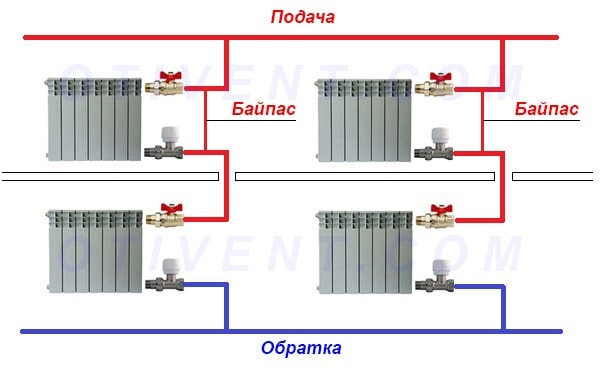
Basically, a bypass is an element of a one-pipe heating system. Such a system has a number of advantages, of which the main one is inexpensive installation, and a large number of significant disadvantages. Installing a bypass minimizes the disadvantages of a one-pipe heating system. By its design, a bypass is jumper from the pipe, connecting the "return" with the supply pipeline. A jumper is installed in the immediate vicinity of the radiator and two ball valves are mounted on it. This allows you to bypass hot water from the supply pipe to the return, bypassing the heating device, thereby adjusting the temperature in the room.
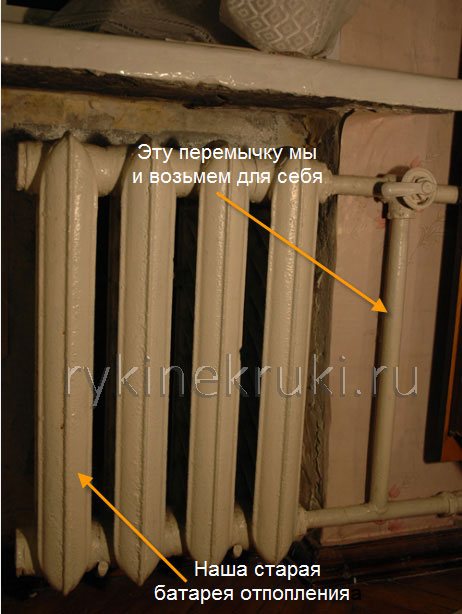
Challenge 1. Where can I find a steel water pipe?
So here we go. We have to replace the heating pipes - that's all! A friend of mine asked in many shops that sell plumbing fittings and plastic pipes - steel pipes are nowhere to be found! But the problem, in fact, is solved very simply - there is a jumper on your old battery, so we will use it:
So, we found the pipe for the lintel. If we rearrange it, then we need to mount it somehow. All steel pipes are known to be connected using threaded connections. Let's look at our pipe. On the one hand, it has a thread:
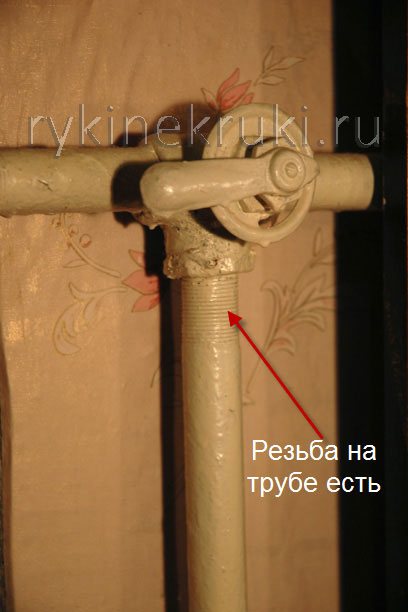
There is no thread on the other side, since our pipe is welded from below to another pipe:
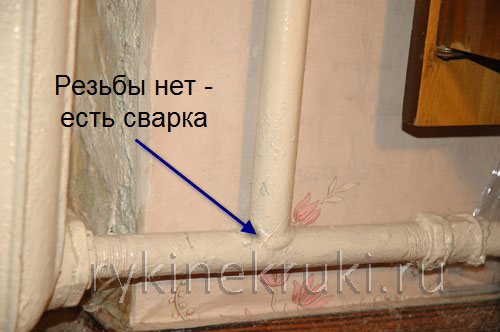
It turns out that from the bottom side we will need to cut a thread for this steel pipe.
But first you need to remove the jumper.
| By reading my blog, you are probably making repairs. Add to your bookmarks this page... All useful home improvement stores are located here. |
- ATTENTION! Make sure we turn off the water in the radiator!
- Saw off the bottom of the pipe under the very T-shaped crosshair in order to have the pipe as long as possible. You can cut it off either with a hacksaw or with a grinder.
- Bend the bottom of the pipe a little to the side.
- With the help of the Swedes, we unscrew the pipe from the upper threaded connection.
Difficulty 3. How to mount a ready-made jumper?
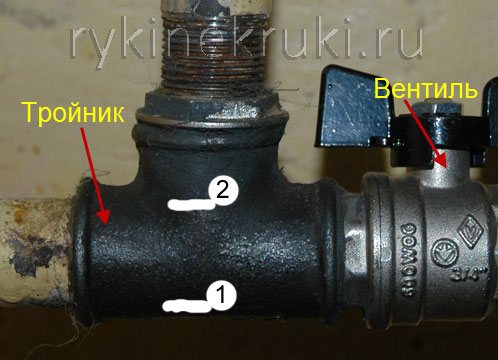
The technology is like this. First, twist two tees, then put three valves - two to the battery and one on the bypass, then mount the jumper - one end is attached in the lower tee, the other in the internal thread of the valve on the bypass. This is where the problem will await! In order to identify it, let's take a closer look at the installation of the jumper. At its lower end, the thread should be cut so that it can be screwed into the tee to its full depth (the threaded part will overlap the flow area of the tee), while the upper cut of the jumper should touch the edge of the bypass valve, so that it can be wound into the thread. You need to tighten up to approximately the white line "1":
Further, flax is wound on the upper thread and the jumper is started to screw into the upper valve. At the same time, it is unscrewed from the lower tee. The length of the jumper should be such that it could be screwed all the way into the upper bypass valve, but it should be unscrewed from the lower tee so that it would completely free the section (passage) in the tee, but it should not be unscrewed too much! Therefore, even before threading, the bridge must be accurately measured in length!
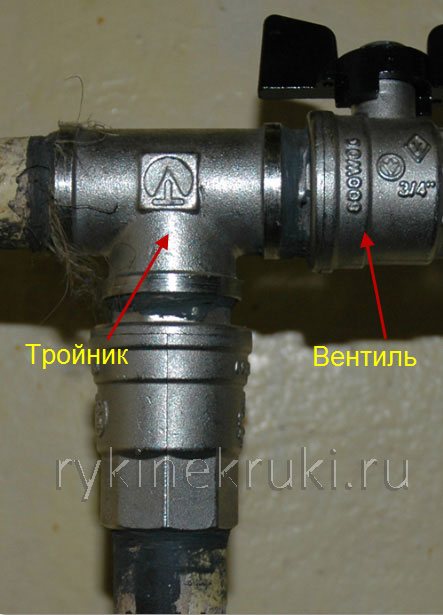
At the same time, from the lower tee, the jumper is unscrewed to approximately the white line "2".
After that, flax with paste is screwed onto the thread unscrewed from the lower tee and tightened with a lock nut, which, by the way, must not be forgotten to screw onto the jumper before installation.