The idea of how to make an electric boiler with my own hands came to me after buying a non-gasified summer cottage. There are 3 worthy models for manufacturing - these are heating elements, electrode (or ionic) and induction boilers. I tried all these options and now I will tell you about the intricacies of self-assembly of these boilers.

A homemade electric boiler is a good alternative to central heating.
Cooking the tool
Before making any electric boiler, you need to take care of a good tool - this is perhaps the weakest point. It is not difficult to assemble the units themselves, but, for example, it is unrealistic without a welding machine.

It is not realistic to assemble a good home electric boiler without a welding machine.
- Welding machine - it is better to take an inverter welder (the price starts from 4700 rubles);
- Cutter - you need to be able to work with a gas cutter, so for home use, take plasma models (price from 4300 rubles);
- Bulgarian - it is desirable to have 2 grinders, a large one for a 230 mm disc (price from 2800 rubles) and a small one for a 125 mm disc (price from 1800 rubles);
- Electric drill;
- Calipers;
- Hammer;
- Kern;
- Roulette.
Assembling a heater with heating elements
To make a homemade electric heating boiler with a tubular electric heater, you will need the following set of materials:
- steel sheet with a thickness of more than 2 mm;
- a piece of steel pipe (length and diameter depend on the capacity of the unit);
- three-phase heating elements (it is not recommended to use heaters with a built-in relay, as they wear out quickly).

First, the future bottom of the boiler must be cut out of the steel sheet. The bottom dimensions must correspond to the pipe diameter. Then, it is required to make a flange from the same metal - a ring whose inner diameter is equal to the outer or inner diameter of the pipe, depending on how the part is planned to be fixed on the body. The ring width is usually 30 mm.

Further, a cover with a diameter corresponding to the outer diameter of the flange is made from a steel sheet. The cover and flange are connected with 6 bolts, holes are made in advance in the mounting locations. Several more holes are drilled in the lid - their size should correspond to the size of the heating elements planned for installation.
Welding elements
The bottom should be welded to the boiler body first, and the flange should be welded next. The cover is mounted only after the tubular heaters are firmly fixed on it. A sealing gasket made of water-resistant material is inserted between the heating elements and the cover.

Between the cover and the flange, there is another gasket made from a car camera. This gasket must be an exact replica of the flange, including bolt holes.
Installation of branch pipes
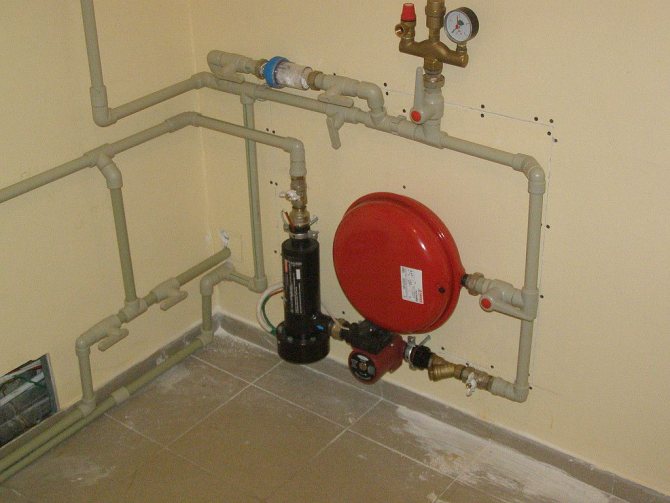
Before closing the boiler with a lid, fittings are installed in its body for connecting pipes of the heating system, having previously cut out suitable holes. It is important that there is a thread at the ends of the nozzles: this is required for the installation of inlet taps, which will block the circulation of the coolant in the circuit if the electric boiler needs to be repaired. A pipe for draining hot liquid is located at the top of the unit, it is advisable to build it directly into the cover. The cooled heat carrier is fed through the pipe from the bottom.

When the pipes are installed, the boiler is completely assembled and connected to the network. Sometimes its design can change: for example, not only the cover, but also the bottom is mounted on the flange.The device is versatile and can be easily adapted to the technical parameters of the home heating system.
Electric installation work
During electrical work, the contacts of all the heating elements of the boiler are connected to the block, and the neutral wire is connected to it. Sometimes heating elements are immediately short-circuited to this wire without using a block.
The cross-section of the wire core must correspond to the load that the heating elements create: then the home-made electrical unit will work without failures.
A phase wire is connected to the contact of each heater, passed through the circuit breaker. The cable cross-section is selected based on the load created by all the included heating elements at the same time.

All wires must be insulated, special attention must be paid to ensure that their bare parts do not come into contact with the metal cover of the boiler.
Option number 2. Making an electrode boiler
The electrode boiler is a more progressive development. Such heaters began to be widely used in the last 10-15 years.
Electrode boiler device
The water itself is used as a heating element in the electrode boiler. The boiler is a metal body, into which a steel electrode insulated from the body is inserted.
A phase is connected to the electrode, and zero to the case, when voltage is applied, the water ions begin to oscillate at a frequency of 50 hertz, as a result of which the liquid heats up. That is why such aggregates are also called ionic.

General diagram of the electrode boiler.
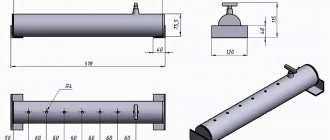
The dimensions of such units are small, a pipe with a diameter of up to 320 mm and a length of up to 600 mm is used as a body, but this is the maximum, for private houses ion boilers are made almost half the size.

Diagram of a heating system with an ionic boiler.
Dignity:
- Quite modest in size, this boiler will not interfere even in the local heating system of a small apartment;
- In these heaters there is no "dry running", that is, without water, the boiler will simply stop working, but nothing in it will burn out;
- The system is not afraid of voltage drops;
- Heats up quickly and also cools down quickly, which means it is easy to adjust;
- Compared to units powered by heating elements, the electrode boiler is much more economical.

Electrode boilers are much more economical than heating elements.
disadvantages:
- Ionic boilers are very demanding on the quality and level of electrical conductivity of the coolant;
- Due to the increased risk of electric shock, the devices need reliable grounding;
- When air enters the system, the electrodes actively corrode and quickly become unusable.
We collect the ionic boiler
| Illustrations | Recommendations |
| Body material.
|
| We adjust the branch pipe. One branch pipe will be welded from the side, the second from the end of the pipe. First, we need to trim the side pipe so that it fits snugly against the body of the pipe. I cut the pipe with a grinder, and then brought it to perfection with a round file. |
| Cut a hole. At that time, I did not have a plasma cutter, so I had to nibble the pipe around the circumference and drill 5 mm holes. |
| Adjusting the hole. Then, with the help of a natfel and a round file, the circle is brought to the ideal. The distance from the edge of the pipe to the side branch pipe is 10–15 mm. |
| We weld the pipes. The pipes must first be tacked by welding in several places, so as not to lead, and then scald the seam. |
| Cut out the platform. As a platform, I used a sheet of fiberglass with a thickness of 20 mm, an approximate size of 120x120 mm, cut it with a hacksaw for metal. |
| Preparing the platform. Drill 5 holes in the platform, 1 in the center and 4 along the perimeter (as in the photo). Hole diameters 10–12 mm. A steel electrode will be attached through the central hole, and the side holes are for fixing the boiler drum. |
| Attaching the body to the platform. In order to firmly attach the boiler body to the platform, I welded 12 mm nuts on 4 sides. They easily pass 10 mm bolts. But these "ears" should be slightly raised above the platform, to ensure this gap, I screwed the "native" nuts on the bolts from below and fixed the holders with the same nuts from above. Rigid ears are easier to weld on. |
| Boiler assembly.
|


Do-it-yourself electric boiler for heating made of polypropylene
In order to reduce the consumption of natural resources, people are increasingly resorting to electric heating equipment, but while preserving natural organic matter, they have to pay huge electricity bills. At the same time, there is one effective way to save money - to make an electric heating boiler with your own hands.

DIY electric heating boiler
Content of step-by-step instructions:
Among the many advantages of electric boilers, it is worth highlighting:
- high efficiency (over 97%);
- small size;
- noiselessness;
automatic temperature control (in modern models).

Electric boiler connection option
Due to the increased energy consumption (more than 4 kW), such boilers must be equipped with an electrical input of the corresponding power in advance, otherwise an accident on the line may occur. For appliances with a capacity of no more than 6 kW, a single-phase power supply is required, and for boilers with a capacity of 6 kW or more, a three-phase power supply. The equipment is connected to a standard 220 V network.
Important! 1 kW of electric boiler power is usually enough for 10 m² of the heated room. Therefore, for an average country house of 250 m², a 25 kW boiler is required.

Electric heating boilers
According to the method of heating the coolant, electric boilers can be:
Consider the features and manufacturing technology of each type.
The classic version of an electric heating device, in which the coolant is heated in contact with the heating element (heating element in the form of a spiral). The liquid, circulating through the heating system, takes heat from the heating element and transfers it to the radiators.
Important! With increased water hardness, the heating element becomes coated over time, impairing heat transfer. Therefore, periodically, the heating element should be treated with special agents to remove lime deposits.
If the element temperature exceeds the required one, then most likely the circuit is leaking. The consequences of such a breakdown can be the saddest, right up to a fire. Modern boiler models for such a case are equipped with a protection that turns off the system in the event of a leak. Therefore, when buying, you should pay attention to the presence of such protection.
- Wide range of configurations.
- Resistant to mechanical damage and strong vibration.
- The sheath of the heating element is not energized.
- The system functions properly even with weak contact with the coolant.
In order to save money and free space, you can make a homemade electric boiler of this type. This will require:
- Bulgarian;
- welding machine;
- grinding device;
- multimeter;
- thermostat;
- steel sheet;
- adapters for connecting to the trunk;
- pipe ø12 cm, several pipes of smaller diameter;
- electric heating elements, 2 pcs.
Having taken care of everything you need, you can get to work.
Stage 1.First, metal pipes for the boiler are prepared, three pieces ø1.25 cm and two ø3 cm. They are cut from the pipes prepared earlier.
Step 2. Then take a large pipe about 65 cm long (this will be the heating tank). Welding burns through holes in pre-designated places for branch pipes - for supply, "return", heaters, expansion tank and drain.
The edges of the holes are sanded with a grinder to prevent sagging.
Stage 3. The spigots are welded to the corresponding holes.
Step 4. A circle of the required diameter is cut from the sheet steel and welded to the bottom of the heating tank. The protruding edges are cut off, the joints are sanded.
Stage 5. A long pipe ø1.25 cm is welded to the upper part of the structure - the second electric heating element will be screwed to it.
Stage 6. A pair of holes is made in the bottom of the structure to install a 1.5 kW electric heater. The heating element is fixed, after which the boiler is screwed to the heating system (by means of nozzles) and the wires are connected.
Stage 6. Next, another heating element of lower power (0.9 kW is enough), equipped with a thermostat, is screwed to the upper branch pipe.
Stage 7. Everything is connected and the system is filled with water. After a few hours of operation, you can check the system with a multimeter. If everything was done correctly, the device will show a minimum of 70 ° C - this temperature is quite enough.
All that remains is to grind and paint the boiler.
Having appeared relatively recently, boilers of this type have already gained immense popularity. The principle of their operation is quite simple: a functioning device generates electromagnetic waves that interact only with metal. They do not affect other materials in any way, therefore, it is impossible to burn yourself even in direct contact with the boiler.
An induction boiler consists of two main elements:
The pipeline (another name is the receiver) has a fairly large dimensions, therefore, if a deposit forms on its inner walls, this will not affect the efficiency of work soon.

Pipeline (also called receiver)
Among the positive qualities of this device, it is worth highlighting:
- reliability;
- security;
- the ability to operate any type of coolant;
- protection against plaque;
- consistently high efficiency;
- quick exit to working mode;
- lack of detachable connections.
Induction heating boilers
The design of these boilers, like the heating elements, is quite simple, so if you wish, you can do your own production. You just need to prepare:
- welding inverter;
- nippers;
- grinder;
- steel wire;
- stainless steel wire rod;
- thick-walled plastic pipe;
- adapters;
- metal mesh;
- copper enameled wire.
Important! It is recommended to use a 15 A welding inverter as an energy source (more is possible).
Stage 1. The material that will be irradiated by electromagnetic waves and waves will be small pieces of wire rod or steel wire ø7 mm. The maximum length of the segments is 5 cm.
Stage 2. It is also necessary to prepare the case. It will simultaneously:
- the basis for creating an induction coil;
- part of the heating main.
For the manufacture of the case, a plastic pipe with an inner diameter of a little less than 5 cm is used.
Stage 3. To connect the boiler to the water supply, adapters are used. Through these adapters, the cooled coolant will enter the boiler, and the heated one will go back to the pipeline. At this point, the first adapter is attached to the base.
Stage 4. An iron mesh is laid at the bottom of the structure. It will prevent pieces of wire from getting into the trunk.
Stage 5. After that, the wire itself is filled up. There should be just enough of it to completely fill all the free space of the container. The upper part of the body is closed with a second adapter.
Stage 6.After creation, you can proceed to the main thing - the induction coil. Enamelled copper wire is taken and wrapped around the body in ninety turns. They should be placed approximately in the center of the structure.
Step 7. Then the electric heating boiler should be connected to the heating system. To do this, a small section is cut out of the pipeline, and a structure is attached instead.
Stage 8. The coil is connected to the inverter, the system is filled with water.
Important! Turning on the inverter is permissible only after filling the line, otherwise the plastic case will melt.
This unit differs in that it is in direct contact with the heating fluid as a carrier. The bottom line is this: the boiler is equipped with a special converter that affects the ions in the liquid. After starting, the ions move chaotically, come into contact with other particles and, as a result, release thermal energy.
The main advantage of electrode models is absolute immunity to damage to the circuit. If the ion chamber is left without a coolant, then it will simply turn off. All this provides increased operational safety and almost complete absence of plaque.
Important! Due to the difficulty in implementation, it is impossible to make such a boiler at home, moreover, without the skills of working with electrical engineering.
Immediately, we note that it is better to entrust the connection to specialists. But if it turned out to build a homemade boiler, then there should be no problems with this.
Stage 1. First, you need to obtain the appropriate permission from the power supply organization. This is necessary in order to find out whether the generated electricity will be enough for the new boiler without prejudice to other users.
Stage 2. Next, the installation location is determined. Everything is simple here: if natural circulation of the liquid is planned, then the device is installed at the lowest point of the system, if with forced, then in any convenient place.
Stage 3. The electric boiler crashes into a pipeline rupture (at the junction of the circuits).
Stage 4. Then you need to bring the wiring. A separate line must be allocated for the boiler. The cable used for connection must be suitable for the power of the circuit, since at the slightest resistance, the efficiency will drop, and the system itself may fail.
Stage 5. Only grounding remains. To create it, the heating system is connected to one of the grounded metal elements of the house (for example, to fittings).

Electrode boiler Galan Ochag 3
As you can see, you can make an electric boiler at home. To do this, you need to adhere to the instructions, prepare all the necessary equipment and have minimal skills in working with equipment.
Due to certain circumstances, many install electric heating equipment, for which you have to pay a lot of money on electricity bills. But there is one solution that allows you to save quite a lot - to assemble an electric boiler with your own hands. Almost everyone can make a homemade electric boiler for heating, which will be in no way inferior to factory products. If you approach this issue thoroughly, then such a product may turn out to be even better than the factory model.
There are three types of electric boilers for home heating. The first ones work from heating elements. Equipped with a tubular electric heater, which is heated with electricity, transferring its temperature to the liquid. The heater has insulation, due to which the coolant is not energized by 220V.
This type of boilers has the following positive qualities:
- quite low price;
- the possibility of a short circuit is excluded.
The downside of such devices is the likelihood of limescale appearing on the heating elements.This negatively affects the operation of the heater and the equipment as a whole, and may even lead to its breakdown. In the case when distilled water or special liquids are used as a heat carrier, such misunderstandings do not arise.
The second option is an induction electric heating boiler with your own hands. It is equipped with a transformer with a winding, the heating pipe in this type of boiler plays the role of an induction coil. The coolant is heated by eddy currents that occur on the winding.
Induction boilers have the following advantages:
- the ability to use any coolant;
- fast heating (about 5-7 minutes);
- security;
- long service life;
- small dimensions.
- high price;
- large weight (from 20 kg or more).
And the third option is an electrode electric boiler - this type uses liquid not only as a heat carrier, but also as part of an electrical system. This boiler can be easily assembled by yourself, but high requirements for electrical safety are imposed on this equipment.
This type of home electric boilers has the following positive qualities:
- profitability. Compared with heating elements models, electricity consumption is half as much;
- small size and simple design;
- insensitivity to voltage surges. The device will work even at 180 volts.
- works only with a special coolant;
- it is necessary to establish a reliable grounding, due to the specifics of the operation of this equipment, it cannot be equipped with protective shutdown devices, which increases the likelihood of electric shock.
- periodic replacement of electrodes is required.
A common drawback of any electric heater can be considered the danger of exceeding the limit for connecting electrical equipment in the house. Thus, the total power of all electrical equipment in a dwelling should not exceed 15 kW.
Due to the high energy consumption (more than 4 kW) for this heating equipment, it is necessary to make an electrical input of the required power in advance in order to prevent an accident on the line.
Devices whose power does not exceed 6 kW need a single-phase power supply, and equipment whose power limit is higher than 6 kW must be three-phase. The equipment is powered from a standard electrical network with a power of 220 V.
Important! As a rule, 1 kW of electric boiler power is capable of heating 10 m2 of the room. Based on these data, it can be assumed that heating a 250 m2 dwelling will require equipment with a capacity of 25 kW.
In order to heat a house with an area of approximately 100 m2, equipment with a capacity of at least 10 kW is required. Thus, after connecting the boiler, only 5 kW is allocated to the remaining devices. In order to increase the consumption limit, you need to obtain a special permit.
As a rule, a self-made electric boiler is a cut of a pipe, inside which electrical accessories are built. This is quite convenient, especially if you make the heating units removable, which will make the maintenance of the equipment much easier.
If the unit is not placed in a pipe, but equipped with a separate housing, then it is possible to install additional sensors that automate the operation of the heating system, increase efficiency and reduce electricity consumption. In addition, if it is necessary to replace the boiler, this can be done without violating the integrity of the system circuit.
We will understand the features and technologies of how to make an electric boiler of each type.
This type is the most common. Heating elements are used to heat the coolant. They are located in a heat exchanger, which, in fact, is a sealed heat-insulated tank equipped with nozzles for inlet and outlet of the coolant.
Heating element - is a thin-walled tube made of aluminum, steel or titanium, inside which there is a nichrome spiral. The walls of the tube and the spiral are separated by a dielectric storage, usually quartz sand plays its role.
The principle of operation of such equipment is as follows: the spiral heats up from the fact that an electric current passes through it, heat from it is transferred to the sand and the tube, and the tube already heats the coolant. The water is heated approximately 15-20 minutes after the start of the equipment.
To save money and free space, you can make a similar electric boiler yourself. To do this, you must have on hand:
- grinder;
- welding equipment;
- grinding unit;
- thermostat;
- multimeter;
- steel sheet;
- adapters for connecting to the pipeline;
- pipe ø12 cm, and 3-5 pipes of smaller diameter;
- 2 heating elements.
After all the necessary tools and materials are prepared, you can start work:
- Metal pipes are being prepared: three tubes with a diameter of 12.5 mm and two with a diameter of 30 mm. These parts are cut from pipes prepared in advance.
- A section of a large pipe with a length of about 65 cm is required, it will act as a heating tank. In places that have been marked in advance, holes are made by welding for nozzles - supply, "return", drain, expansion tank, heaters. With the help of a grinder, the edges of the holes are sanded.
- Nipples are welded to the corresponding holes.
- A circle is cut out of sheet steel of the desired size and welded to the bottom of the heating tank. The protrusions are cut off, the connecting seams are sanded.
- A long pipe with a diameter of 12.5 mm is welded to the upper part - a second electric heating element is screwed to it.
- Several holes are made in the bottom for mounting a heating element with a power of 1.5 kW. After the heating element is fixed, the boiler is screwed to the heating system by means of the nozzles and the wires are connected.
- After that, a less powerful heating element (about 0.9 kW) is connected to the upper branch pipe, which is equipped with a thermostat.
- After everything is connected, water is poured into the system. After several hours of operation, the system is checked with a multimeter. In the event that everything is carried out according to the instructions, the readings of the devices will be 70 ° C - this temperature is optimal.
The finishing touches are the sanding and painting of the boiler.
The disadvantage of such equipment is the likelihood of scale deposits on the heating elements. Which leads to a decrease in the efficiency of work or breakdown of the device. When using special liquids or distilled water as a heat carrier, this problem is prevented.
In boilers of this type, the coolant is heated by means of an induction current generated in a heat exchanger from a ferromagnet. An induction boiler looks like a cylindrical body, inside which an inductor winding is located, in which a heat exchanger core is located. Can be a labyrinth of pipes or cavities.
After the voltage is applied to the inductor coil, an electromagnetic field is created that quickly heats the metal core, which in turn transfers heat to the coolant that passes through it.
Ordinary water can be used as a coolant, regardless of its hardness, antifreeze and even oil. Due to the fact that these boilers have a zero likelihood of scale formation, their efficiency does not decrease over time.
This boilers, like the heating elements, are quite simply arranged, so if you wish, you can easily make it yourself. For this you will need:
- welding inverter;
- nippers;
- Bulgarian;
- steel wire;
- stainless steel wire rod;
- thick-walled polypropylene pipe;
- adapters;
- metal grid;
- copper enameled wire.
Important! As a source of energy, it is recommended to use a 15A welding inverter (more is possible).
Induction boiler assembly steps:
- For material irradiated with electromagnetic waves, cut wire rod or steel wire with a diameter of 7 mm. The maximum length of the segments should be 5 cm.
- It is necessary to make a body. It will serve at the same time: the basis for the manufacture of the induction coil and part of the heating main. To create a body made of polypropylene tubes, a pipe is used, whose inner diameter is slightly less than 5 cm.
- To connect the boiler to the water supply, you must use adapters. With their help, the heated coolant will go into the pipeline, and the cooled one will go back to the boiler. At this stage, the first adapter is attached to the base.
- At the bottom of the structure, it is necessary to lay an iron mesh, which will prevent pieces of wire from entering the pipeline.
- After the mesh has been laid, it is necessary to fill in the pieces of wire. They need such a quantity that there is no free space left in the container. Then the upper part of the body is closed with a second adapter.
- This stage is perhaps the most important, as it creates an induction coil. For this, enameled copper wire is taken, which must be wound around the body in 90 turns. The turns must be placed approximately in the center of the structure.
- The structure is connected to the heating system. To accomplish this task, a small section is cut out of the pipeline, and a unit is installed in its place.
- The coil must be connected to an inverter and the system filled with water.
Important! The inverter can only be turned on after the system is already filled with water, otherwise the plastic case will simply melt.
This type of electric boilers in the design of the heat exchanger has two electrodes to which electricity is supplied, which creates a potential difference. The salts in the coolant make it an electrical conductor. Electricity passes through a high-resistance electrolyte which heats up. The rated power is reached in just a couple of minutes.
The role of the coolant (electrolyte) in electrode boilers can be played by a roof prepared in a special way, or a liquid based on ethylene glycol.
It is enough to simply assemble this type of heater on your own. To do this, you must have at hand:
- iron pipe, with a diameter of 57 mm with thick walls;
- iron sheet, more than 2 mm thick;
- inner electrode with a diameter of 25 mm;
- gaskets made of paronite or rubber and connecting clamps.
Stages of assembling the electrode boiler:
- Before starting work, you must obtain the appropriate permission from the organization involved in the supply of electricity. This permission is required in order to find out that after the installation of the equipment, the supplied electricity will be enough for him without prejudice to the supply for the neighbors.
- It is necessary to determine the installation location. It is quite simple here: with natural circulation, the device must be installed at the lowest point of the system, with forced circulation - in any other place.
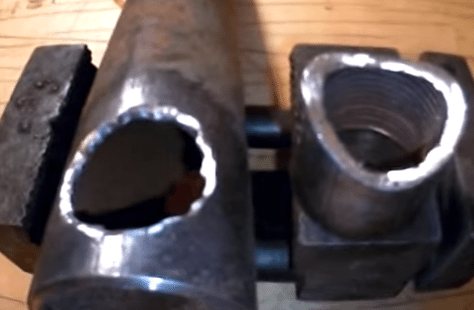
- As during the assembly of the above equipment, it is necessary to connect pipe nozzles to the future body. One end of the pipes is welded to the unit, and the other end is threaded.
- When making an electrode boiler on your own, a hole is drilled in the body for a plug. An electrode is attached to it, which is installed inside the boiler.
- At the end, the homemade body is welded by installing the bottom and lid, cut from an iron sheet.
- After the welds have been cleaned, it is necessary to check them for permeability. This is done in the following way: the welds are covered with soapy foam, and pressure is generated inside the housing.If bubbles appear anywhere, you need to know that in these places the boiler will leak.
- The wiring is being supplied. The boiler must be connected to a separate line. The connection cable must correspond to the power of the loop, because at the slightest resistance, the efficiency drops, and there is a likelihood of failure of the entire system.
- Installation of grounding. In order to do this, the heating system must be connected to some grounded element of the house (for example, to fittings).
After all the faults are found and eliminated, the body must be covered with enamel paint.
The correct operation of the boiler depends on the presence of soda in the water, which plays the role of a coolant. It is added in order to increase the current strength: this indicator is calculated by dividing the power of the device by 220.
Before starting the boiler, it is necessary to completely check all connections, wiring and fill the system with water.
For more efficient operation of the system, a circulation pump can be connected to it. Its task will be to distill the coolant, due to which it will warm up more evenly.
In the case when the system is made with natural circulation, it would be a better option to make a slight slope from the outlet to the return, so that the cooled water returns to the boiler faster.
If torn or pinched wires are found in the wiring, replace them immediately and insulate them well. Ignore these defects cannot be ignored, due to the fact that there is a rather high current strength in a three-phase system.
Preparation is cleaning the device from dust and dirt. Also, during the first start-up and during further operation, it is necessary to prevent voltage surges. To avoid this, you need to install an RCD.
First, the system is filled with water so that no air locks remain in it. Usually radiators are equipped with special taps for this purpose. Next, you just need to turn on the boiler to the power grid and wait for it to warm up.


Option number 3. Induction boilers
Of the widely used models, the induction boiler can be considered the latest development.
How induction heaters work
If you do not go into the intricacies of the device, then an induction boiler is the same microwave oven, the coolant is heated by a magnetic field.

The heating system scheme implies operation at a given time interval.
Dignity:
- Security;
- High efficiency;
- Any coolant can be used in these units, its quality does not matter;
- In induction boilers, virtually no scale is formed.
disadvantages:
- The cost of induction boilers is quite high;
- These devices have relatively complex control automation. Assembling it with your own hands is problematic for an amateur.
Putting together a simple induction heater
When I began to study homemade induction heaters, I realized that the instructions there are not simple, and the drawings are quite complicated for a home craftsman, but there is an interesting solution, which I will tell you about later.
| Illustrations. | Recommendations. |
| What the boiler consists of. To assemble such a boiler, you need to buy an induction stove with a power of 2.4 kW (it costs about 2000 rubles) and 3 m of a profiled pipe with a section of 25x50 mm with a wall thickness of 2.5 mm. |
| Principle of operation. We need to build a kind of flat container from a profiled pipe through which water will circulate. Then attach an induction stove to this container and turn it on. This is the same as putting a pot of water on top of the stove. |
| We cut the pipe. The most difficult thing in this work is to do everything as accurately as possible. I cut the pipe with a miter saw on a stop bed. In my case, the pipe was cut into pieces of 400 mm, after which I cleaned the edges from the burrs with a file. |
| Capacity diagram. As shown in the diagram, water circulates like a snake through this improvised radiator. It was not by chance that I made exactly 6 registers, so I will have the supply and return on one side and it will be easier to connect the stove to the heating system. |
| Cutting the connecting holes. The connecting holes must be clearly opposite each other. In this case, I drilled 2 holes along the edges with a 10 mm drill, and then cut out the middle between them with a small grinder. |
| Pipe numbering. There is a very important point: profiled pipes are not perfectly symmetrical, on the one hand they are slightly rounded, and on the other they are even. If you look closely, you can see it in the photo on the left. So, we need to initially fold the sharp edge of the pipes with the blunt one. In order not to be confused later, the pipes are immediately numbered. |
| We collect capacity. Now we need to boil all the seams between the pipes, for this we lay them out on a perfectly flat surface and tighten them with a clamp. Further, so that the stove does not lead, first we grab all the seams pointwise, and then we weld the seams thoroughly. |
| We close the end of the container. To weld one side of the container, I cut a strip. The strip was cut from the same profiled pipe, I simply cut off one of the sides with a grinder. We weld as usual, first we grab it, then we scald it. |
| We weld the pipes. On the reverse side, we do almost the same thing, with the only difference that the inflow and return pipes are welded to the extreme pipes. The contact area of our metal container with the induction stove should be as large as possible, so the welding seams must be cleaned with a grinder. |
| We mount the guides. In order to hang this whole structure on a vertical wall at the back, we weld 2 corners, into which our induction stove will then be inserted, as in a niche. |
| Painting. At the end of the welding work, I painted the entire structure with heat-resistant paint and welded on the hinges for hanging our induction boiler on the wall. In principle, that's it, now you can connect the boiler to the heating and use it.
|


A little more difficult ...
Homemade boiler drawing
Despite the availability of alternative ways of using electricity in heating systems, a full-fledged boiler still remains the best option. The boiler body is best made of steel. This choice is justified from the point of view of safety, durability of the structure, as well as ease of manufacture. You can create a body using a conventional welding machine. Such work will not require any serious special skills.
Do not make a large case. The more compact the boiler is, the more efficiently it works. What to do if the house is large and you need a unit, the power of which will allow you to heat a large amount of water? Refuse the electric boiler in favor of a different type of equipment. Electrical appliances are suitable for heating a small country house, but when heating large cottages, they will not be the best choice.
The body can be of any shape, but it must be sealed on both sides. Two holes are made on both sides. Through one, the coolant is supplied to the system, through the other cooled water enters the boiler.
Types of heating elements
The biggest difficulty in the manufacture of an electric heating boiler is to choose the right heating element. Its power should be enough to heat the coolant and water in the hot water system (if necessary, equip it). The power is selected based on the calculations performed. When designing a hot water supply system, it is better to choose a heating element with high power indicators.
The heating element is installed in the housing on the lower cover, opposite the hole through which the cooled coolant is supplied to the heater. It is worth installing shut-off valves in the pipeline next to the boiler in order to ensure the maintainability of the device.Shut-off valves will allow you to turn off the boiler, if necessary, without draining the water from the system. As a rule, heating systems with an electric boiler are made with forced circulation, which will also require the connection of pumping equipment.
Electrical panel
The operation of electrical equipment is provided by the energy of the mains. To connect a homemade device to the latter, you will need to design an electrical panel. You will definitely need to connect a three-phase input. It is better to entrust this part of the work to a qualified electrician, since the cost of error is disproportionately high.
A starter, automatics, relays, electrical device controls are installed in a metal shield. The system must be grounded. The effectiveness of grounding should be checked annually by employees of specialized organizations. The data obtained by measurements is necessarily recorded in the protocol. The simplest way to perform grounding is as follows.
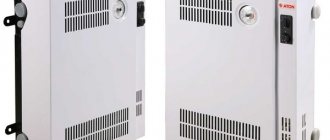
Factory electrical panel
The electrical circuit of the device will include the following elements:
- Machine.
- Magnetic switch.
- Control buttons.
- Toggle switch and relay.
- Circuit breakers.
- Thermal sensors.
- Additional automation (if necessary).
After connecting to the mains, you can start the boiler for the first time and test the system.
Output
Each of the boilers presented by me has been repeatedly tested and is guaranteed to work, which one to choose is your business. The video in this article has a lot of recommendations, and also shows the subtleties of the process. If you have any ideas or have any questions, write in the comments, I will try to help.

A small homemade electric boiler can heat a medium-sized private house.