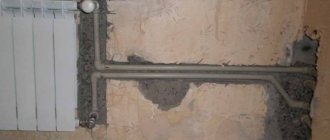
Hello! We had a renovation, the pipes in the bathroom are hidden under the tiles. Recently I noticed that a wet spot appeared on the wallpaper in the room on the side of the bathroom. The plumber said that he could not do anything. the pipes did not need to be tiled. Please tell me what can be done, preferably without prejudice to the repair?
Good day, there is no other option how to open the wall either from the side of the tile or wallpaper, you need to get to the place where it leaks and understand from what.
It is necessary to insulate the pipe
Do you think this is condensation?
in such cases, a competent plumber-tiler recommends making a removable shield so that in the future there is access to the tubes! since you have already done the opposite, we recommend that you still open where the tile is to eliminate the leak and make a removable shield for the future.
Most likely, the pipes were laid without insulation (termoflex), so condensation occurs on the cold water supply pipe and gradually seeps out. Carefully open the tile, put on termoflex and repair everything in the reverse order.
Hello! First you need to find the cause of the leak, perhaps the neighbors are to blame for the leak. If it is not possible to lay pipes outside, then you will have to carefully open the tiles. Regards, Oleg.
a wet spot can be condensation from a cold water pipe. In the heat can be like that. Water will find a hole. If the stain enlarges several times and a trickle of water appears, then only an autopsy.
Look for the master who laid the pipes for you, if after the repair he did not leave you a wiring diagram. Further, in any case, it is necessary to make a so-called plumbing hatch, since in case of any problems with plumbing or pipes, house craftsmen will not be able to inspect your bathroom (which is what happened) and in a disputable case you will still have to hammer it, but not carefully, but urgently. It is condensation, a leak through the riser or something else that can be understood only on the spot. It is better now to sacrifice a little repairs - but to get access to the pipes, than to get global problems later in case of controversial cases of gulf or leaks.
WELCOME WHAT PIPES? , SEWERAGE OR WATER PIPELINE.
reveal a row of tiles. take out the pipes. small losses
It is unlikely to guess, - there are several reasons at once - for cheap repairs - these are: - cheap metal-plastic, walled up twist, unscrewed joint of steel pipes, stray currents (if there are electric wires nearby, a leaky plinth of a bathtub - and a gypsum wall - which is very common Treatment: - check the plinth, look under the bathtub with a light bulb - is there any dampness there (turn on the water) - it is not said at what level the top of the dampness If a puddle is visible - it means that there is a mess with the pipe Sometimes it just helps to remove the stress on the hot pipe (thermal expansion presses pulls the twist place of twisting) - then seal up with foam Inspect the leak according to this recipe and report
Hello everybody! Here you sit and dumb here, what condensation can there be, pipes in the wall and do not have contact with warm air, do not powder people’s brain. And I would advise you to open the place where the leak is, from the side of the tile, to eliminate the leak, and to close everything back and put the tiles (if after the repair there are at least 2-3 pieces left, then it is very good). This work is done in 2 days. Good luck and success.
Any renovation in the bathroom should begin with an audit of the plumbing system. If the pipes have been serving for more than 15 years, then, most likely, the time has come to replace them. This will be the first stage of the renovation. But what if the repair is not yet planned, and the pipe in the bathroom is already leaking? The answer is obvious - it is necessary to take urgent measures to eliminate the leak, otherwise the neighbors will be flooded and in addition to repairs in their apartment, they will have to make repairs too.
Plumbing in houses and apartments is most often made of three types of pipes:
- metal;
- metal-plastic;
- polypropylene.
How to repair a leaking metal pipe
It should be understood that if a steel pipe is leaking, then this is a sure sign that it needs to be replaced. However, the replacement was done by professionals, and this can not always be done in the shortest possible time. In the meantime, it is urgently necessary to eliminate the leak. You can do this with your own hands using a special device - a repair clutch.
Coupling for repairing three-quarter steel pipe
When buying a repair coupling, you should take into account that they differ in size - different couplings are needed for pipes of different diameters. To find out what diameter is needed, wrap a thread around the pipe to be repaired and measure the length of the full circle, then divide the resulting value by 3 - get the desired diameter. A value of the order of 20 mm of the outer diameter corresponds to half an inch of the inner diameter, 25 mm to three quarters, 32 mm to one inch. Having found out the diameter, in the store we buy a repair coupling of the appropriate size and proceed with the repair.
- We unscrew the four bolts connecting the halves of the coupling.
- We put a rubber strip on the place of the leak and squeeze it with the halves of the coupling.
- Tighten the bolts until the leak stops.
Repair sleeve installed at the leak site
Strictly speaking, this is the end of the repair of the leakage of the steel pipe. It is important to remember that the measures taken are temporary - the maximum, how long the repair coupling will last, is six months. Therefore, you should as soon as possible invite specialists who will change your metal pipes for more modern ones - metal-plastic or polypropylene.
Elimination of a leak in a metal-plastic pipe ↑
Unlike metal pipes, a leak in a reinforced plastic pipe does not necessarily signal the need to replace it. Often the cause of a leak is its mechanical damage or a loose fit of the fitting. In the second case, it is usually sufficient to tighten the retaining nut to stop the burrowing. If the above measure does not help, the fitting should be replaced. If the pipe itself is damaged, then a connecting sleeve should be cut into the place of leakage.
Collet coupling for metal-plastic
The repair process should be carried out according to the following algorithm:
- Look at the pipe markings to find out the diameter.
- Buy a collet sleeve of the appropriate size from a store.
- Cut the pipe right where the leak is.
This is how a metal-plastic pipe is cut with special scissors. If the gap is too large, it is better to completely remove the damaged area.
Finished incision with removed damaged area
- Unscrew the collet nut and slide it over one end of the pipe. Put on the sealing brass ring next.
- Insert the collet fitting as far as it will go.
- Do the same for the second end.
- Tighten the retaining nuts first by hand and then using any suitable wrench. As a result, you will get a collet coupling in the place of leakage.
Installation of a metal-plastic coupling
Collet coupling installed in place of leak
Since the entire metal-plastic system is assembled on fittings, the appearance of another collet connection in the water supply will not affect the service life of the entire system. The described method allows you to forget about leaks for a long time, however, if the problem repeats over and over again, then it is still time to change the pipes, that is, call specialists to carry out a major overhaul of the water supply system.
Do-it-yourself temporary elimination of a weak leak
It also happens when the reason for the pipe leak in the bathroom is not so terrible and serious, so there is no particular need to change the pipe. Then you can try to fix the problem on your own. There are two solutions for this: cold welding or bandage.
Option one - cold welding

Scheme of cold pipe welding.
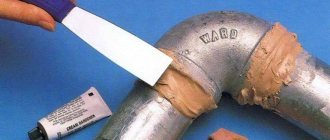
Now on sale there is a very useful substance in everyday life called cold welding. Such welding, without the application of special efforts and skills, is capable of very reliably interconnecting materials such as metal, glass, plastic, wood and others. Cold welding is perfect when the pipe does not flow much under the bathtub, but only oozes.
Turn off the water and put on rubber gloves before doing this welding. Then clean the damaged pipe well, thereby freeing it from dust and dirt. Wipe the pipe dry and degrease the surface thoroughly with acetone or alcohol. After that, remove the weld (so-called punches) from the packaging and press it as hard as possible against the deformation of the pipe. It is best if a man does it. Within about 20 minutes, the weld will set and the surface will be restored. All you have to do is wait a little and cover it with paint.
Option two - clamps and bandages
Another equally good way to eradicate the pipe leakage problem with your own hands is a clamp or bandage. The clamp is used when it is necessary to block the water leak in the pipe for a while (usually for several days). The bandage is used in the same cases, as well as when condensate is constantly collecting on the pipe.
To repair a pipe with a clamp, you will need a regular metal clamp, which you can buy inexpensively from the market or any hardware store, and a piece of rubber to act as a gasket. Moreover, a piece of rubber should be about 2 times larger than the damaged area. If the problem needs to be solved urgently, you can use ordinary wire instead of a clamp. Shut off the water. Clean the damaged area on the pipe and wipe dry. After that, firmly press the rubber to the damaged area and fix it as tightly as possible with a clamp or wire.
Related article: Site cleaning
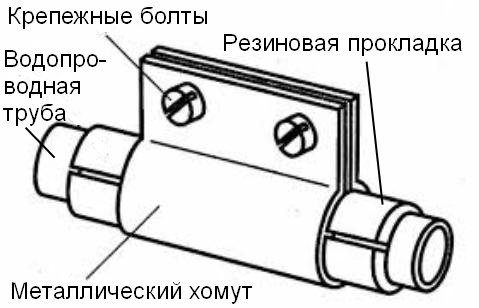

The scheme of fastening a metal clamp.
To put the bandage on the pipe under the bathtub, you must first purchase it. There are many pipe bandages on sale now. Keep in mind that it must be the correct size and made of waterproof material. The best option is fiberglass. Usually, the bandages are selected according to the pipe diameter. But its width should be about 7 cm more than the damaged area. In this case, the bandage has a longitudinal cut, with the help of which it is put on the pipe.
Before installing the bandage, close the water valve, wipe the pipe dry and, if necessary, clean its surface. Coat the inside of the pipe and bandage with epoxy or special waterproof glue. Put the bandage on the pipe carefully and fix it very tightly with a metal clamp. Depending on the width of the place damaged on the pipe, you can use two or even three clamps instead of one. This is necessary for greater reliability. After two days, when the glue or resin is completely dry and set, you can open the valve and use the bathroom.
Repair of a polypropylene pipe ↑
Polypropylene plumbing is perhaps the most reliable and durable, since all connections are thermally or chemically soldered, forming a single monolithic system. Therefore, the leakage of a polypropylene water supply system is possible only in two cases:
- Poor soldering of elements. It may show up after a certain time, after the introduction of the entire system into operation. If this happens, then you will have to redo an entire section of your plumbing. If you do not have special skills, it is better to resort to the services of specialists.
- Mechanical damage. There can be many options for how this could happen, but the solution is always the same - soldering a polypropylene coupling sleeve into the leak.
Polypropylene coupling
The process of soldering the coupling is much similar to the installation of a collet coupling on a metal-plastic pipe.
- From the marking on the pipe, we determine its diameter.
- In the store we buy the necessary coupling.
- We cut the pipe at the leak.
We cut a polypropylene pipe Thermal brazing of polypropylene pipes occurs much more often than chemical brazing, so we will consider it. You need a special soldering iron. We are looking for it either from friends, or we rent it - many stores give a soldering machine for a very reasonable price for a while. We install Teflon nozzles of the required diameter. We heat the device. On the one hand we put on the coupling, on the other we insert the pipe.
A universal way to eliminate leaks ↑
In conclusion, we will describe another way to eliminate leaks. It is universal, that is, it fits any type of pipe.
- We take an ordinary rubber household glove. In the part opposite to the finger one, cut a tape 10-15 mm wide with scissors in a spiral.
How to get a rubber band from a household glove
Video tips for connecting metal-plastic pipes
The most important thing when repairing pipes with your own hands is to clearly understand whether this is a temporary solution or a permanent one. If the leak is caused not by mechanical damage, but by natural wear and tear of the pipe, any measure can only be temporary. Such a flow will intensify, therefore, it is necessary to invite specialists as soon as possible to radically solve the problem.
Pipe leaks from time to time accompany their operation: most often the causes of such phenomena are corrosion or deformation. Thanks to the use of polypropylene, polyethylene and metal-plastic pipes, the problem of corrosion was solved, but the threat of mechanical damage remains relevant in this case.

How to start fixing a leak
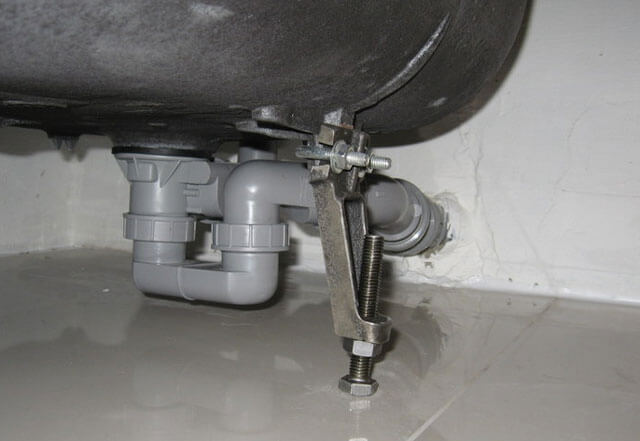
Standard situation - it was discovered that a pipe is leaking: what to do in such cases? The first step is to pinpoint exactly where the pipe is flowing. If a sink, washbasin or bathtub drain leaks, the reason for this phenomenon is usually a poor-quality connection of the drain hole, siphon and the entrance to the pipe.
In this case, to eliminate the problem, you will need to tighten all threaded connections through which the sewer pipe flows. Sometimes it helps to replace the gaskets at these joints.
Elimination of leaks at the joints
The first step is to determine exactly where it flows from. If water collects under the sink or under the drain in the bathroom, then first of all, you should check the quality of the connection of the drain hole and the pipe.
Advice. Often, the problem of leakage can be solved by the process of tightening all threaded pipe connections or replacing rubber gaskets at the connection point.
Cast iron pipe joints
In order to understand how to cover up when the joints of cast-iron sewer pipes are leaking, you should first of all determine how the connection was sealed.
If the connections of the parts of the sewer cast-iron pipeline were minted with lead, then the following must be done:
- The junction is cleaned to pure metal;
- The gap is minted with lead... Lead cones are chased with a chisel. The soft metal compresses easily into the crevice.
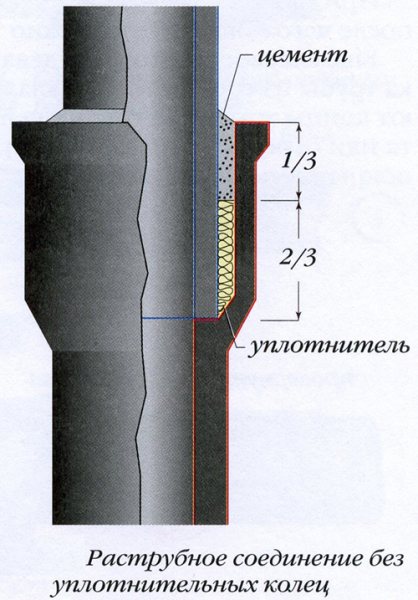
If the joint was sealed with cement, then the following instruction should be implemented in practice:
- Remnants of old cement are removed from the surface using a narrow chisel and hammer;
- After removing the material, the gap itself is cleaned;
- New tarred strands are hammered into the gap and covered with a fresh layer of cement mortar.
Advice.Before driving, it is recommended to treat the strands with an asbestos-cement mixture with the addition of water in the proportions of asbestos / cement 3/7. The putty should be the consistency of soft plasticine.
Sealing the joint with cement
If it turns out that you have a sewer pipe leaking in the toilet right along the joint and of everything you can cover up, you only have cement left from the repair, you should not be upset because cement is perfect for this purpose.
In this situation, proceed as follows:
- The joint is carefully cleaned, the old sealing material is removed;
Advice. Do not use a heavy tool for this, so as not to damage the pipeline.
- For further work, we prepare the following materials: bandage, cement;
- We knead the gruel from water and cement;
- We dip the bandage into the created solution and wrap the leaking joint;
- After the bandage with cement has hardened, we clean the joint with sandpaper.
If the pipe is leaking at the junction
Using the caulking method for cast iron pipelines
If leaks are detected at the junctions of cast-iron sewer pipes, you should prepare for a rather complicated procedure for eliminating the problem (read: "How to repair a crack in a cast-iron sewer pipe - reliable and proven methods"). In this case, much depends on the quality of the docking work.
If stamped with lead, the procedure is as follows:
- Strip the docking area until clean metal appears.
- Stamp the gap using lead cones. This is done with a blunt chisel, since in this case it is quite easy to seal the gap with soft lead.


What to do if the pipe in the toilet is leaking:
- Clean the joint from the old mortar using a narrow chisel and hammer. Care must be taken not to damage the pipe.
- After removing the old seal, the gap must be well cleaned.
- For new clogging, tarred strands and an aqueous solution of cement are used, in a ratio of 10: 1 to water. Before clogging, the strands are treated with a special substance, which includes cement and asbestos, in a ratio of 7: 3. During kneading, a little water is added: the finished solution should be like plasticine.
If the connection to the drain under the bathroom oozes
Breakthrough of water between the gander or at the junction, what to do. We solve the problem as follows:
- shut off the water;
- unscrew the pipe from the drain, substituting a container for collecting water;
- clean the cavity inside with a brush, a washing vacuum cleaner;
- heat a piece of pipe and the drain point with a blowtorch until steam stops flowing, which will mean complete drying of moisture;
- sandpaper the places on the gander and drain;
- degrease with acetone, wipe with a dry cloth;
- apply a piece of silicone to the pipe and the bottom around the gander;
- attach the gander to the bottom of the bath, wrap it around the circumference with a serpentine mesh, on top - another layer of silicone;
- wrap with construction polyethylene;
- wait 2 days until it is completely dry, the silicone and polyethylene set, and check if the pipe is leaking.
With proper dismantling, the structure will still serve for at least 3-4 years.
Elimination of leaks at the pipe junction with cement
What to do if a pipe is leaking and only cement is available from all possible materials?
In such a situation, the work is carried out as follows:
In cases where a leak was detected directly on the pipe body, a completely different algorithm of actions will be required.
Elimination of minor defects in a cast iron pipe

Connection diagram of cast iron pipes.
It also happens that a defect has formed on the still normal cast-iron pipe. And you still do not want to change the only pipe for plastic or do not have enough funds for this. There is also a good way out of this situation. But it works only in those cases when a minor defect has formed on the cast-iron riser (the so-called small "fistula") and the water only flows slightly under the bathtub without flowing out in a stream. Of course, in this case, you can use an ordinary clamp. But if you think about it, then by and large it is not really needed here. You can eliminate the defect in a simpler way, using ordinary cement.
To do this, first turn off the water and wipe the pipe. Then take sandpaper and carefully clean the area of the defect. Use a rag to shake off the dust and lightly wet the surface. Take a small handful of dry cement and apply over the heat of the pipe. After the cement is wet, apply some more. Do this until the cement is no longer soaked. Due to the fact that the cement adheres well to the metal, the site of the defect will be completely tightened and will not leak.
Related article: DIY flower bed fencing
If the problem is more serious and there is not a fistula on the cast-iron pipe, but a crack, then you need to make a gasket of bandage and cement. Alternate a layer of bandage and cement, going around in a circle about three times. So it is safer to hold the metal together. It should be noted that the elimination of a defect on a metal pipe in a bathroom with the help of cement requires waiting about three days, during which the cement will set. Only then can you use the riser.
The next way to prevent the metal pipe from leaking is to wrap it with a rubber band. You will need either a medical harness or elastic rubber from a bicycle tube. Then you simply wrap the leak with this bundle and secure everything with wire. For greater reliability, it is recommended to wrap the problem area with a bandage on top and paint it with oil paint. But if the pipe is flowing very tightly to the bath itself, this method will not work.
Install the bandage
If the pipe is leaking in the bathroom, a temporary solution is to install a bandage. Before that, you need to determine what kind of damage will have to be dealt with (fistula or leakage), and where exactly it is located.
The rubber band is applied in this way:
- A rubber gasket is installed on the emergency section of the pipe.
- After pressing firmly against the pipe, fixation with a clamp is applied.


The clamp can be purchased without any problems in the store, but it so happens that at the right time it is not at hand. In this case, the clamp can be made by yourself, or you can use a wire, bundle, rope or hose instead.
The bandage rubber can be an old rubber boot, from which the shaft is cut off. The same goes for the rubber hose, bicycle tube. The width of the band is made depending on the diameter of the pipe being repaired.
Using a wooden wedge in the bathroom
There are situations when a high-pressure leak is formed, but there is no possibility of water shut-off: how to make sure that the pipe does not flow? A bandage in such a situation usually does not help either.
If the leak is caused by a fistula, it can be repaired with a small wedge-shaped wooden peg. The size of its tip is made the same as the resulting hole in the pipeline.
A peg with a sharp end is inserted into the fistula, and then hammered with a hammer.This temporary measure allows you to buy the time required to call the emergency service.
How to eliminate a leak depending on the location of the leak and the material
Before proceeding with liquidation, remember that this is a temporary measure. It is recommended to seek help from a specialist who will perform a professional restoration of the highway.
Eliminate leakage in the plastic pipe at the joint
Polypropylene products are installed during the installation of all communications. The most common cause of trouble is leakage at the joints.
How to seal a leaking pipe:
- Clamping clamp. It is a repair part with screw clamps, under which a plastic waterproof material (rubber) is placed. The screws are tightened securely.
- "Cold welding". The component is thoroughly kneaded, the composition is applied to the damaged area of the plastic water supply system and allowed to harden.
- Bandage with an adhesive base. This is a part of a pair of clamping straps. Inside them can be rubber impregnated with a two-component adhesive. Such a band cannot be used to seal a leak in a pipe under pressure.
- Adhesive impregnated tape. Material is wound on the damaged area in several layers in order to quickly stop a minor leak.
- Leak-proof sealant. A silicone or neutral compound is applied with an assembly gun to the hole formed and allowed to dry.
Before eliminating the leak, the joint must be thoroughly cleaned and degreased, and then use sealing and adhesives.
Eliminate a leak in the heating system
If the heating pipe is leaking strongly, you cannot do without the help of the emergency service. Water flows through the system under high pressure. Strong pressure quickly widens the communication gap. Therefore, it is important to shut down the system as soon as possible.
To eliminate a small leak in heating communications, you can use improvised means. Minor damage must be closed with a self-made device in the form of a clamp. It can be easily made from a suitable piece of rubber. The seal is applied to the hole, pulled tightly and wrapped with wire. From above, the structure is wrapped with a fabric strip in several turns, tied to a tight knot. A self-made pipe clamp is securely fixed to eliminate leaks. A screwdriver or a nail is pushed under the knot and rotated until the fabric is tight.
Other ways to eliminate a rupture of the heating main:
- use "cold welding";
- make a clamp from a piece of tin, tightened with a bolt;
- glue the pipe with a bandage on top of which epoxy is applied.
Any of the above methods can be used if the temperature of the water in the heating system allows. Factory supplied rubber band and bolt-on clamping bands are available. Sealant, emergency glue, or cold welding can be used to eliminate radiator leakage. Replace a damaged heating section as soon as possible.
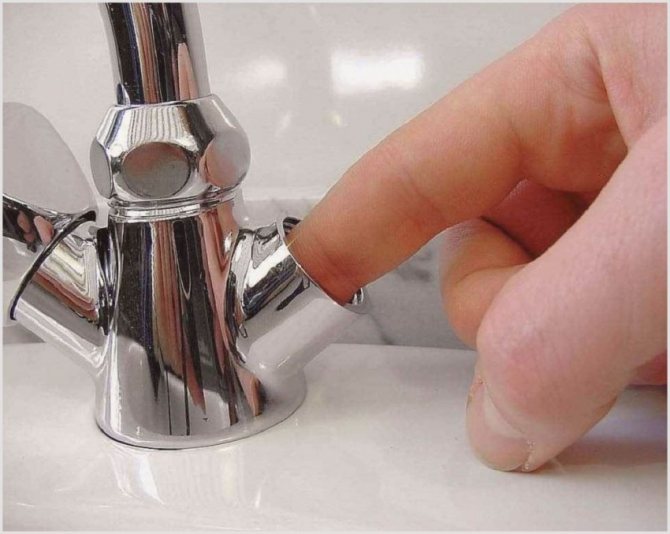
Eliminate a leak in a bathroom faucet
Mixers of various types and designs are installed in the bathrooms. Therefore, the causes of the accident and the methods of repair are not the same:
- Wear of the valve box of a two-valve mixer. It is necessary to determine which valve is leaking. Then turn off the water supply to the tap and remove the top cover. Unscrew the valve and remove the valve-axle box. Replace this part with a new one or change the gaskets.
- Violation of the tightness of the connection of the mixer to the water supply. The leakage of the pipe joint is eliminated by means of a clamp, band, sealant or "cold welding". If all else fails, replace the fittings that may have worn out.
- Breakage of the lever mixer cartridge. The most acceptable repair option is to disassemble the lever, take out the cartridge and put a new one in its place.


Sometimes the faucet flows through a hose, shower head, or at the junction with a spout.It is necessary to disassemble the structure and wrap all joints with FUM tape.
Eliminating a leak in a cast iron sewer pipe
Elimination of pipe leaks in the toilet is the simplest. The contents of the sewage system move by gravity, so there is no strong pressure or high pressure of the liquid in case of a burst.
How to stop a leak:
- stop using the sewer;
- dry the joint with a rag or hairdryer;
- clean from cement mortar;
- grease the joint with plumbing sealant several times or with a composition of PVA glue, water and cement;
- let the mixture dry for 24 hours.
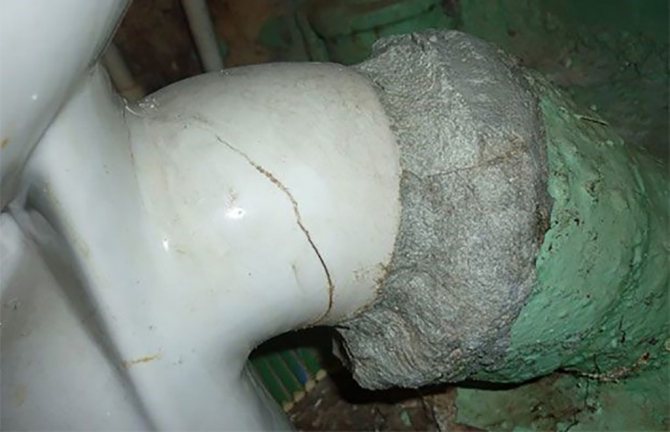

If the defect is significant, the composition will not help. You need to hammer in a wooden wedge shallowly or soak gauze with epoxy resin and apply a winding. Alternatively, you can use several layers of rubber bandage and tighten it with copper or aluminum wire. But the most reliable way is to install a homemade or factory clamp. If longitudinal cracks form on the cast iron surface, sealant or "cold welding" can be applied.
All of these methods can be applied in a complex manner. The main thing is to remember that self-repair of communications is a temporary measure. For high-quality elimination of a leak for a long time, you need to invite a plumber.
Sealing a pipe in a toilet
A leak in the pipe can also be repaired with an adhesive bandage.
The procedure in this case is as follows:
- The water in the pipe is shut off by a valve.
- A hairdryer is required to dry the damaged area.
- The selection of a dense flexible material of the required size is carried out. It can be rubber, plastic, fiberglass, etc.
- Epoxy glue is required to glue the patch to the leak.


When using fiberglass, the cut piece should be enough to wrap the pipe at least 5-6 times. In this case, the width of the band should exceed the pipe diameter by at least one and a half times. It is more convenient to apply glue to the bandage with a brush or spatula.
Having wound the bandage fabric on the pipeline, until it is completely dry, it is fixed with a tie or a clamp. Drying of the glue usually takes 24-72 hours. In this case, the air temperature should be at least + 15 degrees.
If a metal pipe is leaking
It often happens that a pipe in the bathroom has flowed: what to do in order not to flood the apartment and the neighbors below?
In this case, proceed as follows:
- The first step is to cut off the water supply.
- Cut off the damaged section of the pipeline using a hacksaw or a grinder. The cut is made with an indent of 30 cm in both directions.
- Unscrew the threaded pipe connection adjacent to the damaged area.
- Threading is carried out at the cut off stationary end of the pipe. It is convenient to use a gas wrench to hold the end of the pipe.
- A sleeve is screwed onto the threaded end.
- A measurement is taken of how long the new pipe should be, taking into account the threaded section.
- To make the insert, use a pipe of exactly the same diameter as the old one. The produced section must be equipped with threads at both ends.
- A sleeve is used to connect the new section to the pipeline, and a pipe wrench can be used to hold it.


Before screwing on the coupling, it is necessary to seal the threaded sections of the cut, using flax, a sealing putty, or a special tape-fumigant for this. In addition to repairing metal pipelines, leaks on pipes made of other material can be eliminated in the same way. In the event that it is not clear what to do if the pipe is leaking, it is best to seek help from professional plumbers.
Initial emergency measures
Usually pipes, especially plastic ones, do not deteriorate by themselves. They do not burst, rot or crack.However, if you installed them for a very long time or the installation was done poorly, they may begin to ooze systematically. The best option, of course, would be to replace the pipe and the piping adjacent to it. But not everyone can afford it, and it cannot be done instantly. And you still have to stop the leak. Consider then the first steps in this problem.
First you need to completely shut off the water valve. If you live in an old Khrushchev, which is now a very rare occurrence, then you will have to shut off the water throughout the house. Usually the valves in this case are in the basement, and you just can't get to them, and it is quite possible to have time to flood the neighbors during this time. It is very good that now almost all apartments have their own valves, which can be closed without difficulty.
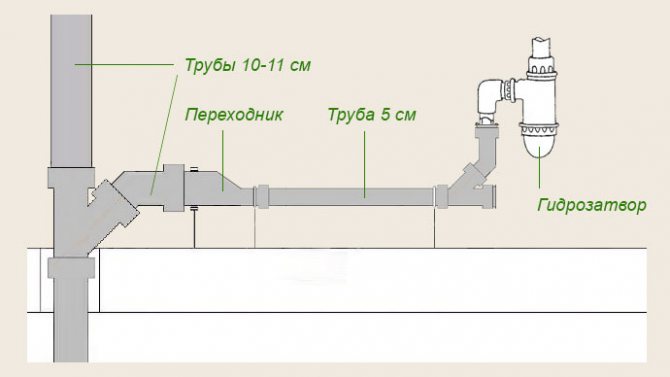

Internal sewerage layout.
It is necessary to shut off cold water and hot water too, just in case. And this should be done as quickly as possible. That is why it is so important that access to the valves is always free. And if you are already thinking of changing pipes, make sure that the valves are installed in the toilet near the toilet. This will ensure always easy and quick access to them.
If you turn off the valves and the water stops flowing, this is a good sign. This means that the pipe is damaged up to the valve. Now all that remains is to call a plumber and transfer the solution to the problem into his experienced hands.
But there are also cases when the pipe flows under the bathroom in a place where closing the valve may not give any results. A clear sign: the water continues to flow even after shutting off. In this case, call the emergency service immediately! In the meantime, while you are waiting for her arrival, you need to put a container under the leak so that all the water is collected in it.
Related article: Playhouse for children: step-by-step photos, diagrams, drawings
Another option is to temporarily stop the water leak by tying the pipe with a rag. But the container still has to be substituted. You can also tape the pipe as tightly as possible. And to keep the fabric or scotch tape more secure, you can sprinkle a little table salt on their surface before wrapping. All the puddles formed as a result of the leakage of the pipe under the bathroom must be wiped off with rags as soon as possible so as not to flood the neighbors and create even more problems.


