Wall this is the main structural part of the building. Its main purpose is to carry weight from overlying structures and transfer it to the foundation. Therefore, it must have the necessary strength (which is calculated according to special methods) and stability, as well as successfully withstand the emerging vertical and horizontal loads.
Considering also that the walls are also enclosing structures that divide buildings into separate rooms and separate them from the external environment, they must have the required design coefficient of resistance to heat transfer. That is, to maintain the required parameters of temperature and humidity in the premises.
The walls also have a decorative function, since with the help of various solutions in terms of architecture, they form the general compositional appearance of a building or structure.
Modern building technologies offer a wide variety of building materials from which walls are made. But the most popular of the materials is still brick. It can be used for both external walls and internal walls and partitions.
Bricks and masonry
The standard size of ceramic bricks is 250 × 120 × 65mm. When performing brickwork, the bricks are laid on a 1 cm thick mortar. In order for the masonry to be strong and stable, the bricks are laid in the masonry, with the so-called bandaging of the seams.
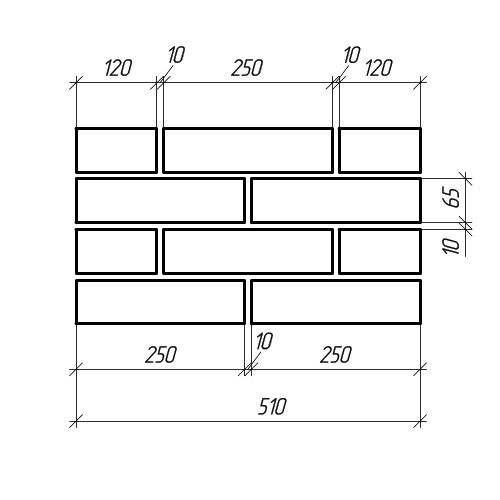
Dimensions of standard brick masonry
The thickness of the walls is taken as a multiple of the size of half of the brick. For example, 120 mm is half a brick, 250 mm is a whole brick, 380 mm is equal to one and a half bricks, 510 mm is two bricks, and so on. Ceramic bricks are made hollow and solid, that is, with or without voids.
Dimensions of brickwork
Solid bricks are used in places where there is a need to withstand distributed loads. For example, in foundations, plinths and elsewhere. Although, external walls can be laid out of solid bricks. But this should be advisable, since in order to ensure the standard thermal conductivity, the wall thickness can grow significantly.
Hollow bricks, due to the presence of voids inside them, are less heat-conducting, that is, the walls of them can be thinner in size compared to solid ones. And due to their lower own weight, they load less on the foundation of the building.

Dimensions of a standard brick
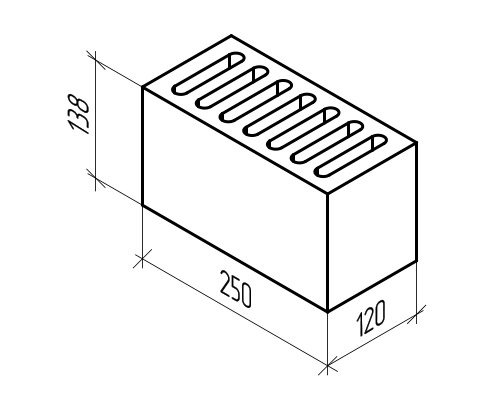
Brick with seven slotted voids
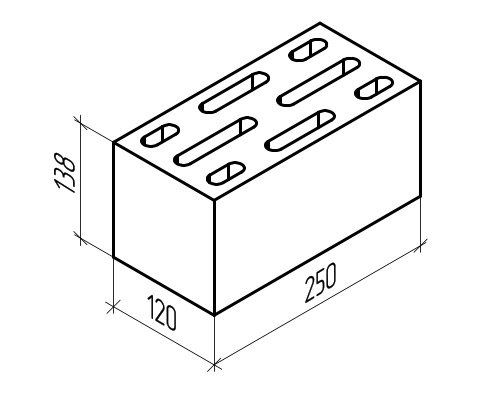
Lightweight concrete stone with slotted voids


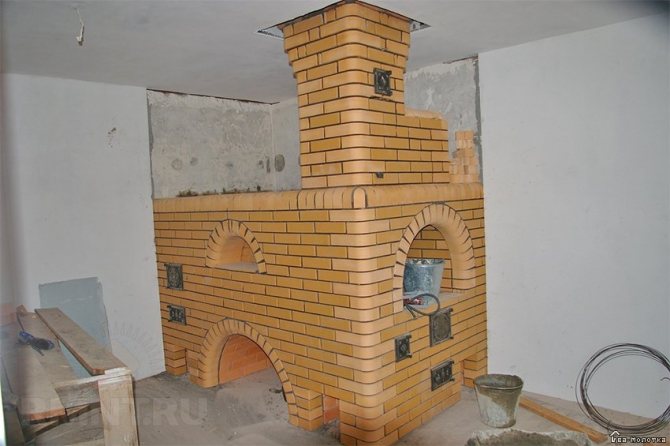
Examples of constructions
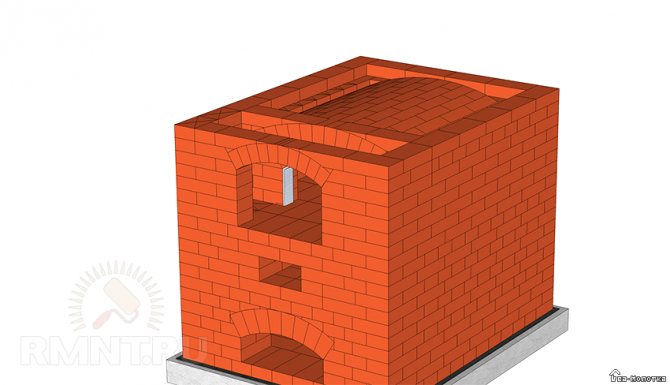
The figure below shows the order of a simple rude for a seasonal dacha or a temporarily inhabited house. A feature is the minimal use of fireclay bricks (highlighted by textured filling), which, generally speaking, is difficult to do without, and a niche above the hob. In cold weather, it speeds up cooking, and if it is already warm enough outside, it does not allow the stove to overheat the room during cooking.

Ordering a simple country oven-rough
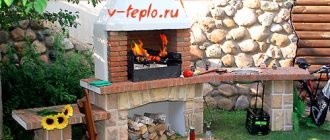
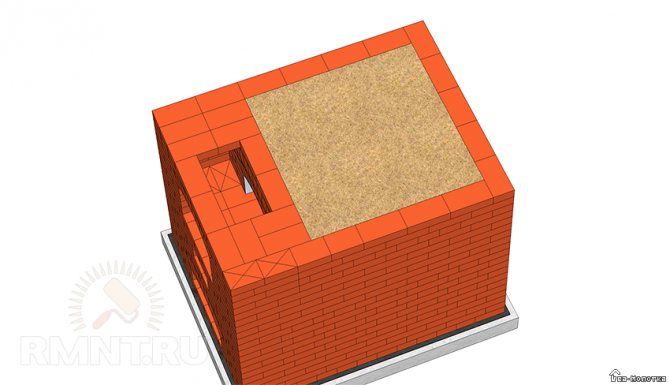
On the trail. fig. - the ordering of a single-burner rough is also compact and light, but more complicated, with a combined channel system. This is an option more for a hunting lodge or summer cottage, where they spend their weekends in winter.

Heating and cooking oven ordering - rough for regular use
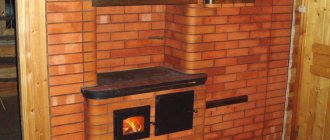
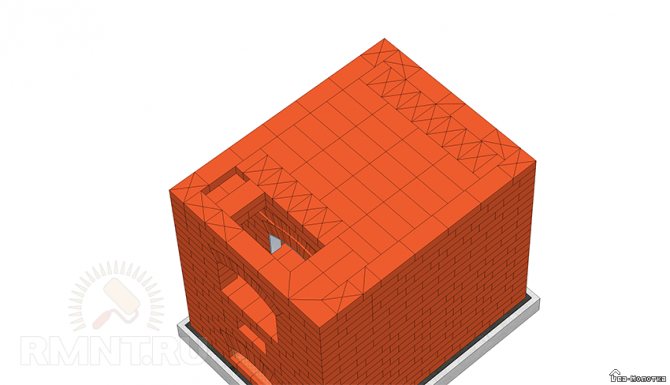
Further in Fig. - ordering of the house heating and cooking coarse with switching to winter and summer running (two-way). This stove is rather complicated, but it is quite economical both for winter and summer running. Option for a permanently inhabited summer cottage or a one-room house.

The order of the house heating and cooking stove is rough with winter and summer running
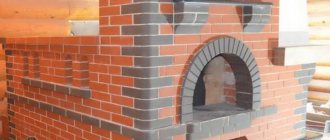
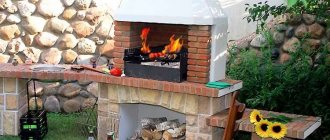
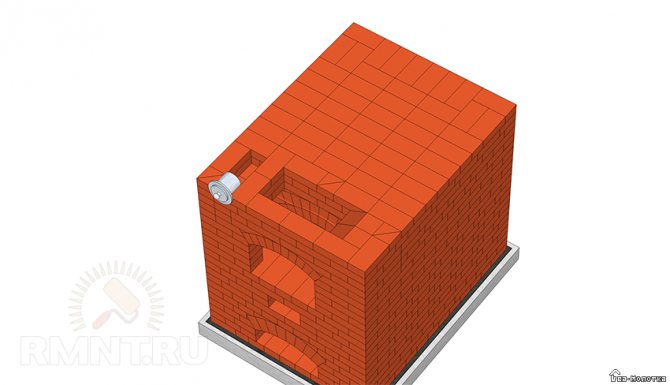
On the trail. fig. - ordering and drawings of heating coarse - fireplace stove (furnace door can be glass) for a house of 2-3 rooms. In a 2-room one, this rude is placed in a wall, and in a 3-room one - with a facade in the living room and in the rear in 2 adjacent rooms; the partition between them falls on the back side (backdrop) of the oven. Agree, 650 bricks for a heating stove for a 3-room house is not much.

The order of the heating stove is rough for a 2-3 room house
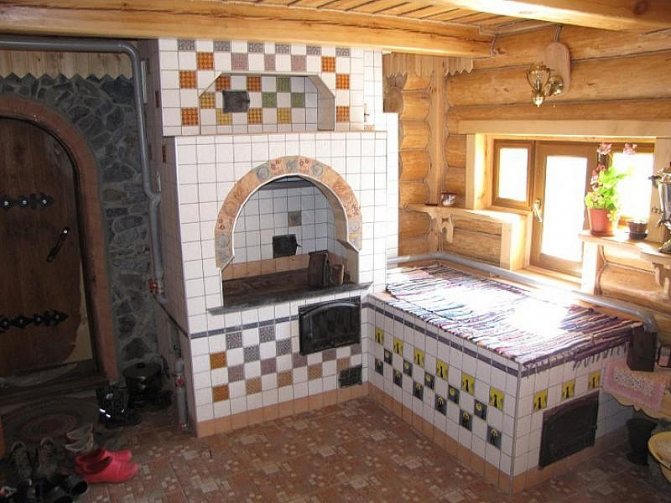
Now - in fig. below the diagram and ordering are rough with a stove bench: a cooking part in the kitchen / hallway with a bathroom; lounger - in the living room. This is already a very complex construction for an experienced stove-maker. For a firebox in warm weather, the stove bench is covered with a feather bed, etc., so that the room does not overheat, but then the windows in the kitchen / hallway will have to be kept wide open, because switching to summer running is not provided.

Scheme and order of the heating and cooking oven-rough with a stove bench
And finally - rough, so to speak, aerobatics, see fig. below: for a house with a heated attic, where an additional shield with checkerboard channels is located (in the inset at the bottom right). This stove can also be a fireplace stove if you take a glass door of the firebox. It is 2-way; ZLH in the drawings - a summer valve.

The order of a 2-storey heating stove is rough for a house with a heated attic
About chimneys
The chimney for rough must meet all fire safety rules. It should only be noted here that the best chimney for a coarse one is a sandwich one, because it also does not require additional capital construction work.
Ordering drawings
When making drawings of sections of buildings, with a drawing scale of 1:50 or less, the masonry on them is shaded with thin lines with an angle of inclination of 45 degrees. It is also possible to trace them along the contour with a solid main line.
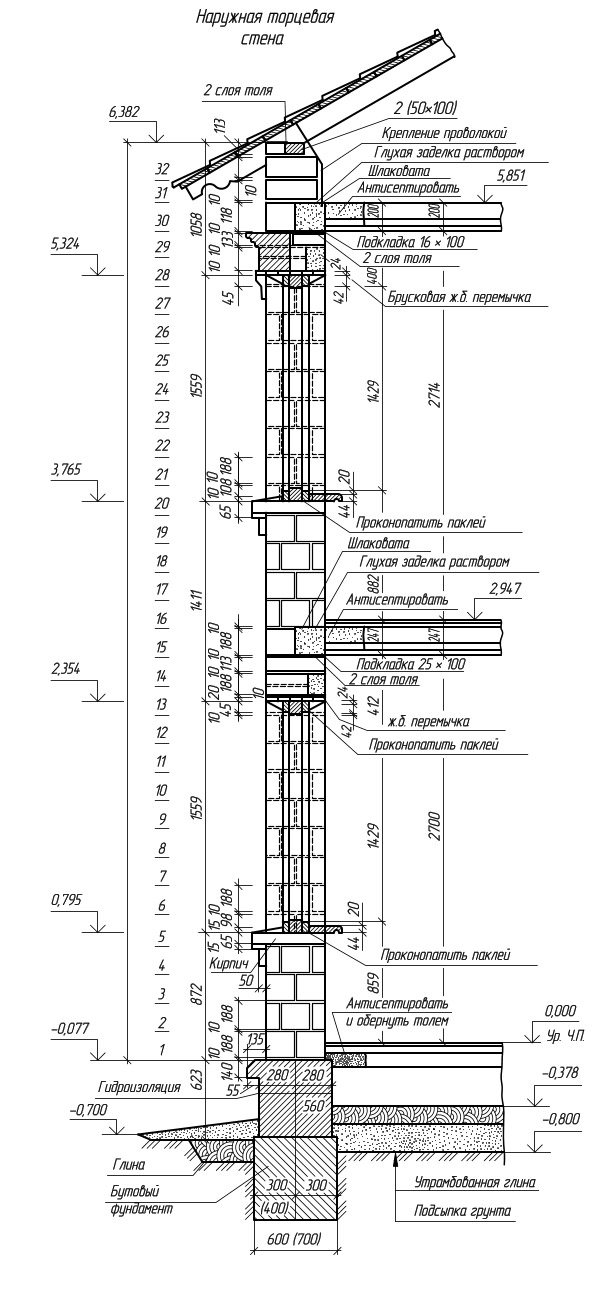
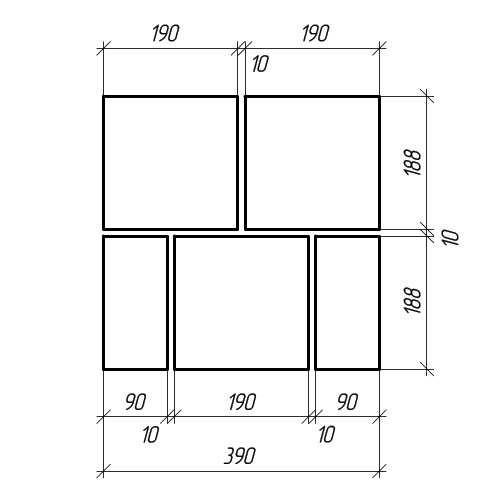
Vertical ordering from lightweight concrete stones
To depict masonry, special drawings are used, which are called orders... They are usually manufactured on a scale of 1:10 to 1:20. The illustration on the right shows the vertical arrangement. Namely, a cut in the area of the outer wall window in a two-story house. As can be seen from the drawing, its walls are lined with two types of bricks: 390 × 90 × 188 mm in size and longitudinal halves 390 × 90 × 188 mm with a 10 mm mortar joint. In the drawing, the rows are numbered, all the dimensions necessary for reading are set, the height marks are set and the necessary inscriptions are made for explanation.
If it is required to clarify the type and type of individual structural elements, then a drawing of individual masonry units is performed. The explanatory figures below show a horizontal order of two adjacent rows for the corner of the outer wall, made of ceramic bricks. The reinforcement used in the masonry is marked with a dashed line.
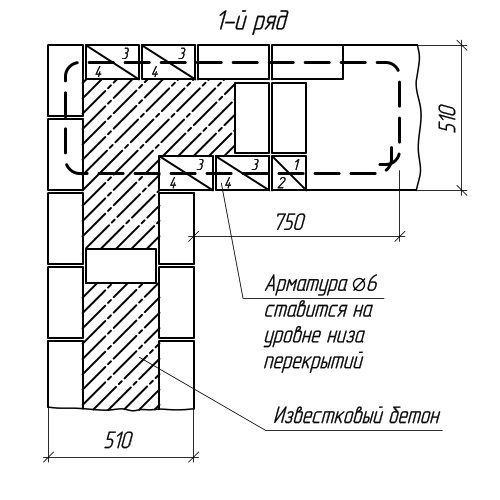
Horizontal ordering of the first row
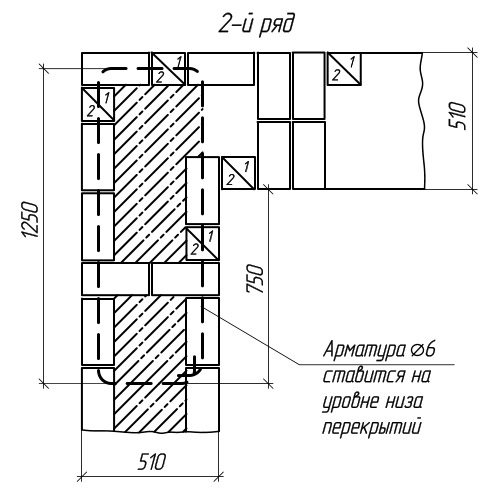
Horizontal ordering of the second row
Ordering
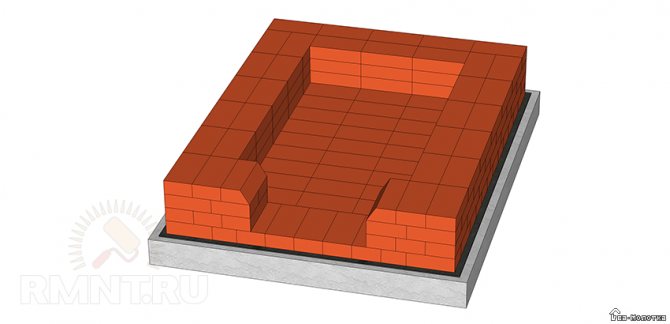
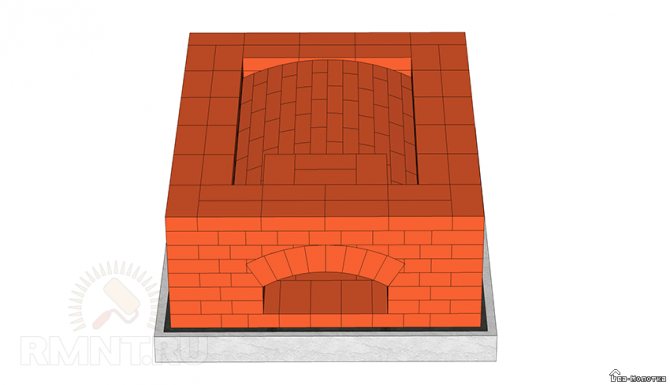
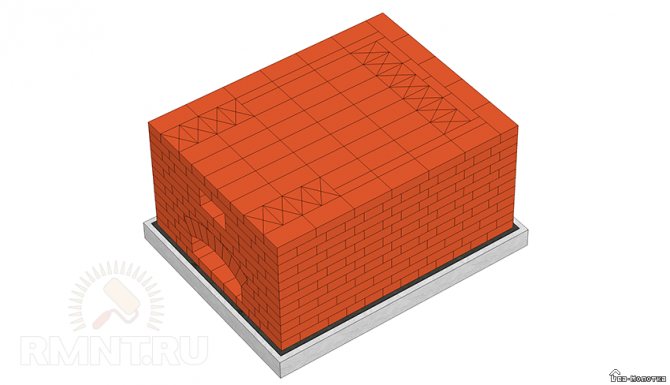
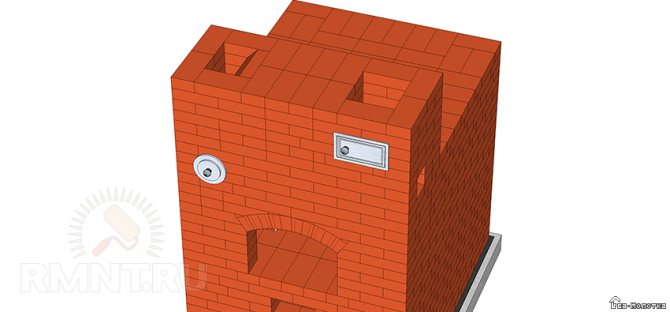
The first row is laid on the foundation waterproofing. In the corners, 3/4 bricks and beveled bricks are used for better dressing of subsequent rows of masonry. The entire construction of the guardianship is laid out on a cement-sand mortar.
The second row is the beginning of laying the walls of the guardianship.
Third row. The construction of the walls of the guardhouse with the use of 3/4 bricks continues.
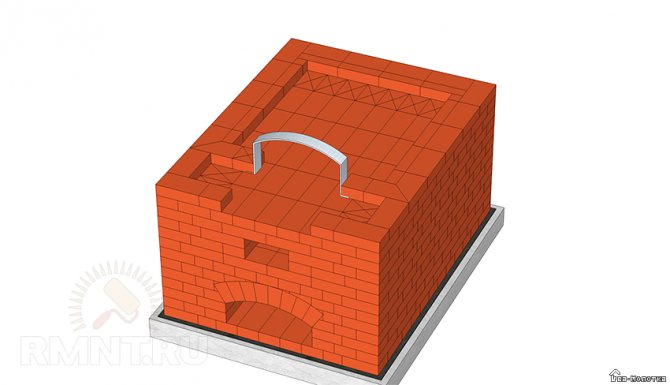
The fourth row is laid out according to the given order and involves the use of beveled bricks to support (heel) the arch.
The fifth row is laid using 3/4 bricks in the corners of the kiln, beveled bricks to support the arch. The arch is also laid out here. A wooden template is pre-made, which is inserted into the opening of the sub-oven.
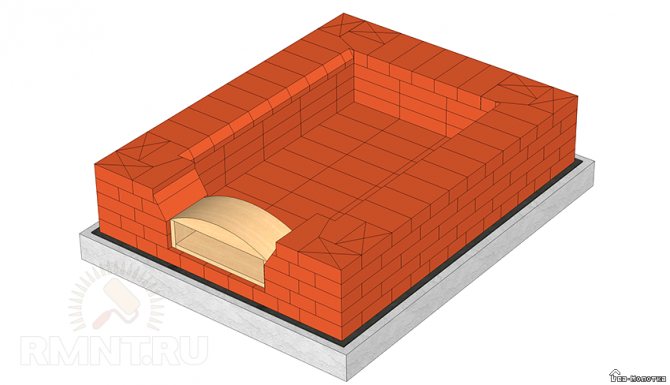
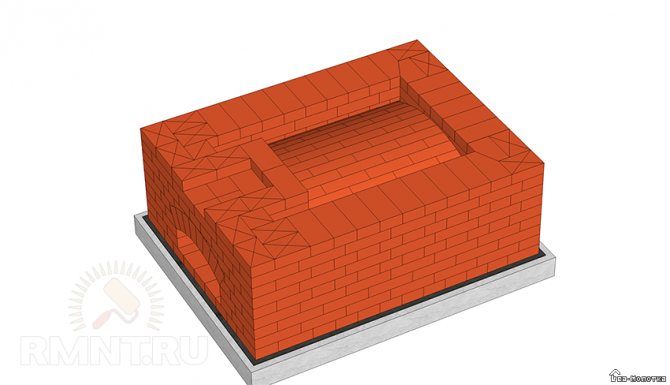
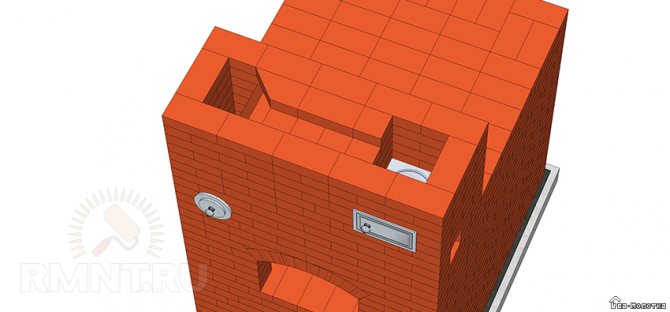
The sixth row is laid out according to the given order.A wooden template of the vault of guardianship is made in advance, which is inserted into the inside of the masonry. In the process of making a template, it is necessary to provide for its easy disassembly at the end of the laying of the vault of guardianship. For a snug fit of the template to the walls of the masonry, 1-2 spacers are driven in at the bottom.
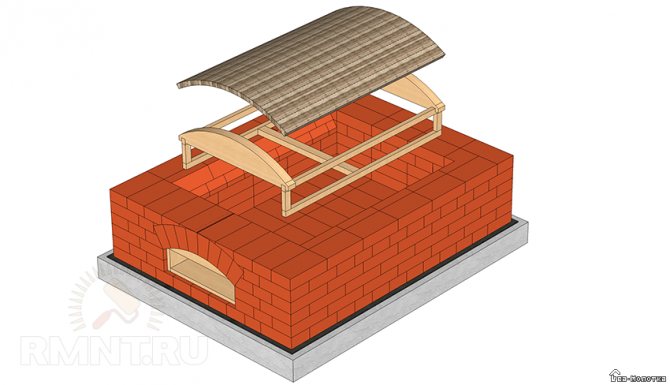
The seventh row involves laying the arch and the next row. The arch begins to lay out on both sides, gradually moving towards the middle. The last brick is called a castle brick, its role is to create compressive stress at the base of the vault, which will ensure the strength of such a structure. In this regard, the last brick is inserted into the gap less than 1/4 of the brick using a mallet. The bricks in the vault are laid as tightly as possible to each other, so the seams at the bottom are made as small as possible, and the upper gaps are made of the same size, into which, if possible, fragments of brick can be embedded.
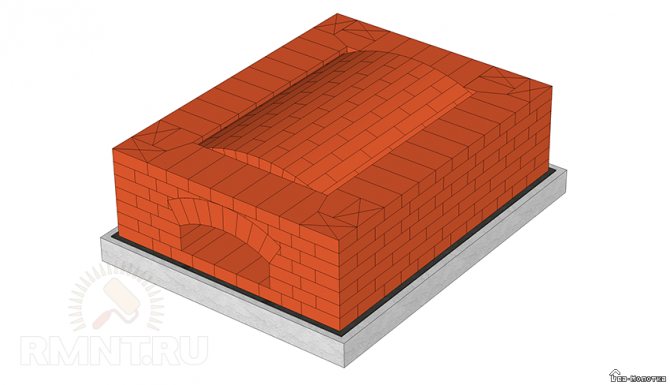
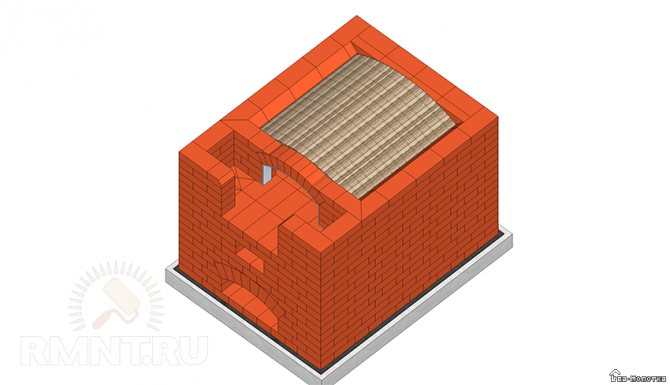
The eighth row provides for one layer of masonry walls of the guardianship in accordance with the given order with the arrangement of the site of a cold stove.
Ninth row. In addition to one row of walls, the walls of the stove are also laid out.
The tenth row completes the laying of the walls of the guardianship. For better insulation of the cold part of the furnace from its hot part, the inner space is covered with dry calcined sand to the upper border of this row.
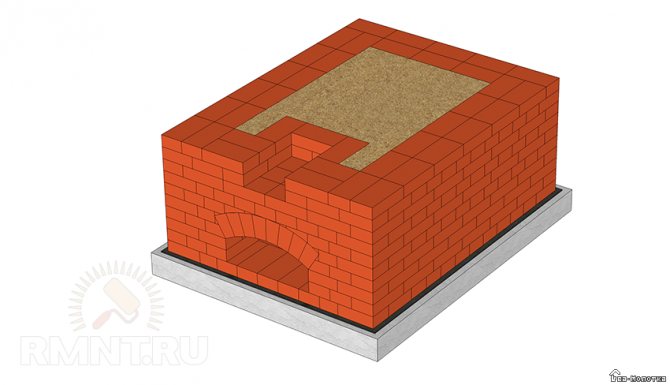
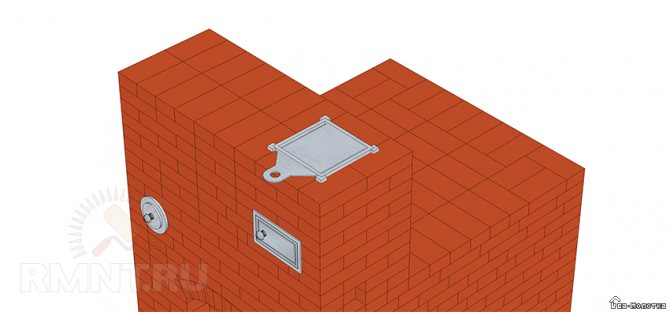
The eleventh row overlaps the guardians completely with the use of additional and beveled bricks. From this row, the cement-sand mortar is replaced by a clay-sand mortar.
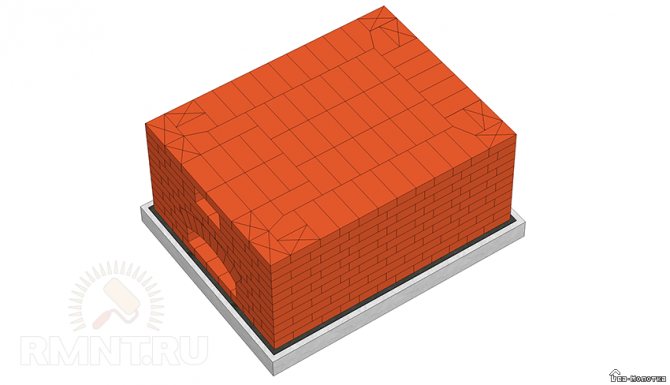
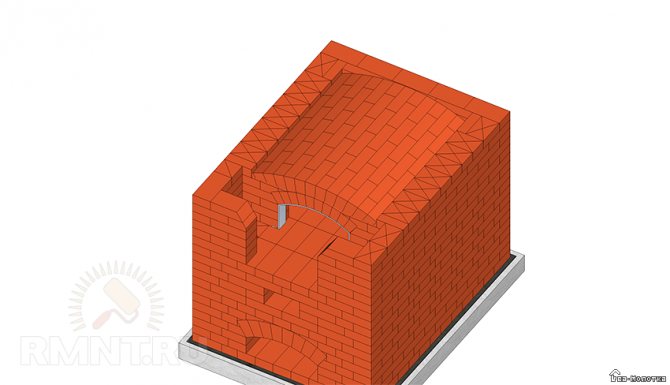
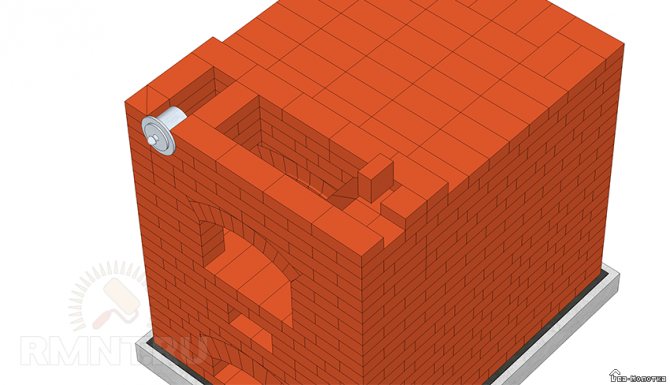
The twelfth row begins the device of the hot part of the furnace (under, six). Therefore, all surfaces in contact with fire must be made of fire-resistant bricks, the dimensions of which coincide with the dimensions of an ordinary one. The surface of the hearth must be level. To do this, it is sanded with fine sand and bricks, removing all the unevenness of the masonry. In addition, for the convenience of removing coal from the hearth, its surface is made with a slope towards the mouth.
The thirteenth row lays the cooking chamber and the six. A hardened metal mouth arc is also installed here. A hardened steel wire attached to it is laid in the masonry.
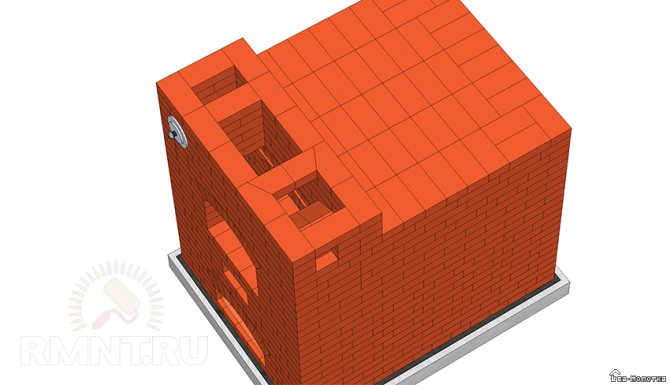
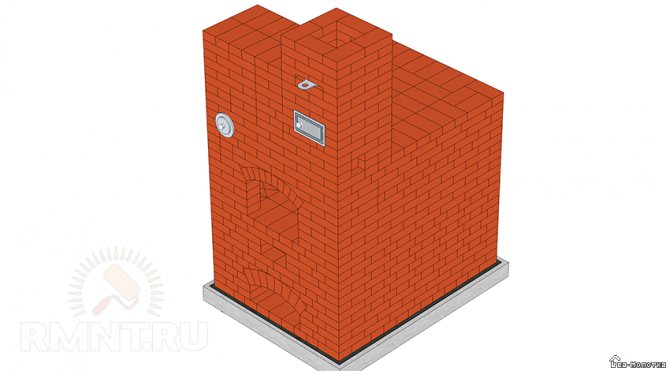
The fourteenth, fifteenth and sixteenth rows line up the walls of the furnace and the pole.


The seventeenth row is the final one in the masonry of the mouth with an arched vault. At this stage, sloped brick heels are laid out, which are the supports for the brick vault of the cooking chamber, and the formwork of the arch of the cooking chamber is inserted.
The eighteenth row is laid out according to the principle of a vault, which is described in the seventh row using clay-sand mortar and refractory bricks.
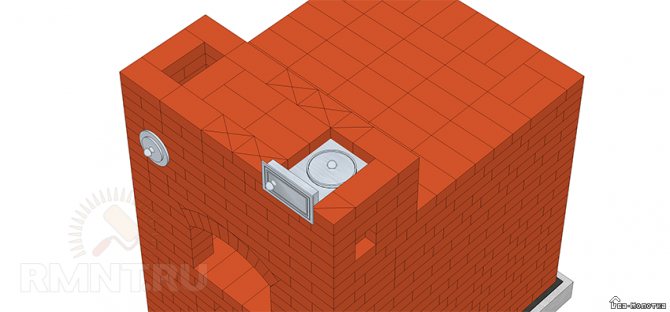
The nineteenth row involves building up the walls and arch of the six.
The twentieth row continues to build up the walls, and also partially overlaps the hole above the sixth, leaving a channel for the overtube. The inner space above the cooking chamber is filled with dry calcined sand.
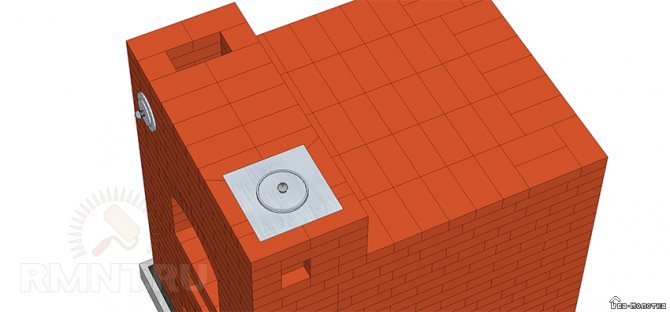
The twenty-first row covers the crucible. The overtube channel is somewhat reduced for the device of the protrusion, which prevents the penetration of sparks from the cooking space into the pipe. Here, the laying of the samovar channel begins.
The twenty-second row completes the overlap device. A strangler is installed in the samovar channel. The steel wire on its sleeve is embedded in the masonry.
The twenty-third row assumes the laying of the overtube channel and the samovar. The strangler is also attached here with the help of hardened steel wire. In this row, a small opening is made to remove soot from the channel ledge, which is covered by 1/2 brick, placed on the edge and coated with clay mortar. During cleaning, this brick is knocked out, and at the end of cleaning it is replaced with a new one. Now they often put a special metal plug instead of a brick.
The twenty-fourth row is a continuation of the laying of the above channels.

Twenty-fifth row.A channel for installing a view is highlighted in this row.
The twenty-sixth row involves building up the strangler channel, then the overtube channel is blocked and the view is installed.
The twenty-seventh row is laid out, as shown in the order. To access the view, a half-door is installed opposite it.
The twenty-eighth, twenty-ninth and thirtieth rows suggest further laying of canals with ligation of the sutures.
The thirty-first row, according to the order, connects the strangler and the pipe through a narrow passage.
The thirty-second row overlaps the stranglehold and the channel connecting the strap with the pipe. A valve for the tube above the pipe channel is also installed here.
The thirty-third and subsequent rows to the ceiling involve laying the pipe channel.
Not reaching three rows to the ceiling, cutting is done to increase the thickness of the brickwork. This increases the fire safety of timber floor and roof structures. Further, the pipe riser is laid out in the same dimensions as before cutting. To avoid the accumulation of condensate on the pipe walls, the pipe stand is plastered over a metal mesh. As the pipe passes through the timber roof structures, the wall thickness of the channel also increases. The upper part of the pipe must be protected from the penetration of precipitation by a metal cap. The laying of the outer part of the pipe is carried out on a cement-sand mortar. For strength, it can be plastered.
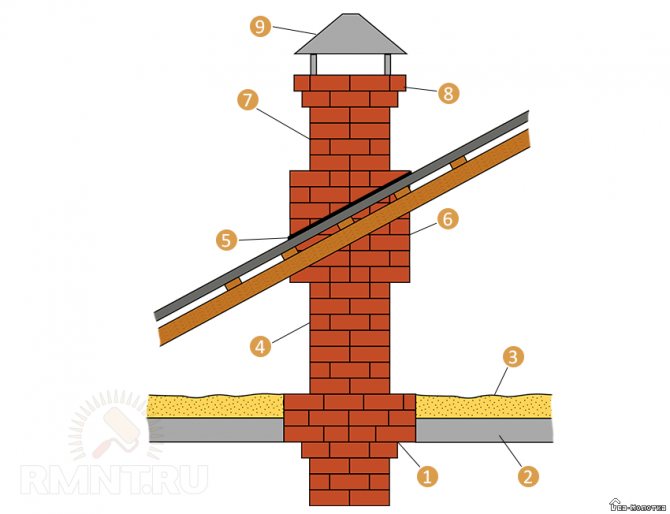
1 - cutting; 2 - overlap; 3 - insulation; 4 - pipe riser; 5 - metal sheet; 6 - otter; 7 - pipe neck; 8 - head; 9 - metal cap
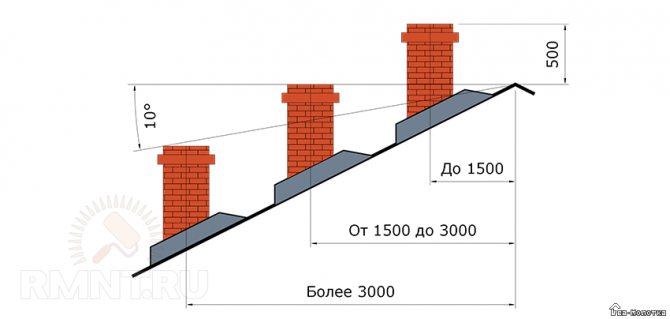
The height of the outer part of the pipe to improve traction depends on its distance from the roof ridge.
Flat pattern of walls with channels
If channels are provided in the wall for ventilation or chimneys, then special drawings of the wall sweep with channels are made.
The figure shows a flat pattern for walls with channels, as well as a wall plan. For the convenience of reading the drawing, the channels are highlighted with a solid main line. The openings in the ventilation ducts are shown diagonally, and in the flue ducts, half darkened. Exactly where these channels are located is indicated by binding to the floor of the floor and to the outer wall.
For each channel, a numerical value is indicated separately, indicating on which floor the channel begins. As you can see in the picture below, on each floor of the building there are two ventilation ducts located in the bathroom and toilet rooms and one for the chimney starting in the kitchen.
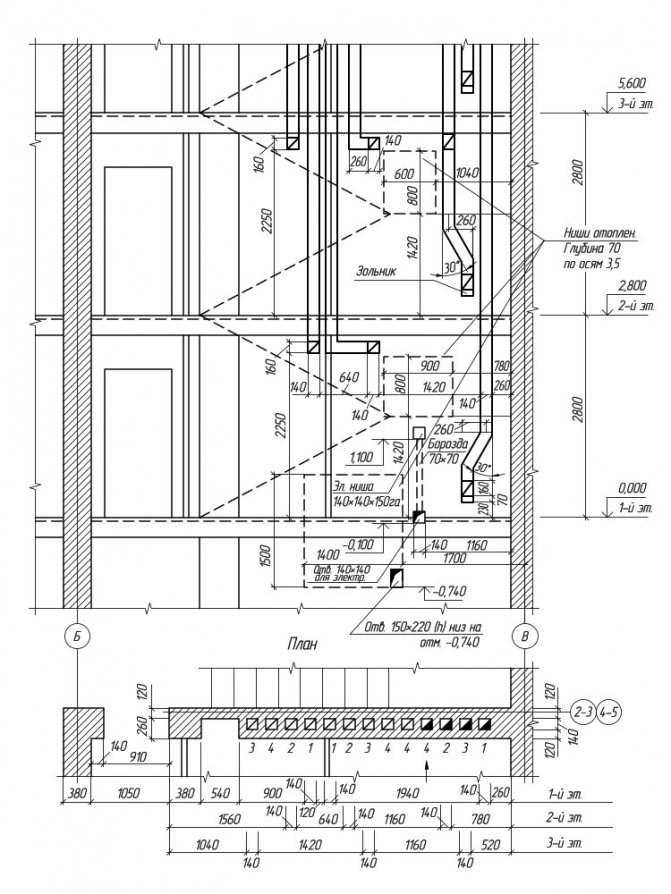
Wall sweep with ventilation ducts and chimneys
Special Requirements
We repeat: the advantages are crude - compactness and the possibility of building in an existing house without major construction work. But it is not so easy to place a more powerful firebox in the structure of a furnace of the same dimensions, it will quickly become unusable from an excessive heat load. If special requirements are not met:
- Furnace foundation.
- Masonry mortars.
- Methods of laying the structure of the furnace.
- The choice and methods of installing oven fittings.
Foundation
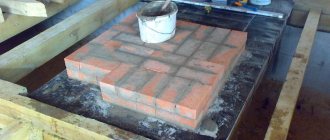
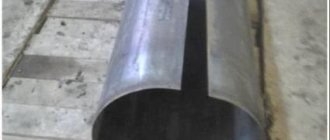
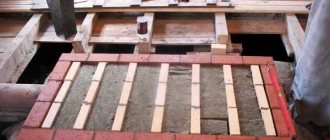
The construction of the foundation for roughness is shown in Fig. A crushed stone pad without sand filling is leveled into the horizon before pouring. Grouting mortar M150 - cement M300 and sand 1: 2. The gap between the rubble foundation and the flooring is 30-40 mm. Do not forget to support the trimmed logs! Leaving their ends dangling is a common but gross mistake. The dimensions of the foundation in the plan should protrude on the contour of the furnace by at least 100-150 mm.
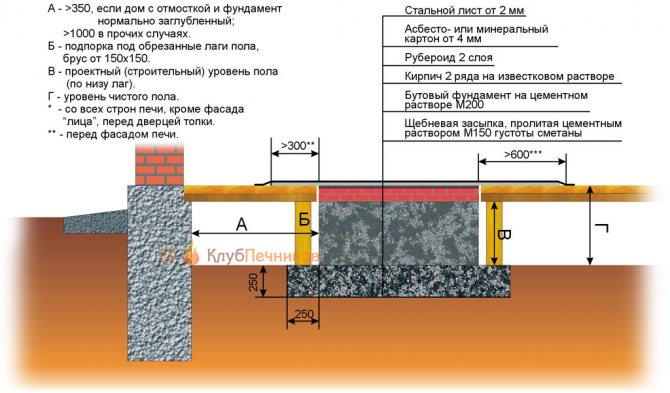
Furnace foundation device - rough
Note: a brick bed on the foundation for the stove is laid out with dressing in the rows and between the rows in the same way as the first 2 rows of the masonry of the furnace structure, see below.
Solutions
To fold coarse, 3 types of solutions are used, see fig. below.The bed on the foundation and the chimney are laid out on a lime mortar that combines sufficient heat and moisture resistance, but the quarry should be laid only on a completely moisture-resistant cement-sand mortar. It is highly desirable to take sand for clay mortar from mountainous or ravine, with rough grains. Ordinary clay - purchased from the oven, guaranteed fat content and, most importantly, purity. Self-excavated clay, brought to the required fat content with sand, is not very suitable for coarse masonry.

Compositions of masonry mortars for the oven-coarse
Masonry
For rough masonry, an oven brick is used and, if the order (see below) is provided, fireclay brick; the red worker is of the highest quality - light red (completely annealed), without spots of burnout, distortion and swelling. Dry-formed bricks are absolutely unsuitable. The masonry of the structure is roughly carried out on the trail. rules:
- If you are an inexperienced stove maker, each row of masonry is first laid out on dry; detected defects of cutting / chipping of bricks are eliminated.
- Before laying on mortar, each brick is soaked until the release of air bubbles stops. Plump all the bricks in a barrel indiscriminately!
- A layer of 5 mm mortar is applied to the bed and the poke of the brick to be laid.
- The brick to be laid is laid with a smooth movement slightly inclined and moved to the previous one so that there are no air bubbles in the seam.
- Press the brick until the seam converges to 3 mm; you can’t knock!
- The initial seam between fireclay and ordinary masonry is 8-10 mm; after pressing - 6 mm.
- The seam between bricks and metal embedded parts (see below) is 10 mm.
- Excess mortar squeezed out of the seam are removed with a trowel (trowel).
- The recesses in the joints found after removing the excess mortar are filled with the mortar by indentation without transverse movements, but not by rubbing!
Those who prefer to study visually a video tutorial on laying heating and cooking stoves can see below:
Video: laying a heating and cooking oven
Fittings
Incorrect installation of the oven door
Fittings and grates for rough need cast iron; doors and latches - with a mounting skirt and holes in it for diagonal wire whiskers. Steel welded or cast iron fittings with lugs for straight whiskers (laid along the corresponding walls of the furnace) are unsuitable in this case. However, place doors / latches as shown in fig. on the right, you can't be rude; this is not at all according to the stove rules. For a dacha Dutch woman for 2.5 bricks in the plan, which is heated once or twice a season, maybe it will do, but not for the rude.
It is necessary, firstly, to squeeze the mustache (wire - galvanized 2-3 mm) with a wrap so that they do not move. Press down at first not tightly, put it at the desired angle (at least 12 mm should remain from the far end of the mustache to the inner side of the masonry). Then tighten gently, shake the door / latch slightly. Didn't leave? Good. Then, secondly, you need to tightly wrap the skirt with an asbestos cord (or basalt fiber), and only now put it in place. You can also watch the following videos about installing fittings in the oven.
Video: installing the door in the oven
Video: grate and stove
Bricklaying methods
What are the types of brick laying? Below we will understand in more detail.
Spoon laying
This easy method takes place in half a brick from row to row with an offset of all vertical seams. Shifts by half or a quarter of the length of the brick.
Chain way
This method of laying is based on the fact that 2 horizontal layers must be connected together. The chain ligation method is one of the main ways to make the wall uniform and very strong. The brickwork technology is very simple - one horizontal spoon row, with parallel subsequent laying of 2 bricks and carrying out a breakdown of the seams, and the second row is bonded. Here we draw your attention to the fact that the vertical seams of the butt and spoon rows are not allowed to coincide.
If you have a wall of one and a half bricks, then a more complex technology should be used: the masonry is 1 spoon and 2 butt bricks. Naturally, the seam should also shift as the rows rise.
Multi-row dressing
Usually, in the bulk of cases, there is no need to perform every second row with a jabbing method. At the same time, the strength of the wall will not suffer too much when alternating up to 6 spoon rows with 1 butt. However, there are limitations.
The following must be laid out by the jabbing method:
- Last and first rows;
- All elements that protrude (cornices);
- Parts of the wall that are under the beams.
Lightweight brick laying method
This method is used during the construction of houses with a small number of floors. A distinctive feature will be that there are large cavities in the wall, most often filled with thermal insulation (mineral wool, expanded clay, etc.). A wall made with lightweight masonry is 2 walls (usually half a brick). Lightweight masonry methods can be very different in implementation.
- Laying method with three-row diaphragms - 5 rows of a hollow wall with 3 butt rows alternate. Laying 3 rows is necessary so that the length of one brick is not enough to connect the elements of the structure, and the organization of the ligation will make it possible to form the reliability of the structure.
Masonry with diaphragms. 1-expanded clay or foam concrete, 2 - screed, 3-solid angular, 4-diaphragm.
- Well masonry so called because in the section it is very similar to a chain of wells. Between the thin walls, the dressings are vertically above each other.
- Anchoring brick-concrete masonry uses foam concrete instead of insulation. Those jointed bricks that protrude from each wall into the interior cavity form the anchoring of the concrete to the wall.
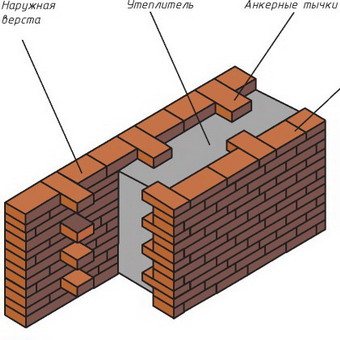
- Method of laying bricks with an interlayer occurs with the formation of 5-6 cm gaps in such a way that a reliable dressing is obtained, as well as that there is no possibility of mutual displacement of the inner and outer walls. The resulting layer acts as thermal insulation and may well be filled with some kind of insulation.
Reinforced masonry method
This method is used in the construction of brick walls, which can perform various functions:
- The applied reinforcement is capable of giving additional rigidity and reliability to the wall in earthquake-prone areas.
- The use of reinforcement can be due to the replacement of the laying of butt rows or diaphragms during the construction of heat-insulated lightweight walls.
Decorative masonry
The decorative masonry method is used in cases where the wall will not be plastered. In such cases, it will be logical to make the surface look as attractive as possible. It will be difficult to bring all types of brickwork with the provision of a decorative surface near the facade, but we will list the main ones:
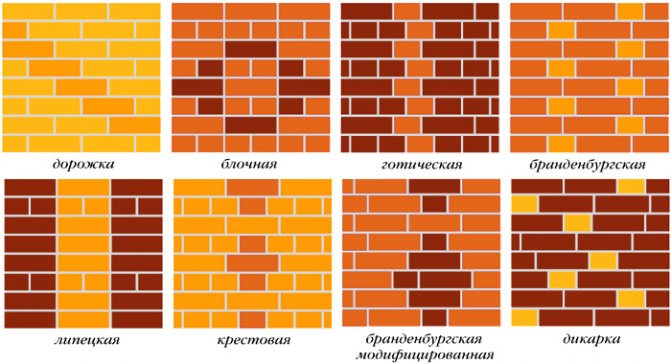
Formation of a pattern from bricks of different colors by chain dressing. It is the simplest solution for the combined use of silicate and red bricks.
The use of Bavarian masonry, i.e. several bricks with a dark shade alternate in each row.
With this method, facing brick is used to lay out the embossed corner of the structure.
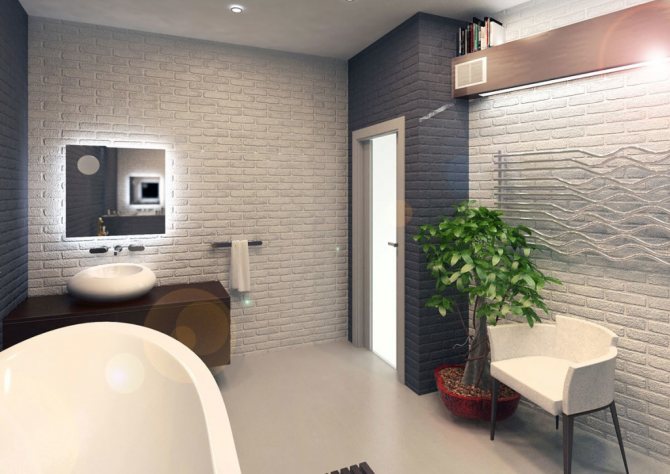
The use of decorative masonry, together with neat cutting of the seams, can be attractive not only on the facade, but also inside. We talked about this in more detail in the article "Decorative brick in the interior".
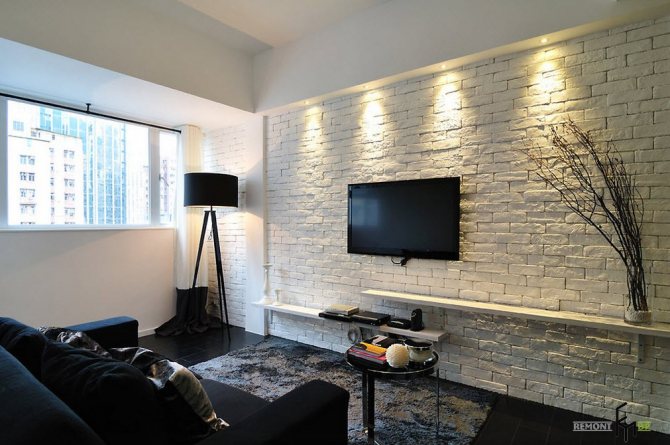
In this case, decorative brick of an unusual shape was used.
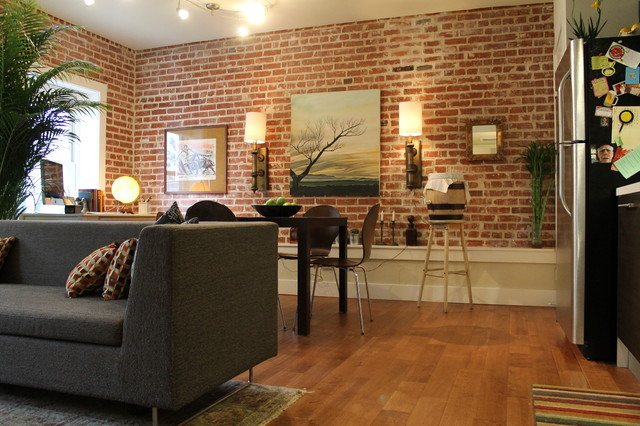
With this method, an imitation of partially destroyed and rough masonry is organized. But most often, embossed wall panels are used for such an interior.
Openwork way
Everybody usually associates brick with solid capital walls.But, despite this, it is quite possible to build walls and fences that look weightless from it.
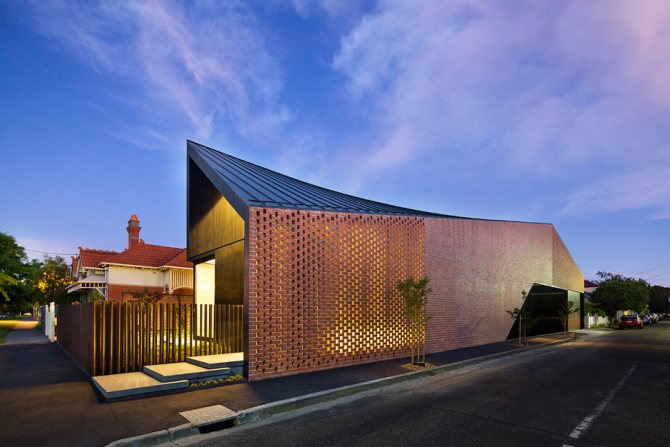
Fences and walls do not have to be straight, as everyone is used to. So, during the construction of ancient castles and fortresses, hewn stones were used, but even curvilinear structures and not necessarily monolithic ones can be made from ordinary bricks.
It is easy to build such a stove with your own hands.
The whole process can be divided into several stages:
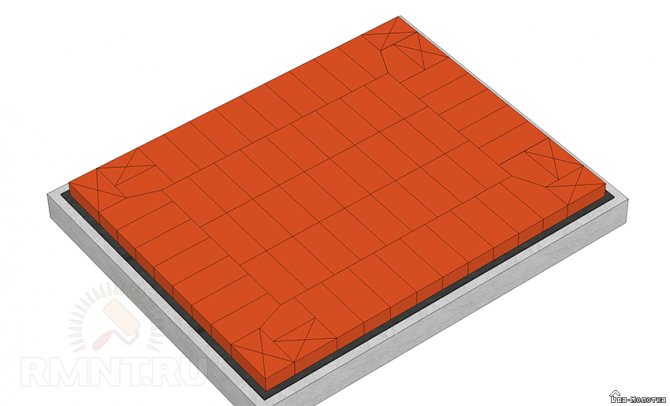
- laying the first row, on the evenness and accuracy of which the accuracy of the entire masonry as a whole will depend;
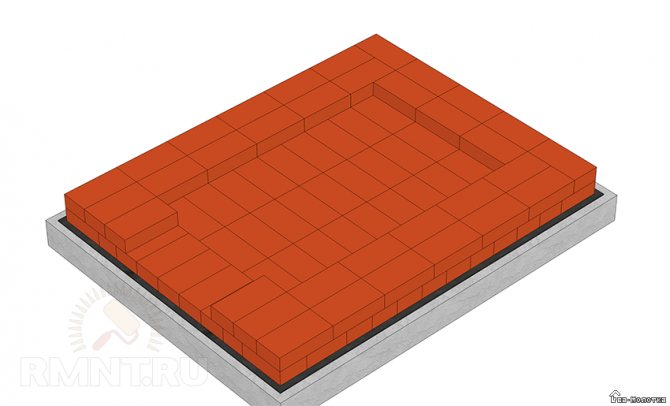
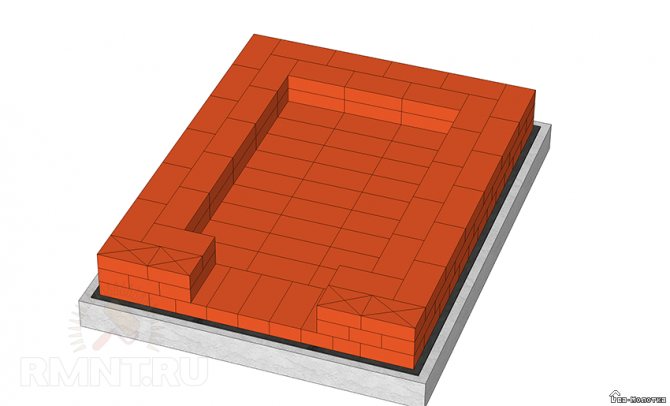
- installation of the second row with a niche for the ash pan;
- laying the combustion zone with fireclay material;
- pipe creation.
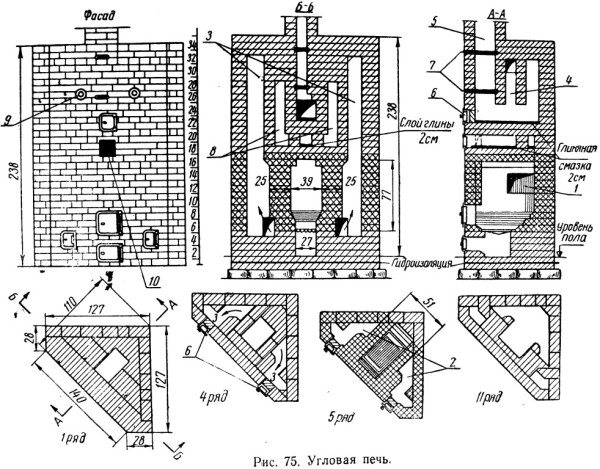
Corner oven designs are perfect for any layout. Due to its rather compact size, such a stove can be placed not only in the living room, but also in a small bedroom. Depending on the interior design and room parameters, you can choose a symmetrical or asymmetrical model. The angular arrangement makes it easier to view the stove, making it a decoration and highlight of any interior. This type of heating structure will be an excellent option for a private house or summer cottage.
Rules for setting procedures and techniques for their operation
Ordering is a strip with marked divisionscorresponding to the thickness of the horizontal row of masonry (77 mm, taking into account the seam and the thickness of the brick). Ordering is needed to attach a mooring cord (twine) to it, which ensures the vertical and horizontal row. It is very easy to make a wooden order yourself. To do this, on a wooden lath with a cross section of 50 × 50 mm up to 3 m long, divisions (notches) are applied every 77 mm for ordinary bricks and every 100 mm for thickened ones. The thickness of the horizontal joint when laying is 12 mm. The order is placed on the surface of the wall with the side on which the rows of masonry are marked (inside the house).
You can use a corner metal ordering when laying. It serves as a template for rows of masonry, which, when properly installed (plumb) and rigidly fixed, will ensure the verticality of the masonry.
The use of ordering will reduce labor costs, speed up the masonry process by reducing the time to check the correctness of the masonry, and ensure the verticality of the corners of the brickwork when using corner metal orderings.
The order is established as follows: they take the clamps and test the rotation of the screws and the clamping washer, and then hammer the end of the clamp into the seam of the masonry with a pick hammer and clamp the screw. The second clamp is also fixed after 3-4 rows, then the order is taken and installed, clamping the order with screws before installation is cleaned of the solution.
| Clamp installation. 1- clamp | Setting the order on the tier. 1- laying, 2- ordering, 3- clamps |
Installing and securing the order consists in unscrewing the screw of the upper clamp, insert the order in the upper clamp while maintaining the order, unscrew the screw of the second clamp, insert the order and tighten the screws, verifying the correct installation along the plumb line, adjusting it with screws and finally fixing the order. Then a plumb line is fixed on it and the cord is moored to the order from the inside of the corner shelf.
Having laid out the masonry to the height of one tier using an assembly crowbar, pull out the lower and then the upper clamp from the seam of the brickwork, and then fix the order for the next tier. To prevent the clamps from falling down during rearrangement, they are attached to the order with a cord.
The orders are placed around the perimeter of the house, at the corners, at the intersections and abutments of the walls, as well as on straight sections of the walls at a distance of 10-12 m from one another.
The mooring cord is pulled on each row of the outer verst at the level of the top of the stacked row with an indent from the vertical plane by 3-4 mm.
To control the quality of the masonry, after fixing and aligning the orders, beacons are laid out on them at the corners and at the boundaries of the erected section and masonry is carried out along them.
The mooring near the lighthouses is fastened with a mooring bracket, for this the lower end of the bracket is inserted into the seam of the masonry, and a mooring is tied to the longer end resting on the lighthouse brick. The free end of the mooring cord can be wound around the bracket (handle). To prevent the mooring from sagging, an inventory beacon is placed between the beacons under the cord.
Lighthouses are placed every 4-5 m.
The mooring cord can be tied to nails attached to the seam of the masonry.
Before you start laying bricks, you need to check the installation of orders around the entire perimeter of the house again. Lighthouses are laid out in the form of a runaway punishment during a break in work in order to ensure the dressing of a new masonry with the previously laid out. Shtraba is a section that is laid out before a break in work. The collar provides a better connection of the jointed wall sections.
The bearers are carried out up to six rows in height, they are laid out on the outer versts (facing the facade) and used in the masonry process to secure the moorings.
| Control of the installation of the order. 1- adjusting screw, 2- fixing clamp, 3- screw, 4- movable clamp with mooring, 5- plumb | Fines. a - escape wall at the beginning of the masonry, b - corner pipe, c - escape pipe in the middle of the wall |
Department "TPGS"