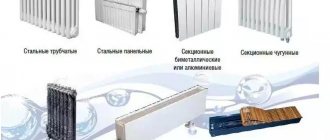
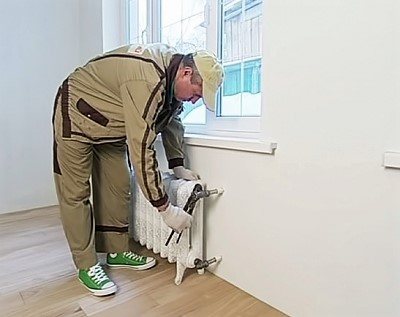
Batteries are the main part of a heating system. Heat supply, service life and heating costs depend on the material of manufacture and correct installation. Today you can find radiators made of different materials: aluminum, steel, bimetal. When installing the heating system, cast iron batteries are still used. How to install cast-iron heating radiators with your own hands, if you have the skills to use working tools.
DIY installation of cast iron heating radiators
Training
Installing heating batteries is a responsible process. Failure to comply with the basic principles entails a low level of heating of the structure. The consequence may be forced repairs in the room or replacement of the heating radiator during the winter.
First of all, you need to determine how the heating system works:
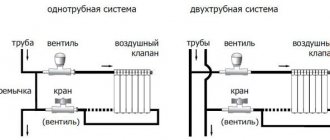
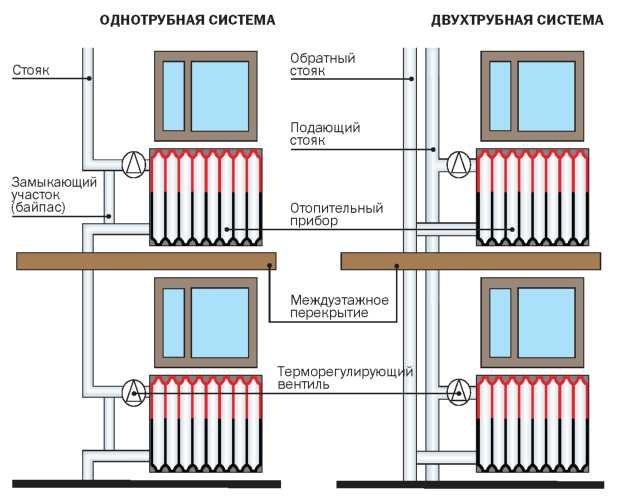
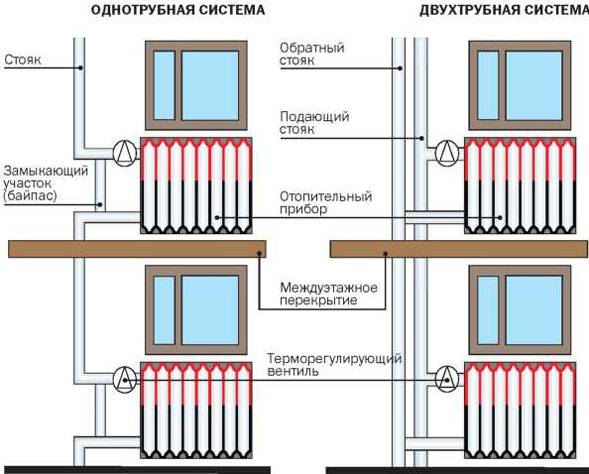
- single-pipe wiring assumes a serial connection. To replace the radiators, it is necessary to completely shut off the hot water supply and drain it. This type of organization makes it difficult to replace the cast-iron batteries of an apartment building in the cold season: all apartments will be left without heat during installation.
- two-pipe wiring is a parallel connection of each radiator to two pipes: supplying and removing hot water. This difficult-to-install system has an advantage over a one-pipe system: at the stage of setting up the system, thermostats can be installed on the radiators to control the temperature in each room.

One-pipe and two-pipe distribution of the heating system.
The type of connection of the batteries to the heating system also matters:
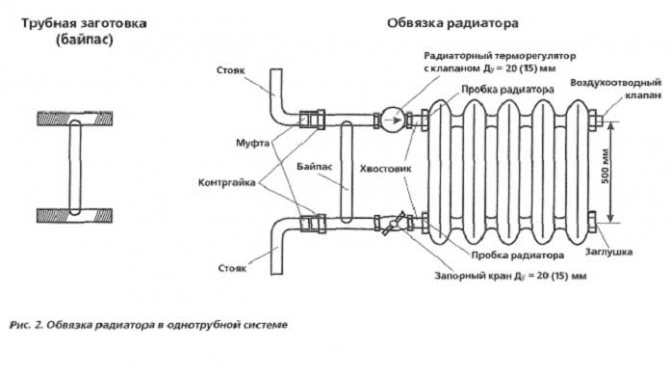
- One-sided connections are most common. The drive pipe is connected to the top of the radiator and the outlet pipe is connected to the bottom, which ensures an optimal heating level. If hot water is supplied from the bottom, the drive pipe is connected to the lower connection. As a result, heat transfer is reduced by an average of 6%. One-sided connection allows you to install a jumper between the inlet and outlet pipes - bypass. Such a transition, in combination with valves that shut off the water supply to the radiator, allows you to regulate the amount of heat in the room and install the pipe without shutting down the main heating system.

Types of connecting batteries to the heating system
- The lower one is used if the pipes of the supply and outlet of the system go into the floor. They are located vertically and take up a minimum of space, do not spoil the overall appearance of the room.
- Diagonal connection is more often used with large radiators consisting of 12 or more sections. The supply pipe is connected to the top of the battery on one side, and the outlet pipe is connected to the bottom on the other. This type of installation, in contrast to one-sided, allows the distant sections of the radiator to warm up.
Important! The design of the heating system affects the choice of parts for installation.
It should be noted that the weight of cast iron batteries is much higher than aluminum ones, which can be easily mounted alone. For a high-quality installation of a cast-iron structure, you need to call several people for help.
It is also possible to contact the community service, which is responsible for maintaining the house. You can hire specialists who will take into account all the nuances and bear responsibility in case of emergency. In the heating system of a separate residential building, pressure surges and contamination of the circulating water are quite low, so do-it-yourself installation will not cause any special problems.


Climate
47 votes
+
Voice for!
—
Against!
Radiators are an important part of any heating system. Nowadays, there are several main types of heating batteries: steel, aluminum, bimetallic, cast iron. But for more than half a century at the peak of fame, it was cast-iron batteries. Do not rush to write them off, because they can live a "second life" in your house. Today we will talk about how to disassemble a cast iron battery, wash, paint and reinstall.
The need to install cast iron batteries
Cast iron radiators are rightfully called "legendary". They were quite popular in the last century, or even the only ones, and were used in structures and buildings of various types and purposes. No apartment of the Soviet era can be imagined without such bulky and hot units.
Cast iron radiators were not just heating devices, they were used not only for heating. Housewives adapted them for drying wet shoes and washed linen, heating cold things, and even defrosting meat. Modern radiators can hardly boast of the same number of functions!
The big advantage of cast iron over other materials is its ability to resist corrosion. With proper use, such a radiator can last over 50 years. It has low hydraulic resistance and high heat dissipation. Exceptional reliability and ease of use are a significant advantage of these radiators.

But the main and main advantage of cast-iron radiators is not their low price and excellent heat transfer, but their ability to function well regardless of the quality of the coolant and how much water is in the cast-iron battery. When installing new generation batteries, our consumers rarely think that the incoming water to the batteries must meet European standards in order to be harmless for European radiators.
Our coolant is inferior in many respects to the coolant used in developed countries. In domestic coolants there are so many different "chemistry", therefore it is of low quality, and because of this, metal batteries of a new sample sometimes do not withstand this and succumb to the destructive force of harmful substances.
The result will be the following: batteries "break" with all the ensuing consequences. And all this happens when you least expect it, as a rule, in terrible frosts! It is difficult to deal with such a problem, which means that it is necessary to prevent this by installing cast-iron radiators in the house.
Advantages and disadvantages of cast iron radiators
The most surprising thing is that, despite the shortcomings of this material, the installation of cast iron batteries is not a very rare occurrence. Such radiators are still very popular among our compatriots. Let's find out why:
- Availability. Cast iron radiators are one of the most inexpensive types of radiators on the market. This is the main reason for such devotion to cast iron.
- Long-term preservation of warmth. Cast iron heats up for a long time, but the accumulated heat is also saved for a long time, therefore, even if the heating system is turned off in the room, the optimal temperature is maintained for a person.
- Functionality. Nowadays, housewives continue to dry clothes on batteries. And yet, no matter how funny it may look, this method makes it possible to do it as quickly as possible.

The disadvantages of cast iron batteries are as follows:
- The radiators are pretty heavy. Radiators of this type are difficult to install, because they are heavy, therefore, installers in most cases work in teams, and not one at a time, as is often the case when working with bimetal and aluminum. Therefore, the connection of cast iron batteries requires corresponding costs.
- Significant thermal inertia. Cast-iron batteries heat up for a long time, because of this, it will be cool in the house for some time after connecting the system.
- Unattractive appearance. Compared to other types of batteries that are known to modern man, cast iron does not look aesthetically pleasing, they are not smooth and more bulky.
- The need for special care. Installing a cast iron radiator is not the last step to be done with batteries. After installation, it is the turn of painting the batteries so that there is no corrosion.
Preparation for the installation of cast iron radiators
It is not yet known how long the installation of cast-iron radiators will still be in demand, but nevertheless, these batteries are the record holders for the time of their use, and the level of their popularity is not expected to decrease yet. According to experts, replacing cast iron batteries is impractical for any other batteries, because cast iron is a more suitable material for heating radiators.
The preparatory stage for the installation of radiators includes the selection of batteries and their purchase, the purchase of all the necessary elements (plugs, brackets, Mayevsky crane, adapters). Before proceeding with the purchase of the last parts, we choose a battery, because often a crane and other parts are included in the kit. During this stage, the brackets are installed, as well as preparation for installing the batteries.
The procedure for replacing radiators requires some preparatory work, which is overlapping and draining water from heating risers, as well as dismantling old equipment and their fasteners. You also need to keep in mind that when replacing heating (old cast-iron radiators), you should decide on the time of such work and agree with the necessary services so that they turn off the hot water supply in the premises.
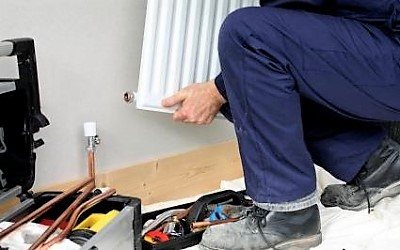
DIY installation of cast iron radiators
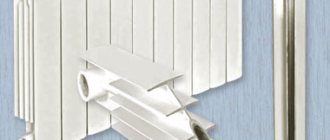
Domestic-made cast iron batteries, unlike imported heating devices, require mandatory broaching of intersectional joints, as well as additional painting prior to installation. With these works, it is customary to begin the installation of a cast-iron radiator. And at the end, you can install a screen for a cast-iron battery for greater decorativeness.
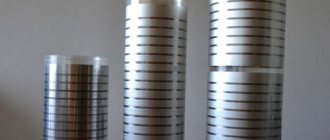
Grouping radiator sections
In accordance with the project, the first stage in the installation of cast iron batteries is their breakdown into sections. To do this, fix the radiator on the workbench and insert two radiator keys into the open nipple holes. The radiator key on one side has an eyelet for the handle, and on the other side - a flat screwdriver, the width of which allows it to freely pass through the nipple hole and abut against their internal protrusions.
Both radiator keys are inserted to the appropriate depth in the lower and upper nipple holes. In order to prevent skewing of the sections, it is necessary to unfold the nipples at the same time, therefore, two people must perform this operation. The nipples on different sides of the radiator have different threads, which, of course, affects the direction of rotation of such a radiator key.

If the sections are disconnected from the side where the nipple has a left-hand thread, the key should be turned to the right; if the radiator is disassembled on the right side of the thread, then, accordingly, the radiator wrench rotates to the left. The grouping of the sections actually begins with the fact that the sections that will be connected are laid on a workbench and the nipple is lubricated with linseed oil. Next, put on gaskets and screw in the nipples for 1-2 threads.
The final tightening of the nipples is carried out using both radiator keys at the same time.The direction of rotation of the keys itself also depends on which side the sections will be grouped on: the key from the side of the section with the left thread rotates to the right, and from the side of the section with the right thread - to the left.
Radiator hydraulic test
After grouping the sections and connecting the cast-iron battery, it is worth doing a hydraulic test of the assembled cast-iron radiator on a special stand. The radiator is connected to a hydraulic press and filled with water, before that, do not forget to release all the air from the device. In the radiator, under the action of the press, the required pressure is created in the range of 4 - 8 kgf / cm. sq.
If during the test the pressure gauge needle begins to fall, this means that the sections are badly rolled up, or they have cracks. In this case, it is necessary to replace the defective sections or tighten the nipples with radiator keys. You can seal small cracks with epoxy glue. Small leaks in the places where the sections are connected can be eliminated by replacing the gaskets.
Radiator priming and painting
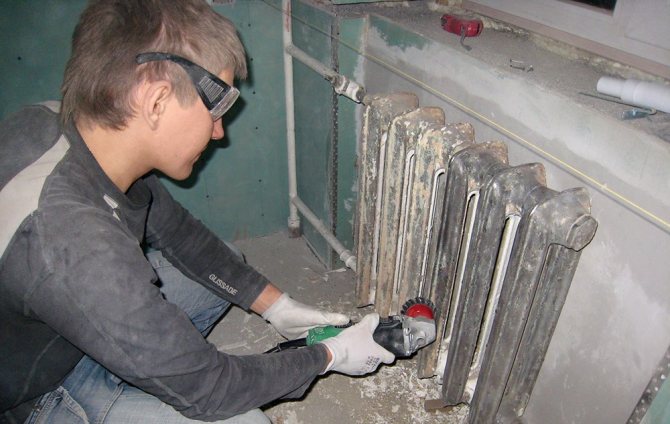
Then you can proceed to painting the cast iron battery. The first thing to do before painting with a radiator is to remove traces of peeling paint and corrosion from it. Next, you need to prepare the surface. Remove the old paint with a remover, and then sand it carefully. For this purpose, use a special attachment for a drill, grinder, brush with metal bristles.
If there are already several layers of paint on the radiator, it may be necessary to get rid of them, since these layers can interfere with normal heat transfer. For this purpose, you need to remove the paint thermally or apply various chemicals. If the old paint stays flat and there is no tendency to delaminate, you can apply new paint over the previous one.
Also, before starting to paint cast iron batteries, it is necessary to remove all dust from them and render harmless. For this purpose, you must take a common solvent. Next, you need to treat the entire surface of the radiator with a primer, which is selected so that its characteristics correspond to the maximum of the characteristics of the paint. Most often, cast iron batteries are painted with a special curved brush designed for radiators, since it is very difficult to paint over the inner surfaces of the sections with a regular brush.

If the painting will be carried out in a vertical position, you need to do the work from top to bottom, so that the formation of drips does not occur. After the primer layer has dried, you can start painting the battery with decorative enamel. For radiators, you need to choose a special enamel. Otherwise, you run the risk that the paint will begin to peel off, turn yellow in the midst of the heating season.
The following requirements are imposed on paints and varnishes for cast iron batteries:
- Resistant to fairly high temperatures (the so-called thermal standard). It is necessary that the paint can withstand the temperature of the radiator, which heats up to 80 degrees.
- The ability to perfectly resist metal corrosion.
- Lack of tendency to discoloration.
There are many different enamels on the market nowadays for radiators, but acrylic enamels are in greatest demand due to the fact that there is no toxic smell when painting batteries, unlike alkyd enamels. Such paints, if necessary, can be diluted with water, and if they get on hands, clothes and other places, they are perfectly washed off. In addition, acrylic compounds perfectly withstand use at high temperatures, do not crack, do not flake, do not turn yellow.

When painting cast-iron radiators, remember that it is not recommended to apply paint and varnish coatings to a hot battery, as the risk of uneven coatings increases, as well as a strong smell of paint increases.Start painting from the top of the batteries, because according to the law of gravity, dripping paint can damage the bottom layer.
First, the inner covers of the radiators are painted, and then the outer ones in order to avoid the appearance of various stains on clothes and hands. There is one more rule to remember when painting cast iron batteries: two thin layers of paint are much better than one thick layer.
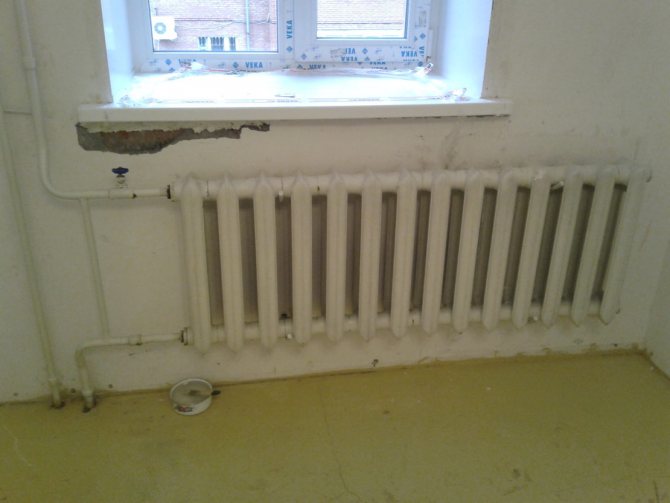
Installing a cast iron radiator
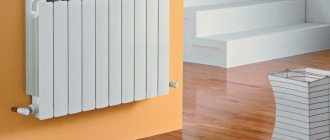
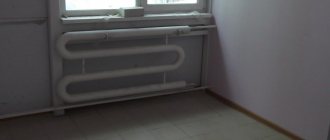
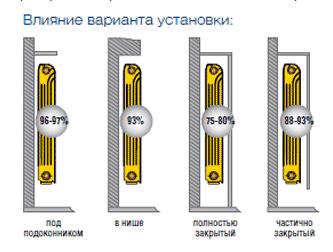
Usually cast iron radiators are installed under windows. In this case, it is recommended to adhere to certain requirements:
- It is necessary that the radiator fins are strictly vertical.
- The deviation of the center of the radiator should not be more than 2 centimeters from the center of the window opening.
- The distance from the upper plane of the heater to the window sill should not exceed 5 centimeters. This is necessary for the convenience of repair, dismantling and maintenance of the device.
- The distance from the floor to the battery should be at least 6 centimeters so that it is convenient to clean the floor under the radiator.
- The distance between the radiator and the wall is determined depending on the material and thickness of the walls, as well as on the installation method of the heating device.

Also, remember that all heating radiators in the same room must be installed at the same level! Before hanging up the heating devices, we recommend that you mark the holes for the brackets. For this purpose, it is necessary to make a special template of thin plywood, the dimensions of which should slightly exceed the size of the cast-iron battery.
On the template itself, in the places where the brackets are attached, holes are drilled in the same line in the lower and upper rows of the conditional sections. For one heater, the number of brackets is determined based on the following calculation: for every square meter of heating surface, there must be one bracket. Next, the template is installed along a plumb line in the place under the window where it will be necessary to install a cast-iron radiator.
In place of the holes in the wall, the nests are punched with a bolt, which are subsequently drilled, after removing the template. The dimensions of the sockets should allow the brackets to be inserted at a depth of at least 12 centimeters and brick them up with cement mortar. To ensure that the brackets are firmly in place in the grout, a second template must be made.

This template is made from a piece of plank and steel reinforcement, then inserted in the place where the brackets come out of the cement mortar. Then, as the cement slurry has frozen, the template can be removed. The use of such a template makes it possible to prevent the bending of the bracket inserts themselves after the grout has set.
The connection to the heating system of cast-iron batteries is carried out with the plugs turned out by means of a squeegee. All threaded connections must be sealed with tow for better tightness. Next, open the valve so that the battery is filled with water.
Replacing and cleaning cast iron batteries
Sometimes water begins to drip from the radiator, and then the question arises of how to eliminate the leakage of the cast-iron battery. To do this, you must first dismantle the battery by preparing a pipe wrench of the correct size to unscrew the locknut flanges, or a pipe cutter with which you can cut the pipe near the locknut if it is impossible to unscrew it.
Then the radiator should be disconnected from the heating system and removed from the bracket. This work must be done in the summer before the heating is turned on. In winter, in this case, you need to leave the whole house without heating and, of course, drain all the water from the system. The procedure for disassembling and assembling cast iron radiators is a rather laborious process and requires the necessary skills from the performer.
It often happens that you need to change any one section, or after prolonged operation, the cast-iron radiator becomes clogged with rust, although it remains fully functional. In this case, it is necessary to disassemble and rinse it. Before disassembling the cast-iron battery, you need to make sure that you have such materials and tools: pipe and battery wrench, grinder, chisel with a hammer, brush for removing rust, blowtorch, gaskets, tow, nipples.
Then the cast-iron battery is disassembled: first, the plugs on the batteries are heated with a blowtorch, after which they are unscrewed. Next, the nipple is carefully cut with a grinder between the radiator sections, then the sections must be disconnected. After that, it is necessary to knock out the nipple with a chisel, while not damaging the thread, which then needs to be cleaned well.
In the last step, the cast iron batteries are grouped and collected. It must be remembered that the nipples on different sides of the radiator have threaded connections of different directions. Gaskets are installed between the sections and smeared with silicone for better tightness. After that, it is necessary to flush the cast-iron batteries inside with a hose.
Thus, in almost all new homes, radiators are installed, which are created using the latest technologies. Cast iron in modern realities seems rather heavy and too cumbersome, so the whole world is switching to more modern alternatives. Of course, these are quite important arguments, but still, our country is different from Europe and the whole world. And with us it is more expedient to install cast-iron batteries.
Handy tools
To carry out the installation of cast iron batteries, you will need the following tools:
- Building level.
- Screwdriver.
- Drill for making holes in the wall.
- Roulette.
- Sealant, sealing tape.
- Pencil.
- Long and short key for connecting the battery sections.

Heating radiator installation tools
Additionally, it is better to purchase a torque wrench. It will help to optimally tighten the parts at the joints. If this is done poorly, they may not withstand the pressure of the heating system. This will cause leakage. And if you tighten it tightly, the thread may break. This will also lead to an emergency.

Torque wrench
Advantages of cast iron batteries
Considering such a heating device as a cast-iron heating battery, the characteristics of this unit largely correspond, and sometimes even surpass the characteristics of more modern products used for heating living quarters.
Among the obvious advantages of this type of radiator are the following:
- the minimum service life is 50 years, which is due to the high resistance of the equipment to corrosion deposits;
- cast iron batteries are reliable in operation;
- the ability to accumulate a very large amount of heat due to the presence of thick walls;
- the device of a cast-iron heating battery is not an expensive undertaking, since the price of these devices is not large. Despite this, cast iron radiators are resistant to dirt in the water (against
Required details
There are some mounting parts included with the heatsink. To install a battery with your own hands, you may need:
- Squeegees suitable for pipes of the main system.
- Depending on the connection diagram, adapters, corners, couplings are needed.
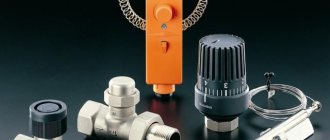
- Valves that serve to shut off the water from the radiator fittings.
- Regulating valves to reduce the amount of fluid passing through. They allow you to regulate the heating temperature of the battery, but are not suitable for complete shut-off, therefore, they are installed together with a shut-off valve.

Additional parts for installation
- A valve for removing air that can accumulate in the pipes and interfere with normal heat transfer. It is better not to use Mayevsky's tap for cast iron central heating radiators.It may not be able to withstand the hydraulic shocks that occur in this system. High contamination of the circulating water quickly clogs up the tap; it will need to be replaced.
- Brackets for attaching the battery to the wall. Their length depends on the type of wall and its depth. If it is decorated with panels or drywall, which is at a distance from the wall, then you need to take into account the length and select the appropriate fasteners.

Brackets for fixing cast iron batteries to the wall
- Bypass when installing radiators in a one-pipe heating system.

Bypass


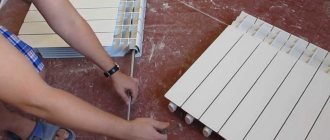
Installing cast iron batteries with your own hands
The process of assembling products is sufficient lightweight and requires few tools and simple construction skills. Due to the weight of the radiator, installation is easier two or three... The durability of the devices and their efficiency depend on the quality of the installation of the heating system.
Mounting brackets
In order to install the brackets, you should mark the wall and determine the placeswhere they will be located. In reinforced concrete walls are drilled holes about 12 centimeters deepinto which are inserted dowels or special plugs made of wood.
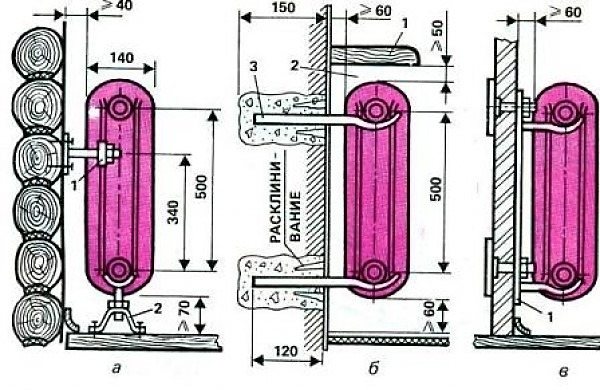
Photo 2. Options for installing a cast-iron radiator on the brackets: a - near a wooden wall, b - brick, c - lightweight construction.
After the holes are prepared, the brackets are attached, which fixed with cement mortar or special plugs.
Important! Before hanging the cast iron battery on the brackets, you should check reliability fastenings.
In the case when the walls are not designed for installing heavy products on them, the best option would be floor brackets. Mountings eliminate any stress on the walls.
How to install a heating radiator correctly?
In addition to batteries, the heating system is equipped with component parts, providing ease of maintenance of radiators and preventing the creation of emergencies. Standard process mounting includes the following stages:
- Installation at the top collector pointwhere the supply pipe is connected, air vent manual or automatic type.
- Installation of plugs to all free collectors. In the case when the plugs do not coincide with the diameters of the supplied pipes, the solution will be to use special adapters, which usually come with radiators.
- Installation of control and shut-off valves... Thanks to the ball valves installed at the inlet and outlet of the battery, it is possible to dismantle the radiators without stopping the entire system.
- Connecting equipment to the heating system... Cast iron batteries can be connected according to four different schemes... The radiator connection is determined based on the selected fittings and pipes.
Crimping
The final stage installation of radiators is their pressure testing. Usually this manipulation is performed using a special device, but in its absence, crimping can be performed independently without additional tools. Filling battery water is produced very slowly, due to which water hammer is prevented. Careful filling will prevent damage to the fittings and the system as a whole.
Connecting sections
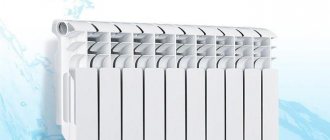
First you need to determine the number of sections. The generally accepted rule: one section heats 2 square meters. m. floor with a wall height of 2.7 m. Similarly, it can be calculated at a different height of the room. In addition, the properties of the radiator can be checked with the seller. The calculation is rounded up. It is worth considering the insulation of the room.
The sections are connected with nipples in the upper and lower parts using special nipple keys. These tools have a flat end on one side and a hole on the other that a crowbar or iron bar can be inserted into for easier work.

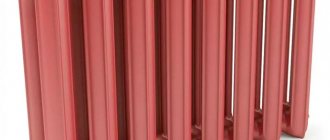
Cast iron nipple
Nipple - a piece of pipe with a recess for a sealing rubber ring and a thread applied on both sides.
Docking windows must have multidirectional threads so that when the nipple is screwed in, it connects the sections. The process must take place simultaneously from two sides, so two people are needed. On the side of the section with a left-hand thread, the key must be turned to the right, and with a right-hand thread - to the left.
For tightness, you can use sanitary flax, but it is better to purchase special paronite gaskets. They are more durable and can withstand high temperatures. Additionally, sealant can be applied to the nipple threads.

Paronite gaskets for cast iron radiator
If antifreeze will be used in the heating system, it is impossible to apply drying oil on the linen roll. It is quickly corroded by antifreeze. As a result, the tightness will be broken and the sections will have to be unwound and reassembled. It is better to treat the threads with a chemical-resistant sealant and install paronite gaskets.

Cast iron radiator connection
Dismantling cast iron radiators
Main cause removing batteries is cleaning equipment or defect detectionthat cannot be eliminated without violating the integrity of the system.
First thing need to disconnect the product from the pipesthat supply the coolant. In order to remove the radiator, you must cut off access to water into the product by shutting off the taps or draining the liquid from the entire system.
Dismantling process quite difficult and requires the presence of a large number of tools and assistants... In the case when it is necessary to replace one section, the battery should be disassembled by breaking the nipples. The plugs are most easily pushed out under the influence of elevated temperatures, which can be achieved by using a hair dryer or other heating device.
Painting. Professional recommendations
It is better to select a special heat-resistant paint. Acrylic is more often used, which has a less pungent odor. Before applying paint, you need to prepare the surface:
- Remove dirt, paint residues with a remover. If the paint stays smooth, you can apply a new coat on top of it.
- Sand the surface with sandpaper. It is more convenient to use a special attachment for a drill or a metal brush.
- Degrease the surface with ordinary acetone or solvent.
- Apply a coat of primer suitable for the paint being used. Wait until dry.
- Apply paint. For the inner surface, take a special curved brush. You need to start over. Paint over the inside first.
- For best results, paint in two thin coats. Each of them should dry out. This will help the paint last longer.

Painting cast iron radiators
Technical features of cast iron batteries
Modern cast iron batteries are in many ways similar in their technical characteristics to more expensive and innovative devices made of bimetal, aluminum and steel.
The working pressure inside the cast iron batteries is eight atmospheres. As for the optimal location of these units, it is most correct to place them in the space under the window openings, which will increase the heat transfer rates.
In order for the amount of heat transferred to be as large as possible, the correct solution would be to periodically rinse the inner surface of the batteries in order to clean it of rust and other harmful substances. This will increase the productivity of the equipment, and at the same time extend the service life of cast-iron radiators.
Installation
Before installation, you need to drain the water from the heating system. It is better to use a pump if necessary. If central heating is working, then replacing the radiator with your own hands must be coordinated with the utilities.Remove old batteries and mountings.
Radiator location
For proper circulation of warm air when installing the radiator, the following conditions must be observed:
- The center of the battery should line up with the center of the sill. Deviation to the side is allowed no more than 2 cm.
- The width of the battery is half to 2/3 of the width of the window.
- The distance from the radiator to the floor should be within 6-12 cm.
- The upper edge of the radiator should be located 5-10 cm from the windowsill.
- The distance between the wall and the battery is 2 to 5 cm.
- There is an opinion that the heating system should be hung with a slope of approximately 1 cm so that air accumulates on the side of the air exhaust valve. According to SNIP standards, the radiator must hang straight. This will prevent air build-up.
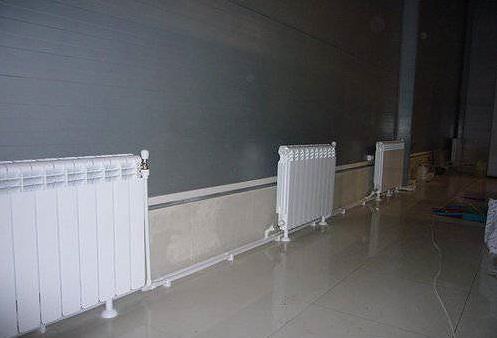
- If there are several radiators in the room, they should be located at the same level.

Correct location of the cast iron battery
Important! Installing the radiator close to the floor or wall disrupts heat transfer and increases heating costs.
Placement of heating devices
It is of great importance not only how to connect heating radiators to each other, but also their correct location in relation to building structures. Traditionally, heaters are installed along the walls of rooms and locally under windows to reduce the penetration of cold air currents in the most vulnerable place.
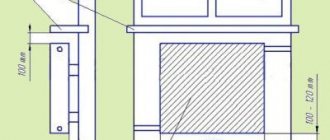
There are clear instructions for this in the SNiP for the installation of thermal equipment:
- The gap between the floor and the bottom of the battery must not be less than 120 mm. With a decrease in the distance from the device to the floor, the distribution of the heat flow will be uneven;
- The distance from the back surface to the wall on which the radiator is mounted must be from 30 to 50 mm, otherwise its heat transfer will be disturbed;
- The gap from the upper edge of the heater to the window sill is maintained within 100-120 mm (not less). Otherwise, the movement of thermal masses may be difficult, which will weaken the heating of the room.
Bimetallic heating devices
To understand how to connect bimetallic radiators to each other, you need to know that almost all of them are suitable for any type of connection:
- They have four points of possible connection - two upper and two lower;
- Equipped with plugs and a Mayevsky tap, through which you can bleed the air collected in the heating system;
Diagonal connection is considered the most effective for bimetallic batteries, especially when it comes to a large number of sections in the device. Although very wide batteries, equipped with ten or more sections, are undesirable to use.
Advice! It is better to ponder the question of how to properly connect two heating radiators 7-8 sectional instead of one device of 14 or 16 sections. It will be much easier to install and easier to maintain.
Another question - how to connect sections of a bimetallic radiator may arise when rearranging sections of a heater in various situations:
The place where you plan to install the heater is also important.
- In the process of creating new heating networks;
- If it is necessary to replace a failed radiator with a new one - bimetallic;
- In case of underheating, you can build up the battery by connecting additional sections.
Aluminum batteries
Interesting! By and large, it should be noted that diagonal connection is an excellent option for any type of battery. Not sure how to connect aluminum radiators together. connect diagonally, you won't go wrong!
For closed-type heating networks in private houses, it is advisable to install aluminum batteries, since it is easier here to ensure proper water treatment before filling the system. And their cost is much lower than that of bimetallic devices.
Of course, over time, moving along the radiators, the coolant cools
Of course, you will have to try before you connect the sections of the aluminum radiator for regrouping.
Advice! Do not rush to remove the factory packaging (film) from the installed heating devices before finishing the finishing work in the room. This will protect the radiator coating from damage and contamination.
The work process itself does not take much time, you do not need any special skill or expensive equipment, you can purchase all the necessary tools at any hardware store. And do not forget, the connection will serve you for a long time and without hassle only if you used high-quality materials in your work and followed all the rules for installing the heating system.
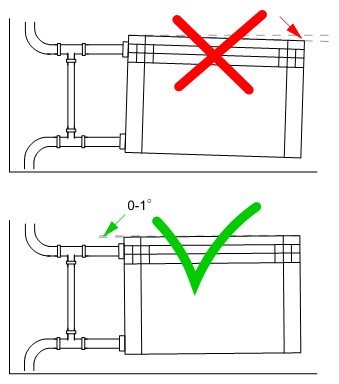
We are talking about exactly what is indicated in this figure.
In the video presented in this article, you will find additional information on this topic.