Useful information about chimney draft
All residents of country or private city houses are familiar with such a concept as chimney draft. Do they know the essence of this term?
If we move a little away from dry scientific terminology, then thrust can be defined as a natural phenomenon in which air moves from one area to another, namely, from an air zone with increased pressure to a zone with reduced pressure. All this happens with the help of a ventilation device - a special channel in the chimney.
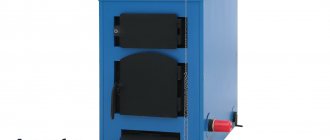
Using this process of aerodynamics, mankind began to use fireplaces, stoves, boilers, heating their homes with different types of fuel - coal, wood, peat, etc.
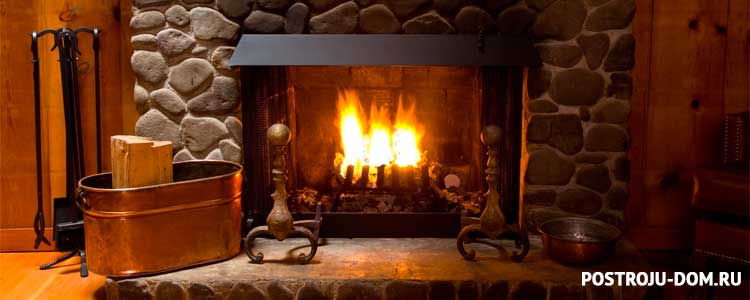
With good draft, the stove ignites quickly and the room is filled with pleasant warmth
A properly designed and built chimney and, accordingly, a good draft depends on:
- the quality of room heating;
- reduction in fuel costs;
- safety of being in buildings with their own heating.
What affects the value
There are three groups of factors that must be taken into account when constructing and checking a chimney.
Intra-house moments
A number of factors, indoors, can significantly affect the presence / absence of traction and its strength:
- The material from which the building was erected.
- Average room temperature.
- The maximum amount of airspace in a dwelling.
- The number of people who are permanently inside the dwelling.
- The presence of internal sources that additionally consume oxygen (air heaters, heaters, stoves, etc.).
- Regularity of fresh air supply (ventilation, ventilation).
External factors
There are other factors that determine the draft of the chimney, and they are located outside the heated room. We are talking about the ambient temperature, atmospheric pressure, humidity, wind direction. The phenomenon of changing temperatures throughout the day can also affect cravings - due to the movement of cold and warm layers of air.
Difficulties with cravings appear for various reasons, some may simply not be noticed. For example, problems with air escaping through a chimney can arise if the chimney is much lower than the ridge of a building or tall nearby trees.
Chimney design features
The draft can be different depending on the design characteristics of the chimney:
- height;
- the presence of insulation;
- tightness;
- location (internal / external);
- length;
- presence / absence of irregularities or roughness, etc.
It is necessary and possible to control traction in the room using the "levers" of the first and third factors (in-house and design). Natural changes, naturally, do not depend on a person.
Keeping the chimney draft under control is a prerequisite for safe and comfortable living in your own premises. If the draft is very weak, then it is almost impossible to light the stove and heat the home.
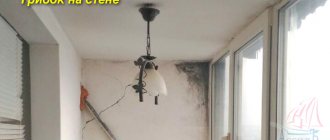
In reverse thrust, combustion gases are “thrown” into the living space, and not into the air through the chimney. It is very dangerous for human health and life!

It is impossible not to notice such atypical behavior of smoke
With a very strong draft, all the heat is rapidly drawn out through the chimney channels, without having time to warm up the heated room to the required temperature.

Advantages and disadvantages of a coaxial chimney for a gas boiler
The considered type of chimney structures has the following positive qualities:
- Improving the efficiency of heating equipment... The coaxial chimney provides an air flow in the required amount and properly removes all combustion products, so the heat transfer of the fuel is maximized. In addition, the balanced circulation of air masses by an order of magnitude reduces the amount of harmful substances emitted into the atmosphere.
- Fire safety... When the boiler is operating, the outer pipe does not heat up to a temperature that can cause a fire in the immediate vicinity of surfaces. Even when installing the device through wooden floors, fire safety measures can be noticeably softened. The occurrence of fire in the chimney itself is also excluded - solid fuel particles do not accumulate on the inside of the chimney.
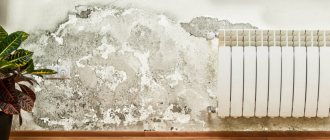
- Preservation of microclimate... Since air exchange takes place in a closed system, no influence is exerted on the microclimate of the room - humidity, temperature and air composition remain unchanged.
- Profitability... A coaxial chimney for a gas boiler can significantly reduce the level of heat losses, therefore, as a result, the equipment turns out to be more economical.
- Small size... Due to their compactness and the possibility of outdoor installation, coaxial chimneys take away very little space from the room, which is especially important if the area of the room where the boiler is installed is already small.
- Ease of installation... The presence of ready-made elements greatly simplifies the process of assembling the structure and allows you to choose a chimney for specific operating conditions.
- Resistant to aggressive environments... The pipe located inside the chimney can easily withstand the effects of corrosive acids formed during combustion and temperatures up to 500 degrees. Subject to the rules of installation and operation, a coaxial chimney for a gas boiler can work for more than 25 years.
Among the shortcomings, the following qualities can be noted:
- Poor resistance to condensation... Condensation can form in the pipe if improperly installed, which can turn into ice at negative temperatures.
- Electricity dependence... In systems with forced air circulation, the chimney may simply stop working if there is a power outage or low voltage in the network.
- High price... A coaxial chimney is expensive on its own, and repairs will also cost a lot.
Why does reverse thrust appear?
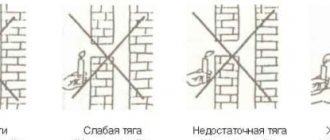
Weak traction can be the basis for back thrust formation. How can you tell if you're not doing well with your cravings?
This is "said" by moments that can be ascertained with the naked eye: a lot of smoke in the stove, soot on the door, the incoming movement of smoke inside the house. In other words, smoke, fumes from the combustible fuel does not go into the chimney through the chimney, but tends to get into the living room with the door open and through the cracks.
Reasons for reverse thrust:
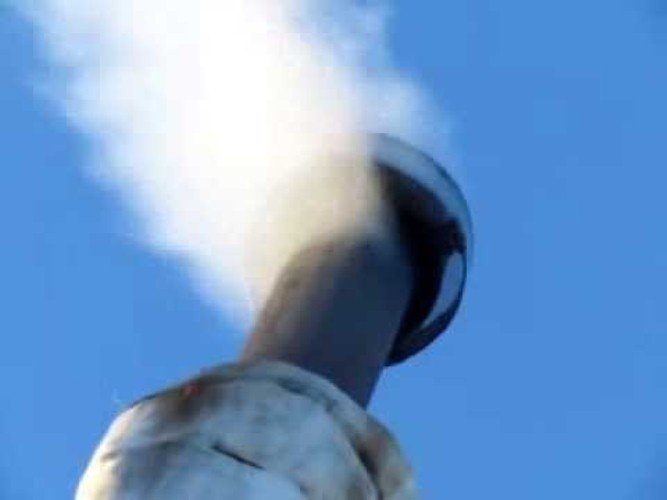
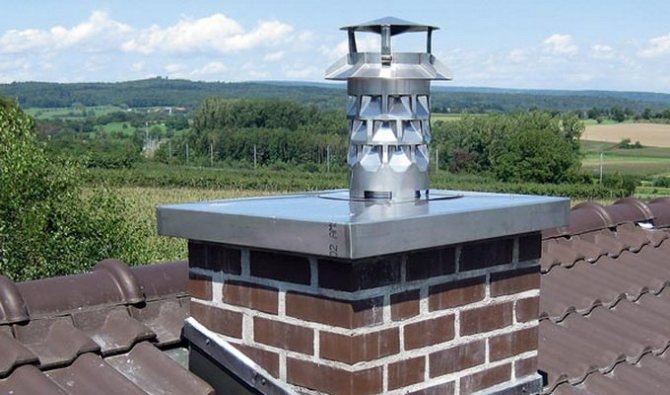
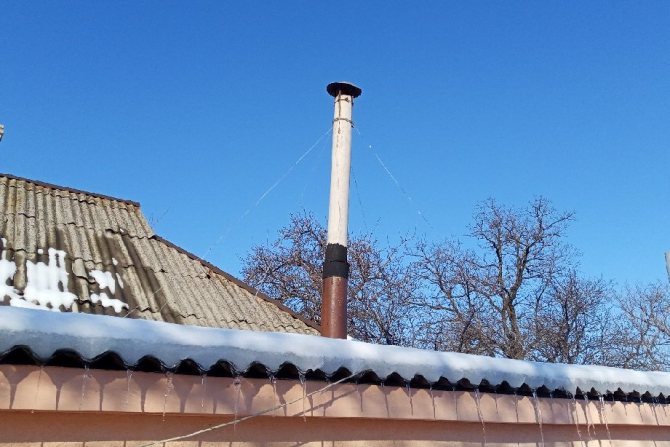
- Chimney design flaws. Low pipe - increased risk of back draft. The higher the chimney, the better the process of extracting exhaust gases and fumes. The optimal pipe height is about five meters.
- Compliance of the pipe diameter with the parameters of the furnace device. A powerful stove requires a chimney with a rather large pipe. But here the measure is very important, since the use of a pipe that is too wide will make the combustion process unprofitable (all the warm air will literally fly into the pipe). It is unacceptable to use several pipes with different cross-sections in the chimney!
- Use of non-smooth pipes. Irregularities, chips, roughness, etc. are an obstacle to good traction.Over time, the chimney opening can narrow due to soot deposits and other combustion elements and hinder the process of kindling the stove and its normal functioning.
- Violation / lack of ventilation. Drafts, open windows in rooms above the firebox do not help the fuel combustion process, but distort it, making it useless and unsafe.
Chimney channels made of metal are in many ways inferior to brick pipes. Rapid heating and the same rapid cooling do not benefit the heating system as a whole and the chimney in particular.

Brick pipes are much more efficient in terms of fume extraction.
Backward thrust can also appear for objective reasons that do not depend on a person. Strong gusts of wind, rainy, cloudy weather with high humidity are unfavorable moments in terms of the formation of problems with traction.
There is such a term as temporary reverse thrust. What is it? In this case, it is worth talking about temporary craving violations, for several days. After a certain period, cravings return to normal.
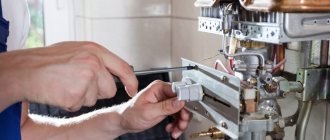
Temporary backdraft can occur due to a cold room, unheated for a long time. The very cold air that has accumulated in the chimney tube interferes with the rapid combustion of the fuel. Therefore, smoke can be "pushed" from the chimney into a dwelling, bathhouse or other room with a stove or fireplace.
It is very easy to eliminate cold air in the chimney - warm up the pipes by burning ordinary newspapers, wallpaper, paper in the oven. The main thing is that these materials are well dried.
If traction problems can be fixed continuously or at regular intervals, then it is necessary to take measures to eliminate the bad traction.
Can an asbestos chimney be used
Chimneys made of asbestos pipes gained wide popularity during the Soviet Union. This was due to a number of factors:
- firstly, there were large reserves of asbestos at that time;
- secondly, this material was cheap;
- thirdly, there were no difficulties with production and installation.
During the massive development of asbestos-cement pipes began to be installed in order to reduce the cost of housing. In this case, a material was used that is not intended for smoke extraction systems.
According to the SNiP rules in the fire safety section, chimneys made of asbestos cement can be installed only when heating devices are used in the house, the temperature of which during the firebox reaches no more than 280-300 ° C. Or in those parts of the chimney, the heating of which does not exceed these indicators. These can be gas boilers with low power or the upper sections of the chimney channels, which receive exhaust gases in a cooled state.
It is possible to make an external chimney from an asbestos-cement pipe in some cases:
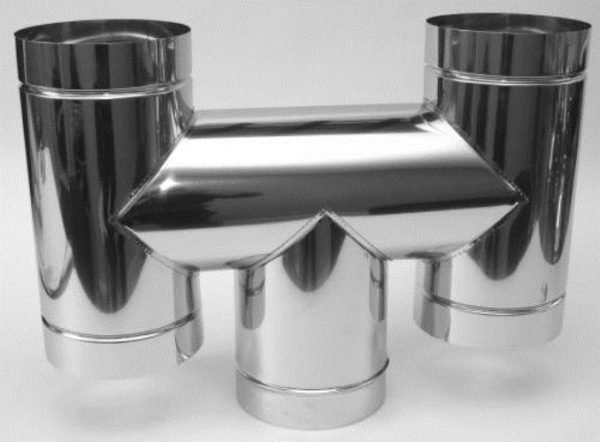
- Independent smoke extraction system - asbestos pipes are installed as a separate smoke extraction system. The process of connection to the heating unit is carried out by means of a connecting sleeve made of stainless steel. In order to install the chimney from the outside of the house, special adapters and tees made of asbestos cement are used.
- Also, asbestos cement can be used to increase the length of an existing chimney. Usually, an increase in the size of the chimney is resorted to in the case of insufficient draft and too much condensation production.
- A sleeve for a brick chimney made of an asbestos-cement pipe is installed to rehabilitate an existing flue system. Usually, brickwork begins to deform after 5-10 years of active use. In order to avoid negative consequences, an asbestos pipe with a brick finish that performs thermal insulation functions can be placed inside the chimney.
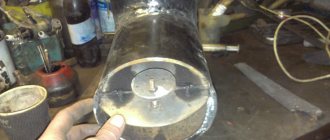
Strength test
Before throwing your energy into a bad deadlift, make sure the deadlift really leaves a lot to be desired.
You can check traction using special devices or yourself. Simple ways to fix the thrust:
- Light a piece of paper, let it burn a little. Bringing it to the stove or fireplace, put out the paper and observe the direction of the smoke. If it goes to the pipe - good traction, deviates in the opposite direction - reverse thrust, if it remains "straight" - there is no thrust. Similar manipulations can be done with thin tissue or toilet paper without setting it on fire.
- If there are smokers in the house, then observe the direction from the smoke of cigarettes or from the flame of a match, lighter near the fireplace or stove. Draw your conclusions in the same way as in the first point.
- The flame of an ordinary candle can also help in determining the draft in the home.
- A pocket mirror, brought to the firebox and covered with condensation, may indicate problems with removing smoke from the stove.
- The presence of too much draft that carries away the useful heat from the room is evidenced by an audible hum in the oven - a loud hum.
- The color of the fire in the firebox can be an indicator of different draft. Gold hue - good traction, white flame - excessive traction, red color and black smoke - poor traction, high probability of reverse thrust.

A regular lighter can help check traction
The anemometer is a device familiar to many people of the Soviet period. With this device, it was possible to measure the draft of the chimney. Readings in the range of 10–20 Pa were considered normal. The disadvantages of the device are in its low accuracy with a wind force of less than one meter per second.

Such a simple device will help to secure your life in a house with stove heating.
Modern industry offers a sufficient number of devices for measuring the draft, there are devices that fix the draft at the inlet and outlet of the chimney.
Causes of malfunctions
After making sure that there is not a sufficient level of draft inside the chimney system, it is necessary to determine and eliminate the possible cause of this defect. Experienced craftsmen claim that the most common causes of malfunctioning of flue ducts are:
- Design error. The choice of the chimney pipe should be based on the volume of the firebox. If the diameter is less than the calculated parameter, the weak one will not allow the smoke to leave their premises.
- Insufficient pipe length. A pipe length of less than 5 m does not provide a significant difference between indoor and outdoor pressure, which creates a weak draft.
- Incorrect position of the chimney. Furnace masters advise you to lay the chimney vertically, as narrow turns trap smoke inside the chimney, reducing draft.
- Long horizontal sections. If, laying the chimney, it is impossible to avoid horizontally located sections, then make sure that their length is no more than 100 cm. Otherwise, she will need an amplifier.

The first step in detecting problems in the chimney system is to sweep aside the most obvious reasons for insufficient draft. When inspecting, make sure that the joints of all pipe segments are tight, that there are no soot blockages. Check that no moisture has entered the flue gas ducts and that the atmospheric pressure is correct.
Troubleshooting methods
If you have detected problems with traction, then, of course, they need to be eliminated as soon as possible.
The choice of means to combat bad or reverse draft depends on the reasons that led to the abnormal operation of the chimney.
Pipe cleaning
One of the common methods to improve traction is pipe cleaning. Fuel, burning in the furnace, releases various substances that settle on the inner surface of the chimney. Soot sticks well to pipes if they are uneven or bent.

When carrying out work, do not forget about safety measures
How to clean the chimney so that there is good draft?
First of all, acting purely mechanically. The chimney channels can be made wider, getting rid of plaque, in the following ways:
- Having prepared about one bucket of potatoes, peel and chop them. Potato peelings are also good. Throw a little into the firebox and wait. When burned, potatoes will release starch, which will become a means that can soften carbon deposits. Soft pieces of soot will fall off on their own, while those that are firmly adhered will have to be removed mechanically.
- Aspen firewood. Heat the oven with two or three logs. They will very much heat up the chimney pipes and help get rid of carbon deposits. But this method requires special care, since the likelihood of a fire will be very high (soot can catch fire).
- Rock salt. This method is more suitable for prevention. The salt added at the time of combustion improves the condition of the chimneys.
- Pipe brush. A heavy load is attached to a brush suspended from a wire rope and lowered into the chimney holes. By lowering and raising this structure, it is possible to force the soot formations to fly off the walls of the pipes and fall into the furnace. These fragments are then removed from the firebox.
The second group of anti-soot measures is based on the use of chemicals. The most demanded chemicals for chimney cleaning are "Log-chimney sweep", "Kominichek". Chemicals are added to the coals formed during the heating of a stove or fireplace according to the instructions and continue to heat. After all the fuel has burned out, it is advisable to leave the coals, since they continue to "work" in terms of cleaning the chimney (at least, this is what the manufacturers advise).

When used correctly, chemicals won't harm your home
Do not believe spiteful critics who talk about the mandatory ignition of soot when using the chemical method. This method does not pose any danger, since the beneficial effect is due to chemical reactions, and not due to the ultra-high combustion temperatures of the reagent.
It should be especially said about the observance of safety measures during all work related to the chimney. Do not fix chimney problems in windy weather! Try to use fall arrest devices when working at height!
Elimination of structural problems
When identifying certain features of the chimney design that negatively affect the thrust force, adjustments should be made to eliminate them. These actions include:
- dismantling several scattered pipes and installing a single chimney channel;
- roof chimney superstructure to the required height;
- insulation of chimney elements, etc.
Ventilation arrangement
In some cases, cravings can improve by avoiding drafts in the house or bath. You can help with problems with traction by installing ventilation devices on the windows.
In the absence of the desired effect after all the above methods, modern devices should be adopted to improve the draft in the chimney.
Installation of devices
To improve the operation of the chimney, it is best to use special devices that allow you to adjust and control the draft. Such devices can be bought in a store or made by hand.


Special devices for regulation
Modern instrument makers have taken care of the release of special devices that regulate the draft in the chimney:
- Regulators. They are installed on the chimney outlet to normalize the draft in the heating system, as well as as a means of influencing the heating efficiency.
- Deflectors. Such devices are fixed on the chimney from the outside.An improvement in the speed of draft is carried out due to the fact that the diameter of this device is much larger than the chimney pipe, and, therefore, a low pressure area arises in it when air flows around it.
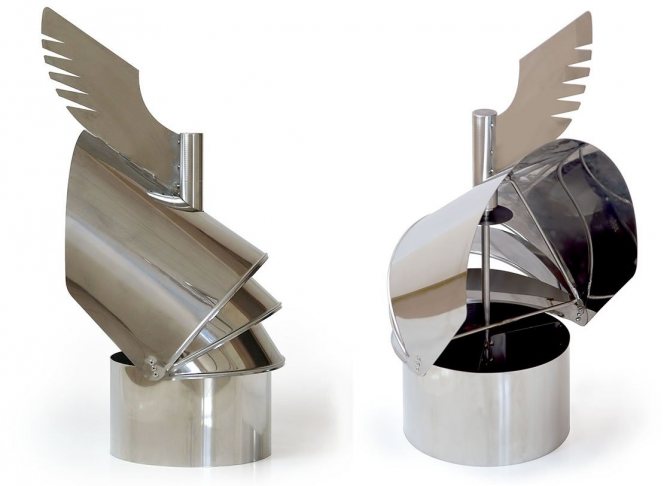
- Chimney weather vane. It is a special design that performs several functions at once: it improves traction, protects the pipe from raindrops and snow whirlwinds. The operation of the device is similar to the operation of a deflector, the thrust speed is normalized due to a decrease in external air resistance.
- Smoke fan. It is very popular among owners of houses with a heating system. An artificial air vortex is created inside the chimney due to the operation of the ventilation system, which requires electricity to connect. Compliance with all necessary safety measures is a prerequisite for the installation and operation of such a device to improve chimney draft.
All devices installed on the chimney pipe to improve draft require mandatory control, especially in winter. This is due to the fact that additional devices attached to the chimney from the outside can become clogged, icy (in winter) and thereby prevent the normal operation of the chimney. Blockage caused by “assisted” devices can cause backdraft and carbon monoxide penetration into living quarters.
Do not forget to regularly inspect along with the chimney and appliances that help increase traction.
Photo gallery: traction control devices
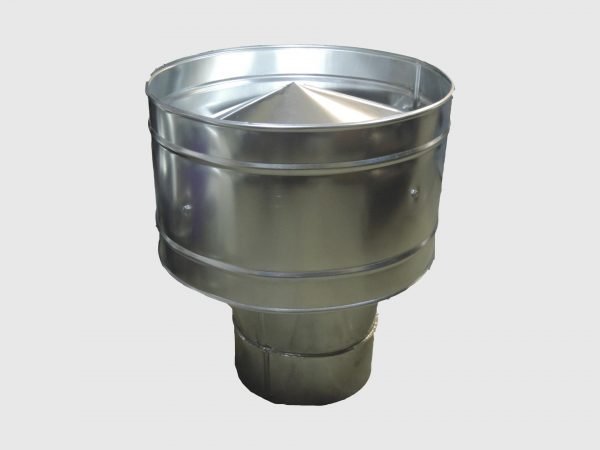
The most common device among stove heating users

Such a device is especially relevant for improving the operation of stoves and fireplaces.

Useful and beautiful device

By installing such a device, you can improve the performance of the entire heating system.
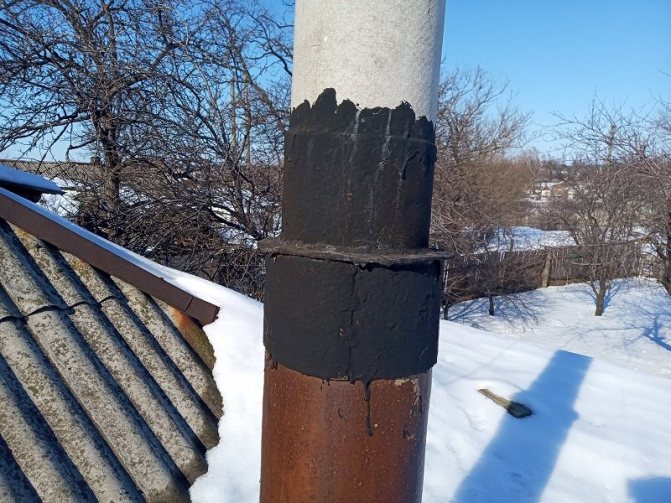
Faced the problem of chimney lengthening
The situation is as follows - two asbestos pipes come out (outer diameter 180, inner diameter 143), they must be extended with the help of galvanized ones. There are galvanized pipes of diameter 135. How can they be combined with asbestos? Some kind of adapters? so that all this is tightly held, tk build up 220 cm
It is not clear what kind of pipes, but in any case, you should not narrow the pipes. I advise you to find a pipe with a larger diameter and put it on top, fixing it with a clamp
chimney pipes, on the roof they come out touching each other. everything around is cemented, you cannot move them apart, i.e. put on top - a problem
What are the initial conditions. Maybe you can do without building a chimney.
initially everything was fine, then a neighboring wall of the second floor appeared nearby (the house is in half - one half is one-story, the other was rebuilt into two floors). On the roof of the one-story half there are chimney pipes, they turned out a meter away from the wall. There are turbulences from the wall and the boiler goes out. This is what the experts said. It is necessary to build up above the ridge of the neighbor's extension. this is 220 cm.
well, no one will tell
Those you have a two-pipe fast passage! Put one big pipe on them, roll it into an oval and put it on. Or order .. Just keep in mind, the pipe will start crying. I have an iron pipe, I am fueled with gas, I wrapped it on top with expanded polystyrene film with foil and fixed it with foil outside - protection from the sun and it turned out beautifully.
Winter however. Equip the existing pipes with clamps to prevent them from flying into the chimney, prepare a clamp for fastening the stretch marks, make or buy caps, pack with asbestos sheet and asbestos cord. Fasten the clamps with prepared guy wires, wrap the steel pipes with asbestos and push them into the existing chimney. Secure with stretch marks. Wrap pipes with Isover, Ursa, etc. Wrap with foil, foil-coated polyethylene foam, etc. Wash the successful completion of the work three times. And it is undesirable to combine chimneys.I will not interfere with theory, this is on the topic of heating and ventilation.
Related article: How to insulate a roof from corrugated board from the inside
In your case, I would do the following: I phoned the companies engaged in tin production and ordered an F180 pipe with flaring on one side to F184, the length of flaring is 15-20 centimeters. After that, this pipe is put on the asbestos pipe and fixed with self-tapping screws. For complacency in the reliability of the fastening, you can put stretch marks. Use pipes Ф135 somewhere else, for example, in a bath. Because even a sandwich with its help is pointless to make (this is not a stainless steel, there is a big difference with the inner diameter). I do not recommend putting them into asbestos pipes, wrapping them with asbestos fiber. similar operations are being done on the ground. Otherwise, "snot" will turn out, and snot and carbon monoxide in the room is a RISK.
Troubleshoot problems yourself
Let's try with our own hands to make the heating process safe and efficient. The most common way to deal with soot build-up in pipes is with a sinker brush.
We clean the pipe with a brush
First, let's prepare everything you need:
- Hard bristle brush. The diameter of this device is selected taking into account the section of the pipe (from fifty to three hundred millimeters).
- Thin metal cable (can be replaced with a very strong rope or rope).
- Weight for hanging from the brush.

This is what a device for cleaning a chimney pipe looks like.
Do not start work if there is strong wind or too much humidity outside. Try to think through and use reliable insurance to protect yourself from unforeseen events.
The ruff is weighted with a sinker, attaching it to the bottom of the device. The brush itself is hung on a cable. All fasteners must be especially reliable, otherwise the structure will disintegrate and you will have to perform additional actions - to "fish" them out of the pipe.
First, they clean all the revision holes of the chimney, and then proceed to cleaning the pipe itself. By doing a few up and down movements, you can get rid of the soot that will fall from the pipe into the stove. It is best if someone else is around the stove to signal efficiency and when to shut down.
Pipe cleaning should be completed when the soot stops pouring.
You can also clean the pipe with the help of improvised means, about which many videos have been filmed.
Video: we clean the pipe with improvised means
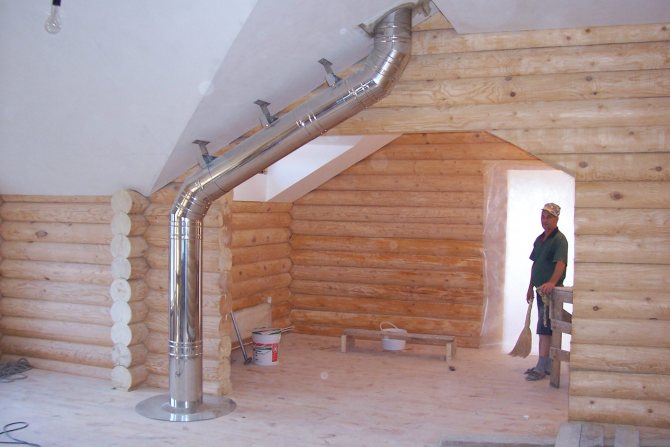
Self-assembly of the chimney
Preparatory stage
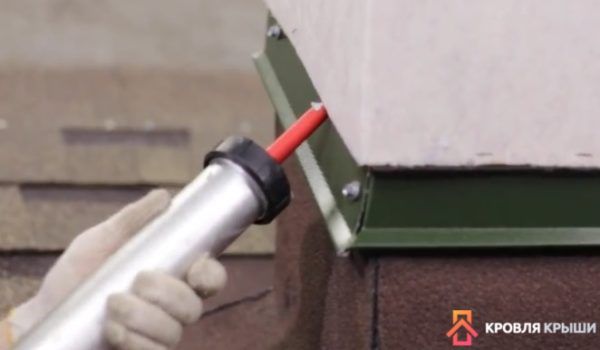
After purchasing a galvanized pipe of a suitable diameter, it is necessary to install it correctly. But before that, it is recommended to take a number of actions that will increase the life of its operation and improve its performance: ⦁ Before joining the components of the chimney with each other, all seams must be treated with a special sealant. This will allow you to achieve maximum tightness, since even the highest quality pipe expansion cannot provide a 100% tight fit. ⦁ It is impractical to seal the system already put into operation (for example, before lengthening the chimney), since the composition will not stick to the hot surface... In this case, you will need to turn off the boiler and wait for the metal to cool.

Before installation, the joints must be treated with a sealant.
Installation of the structure
As soon as the preparatory stage is completed, then we build chimney pipes according to the following scheme: ⦁ The assembly of the structure is carried out gradually. The bell of each successive link is pushed onto the smooth part of the previous one. This allows you to prevent the ingress of condensate formed inside the pipe on the used insulation.

Chimney assembly should be carried out in stages.
⦁ The galvanized chimney pipe is overlapped. In this case, the length of the latter should be at least half the outer diameter of the chimney. This is required by the fire safety instructions.

Chimney joint diagram
⦁ When designing an internal chimney, it should be laid along the main walls or interior partitions. To pass the pipe through the floors, special pipes are used. It is also necessary to foresee in advance how to insulate the chimney in order to prevent possible fire from contact of hot-dip galvanized with wood or other combustible materials. ⦁ The joints of the individual parts of the chimney must be additionally reinforced with clamps (in most cases they are included in the delivery set of the pipeline). ⦁ To ensure the rigidity of the structure, the pipe is attached to the wall using brackets. You also need to fix all the fittings (corners, tees, revisions, and so on).
The chimney must be secured with brackets
⦁ In the lower part of the chimney (immediately after the connecting pipe of the boiler), an inspection hole is installed - a door. It comes in handy when you are thinking about how to clean the chimney of soot and other deposits.
Note! The horizontal sections of the chimney must never come into contact with the gas pipeline or electrical cables. Otherwise, fire may result due to excessive heating of the wall of the galvanized pipe.
Insulation of chimney pipes
These measures must be carried out when the gas outlet system is mounted outdoors or in unheated rooms. Answering the question, why insulate the chimney, it should be noted that this is necessary to ensure the fastest possible heating of the channel and to prevent the formation of condensation inside it. In addition to its main purpose, the insulation plays the role of an insulator and is used when the chimney is located in close proximity to flammable or combustible materials. This helps prevent possible fire.

Chimney with insulation
Advice! In building supermarkets, a chimney with thermal insulation is sold. It is a multi-layer structure, one of the layers of which has a low coefficient of thermal conductivity. A chimney made of such a pipe does not require additional insulation. The disadvantage is the higher price.
Another important point is the protection of the upper cut of the pipe from precipitation and debris getting inside. To do this, use: ⦁ grids; ⦁ weathercocks; ⦁ deflectors of various designs.
Selection of devices for regulation
Let's consider some of the characteristic features and methods of using instruments for traction control and adjustment.
Deflectors
Such structures are installed on the chimney (at its very top) to create obstacles to air flows. The intensity of the wind force drops noticeably when meeting with such devices placed on the pipe. The smoke comes out through the channel "at will" due to the ingress of weak air flows into the pipe. These streams "catch" the exhaust gases and "push" them out.
Deflectors eliminate the possibility of pipe clogging, as well as tasteful, significantly improve the appearance of the entire building.
There are several types of deflectors:
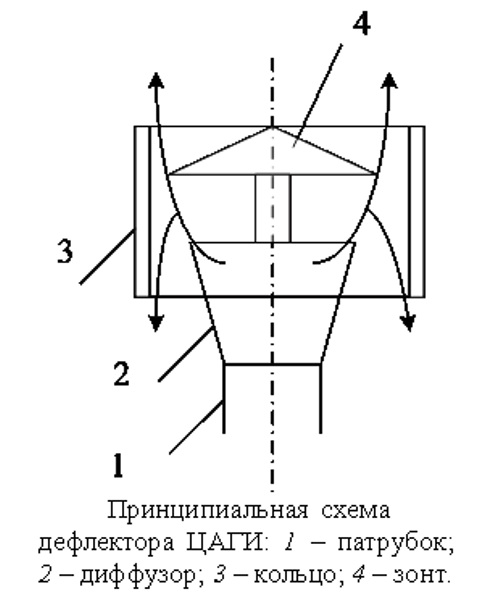
- TsAGI;
- round Volperta;
- Grigorovich;
- in the form of a plate;
- in the form of the letter H;
- rotating;
- vane.
Almost all of these devices are made of stainless steel, in rare situations - of copper. Using brackets, clamps, bolts, sealing tape, the deflector is attached to the chimney pipe. Some devices are also equipped with additional functions: for extinguishing sparks (to eliminate a possible ignition of the roof), for controlling the temperature of the outgoing air (in this case, the sensor is triggered if hot air does not come out and there is a possibility of reverse draft).
The disadvantages of using deflectors are their minimal efficiency in calm weather.
Photo gallery: types of deflectors

The most common traction enhancer
Such a device can be purchased at specialized stores.

The choice of the device depends on the design features of the pipes and your preferences.
Rotary devices
The turbines installed in the chimney head take advantage of the energy potential of the wind. The air currents set in motion the rotary nozzle (it always moves in one direction), and thus the air is rarefied near the chimney. It is completely excluded from entering the chimney with a rotary tube of any foreign objects and sediments.
Rotary tubes have a big disadvantage, similar to the work of a deflector. Their use on a calm day is ineffective.
If you do not have great abilities, buying such devices is not a problem.
Draft regulators
Such devices are a real find for residents of country houses, lovers of baths and fireplace gatherings. These devices are attached to the boiler chimney. They are equipped with a metal plate with a weight that balances it on one side. When the draft is good, the metal plate does not impede the free access of air into the chimney. With weak or reverse thrust, the metal plate serves as a kind of stupor.
The range limits for the thrust are set by the consumer himself, the usual parameters are 10–35 Pa.
The device works completely autonomously, it does not need an electric current supply.
How to increase cravings with your own hands: homemade appliances
Before you start building the deflector yourself, weigh your strength, review the available materials and only then get down to business.
Drawings and diagrams
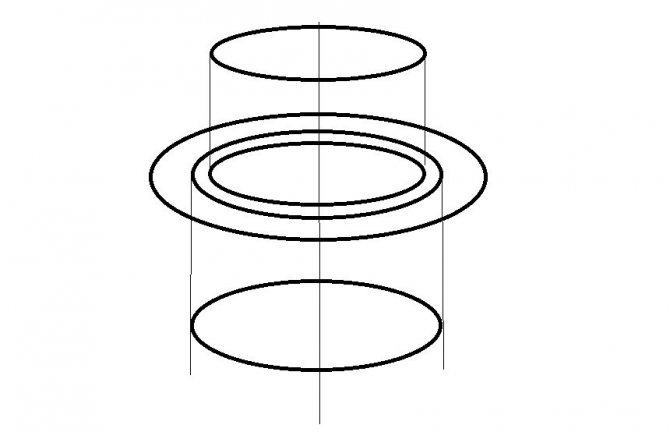
To create a deflector with your own hands, you must use diagrams and drawings. You can use ready-made ones, presented in large quantities on the Internet, or you can do it yourself, relying on the data of ready-made diagrams and drawings.
Photo gallery: ready-made traction instrument circuits

On the Internet, you can find a good help for the construction of the device.

Carefully study the instrument diagrams and choose the one that suits you
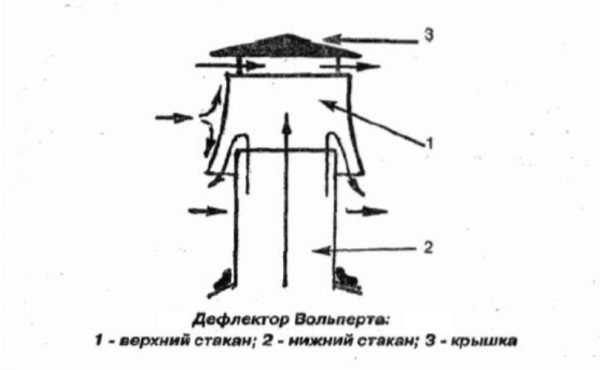
The diagram shows the device of this traction improvement device
The diagram shows the components of this device.
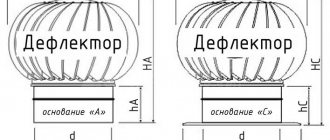
If you decide to test yourself and at the same time save money, arm yourself with measuring instruments to determine the inner diameter of the chimney. Depending on this value, you can, focusing on the table, determine the required parameters for the height of the deflector and the width of the diffuser.
With an inner diameter of 120 mm, these parameters are 144/240, respectively, for a diameter of 140 mm - 168/280; if the internal section is 200, then 240/400; for a section of 400 mm, a deflector height of 480 mm is required, and a diffuser width of 800 mm.
You can calculate the necessary parameters (for a specific pipe diameter) yourself, using simple calculations. To determine the width of the diffuser, the inner pipe diameter must be multiplied by 1.2; the width of the umbrella for protection is considered to be -1.7 x d; We find out the total height of the structure if we multiply the size of the internal section by 1.7.
Having received all the dimensions, we build drawings for more accurate cutting. We draw diagrams on a sheet of Whatman paper or on the back of the remaining pieces of wallpaper.
It is best to build a full-size drawing. So that during cutting it is easy to attach the cut paper parts to the steel sheet and not to recalculate the data taking into account the scale of the drawing.
We stock up on materials and tools
Everything must be prepared in advance so as not to be distracted during work.
We need to make a deflector:
- galvanized sheet with a thickness of at least half a millimeter, you can also use stainless steel;
- scissors for metal;
- drill with different drills;
- riveting device;
- hammer;
- pliers;
- clamps, nuts, bolts;
- marker (for transferring a drawing to a metal sheet).
Preliminary stage
The preparatory work consists not only in drawing the details of the device, but also in cutting them out and trying them on. All paper elements are fastened with paper clips or a stapler and applied to each other. If all goes well, you can carefully remove the bartacks and straighten the templates.
Do not be negligent in the process of creating a deflector, try to think about your safety. In order not to injure your hands and to protect your eyes, use the gloves and special glasses prepared in advance.
Getting Started
So, everything is in place, you can start!
A step-by-step description of the sequence of actions will help you:
- We transfer the parts cut out of paper to a galvanized sheet. We should have a sweep of the following elements: a cap, a diffuser, an outer cylinder and a rack.
- Using scissors for metal, carefully cut out all the constituent components of the deflector. In places of cuts, the metal is bent with pliers to a half-millimeter thickness and "passed" with a hammer.
- The blanks of the diffuser, cap and cylinder are rolled up and drilled holes for fasteners (if bolts are used). Connections are made using rivets or bolts, in exceptional cases, welding (semiautomatic) can be used.
- To fix the cap, we prepare 3-4 metal strips. The dimensions of the strips are 6 by 20 cm. The strips bent at the edges and knocked out with a hammer must be bent in the shape of the letter P. Drill 3-4 holes on the cap, five centimeters from the edge, and fasten the metal strips with bolts.
- The other ends of the galvanized strips must be attached to the diffuser, thereby "looping" the hood and diffuser.
- We insert the resulting structure into the shell.
You can watch the video about the construction of the TsAGI deflector with your own hands.


Video instruction
There are a great many options for solving the problem of roof abutment, each professional master makes changes taking into account specific features and his own skill. But there are several factors that have a critical impact on the production technology of work.
Chimney passage through the roof - the main nuances of the arrangement
To cover the roofs, soft roofing materials, metal tiles, profiled sheets, piece natural or artificial tiles, asbestos concrete sheets are used. Each coating has its own nuances in the manufacture of abutments; both standard components produced by coating manufacturers and home-made components from galvanized steel sheets or rolled soft materials can be used for them.
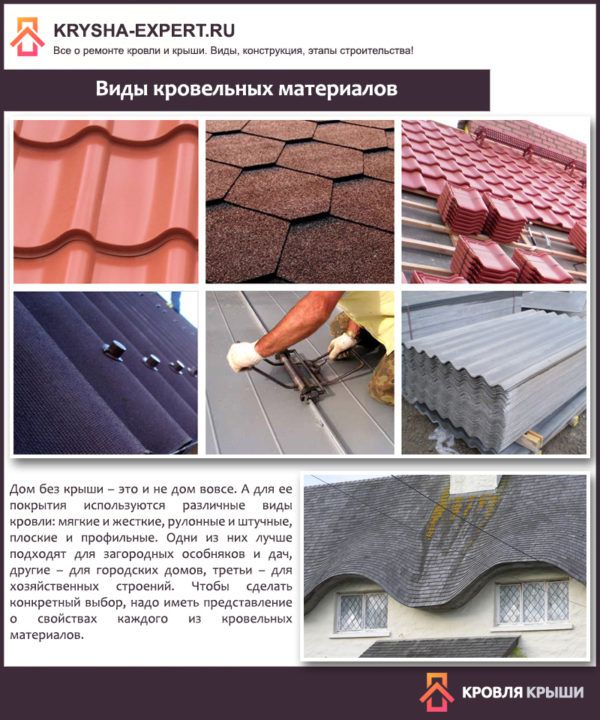
Types of roofing materials
Table. Recommended minimum slope values for roofing.
| Roofing material | Minimum slope of the slope, degrees |
| Corrugated board | 20 |
| Roofing material | 3-4 |
| Metal tile | 25 |
| Asbestos-cement slate | 20-35 |
| Ceramic, concrete roof tiles | 25 |
| Euroslate (ondulin) | 6 |
| Bituminous soft tile | 11 |
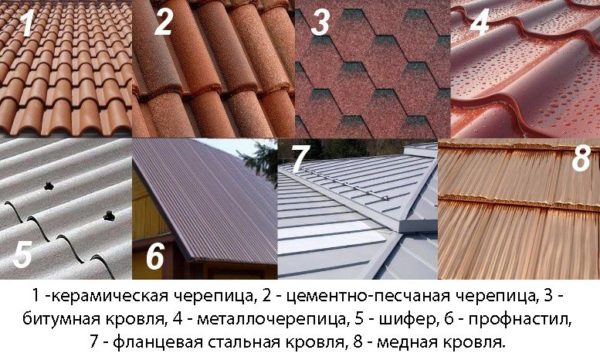
Roofing materials - types and photos
Depending on the architectural parameters, the roof can be flat, inclined, domed, etc. Depending on the type, the slope of the rafters, the type of base and lathing for roofing materials, the location of the load-bearing structural elements change. All these features must be taken into account when choosing materials and technology for adjoining the roof to the chimney pipe.
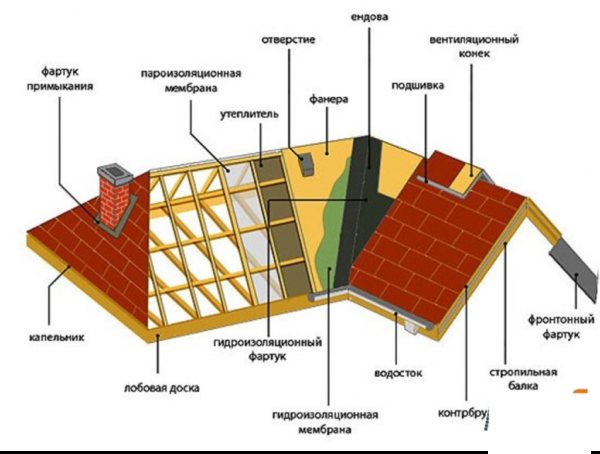
Basic elements of the roof structure
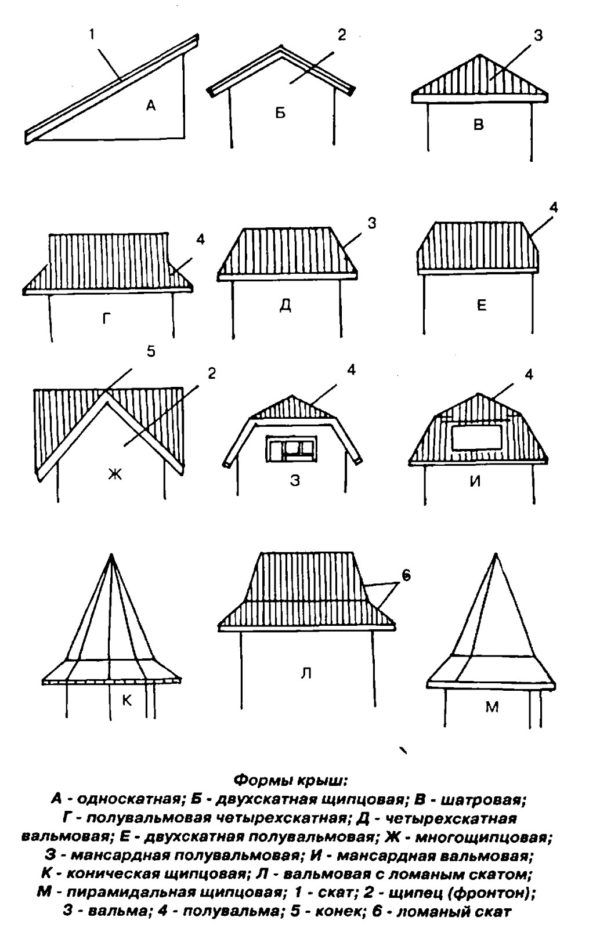
Roof shapes
Chimney parameters
Chimneys are made of bricks, concrete blocks, metal or asbestos-cement pipes. Structural differences affect not only the technology of production of abutting works, but also the choice of materials. Additionally, during the manufacture of the junction, the location of the chimney must also be taken into account.
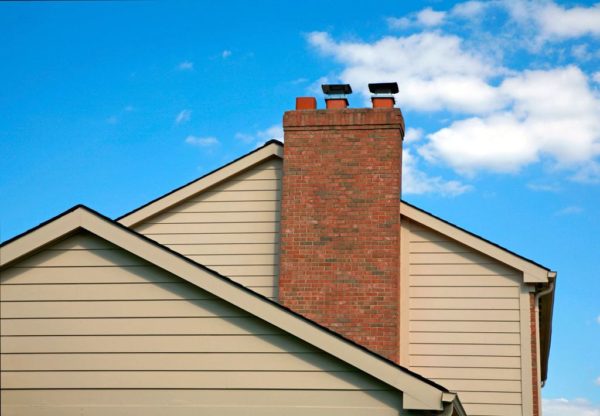
Brick chimney
There is one more feature.Brick chimneys can have flat side planes or with special steps for water drainage. Depending on the method of laying the chimney, a specific algorithm for the manufacture of the roof abutment is selected. Some types of brick chimneys do not require chimneys.
Junction waterproofing works can be carried out during the installation of the roof or after. There are ways to seal the chimney without the need to dismantle the installed coverings; all elements are stacked on top of the existing roof.
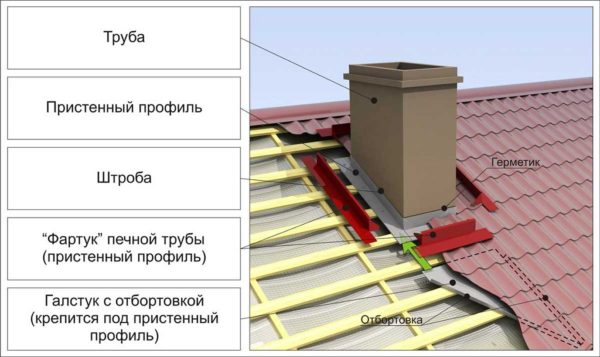
Sealing a rectangular pipe
For example, we will consider three options for the manufacture of abutments on various types of roofing materials: brick chimneys for soft tiles and metal tiles, and round ones for the finished coating. It is these options that are most often found during the construction of private houses. The algorithm for the production of work allows you to carry out them independently without the involvement of expensive specialists. But only on one condition - you have experience in roofing, the necessary materials and tools.
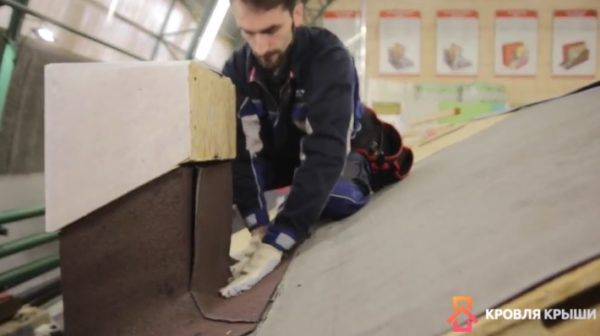
The chimney passes through the soft roof
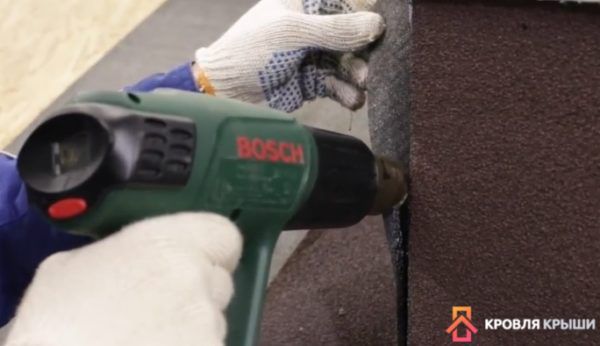
To create a junction point, you will need pliers, a medium-sized flat spatula, an assembly knife, a hammer, a screwdriver, scissors for cutting metal, a hair dryer, measuring tools and fixtures. A mastic based on modified bitumen is used as a waterproofing agent; for a sealant, you can use a special mastic in a tube or any other material based on polymers resistant to the external environment.
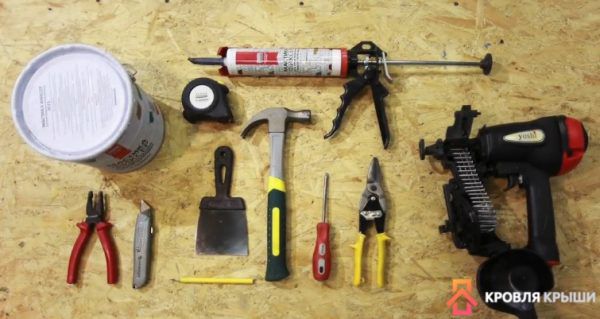
Required tools and materials
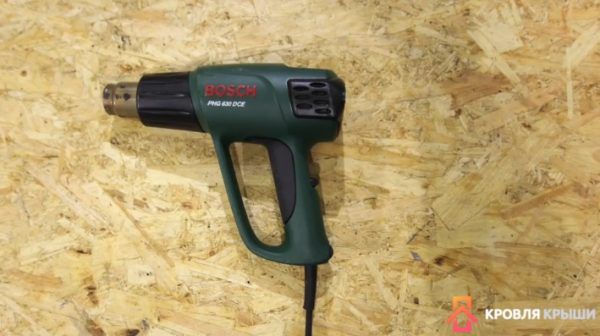
Hot air gun for building
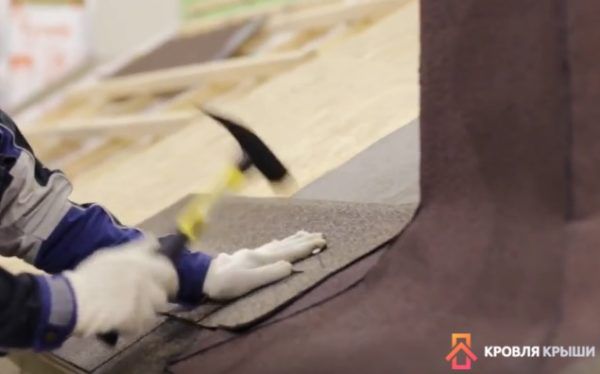
The technology of installation of flexible tiles involves the installation of a fillet, a plinth or a beam of 50 × 50 mm spread along a diagonal near the chimney. The elements are fixed to the crate, tightly pressed against the chimney planes and screwed in this position. On top of the elements, a waterproofing (lining carpet) is installed, individual pieces are glued with bitumen.
At the junction points, you need to install a fillet
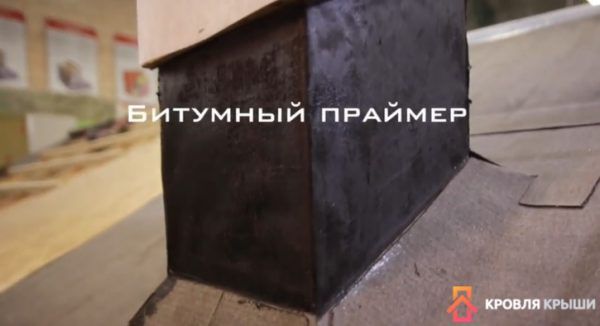
Bituminous primer is applied if the pipe is made of piece materials
It is recommended to wind the underlay carpet on the fillet
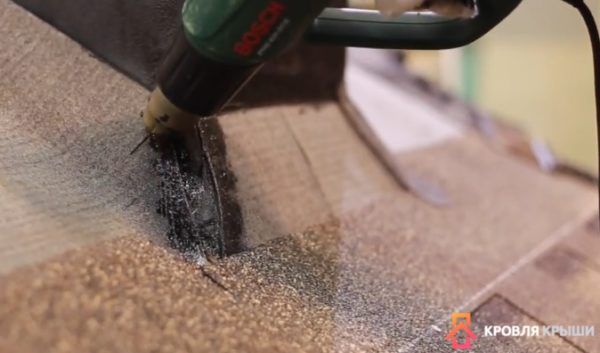
Step 1. Install the shingles of the shingles in the usual way up to the place of abutment with fillets. If one edge enters the surface of the element, then it must be cut off with a mounting knife. Make a vertical cut along the corner of the chimney, and a horizontal cut along the bottom line of the fillet. Always place a piece of plywood under the knife to prevent damage to the underlay when cutting soft tiles. Guide the edge of the knife exactly along the fold line of the roof. Cutting soft tiles is quite difficult, use strong and sharp knives.
Cutting material
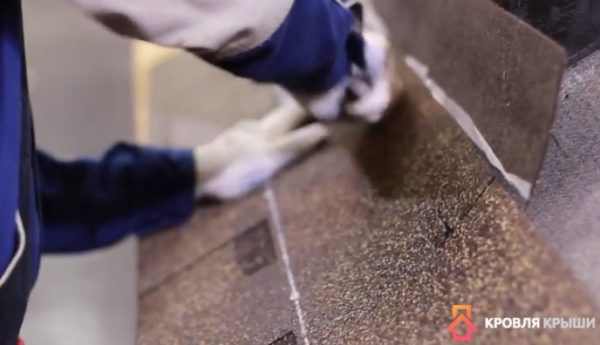
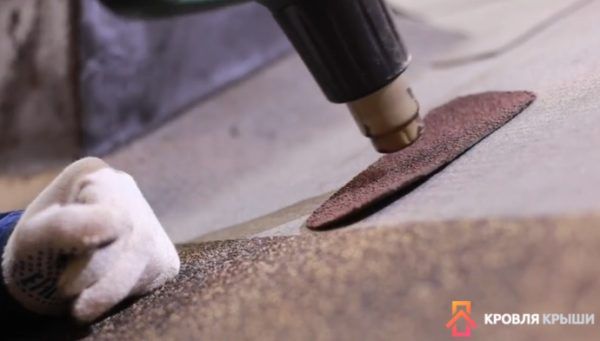
Step 2. Additionally seal all corners of the chimney with patches. How it's done?
- Cut out pieces of material about 6 × 15 cm from the valleys or underlayment. It is better to use a valleys carpet, it is much more durable.
- Use a flat metal spatula to carefully remove stone chips from the surface. It is necessary to ensure that the gluing site is absolutely clean and even. If it is difficult to work, then the patches can be slightly warmed up with a construction hairdryer, but not very much. Otherwise, the material will become very soft and may be damaged.

The patch is heated with a construction hairdryer - Heat the corner of the fillet with a hairdryer, attach a patch to it and press firmly.
The corner of the fillet is warmed up by a hairdryer - Re-heat the patch a little and gently press it against the surface of the chimney with great force. Make sure that the adhesion is firm and over the entire surface of the patch.
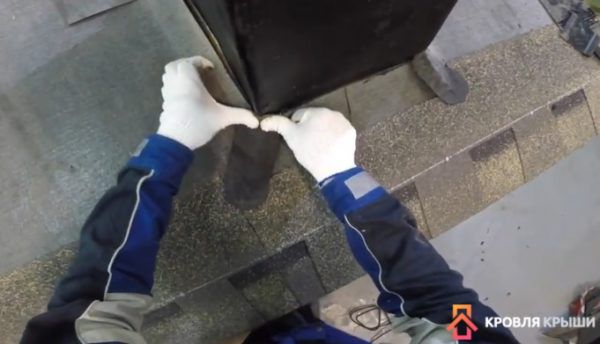
The patch is tightly pressed
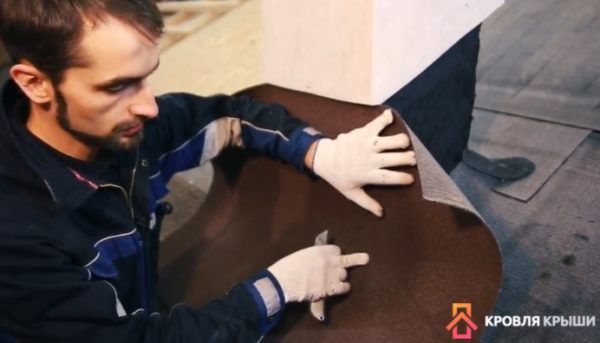
It is recommended to seal the chimney passage with patterns from the remaining pieces of valley carpet. In terms of its performance indicators, it better meets modern requirements.In extreme cases, it is allowed to use patterns from the lining carpet.
Step 3. Attach a piece of carpet to the bottom of the chimney, make marks on it along the width of the pipe. The length of the pattern should correspond to the sum of the indicators of the height of the sealing on the chimney and the length of the material under the soft tiles. Practitioners recommend taking with a margin, a large length will not be a problem for further work, and a too short pattern can cause leaks. Put it in place, bend it and use your finger to find the connection points of the fillet with the slope and the chimney. At these points, you need to cut a pattern.
The points of intersection of the fillet with the slope are found
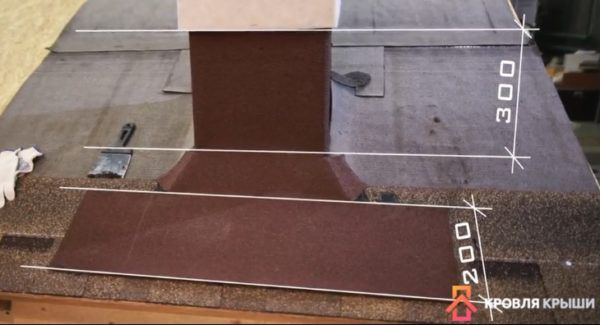
The height of the institution beyond the vertical should take into account the climatic conditions of the location of the house and the maximum height of the snow cover, but be at least 30 cm, the institution beyond the horizon - at least 20 cm. The length of the fillet must be added to these dimensions. The width of the pattern depends on the parameters of the pipe, the length of the side parts of the envelope is at least 20 cm.
Establishing patterns for the vertical and for the horizon
A more accurate pattern can be done on a flat area, transferring the location of the points of the cutting lines and bends using a square and an ordinary nail.
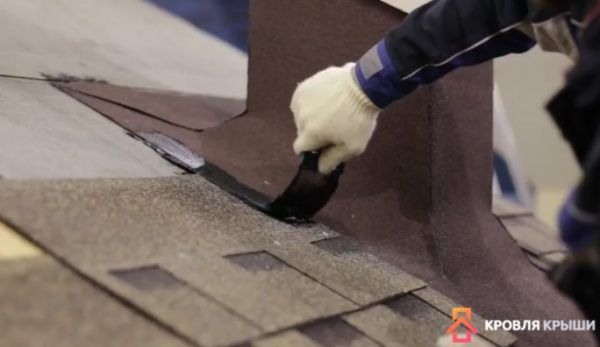
Step 4. Carefully coat the back of each pattern with special mastic, do not leave gaps. The layer thickness is approximately 0.5–1.0 mm. Modern mastic will reliably glue the pattern to the chimney pipe, allow it to withstand wind loads, and exclude the ingress of water under the protection.
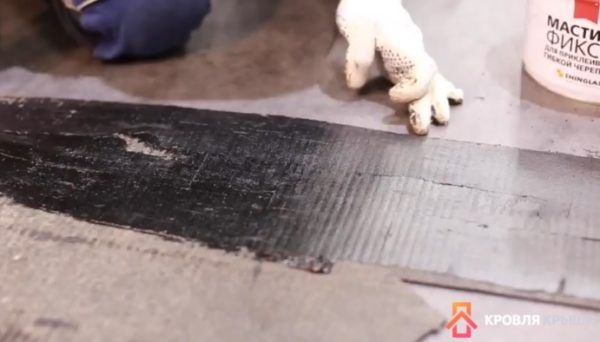
Applying mastic to the pattern
The patterns must be glued taking into account the direction of the water flow. The front is installed first, its lower part should cover the shingles of the tiles from above. In the future, all the water from the chimney will drain onto this element. Next, the side patterns are fixed, in the future they will be covered with a topcoat. The latter must be pasted over the back plane of the chimney.
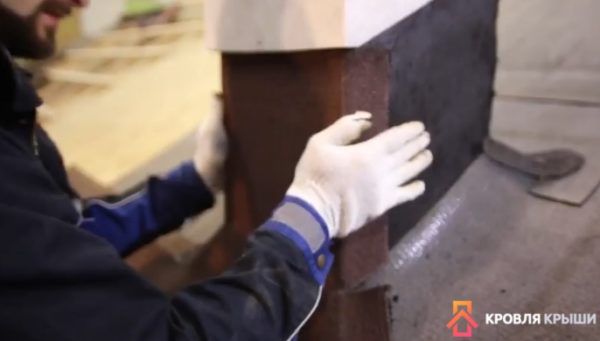
The front pattern is mounted first.
The side part is glued
Installing the rear
The joints are warmed up with a construction hairdryer
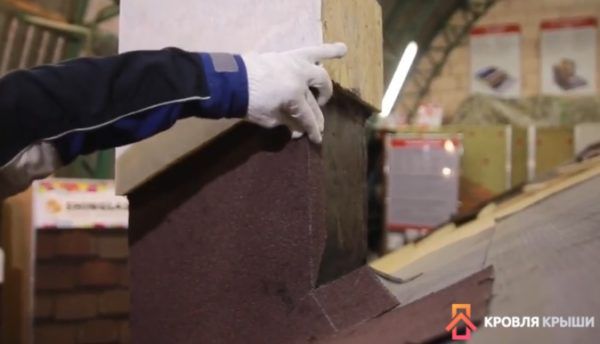
Step 5. Insert the upper metal strip into the chimney gates to fix the position of the pattern. The slats are sold complete with the roof, if you do not have them, then the elements can be made independently from any galvanized and colored metal profile coating. The strips are fixed with dowels, they do not so much increase the tightness as they eliminate the likelihood of tearing the patterns off the surface of the chimney.
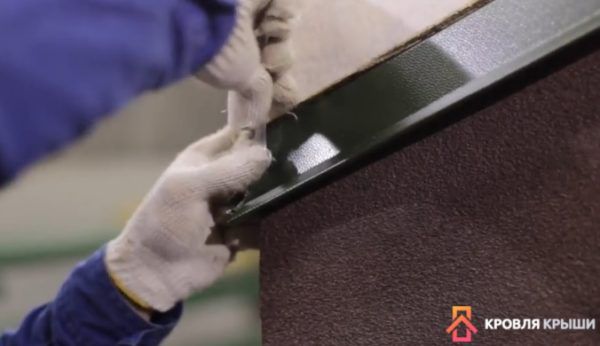
Attachment of the abutment bar
Step 6. Seal the plank abutment carefully with a one-component polyurethane sealant. Try to fill the gaps to the full depth, remove the excess with your finger.
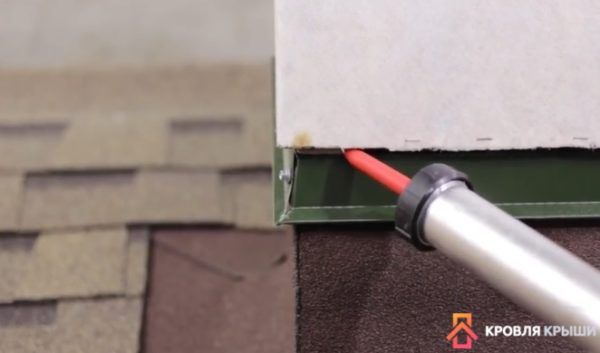
Sealing the junction of the plank
Another photo of the process
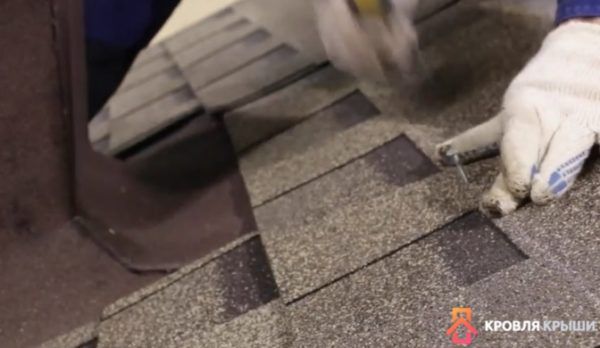
After gluing all parts to the chimney, you can continue laying the shingles. The shingles are cut evenly at a distance of 5–8 cm without reaching the lower edge of the fillet. The side cut of the tile must be coated with mastic, the same operation must be done in all places where there is no self-adhesive layer. The edge of the cut shingles serves as a groove that guides the rainwater in the right direction. The last tile is laid on the back of the chimney, then work continues on the entire roof.
Installation of flexible shingles continues
The side cut of the tile is glued onto the mastic
The last tile is installed on the back of the pipe