How to make a tie in a polypropylene pipe
Do you have plastic communication systems in your private house and do they need modernization or renovation? It is not difficult to install plastic on your own, thanks to the peculiarities of this material, right? But how do you bump into a plastic pipe when it's under pressure? And is it possible to do it yourself?
We will tell you the answers to your questions - the article discusses several ways of tapping into a pipe for organizing a branch from an existing line. Starting with the simplest one - shut off the pipeline for a while and insert a tee in the right place, having previously cut a section.
The tie-in options are provided with a detailed description of the process and are supplemented with visual photographic materials, which will allow you to understand the intricacies of the technology for installing cheap and durable plastic pipes.
By following the recommendations given in the videos, you can do most of the work on your own, without involving qualified specialists.
Features of inserting bends into pipes
Plastic pipelines are different. Some are used to supply water, others to drain it.
There are public highways, and there are personal intra-house and intra-apartment networks. And each option has its own nuances of work.
For tapping into a street pipe of a central water supply system or a village sewage system, permission is required from the owner of the networks, it is forbidden to unauthorizedly carry out such installation work
In order to crash into a common centralized system and not get yourself into problems with the law, you need to go through preliminary approvals.
It is best to delegate the signing of all the necessary papers and the insertion work itself to a specialized organization. This will make life much easier.
But no one bothers to crash into a plastic pipeline inside an apartment or a private house. This can be done almost anywhere. You just need to follow basic rules and not overload the system with an abundance of plumbing devices.
The water pressure in the water supply system should be sufficient for all devices and all users. And the sewer pipe is able to accept only the volume of waste for which it was originally designed.
There are several types of plastic pipes:
- "PP" - polypropylene;
- "PE" - polyethylene (most often it is HDPE);
- "PVC»- polyvinyl chloride;
- "PEX" - made of cross-linked polyethylene;
- "PEX-AL-PEX" - metal-plastic.
Some of them are recommended to be used for the distribution of hot water and heat supply systems, while others only for cold water supply or its removal. The tie-in technologies for all plastic pipes are similar in many ways.
The differences relate to the way they are connected to fittings and to each other in cases where an additional element is inserted into an existing pipeline.
The easiest way is to crash into a sewer pipe. Often it is enough to drill a hole of the required diameter and insert a pipe with a rubber cuff into it - there is no special pressure in the sewage system, such a connection is quite enough
All techniques for tapping a drain into a plastic water supply system can be divided into two groups:
- Cutting out a pipe section and inserting a tee in its place.
- Clamp (saddle) pipe lining with branch pipe.
The first method involves performing welding work with a special soldering iron for plastic or using pressure fittings.
In the second case, the presence of the superimposed part is sufficient.It is simply put on the pipe and mechanically tightened with bolts, or placed on a plastic surface and welded to it by means of built-in heating coils.
Sidebar Implementation Options
The most reliable technology for tapping into a plastic water pipe is a method with inserting a tee into it. In fact, this is a normal branch installation using standard fittings.
First, a section is cut out of the pipeline, and then a part with a bend is mounted in its place. However, it is not always possible to use this option.
If the pipe is located close to the wall, then it is problematic to cut out a part from it for inserting a tee, it will be even more difficult to perform plastic soldering using an iron in such a situation
The use of pads (clamps, saddles) simplifies the process of tapping into the water supply. And if he is under pressure, then this is the only possible option.
For the installation of the tee, the water will have to be completely drained from the plastic pipeline, and this does not particularly need to be done for insertion with the help of special saddles.
Method # 1 - tee or manifold
The main problem with any method of making a tie-in into a water supply system is the water pressure. It is best when it is covered.
Then there will be no splashing during the work, which is simply dangerous, since you have to work with power tools. And the welding of plastic pipes according to the rules must be done dry.
If there is no experience in installing plastic pipelines with electric soldering or gluing, then it is better to refuse the option with inserting a tee - when installing the saddle pad yourself, there are much fewer risks to make a mistake
As an inserted element for organizing a branch, you can use:
- ordinary tee;
- collector for connecting several branch pipes.
- prepared in advance a piece of pipe with a soldered branch.
The end with a branch pipe can be threaded and soldered. The choice of the type of fitting depends on the type of plastic and the type of installation of the entire pipeline system.
If the water supply system was originally made in a collapsible version, then the insert into it should be done with a threaded connection. And if the entire pipeline was carried out by welding with an electric soldering iron, then it is better to insert into it in the same way.
Tee insertion technology is as follows:
- The water is shut off and completely drained from the system.
- The pipe cutter cuts a pipe section to size so that an additional fitting can be connected in its place.
- Installation of a tee using a soldering iron (for HDPE and polypropylene) or glue (for PVC).
- Installation of a shut-off valve on the outlet.
After installing the tap on the created branch, further work can already be performed with the water turned on. Welding plastic pipes when tapping in a branch can be butt-welded and into a socket. Both options are acceptable.
The method of connecting plastic pipelines is selected based on their material, and fittings and tees, according to their characteristics, must correspond to the installed pipes
If getting close to the water supply with a soldering iron is problematic due to its close location against the wall, then you can use collet clamps or press couplings.
To do this, first a section of the pipe with a welded bend is prepared, and only then it is inserted into the place of the cutout in the water supply system.
Method # 2 - electrowelded saddle
An overhead saddle on a pipe is understood as a part of the water supply system, which is designed to organize branches from the main line.
This element greatly simplifies the installation of branching units and does not imply a violation of the through integrity of the tubular product.To perform a branch in a plastic pipe, at the point of the tie-in, only a hole of the required size is drilled.
To install the saddle, you do not need a lot of space, it can be mounted even in narrow places and wells - with the help of such a fitting, you can cut into the water pipe at any part of it
A conventional saddle is fixed to the pipe with clamps and bolts. Its electrowelded counterpart has built-in heating coils in its design.
When voltage is applied to them from the mains, these elements melt the plastic, which, after cooling, forms a reliable connection between the fitting and the water supply.
Methods for tapping metal pipes
Despite all the advantages of a welded joint, home owners do not really like to use it when organizing an additional tie-in. This is due to the need to find a good specialist who will certainly be able to guarantee that the seams will not leak. In addition, welding work is usually accompanied by the appearance of soot spots on the walls, ceiling and floor. This means, at least, a redecoration of the premises will be required.
Therefore, owners often "bump" into the heating system on their own, without using a welding machine. An additional bonus is the ability, if necessary, to disassemble such a connection and replace the installed fitting with another. There are 4 main ways to insert:
- Threaded.
- Flanged.
- Using couplings.
- With the use of a saddle outlet.
Each of them has its own advantages, disadvantages and installation methods, which means that it requires a more detailed analysis.
Threaded docking option
This method has already been briefly considered and it was found that it is of little use for connecting to an existing network, but it is quite suitable for connection. The thread in this case is not cut with a die, but with a special device - a pipe die. We'll have to attend to his search. The procedure is as follows:
- Two pieces of pipe of the required length are cut off.
- To facilitate work, a chamfer is removed from their ends at an angle of 45 degrees.
- The pipe is clamped in a vise of a suitable size.
- Klupp neatly, without distortions "cites" on its end.
- With little effort, threads are cut to the required length on both sides of each pipe.
- Now you need to connect them. For this, steel couplings and angles with an internal thread are used. It is better to use a lock nut on one side.
Pipelines connected by this method are very durable, and with proper installation they can serve for several decades.

Flanged method
This option is used in the case when the heating has a "muffled" outlet, and there is no desire or opportunity to cut threads. Like the previous method, this connection involves the complete or partial drainage of water from the system. Docking is carried out thanks to a special fitting, the so-called flange. It is a wide, bolted metal clamp. Therefore, first of all, you need to purchase this element of the heating system. The flange must necessarily correspond to the outer diameter of the pipes to be connected. Installation sequence:
- Make sure the pipes are cut as flat as possible. The gap between them depends on this, and hence the load on the fitting.
- The flange must be "halved" by loosening the fastening bolts.
- Clean the junction from metal shavings and put a rubber gasket on it, its middle should be approximately above the joint.
- Fit both flange halves and tighten evenly with bolts.
A significant disadvantage of this connection method is its low reliability. In this regard, the flange is significantly inferior to the thread. Therefore, the pipes must be immobile. Most often they are securely fixed to the wall. In addition, the connection cannot be called durable, especially when used in heating.Due to the constant temperature drop and expansion of the metal when heated, the gasket quickly loses its properties, and hence its tightness. Therefore, the flange can only be used as a temporary measure.


Docking with couplings
It is a reliable and most common way of connecting pipes to an existing heating system. True, it also requires draining the coolant. Docking is carried out using a Gebo coupling. Its design is based on a compression ring, which, when tightened, securely grips the fitting to the pipe. On the other hand, the coupling most often has a tap thread. Sometimes a fitting is used to connect two pipes. The installation sequence is considered with just such an example:
- The ends of the pipes should be sawn off as smoothly as possible.
- You must first make the markup. For this, the sleeve is applied in such a way that the cut is approximately in the middle. In the place where the fitting ends, we put a risk with a pencil.
- The ends of the pipes are inserted into the sleeve, the depth is adjusted according to the mark supplied earlier. It is imperative to maintain alignment and avoid misalignment.
- Using two gas wrenches, the fitting nuts are tightened to the limit.
Most often, in this way, a transition is made from an existing metal heating system to a new one made of PVC. In this case, a valve is installed on one side of the Gebo coupling. The big disadvantage of this method is the high cost of the fitting itself.


Saddle tap
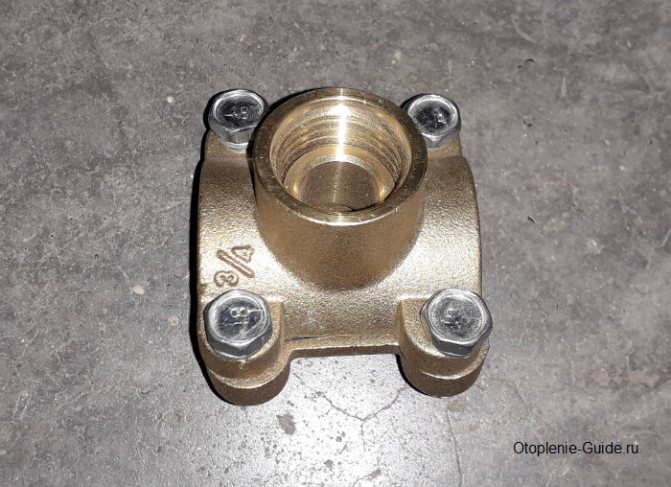
Perhaps this is the only option that allows you to connect to the existing heating. A special fitting is required - a saddle branch, a “saddle” in the language of specialists. It is very similar to the previously discussed flange, the difference lies in the presence of a thread into which any adapter can be screwed. Saddle has a number of undoubted advantages:
- installation does not require a lot of space and can be carried out in the most inconvenient place;
- has a relatively low cost;
- installation on any section of the pipe is possible;
- no experience or qualifications are required for installation.
In addition, a minimum amount of time is required to install the saddle. Therefore, the method is often used in emergency situations. In contrast to the flange, in this case the connection is very reliable. The fact is that the bend is installed on the whole pipe, and does not connect its two sections, so there is no need for rigid fixation. The saddle branch is mounted in the following sequence:
- Choose an installation location and clean it well.
- Try on the pipe elbow and mark the center of the threaded connection on it.
- Mark the place of the future hole. It can even be drilled a little, but in the absence of experience and accurate data on the wall thickness, it is better not to do this.
- We put the saddle in place, put the gasket and tighten the bolts evenly.
- The point marked with a punch or drill should be in the center of the threaded hole.
- Using a reel, we screw in the ball valve.
- Now you need to drill a hole in the pipe, right through the open tap.
- The scope of delivery includes a special sleeve to protect the thread. It is necessary to select a drill of the largest possible diameter according to it.
- Use a drill to make a hole. As soon as the water flows, you need to pull out the tool and close the tap.
For safety, it is necessary to put on a protective rubber shield on the drill shank, and it is better to use a cordless power tool. In this way, as a rule, the "warm" floor is connected to the existing heating.
How to properly crash into a water supply plastic pipe
Do you have plastic communication systems in your private house and do they need modernization or renovation? It is not difficult to install plastic on your own, thanks to the peculiarities of this material, right? But how do you bump into a plastic pipe when it's under pressure? And is it possible to do it yourself?
We will tell you the answers to your questions - the article discusses several ways of tapping into a pipe for organizing a branch from an existing line. Starting with the simplest one - shut off the pipeline for a while and insert a tee in the right place, having previously cut a section.
The tie-in options are provided with a detailed description of the process and are supplemented with visual photographic materials, which will allow you to understand the intricacies of the technology for installing cheap and durable plastic pipes.
By following the recommendations given in the videos, you can do most of the work on your own, without involving qualified specialists.
Method # 3 - crimp clamp (pad)
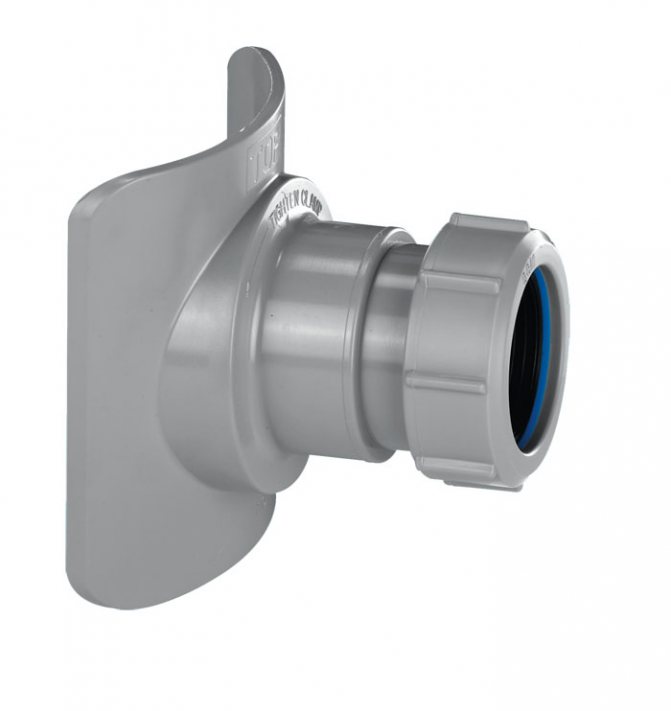
In addition to the electrowelded saddle, there is a simpler analogue of it - an overhead clamp. It consists of two separate bolted parts.
One for the lining on top of the plastic pipe, and the second at the bottom for attracting the upper part. An additional sealing gasket is inserted between them to prevent leaks.
Tie-in scheme. The number of tightening bolts and the size of the clamp depends on the diameter of the pipeline into which the tie-in is made
Typically, the top and bottom overlays are exactly the same size as the pipe. But there are also universal clamps, in which the top is made small, and instead of the bottom there is a metal strip for the screed.
Outwardly, they resemble repair counterparts for connecting with a hose or closing fistulas. Only in the upper part do they have a branch pipe for connecting a branch.
Clamps for tapping into a plastic pipe are:
- with shut-off valve;
- with built-in cutter and safety valve;
- with a flanged or threaded metal end;
- with a plastic end for soldering or gluing.
To make a tie-in, the clamp is put on the pipe and fixed on it with nuts or bolts, depending on the design. Afterwards, drilling is performed through the existing branch pipe. And then the branch itself is connected from the main.
It is not recommended to drill the pipe without using a clamp or saddle. You can make a mistake with the drill diameter and drilling point. The best way to do this is through the nipple of the fitting already installed for the branch.
So the size of the drill will definitely be slightly smaller than the internal section of the cut-in branch and will be installed exactly where it is needed.
The nuances of working on a water supply system under pressure
For tapping into the pressure pipeline, electrowelded saddles and clamps with a built-in cutter are used. It is located in a special sealed nozzle body.
For drilling plastic, it is often enough to turn it with a hex wrench. But there are also models for a drill.
The presence of a sealed branch with a cutter inside ensures that there is no splash of water when drilling a pipe under pressure
Some of these designs have a built-in valve. Then, after completing the drilling, the cutter rises, the tap closes, and the drill bit is removed. Instead, a branch pipe is mounted.
However, there are also commercially available products with a branch pipe that is directed sideways from the drill (parallel or at an angle to the connected water supply).
The use of linings with an internal cutter allows you to cut into any water supply... It doesn't matter if they are under pressure or not. But such attachments are much more expensive than conventional clamps and saddles.
They greatly simplify the tapping process, but they will have to be spent on them. At the same time, in terms of the tightness of the resulting joint, they do not exceed and are not inferior to standard solutions.
Conclusions and useful video on the topic
There are many nuances in connecting a branch to a plastic pipeline. There are also different types of plastics, and fittings in terms of design, and methods of insertion.
In order to avoid gross mistakes, we recommend that you watch the videos below on this topic.
Tapping into HDPE pipe under pressure using a saddle with a cutter:
Features of mounting an electrowelded saddle:
The nuances of inserting into a polyethylene water supply system:
It is not often necessary to crash into existing plastic plumbing.But sometimes you need to change pipes, install water meters, or simply connect additional plumbing. There are several different types of fittings and tapping technologies for this.
For any case, there is the best option so that the installation can be carried out independently. It is mandatory to delegate these works to professional plumbers only in a situation of connection to a common water supply system, where preliminary approvals are required.
Source: https://sovet-ingenera.com/santeh/trubodel/kak-vrezatsya-v-plastikovuyu-trubu.html
How to bump into a plastic water pipe: methods and necessary permissions
There are several ways to embed an individual outlet into the existing centralized communications. It all depends on how far away the collector well is, if we are talking about a tie-in outside an apartment or house. Such work requires permission. When it becomes necessary to connect an additional outlet inside the apartment, no approvals are needed.
What are the features of connecting a pipe to a centralized system
Work on insertion into a plastic water pipe, into a steel or cast iron pipeline is entrusted to the specialists of the water utility or a qualified contractor (with the knowledge of the water supply organization).
Self-tapping, even into a public plastic water pipe, is prohibited by law. An additional connection to the centralized water supply bypassing metering devices is illegal.
Note! You should start planning an individual tie-in to a centralized system with an official permit. Independent connection is punishable by material and administrative punishment.
Apply for the appropriate permit should be in the department to which the required pipeline belongs. In the case of a water supply system, this is a city water utility or an organization that maintains water supply systems in a village or a settlement. To obtain a permit for tapping into a pipe, you should have documents for the land plot and house with you.
A permit for tapping into a centralized pipe will contain:
- accurate data on the place of the tie-in;
- indication of the diameter of the pipeline and branch;
- additional information depending on the purpose of the work.
After obtaining permission, you should contact the SES. After that, a tie-in project is prepared and registered, and an estimate of the work is drawn up.
Tie-in scheme into a centralized water supply system
If there is a collector well in the area where your house or plot is located, then the tie-in is carried out (if allowed) in this well. If it is located far away, then access to the pipe is carried out through an additional well.
For this:
- in the place indicated by the project, they dig a square pit measuring 1.5 \ 1.5 meters;
- from the pit, in the direction of the house, they dig a trench for future allotment;
- upon completion of all work on the tie-in point, an additional well with a cover is erected to access the connection point.
Connection to a centralized pipe, which is under pressure, is carried out in two stages:
- Fitting a branch flange with shut-off valve.
- Reaming the pipe body.
You can cut into a plastic water pipe with or without welding. Connection to steel communications is usually carried out using a welded flange.
Note! The general rule of tapping in a branch is that the diameter of the cut-in communication is always less than the diameter of the central pipe.
Methods for inserting into a plastic water supply system inside an apartment
An additional outlet from the central water supply inside the apartment is easier to carry out than a tie-in into a common pipeline.
Threaded connection method
This method is free from most of the disadvantages inherent in welding, but it is very laborious, and most importantly, it requires a complete shutdown of the feed.Without going into details, the process of connecting to the fuel line is carried out in the following sequence:
- The place chosen for insertion is manually or with the help of a grinder cleaned of old paint. In this case, the size of the fitting to be installed, together with the thread, must be taken into account.
- In accordance with the dimensions of the tee, the stripped place is marked.
- A part of the pipe is cut out in the selected area.
- At the ends of the pipes of the main, a thread is cut, the pitch of which corresponds to the element to be installed.
- The fitting is fixed. In this case, on the one hand, it is screwed directly onto the thread, and on the other, you will have to use an adapter sleeve and a locknut.
Now that the algorithm for carrying out the work is clear, we can highlight the main problems when using this method:
- the large force that is applied to the pipe when threading can damage the old rusty line;
- correct work with a plate requires a lot of experience and practical skills;
- the connection turns out to be cumbersome and does not have sufficient quality;
- it is necessary to shut off the "riser" and drain the water from it.
The last point requires a special explanation. The fact is that such manipulations with the system should be performed independently only in a private building.
Any work related to interference with the heating of an apartment building can be carried out only with the permission of utilities.


Tapping into a plastic pipe without welding - several solutions
A private house or dacha is being rebuilt, improved, and equipped throughout the entire period of operation. Sometimes these manipulations are performed forcibly, due to wear and tear of any structure or system, and sometimes there is a desire to modernize them to increase comfort in the house.
But, whatever the reasons are at the heart of the process, sometimes such an operation as cutting into a pipe without welding becomes relevant.
For example, without this procedure, it is impossible to organize an additional sewer drain when installing a washing machine, or vice versa, creating an additional point of water intake for connecting a household appliance to the water supply system.
Outlining the range of tasks
If you need an insert into a water pipe, for example, then the most logical at first glance would be a very simple way:
- The pipe is cut.
- A tee is welded or inserted.
- The connection to the tee is in progress.
If you have to deal with a plumbing or heating pipeline that is still "Soviet-style", that is, metal, then such a head-to-head manipulation is a very effective way to solve the problem.
But in practice, such pipes are found less and less, they are ruthlessly and everywhere replaced by systems made of plastic and its derivatives.
Therefore, today the question of how to cut into a plastic pipe will be more relevant.
Naturally, this work is not as simple as it seems at first glance, although on the other hand a non-professional can cope with it, if he is armed with our advice, and also shows diligence and will. And first, you need to understand the amount of work that you will have to face.
Possible problems with sidebar:
- The pipe is sawn and in the right place a piece for the tee is cut very precisely in size. It should be borne in mind that the pipe can be very close to the wall surface, and it can still be walled up halfway into the wall.
- Possibly dad-mom docking is required. The end of each pipe is equipped with an extension - a bell, in which there is a rubber seal. It is in this socket that another pipe will have to be inserted.
- Also, most likely, you will have to replace one whole pipe with two smaller ones.And between them, you will need to install a piece of pipe with a pipe through which the connection will be made.
Tapping into the water supply using a pipe
In fact, the answer to the question of how to bump into a water pipe can be very simple. One way of doing this does not require cutting the pipeline element at all. To begin with, a piece of pipe with a branch pipe, of course, the same diameter as the water pipe, is purchased in any specialized store.
Inserting without cutting - a few easy steps
A branch pipe must be cut out of the acquired pipe segment, but in such a way that an element of the "half-pipe" type is obtained at its end. It is he who must ensure reliable overlap of the place of the future tie-in. Simply put, a second pipe wall should form. In a predetermined place, a hole is drilled, the diameter of which must correspond to the diameter of the nozzle.
Any non-drying sealant, for example, "Body 940", is evenly applied to the entire inner surface of the flange. It is worth looking for in car dealerships, in auto cosmetics departments. The area around the hole is lubricated with the same composition, but you do not need to reach about 1 cm to the hole itself.
Further, when installing such a curved flange on a pipe, I will have to use such a fastening element as a clamp for tapping into a pipe. Rather, you need two of them to pull the edges on both sides. The clamps must be tightened very carefully, but so that the sealant begins to squeeze out from under the flange. Residual grease is removed.
Attention! If a tie-in is made into a polyethylene pipe of a water supply (sewerage), where a small pressure is recorded, then the use of clamps is an optional condition. It is possible to simply "fasten" the flange using a wide electrical tape.
Plumbing repair
Steel pipes
Repairing water pipes if they are steel is a common occurrence. Steel rusts with all the ensuing consequences. The wear rate of the pipe is usually not very different along its entire length; the exception is when a steel pipe without an anti-corrosion coating is constantly damp in a small area, and in more favorable conditions along the rest of its length.
An example familiar to any plumber is the risers in the ceiling next to the embossed sewer pipe.
The choice of repair methods is small here - only gas or electric welding. A whole new piece of pipe is welded to it, or threads are welded to which the branch pipe and all the necessary fittings are connected - tees, valves, etc.
Reinforced plastic and polypropylene
Here, the repair of the toatm water pipe may only be required after defrosting the water supply or supplying off-design pressure to it: these pipes are not exposed to dampness or corrosive environments. The repair method is not fundamentally different from the tie-in method: the defective section is cut out, and a new section is mounted on the fittings to the edges of the whole pipes.
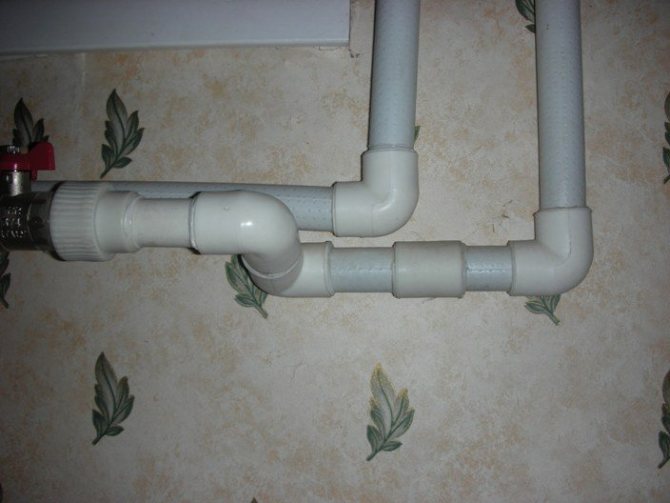

A couple of extra fittings will not spoil the aesthetics of the bathroom
Tip: When replacing a section of water supply, use pipes of the same diameter as the whole pipe. Any transition in diameter is a place where fine sand, scale and slag will accumulate.
Instructions on how to make a tie in a plastic pipe
In everyday life, plastic pipes are even more common today than metal ones. The lightness of the material, its insensitivity to corrosion, ease of installation - all this makes plastic products the best option.
Insert into a metal pipe
Therefore, the question - how to make an insert into a plastic pipe, is relevant for many home craftsmen.
Technology features
The mechanism of the process is quite simple. To cut into the pipeline, you need to drill a hole in the required area.If we are talking about any main option - a water supply system, a sewerage system, where there is no way to turn off the water, it is necessary to immediately solve the problem and shut off the water exactly at the working area.
Technology features
That is, you need to achieve 2 goals at once: to make a hole and shut off the water under pressure using some kind of locking mechanism. Moreover, the fittings should also provide for the possibility of installing the next branch.
Drilling a pipe
An insert into a plastic sewer pipe or, conversely, fastening a branch to a cast-iron trunk, requires compliance with 2 main rules:
- the diameter of the pipe into which they are cut is larger than the pipe that is being mounted;
- the diameter of the drill must be exactly the same as the diameter of the cut-in section.
The design of such a device depends on the type of pipeline. In addition, the scale of the work itself must be taken into account.
Main pipeline
The main pipeline implies the supply of liquid under pressure, and it is very tangible, which means the use of special equipment and special locking mechanisms.
To get to the highway, you need to dig a trench, for which, as a rule, shovels are not enough, but the services of an excavator will be needed. It is possible to carry out any work on connecting to the backbone systems only upon receipt of a special permit confirming the qualifications of the master.
All this makes the possibility of self-tapping into the highway an extremely costly and unprofitable occupation.
Sewage pipe
In household sewer and water supply systems, you can actually make a cut-in of a plastic pipe yourself, both into a plastic and a steel pipeline.
Installation technology in a metal pipeline
Today, private houses and apartments are serviced by cast iron and steel pipes. To install a new section in them, special devices are used - clamps. The design of the latter can be different, and the rules for working with metal alloys are different.
Do-it-yourself insertion into a steel pipeline requires the following recommendations:
- the best way to work is to use a saddle clamp. They use different types depending on the system - sewer, plumbing, heating. In addition to the seat itself - the part adjacent to the pipe, the device includes a drill and a shut-off valve;
- before installation, the surface of the pipeline is cleaned from rust and dirt;
- the device is fixed with bolts, gaskets are used;
- a hole is drilled and a shut-off valve is immediately installed;
- turn the valve, shutting off the water supply. Install special equipment for drilling a hole for the pipe. The guide sleeve allows you to drill in the required direction;
- after that, the fitting or adapter is fixed and a new branch is connected. The photo shows the moment of installation.
Cast iron is more brittle than steel. The insertion of a plastic pipe into a cast iron pipe is carried out according to the same scheme, but subject to additional requirements: bimetallic crowns and special devices are used for drilling. It is important not to let the bit overheat and only run at low speeds. It is practically unrealistic to install a cast-iron pipeline on your own.
Rules for installing new equipment
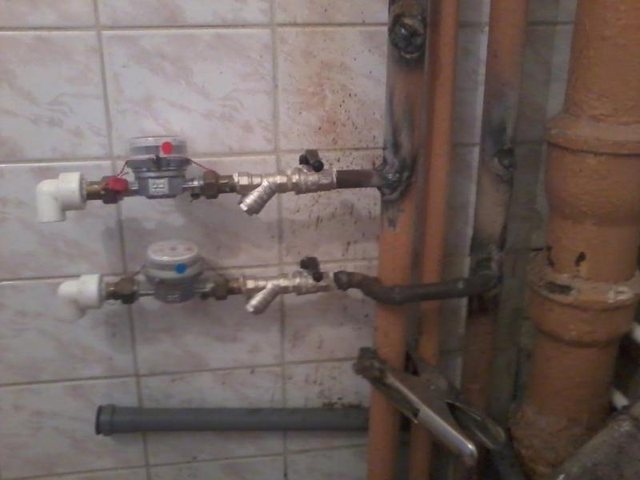

Tie-in to the central heating system
Installing new equipment or replacing out of order should not affect the performance of the entire system. The correct insertion into the existing internal networks of heating pipelines is carried out with a minimum period of stopping the heat supply of a house or apartment.
This procedure should be performed only in compliance with the following rules and recommendations:
- Minimal coolant leakage. This is especially true for closed pressure systems.In this case, the best option would be to insert into the heating without welding using special couplings;
- Reduce system downtime during work execution. For this, it is necessary to provide in advance for the availability of all tools and materials;
- Preservation of room heating parameters taking into account new equipment for modernization. Efficiency should not decrease, the temperature regime should not change, unless this is planned in advance;
- Security. This is especially true when the heating element is inserted into the heating system.
To do this, it is recommended to first study the existing heating scheme in advance and develop a plan for its modernization or repair. For example, inserting an electric boiler into the heating system is carried out not only according to the manufacturer's recommendations, but also taking into account the optimal location of the equipment. Consider the common types of work that you can do yourself.


