Selection and installation of radiators
For the bottom connection, bimetallic heating radiators are recommended, they are easy to assemble, install and repair. The radiator sections can be removed, added or replaced if damaged.
When buying, it is better to give preference to domestic manufacturers, it is important to check the integrity of the battery and packaging. Documentation must be understandable and written in Russian
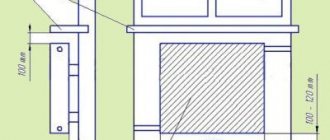
Before installing, you need to do the markup. it is done with a pencil on the wall. This marks the points where the brackets will be installed. The bottom of the radiator must be at least 7 cm from the floor and 10 cm from the window (if located under the window). The distances are maintained so that the air in the room can circulate freely. The distance to the wall should be about 5 cm.
For more efficient circulation of the coolant, heating radiators are installed with a slight slope. this also eliminates the accumulation of air in the heating system.
When connecting, it is important to follow the markings and not to confuse the return and flow. If connected incorrectly, the radiator may be damaged and its efficiency will decrease by more than 60 percent.
The following types of bottom connection are distinguished:
- one-sided piping - pipes come out from the corner below and are located side by side, heat loss can be about 20 percent;
- versatile piping - pipes are connected from different sides. such a system has more advantages, since the length of the supply and return lines is less, and circulation can occur from different sides, heat loss is up to 12 percent;
A top-down connection is also used. but in this case it will not be possible to hide all the heating pipes, since the coolant will be supplied in the upper corner, and the output will be from the opposite lower corner. If the heating radiator is short-circuiting, then the return line will be brought out from the same side, but from the lower corner. In this case, heat loss is reduced to 2 percent.
If you plan to connect heating radiators yourself, it is important to follow the installation and safety techniques. During installation or repair, the coolant must be drained, the batteries are cold
If in doubt, it is better to call the wizard or use the training video lesson, since it will be difficult to repair the sections with the lower connection. It is better to plan a heating system with bottom heating together with the layout of the house.
Heating radiators with bottom connection Aluminum radiators for home Steel panel radiators Heating radiators or underfloor heating
Overview
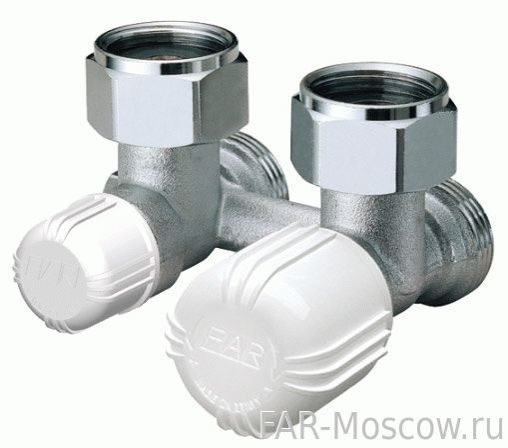
Stout straight bottom connection with bypass for one-pipe heating systems.
For connection to radiators with 3/4 ″ male thread (or 1/2 ″ female with adapters). Suitable for central heating with forced heating medium.
Suitable for any radiator with bottom connection.
| Straight |
| 3/4 ″ BP x 3/4 ″ HP |
| 50mm |
| Nickel plated |
| 110C |
| |
| 10 bar |
| Italy |
Is it worth using a one-pipe heating system
When laying pipes, a 2-pipe heating system is often used. Schematically, it can be represented in the form of 2 circuits, one is responsible for supplying hot water to the radiators, and the second for removing the cooled coolant and supplying it to the boiler. This approach allows you to organize the circulation of water of the same temperature in all batteries.
A significant drawback of this method of organizing heating is considered to be the financial cost of pipes (the price of a device for such heating will be approximately 1.5-2 times more than that of a one-pipe one), and the labor intensity increases. In addition, the pipes will be more difficult to mask.
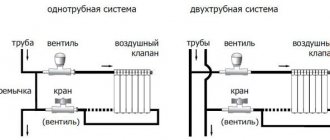
The single-pipe scheme does not imply the presence of a separate riser for the removal of the cooled heat carrier, that is, about half the pipes will be required. Schematically, it can be represented in the form of a closed loop, and the connection of radiators with a one-pipe heating system is performed sequentially.
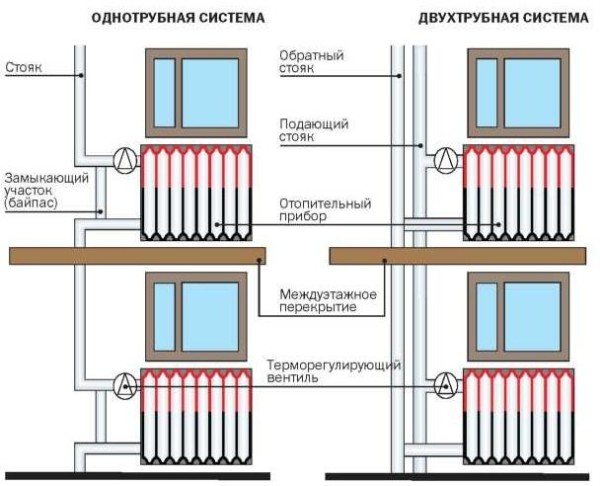
Comparison of one- and two-pipe heating system
Such a system began to be widely used during the construction boom even under the USSR, at the same time its significant shortcomings were discovered:
the main thing can be considered the fact that the last batteries in the circuit receive a coolant with a temperature about 30-50% lower than those nearest to the boiler, this leads to the fact that the rooms are heated extremely unevenly;
Note! This disadvantage can be easily solved by increasing the number of sections of the last radiators. But when building a large number of objects, this will lead to an increase in calculations, which is not very convenient
- you will need a rather powerful pump, it will not work to organize the movement of the coolant by gravity;
- it is characterized by large heat loss;
- system start-up takes longer than in the case of a two-pipe system;
- when doing work with your own hands, the risk of air jams during operation is especially high. It is just that quite often it is not possible to withstand the necessary slopes along the entire length of the pipes.
The listed list of disadvantages is typical for a conventional one-pipe heating system. Nowadays, most of the listed disadvantages are successfully eliminated by installing simple devices. For example, it is already possible to regulate the temperature in individual batteries, and the installation of balancing valves will allow to achieve almost the same operating conditions for all batteries in the circuit.
Given the significant savings on materials, such a heating system scheme definitely deserves attention.
Product description
Stout straight bottom connection with bypass for one-pipe heating systems.
For connection to radiators with 3/4 ″ male thread (or 1/2 ″ female with adapters). Suitable for central heating with forced heating medium.
Suitable for any radiator with bottom connection.
| Straight |
| 3/4 ″ BP x 3/4 ″ HP |
| 50mm |
| Nickel plated |
| 110C |
| |
| 10 bar |
| Italy |
One-pipe and two-pipe heating systems
Depending on the number of pipelines, the systems are single-pipe, double-pipe and beam. In a one-pipe system, the coolant is supplied through one pipe, passes through the channels of the battery, gives off some of the heat, and goes back into the same pipe. The only advantage of such a system is the ease of installation and the minimum amount of consumables. Due to these features, such an installation scheme is used in the construction of multi-storey typical houses. The radiators are connected in series, respectively, in devices remote from the boiler, the temperature of the coolant decreases. If the supply and return in the heating system is made by one pipe (lateral connection of the heating radiator from a vertical riser), it is impossible to regulate the temperature of a separate device, since a narrowing or blocking of the flow will affect the operation of all subsequent batteries. To provide this possibility, a jumper must be installed between the supply and return pipes.
In two-pipe systems, two pipes, supply and return, are separately supplied to each battery.At the same time, the pipe consumption increases, but the system works much more efficiently. It is recommended to connect the radiator to a two-pipe heating system diagonally, but other connection methods can be used depending on the location of the pipelines. The two-pipe system has several advantages:
- Natural and forced circulation of the coolant can be used.
- A heating connection diagram of any complexity can be used, taking into account the architectural features of the building.
- The temperature control of each device is carried out separately and does not affect the operation of the system as a whole, which allows you to maintain different temperatures in individual rooms.
Collector wiring (beam system) involves the supply of coolant to each battery (or room) directly from the boiler. The temperature control of the devices is carried out using the manifold control valves. This wiring method allows you to connect a heated towel rail or underfloor heating system to the heating system, regardless of the batteries.
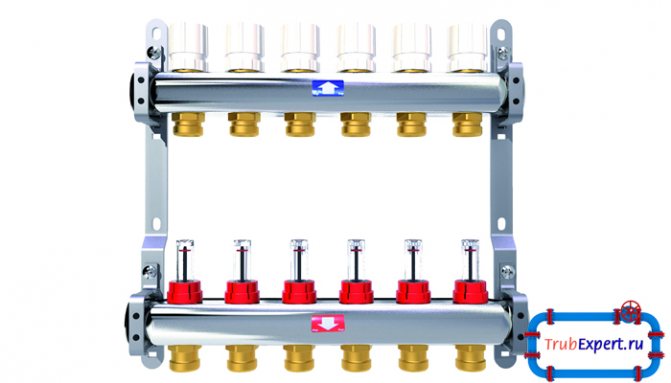

Manifold for distributing pipes of the heating system
The collector wiring allows you to balance and adjust the system with a high degree of accuracy, however, in addition to its advantages, it also has many disadvantages:
- High cost. The pipe consumption increases several times and the installation of additional equipment (manifold, hydraulic separator) is required.
- The pipe is laid into the screed in one piece; joints in the screed are not allowed.
- Natural circulation is not enough; installation of a circulation pump is required for each circuit. The use of electrical equipment makes the system dependent on power supply.
- Limitations when choosing a pipe type. Usually, a reinforced plastic pipe or cross-linked polyethylene is used. Connecting the radiator to polypropylene pipes, which are at an affordable price, in this case is impossible.
Ways of connecting the mixing unit
You can connect the mixing unit to the heating, and specifically to the boiler, in different ways, which depend on:
- Depending on the type of valve used (two-way or three-way)
- On the type of connection of the circulation pump (serial or parallel).


To implement the connection diagram of the mixing unit for heating with a two-way valve and a serial connection, the direct flow of the heating system is changed from the reverse one, and the circulation pump is placed on the bypass.


The advantage of the circuit is its compactness, the minus is the decrease in performance.
- Air solar collector - what it is and how to do it yourself. Step-by-step master class and tips for use in the heating system (110 photos and videos)


Installation of heating pipes: wiring methods and rules for placing the heating system (125 photos)


Heating in a two-story house: projects, diagrams and heating systems with your own hands (125 photos and videos)


When implementing a scheme with a three-way valve using the parallel connection method, a three-way mixer is installed above the pump.


You can do without a mixing unit if the temperature of the coolant in all lines is the same and if the boiler can output a coolant whose temperature is about 30 ° - 40 ° degrees.


Prices for mixing heating units are varied, starting on average from 1,500 rubles and reaching 30,000 rubles, depending on the material from which they are made, the equipment with additional equipment, the price also depends on the manufacturer and model.


Rifar aluminum radiators with bottom connection
Rifar Alum 350 Ventil 1400 rub.
Today, when designing a heating system in a country house, much attention is paid to the rationality and compactness of systems.Therefore, the bottom connection of radiators is the most versatile and aesthetic option, due to the fact that all return and supply pipelines are conducted under the floor, and the connection to the radiator is carried out at the bottom, which is very convenient
It was believed that the bottom connection allows you to reduce the efficiency of heating systems by 5%, but today, thanks to modern developments, this opinion has changed. For such heating devices, underground piping is optimal. In such devices, for better distribution of the coolant, distribution pipes are used.
The best choice is the Rifair radiator, which, in the case of bottom connection, is completed with a special thermostatic device located in the body of the heater. Rifair radiators use a seamless technology without the use of welding, which allows the use of oil as a heat carrier, as well as various antifreeze anti-freeze liquids. Thanks to a special lightweight aluminum alloy, a high heat transfer rate is provided, and the special design of the internal channels and the body allows it to withstand high pressure.
In terms of overall dimensions and the best heat transfer indicators, domestic radiators with a bottom connection Rifar stand out, where, having a special compactness, they can heat fairly decent areas of premises. All models are capable of withstanding pressures up to 20 bar and coolant temperatures up to 110 C.
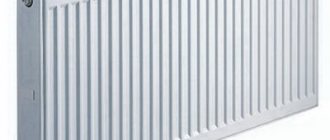
In private houses and multi-storey buildings, it is recommended to use Rifar steel panel radiators, consisting of several panels. A distinctive feature is a two-layer environmentally friendly varnish coating that does not emit harmful substances into the environment, and special methods of performing the painting process and applying protective layers reliably protect the heating device. In the case of a bottom connection, a ¾ ”male thread is provided. Among the options offered, there is a large selection of sizes, where you can choose the right model for any ceilings and window sill.
Universal Russian radiators Rifar with bottom connection can be installed in heating systems with copper, steel, metal-plastic and polypropylene pipes. All models are injection molded.
We are doing our best.
All Rifar heating radiators are technologically advanced radiators made under the strict supervision of professionals.
Bottom radiator connection corner Stout 3/4 ″ х 3/4 ″ (SVH 0004 000020)
Lower radiator connection unit Stout 3/4 ″ х 3/4 ″ angular (SVH 0004 000020) is intended for connecting radiators with connecting pipes located at the bottom of the device to the distribution pipelines of a horizontal two-pipe water heating system, as well as for disconnecting radiators from the pipeline network without emptying the heating system.
The bottom connection unit Stout 3/4 ″ angular (SVH 0004 000020) has a center-to-center distance of 50 mm and a nominal capacity of kvs 1.8 m3 / h.
Operating conditions
Straight radiator connection Stout 3/4 ″ can be used in two-pipe hot water radiator heating systems with operating pressures up to 10 atmospheres... The temperature of the working medium should not exceed + 120 ° C.
The structure of the lower connection unit Stout for the radiator
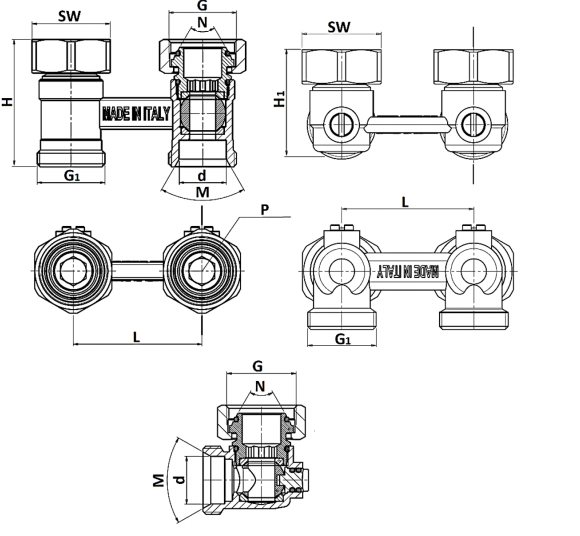
Stout bottom radiator connection unit straight for a two-pipe heating system consists of an H-shaped body (6) with built-in ball shut-off valves. The unit is fixed on the radiator pipes with union nuts (7), the tightness of the connection is ensured by O-rings (1)mounted on top fittings (2).
For connection to the heating system pipelines, the lower part of the Stout unit is equipped with an external thread for connecting Eurocone compression fittings. The body of the corner unit of the bottom connection Stout is made in the form of a square, which allows the radiator to be connected to pipes hidden in the walls. To turn the ball valves, slots for flat objects (for example, a coin, screwdriver, knife, etc.) are made on the stem of the locking mechanism.
Construction and materials
| 1 - O-ring of EPDM upper connection 2 - CW614N nickel plated brass upper connection 3 - NBR upper connection O-ring 4 - PTFE ball seal 5 - CW614N brass ball valve 6 - CW617N nickel plated brass body 7 - Union nut of the upper connection nickel-plated brass CW617N 8 - Stem made of brass CW614N 9 - O-ring stem seal made of EPDM |
Dimensions of the bottom connection of the radiator Stout 3/4 ″
| L - 50 mm H - 46.5 mm H1 - 36.6 mm d - 18.1 mm P - 10.2 mm SW - 30 mm M - 60 ° N - 60 ° G - 3/4 ″ G1 - 3 / four" |
Installation guidelines for bottom connection Stout
- Bottom radiator connections Stout for a two-pipe heating system are installed on radiators with lower connecting pipes with a center distance of 50 mm;
- The design of the unit (straight or angular) is selected depending on the location of the heating system pipelines;
- On radiator pipes with 3/4 ″ thread, the units are fastened using union nuts with a maximum tightening force of 35 N · m;
- In the case of radiators with 1/2 ”threaded connecting holes, the units are installed through adapter adapters SFT-0049-000002;
- The nodes can be connected to plastic, metal-plastic and copper pipes using compression fittings such as "Eurocone";
- If it is necessary to use pipes on which a connecting fitting with a flat seal is installed, it is necessary to use an adapter SFT-0049-000001. The type of fitting is selected depending on the material and diameter of the pipe;
- The pipeline fittings should not experience misalignment of the branch pipes, uneven tightening of fasteners. If necessary, supports or compensators should be provided to reduce the load on the valve from the pipeline;
- The deviation of the coaxiality of the pipelines to be connected should not exceed 3 mm with a length of up to 1 m plus 1 mm for each subsequent meter;
- After installation, it is necessary to conduct tests for the tightness of the joints in accordance with the requirements of GOST 24054 and GOST 25136;
- When installing and operating Stout locking and connecting units, the use of lever gas keys is strictly prohibited!
Documentation
- Product data sheet (open PDF file)
Specifications
| Manufacturer | Stout |
| Series | SVH 0004 |
| vendor code | SVH 0004 000020 |
| A type | radiator connection unit |
| Execution | angular |
| Application area | hot water radiator heating systems |
| Appointment | for radiator |
| Connection size | 3/4 ″ х3 / 4 ″ |
| Operating pressure | 10 bar |
| Test pressure | 15 bar |
| Working temperature | up to + 120 ° C |
| Ambient temperature | from -20 ° C to + 50 ° C |
| Conditional bandwidth kvs | 1.8 m3 / hour |
| Distance between connecting pipes | 50 mm |
| Flare nut tightening torque | not more than 35 Nm |
| Seal material | EPDM, PTFE, NBR |
| The weight | 267 g |
| Life time | 10 years |
| Country of Origin | Italy |
| Country of origin of the brand | Italy |
| Official manufacturer's warranty | 2 years |
Product quality
Our company purchases products from large proven suppliers.
We are glad to offer you a quality original product!
HydroTeplo is the official dealer of TEREM LLC for the STOUT brand
Strapping made of polypropylene pipes
Before connecting aluminum radiators with polypropylene pipes, you should draw up a piping diagram
When compiling it, it is important to avoid unnecessary knots and "bends" in the pipes, which will make the work more reliable
The piping can be carried out both in one-pipe and two-pipe heating systems, but taking into account the following nuances:
- In the first option, the installation of a bypass is required.
- With a two-pipe system, additional connecting elements are required.
Polypropylene pipes can be connected in two ways:
- The most reliable is soldering. since the ends of the pipes and the tee are fastened together so firmly that they become a single system that is not afraid of either high temperatures or an increase in pressure. Soldering is performed with a special tool.
- If using fittings. for fixing which special devices are not needed, then you should be prepared that they will have to be tightened up and checked regularly. This is due to the fact that when heated, the pipes expand, gradually weakening their "grip". As soon as the fasteners are loose, a leak will follow.
In order for everything to be done correctly, you must follow the sequence of actions:
- Check that the cuts of the part of the harness that goes directly to the battery are even. Cut the pipe again if necessary.
- The next step is to solder the trim parts that fit the fitting located at the top of the radiator. Even a beginner can carry out this procedure with a special soldering iron. It is enough to insert one part of the tee into the pipe, warm up the joint with a soldering iron and hold them until the seam cools down. This usually takes no more than 3 minutes. The same process is carried out with the other side of the tee.
- Assembling the lower part of the harness. which is connected to the lower fitting, is carried out in a similar way, only more adapters are required.
- The locking device is connected to both parts of the trim. for which the branch pipe is unscrewed.
After the shut-off valves are connected, all the nuts are tightened, having previously screwed the tow impregnated with sealant onto the thread of the fitting.
If you decide to install aluminum radiators, it is important to know the following:
As practice shows, the alteration of aluminum radiators for the bottom connection is in great demand, especially in houses with autonomous heating. They look more aesthetically pleasing, evenly and quickly heat up the room, but they require some knowledge during installation, so it is recommended to trust their installation to professionals.
Choosing a place and method for installing a radiator
The options for connecting heating radiators depend on the general heating scheme in the house, the design features of the heating devices and the method of pipe laying. The following methods of connecting heating radiators are common:
- Lateral (one-sided). The supply and return pipes are connected on the same side, with the supply located at the top. The standard method for multi-storey buildings, when the supply is carried out from the riser pipe. In terms of efficiency, this method is not inferior to the diagonal one.
- Lower. In this way, bimetallic radiators with a bottom connection or a steel radiator with a bottom connection are connected. The supply and return pipes are supplied from below in the left or right side of the device and are connected through the lower connection of the radiator with union nuts and shut-off valves. The union nut is screwed onto the lower radiator pipe. The advantage of this method is the location of the main pipes hidden in the floor, and heating radiators with a lower connection harmoniously fit into the interior and can be installed in narrow niches.
The advantage of most steel radiators with bottom connection is the already built-in thermostatic valve for installing the thermostatic head, so you should not be surprised that they cost a little more than radiators of the same size with side connections.
- Diagonal. The coolant enters through the upper inlet, and the return flow is connected from the opposite side to the lower outlet. The optimal type of connection, which ensures uniform heating of the entire battery area.In this way, correctly connect the heating battery, the length of which exceeds 1 meter. In this case, heat loss does not exceed 2%.
- Saddle. The supply and return are connected to the bottom holes located on opposite sides. It is mainly used in one-pipe systems when no other method is possible. Heat loss due to poor circulation of the coolant in the upper part of the device reaches 15%.
When choosing a place for installation, several factors are taken into account that ensure the correct operation of heating devices. Installation is carried out in places least protected from cold air penetration, under window openings. It is recommended to install a battery under each window. The minimum distance from the wall is 3-5 cm, from the floor and windowsill - 10-15 cm. With smaller gaps, convection worsens and the power of the battery decreases.
Typical mistakes when choosing an installation site:
- The place for the installation of the control valves is not included.
- The small distance to the floor and window sill impedes full air circulation, as a result of which heat transfer decreases and the room does not warm up to the set temperature.
- Instead of several batteries located under each window and creating a heat curtain, one long radiator is chosen.
- Installation of decorative grilles, panels that prevent the normal spread of heat.
Coolant circulation methods
The circulation of the coolant through the pipelines occurs in a natural or forced way. The natural (gravitational) method does not involve the use of additional equipment. The heat carrier moves due to a change in the characteristics of the liquid as a result of heating. The hot coolant entering the battery, cooling down, acquires a greater density and mass, after which it goes down, and a hotter coolant enters its place. Cold water from the return flows by gravity into the boiler and displaces the already heated liquid. For normal operation, the pipeline is installed at a slope of at least 0.5 cm per one running meter.
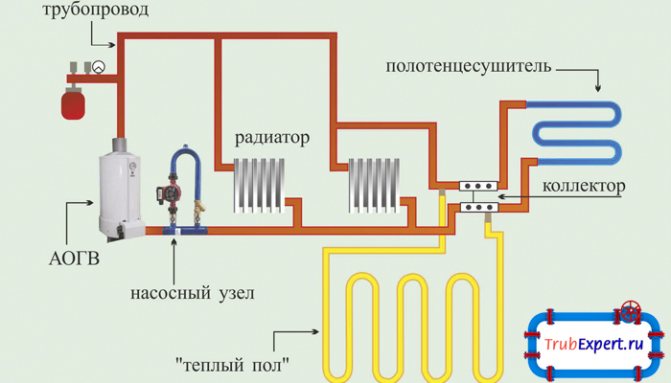

Circulation diagram of the coolant in the system using pumping equipment
For the forced supply of the coolant, the installation of one or more circulation pumps is required. The pump is installed on the return pipe in front of the boiler. The operation of heating in this case depends on the electrical supply, but has significant advantages:
- Small diameter pipes are allowed.
- The line is installed in any position, vertically or horizontally.
- A smaller volume of heating medium is required.
Radiator connections
Manufacturers of equipment for heating systems have created connection nodes for radiators of various shapes and purposes.
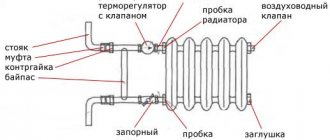
For one-sided connection of radiators in systems with one-pipe horizontal wiring, special two-way connection nodes with a built-in bypass are produced (Fig. 94). At the bottom of the unit there is a bypass that separates the hot coolant, directing one part of it to the radiator, and the other part back to the main. Connections are manufactured in two types: with and without balancing valve. By screwing or unscrewing the valve, the flow rate of the coolant flowing from the radiator is regulated. Adjustment of the balancing valve is carried out according to the tables of the manufacturer of the connection unit. A thermostat is installed in the upper part of the unit, which monitors the air temperature in the room and turns off the supply of coolant to the radiator.
fig. 94. Connection of radiators in a one-pipe heating circuit with two-way connection nodes
For two-pipe heating systems, manufacturers of heating equipment have created about the same unit (Fig. 95). The only difference is that the bypass of the two-pipe assembly is always closed.This is ensured by various technical solutions, in this case, a gasket on the valve stem. It should be noted that there are quite a few manufacturers of radiator connection assemblies. Figures 94–95 show the units, other companies have applied other technical solutions, but they use the same basic principles: lower connection of pipelines to the unit, built-in bypasses and balancing valves.
fig. 95. Connection of radiators in a two-pipe heating circuit with two-way connection nodes
There are also universal nodes for connecting radiators (Fig. 96) with an adjustable built-in bypass, designed for both one-pipe and two-pipe horizontal wiring. By opening the bypass valve, the overflow of the hot coolant into the return line is regulated. Closing the bypass hole completely sends all the coolant to the radiator. Partial opening divides the coolant into two streams: one part goes to the radiator, the other to the main line, and since the cone valves are located on one rod, it becomes possible to balance the heating circuit, making the flow through the radiators more on remote heating devices and less on closely spaced ones.
fig. 96. Universal radiator connection unit
To give the heating radiators a more aesthetic appearance, the number of connecting nodes is reduced and the so-called "single-point" connection is used (Fig. 97). Its main feature lies in the use of a special tube, which is inserted into the radiator. Through this tube, the hot coolant is fed far into the radiator, and the cooled one is discharged through the hole located around the tube. Or, conversely, the hot coolant is introduced through the hole and discharged through the tube. These radiator connections are designed for both one-pipe and two-pipe horizontal heating circuits.
fig. 97. One-point radiator connection
For some radiators, it is foreseen to connect pipelines to the lower plane of the heater. Manufacturers of heating equipment and for them have invented their own connection nodes. As with the side connection of radiators, they are made with a built-in adjustable or non-adjustable bypass and balancing valve (Fig. 98).
fig. 98. Nodes of connection to the lower plane of the radiator
The main advantages of the lower eyeliner
As noted earlier, this method provides for the supply of hot liquid to the radiator on one side, and the output of the cooled one on the other. Thanks to this, the pipes can be easily hidden, practically without losing their effectiveness. And the batteries themselves warm up faster from below than from above due to the high speed of water circulation.
Sometimes the efficiency of the operated equipment decreases due to the airing of the line or its clogging. But even after that, this method of piping ensures uniform heating of the devices (the efficiency is not lower than in the case of the upper piping).
Important! Regardless of which connection method was chosen, a number of special requirements should be adhered to during installation. And this applies primarily to the ratio between the width of the radiator and a similar indicator of the window
Advantages and disadvantages
The advantages of the lower connection of a bimetallic radiator include:
- Aesthetic look.
With this connection scheme, the pipes are easier to hide. For example, this can be done by hiding them under the floor, in the wall, or under the baseboard. - Ease of installation.
The pipes are connected directly, with this option, there are few bends, turns, etc. Thus, the coolant flows without significant obstacles. - The price of the lower connection scheme is less than the rest;
- The lower connection system is more stable, that is, it is difficult to unbalance it.
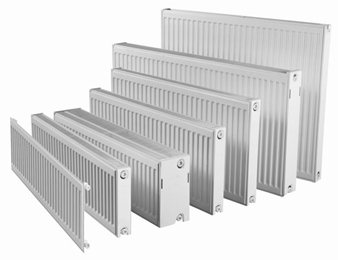

Fig. 3 Panel models of bimetallic radiators
Disadvantages of bottom connection:
- If the pipes are run under the floor to achieve an aesthetic appearance, it will be very difficult to repair the leak. It will be necessary to dismantle the floor. In an apartment building, such a system is not connected, since there is a central heating system.
- The level of heat transfer from radiators with the lower supply circuit is slightly less than with other connections.
As for the small heat transfer, this can be explained by the design of the channels in bimetallic radiators. The hot coolant is fed into the battery and heats up its bottom very quickly. The top of the battery is heated by convection. Thus, the top of the battery may not be completely heated, and air will constantly collect there.
This also applies to the situation when the coolant consists of water and antifreeze (Fig. 4). Antifreeze is heavier than water and it is always at the bottom, and the water will rise up. Thus, with the lower connection scheme, the circulation of the coolant inside the device is disturbed. This results in little heat dissipation and inefficiency of the lower wiring diagram.
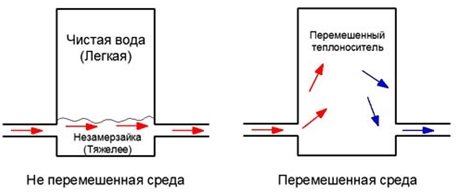

Fig. 4 Circulation of coolant with antifreeze
How to properly connect a bimetallic radiator? Of course, for this you need to have certain knowledge and skills. Correct connection of a bimetallic heating device consists in observing some rules. It should be noted that it is better to connect the lower pipe scheme at the beginning of the repair work. Since this eyeliner is actually performed because of its aesthetic appearance, the pipes go either under the floor or in the wall.
All distances should be strictly observed, for example, from the floor to the radiator, the correct distance should be at least 15 cm, between the wall and the device at least 2 cm.
Next, using a level, you need to accurately outline the places for the brackets. It is better to install the radiator on a stand and put a level on top, then you can be sure that all measurements are correct. Brackets, as a rule, come with a bimetallic heating device. The number of these fixings must be suitable for the size of the device.
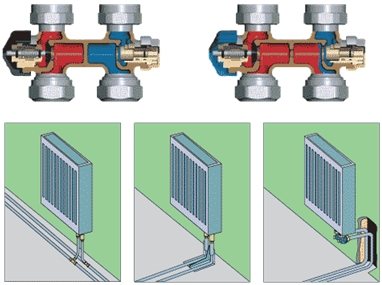

Fig. 5 Correct ways of connecting pipes to a bimetallic radiator
In order to properly connect the pipes, it is important not to confuse the supply and return lines. To prevent this from happening, you need to carefully study all the inscriptions, since there is a corresponding marking on the radiator
If a bimetallic heating radiator is incorrectly connected, heat transfer decreases several times, namely by 60%. Of course, the model of the heating device also depends on this.
The lower tubes, which are L-shaped, should be strengthened, but only after checking the entire system. This is done, as a rule, with the help of polyurethane foam.
Installation and connection of bimetallic radiators must be carried out in protective packaging
This is very important, because if the paint on the radiator is damaged, an irreversible process can take place. The paint will continue to swell from damage
If this happens, but you need to purchase a special enamel-based paint and process the scratch. The packaging must be on the radiator before connecting.
All accessories, plugs and taps must be complete with a radiator, but this must be checked with a consultant in the store. Namely, this is Mayevsky's crane and plugs for another manifold. Correctly install the Mayevsky crane with a torque wrench, so as not to overtighten the connection and not damage the crane. The connections should never be cleaned with anything, as a leak may appear when the system starts up.
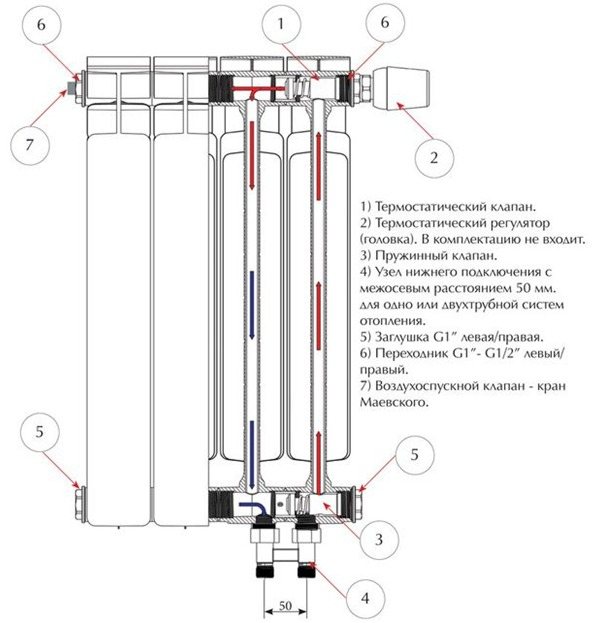

Fig. 6 Device of a bimetallic device with bottom connection
What is a Bottom Liner Knot?
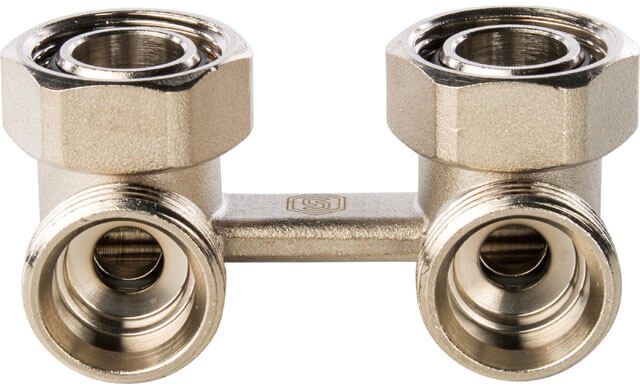
The radiator connection unit with a lower connection ("binoculars") is an H-shaped plumbing fixture with two parallel fittings at the battery connection points, and a strong jumper between them.On one side of this element there is a fitting with a pressed-in union nut and a gasket with an internal section of ¾ ", and on the other side, a фит" external thread is cut into the fitting.
A screw valve or a ball valve is installed inside each bushing, which are designed to regulate or shut off the flow of the incoming coolant; when removing the radiators for their subsequent repair or replacement, shut-off properties are used.
The heating equipment of the bottom connection of the radiator makes it possible to connect aluminum or steel batteries with pipe outlets at the bottom, which have an external thread. Radiators are connected to these pipes in the floor or wall using an angular or straight N-shaped adapter "American".
Efficiency of connection to heating systems from below in the case when the supply pipes pass under the floor, in rare cases to preserve the aesthetics of the interior, as well as for convenience, they are inserted into the walls at a low height - thanks to the corner fitting, the pipes can be connected to the radiator body.
In addition to control and shut-off valves, in order to increase the efficiency of operation, external and internal bypasses are often introduced into the valve connecting nodes, and thermostats are used to stabilize the temperature regime.
What is a bypass in a water supply and heating system? This part is an ordinary jumper, thanks to which the coolant can move freely along the line, bypassing any equipment.

What is a radiator connection assembly
A radiator connection node with a lower connection is an H-shaped piece of sanitary fittings with two parallel fittings at a distance of the seats of a steel panel radiator, and a rigid jumper between them. A typical part has on one side a fitting into a pressed-in union nut with a gasket (American connector) with an internal diameter of 3/4 ", on the other side a 3/4" external thread is applied to the fitting.
A shut-off ball valve or screw valve is located inside each of the inputs, which allows you to regulate or shut off the incoming heat carrier; when removing the battery during its repair or replacement, a shut-off function is used.
What is the connection node for?
In appearance, the heating radiator connection nodes look like two ball valves enclosed in one housing. It can be used to connect the radiator to various types of pipelines:
To carry out the installation of a radiator, to which the pipe is connected from below, the following structural elements are needed:
- bottom connection node;
- thermostatic head (not in all systems);
- special adapters with which the bottom connection block is connected to the pipe.

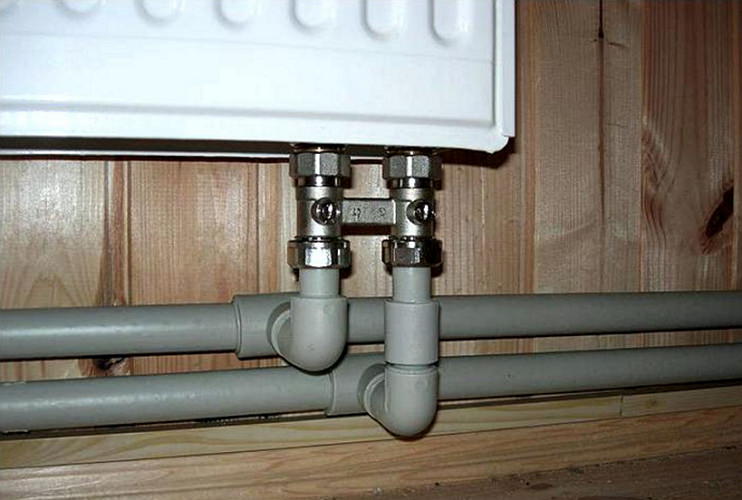
Such modules make it possible to install radiators in one- or two-pipe heating systems, if they are laid in basements or in a wall niche.
As a rule, the dimensions between the axes of the outlet and inlet connections of the battery are 5 cm. The body of the unit for the lateral connection of the radiator is made of brass or bronze, the seals are made of polymer.
Radiator connection diagrams
How well the radiators will heat up depends on how the coolant is supplied to them. There are more and less effective options.
Bottom connection radiators
All heating radiators have two types of connection - side and bottom. There can be no discrepancies with the bottom connection. There are only two pipes - inlet and outlet. Accordingly, on the one hand, the coolant is supplied to the radiator, and on the other, it is discharged.
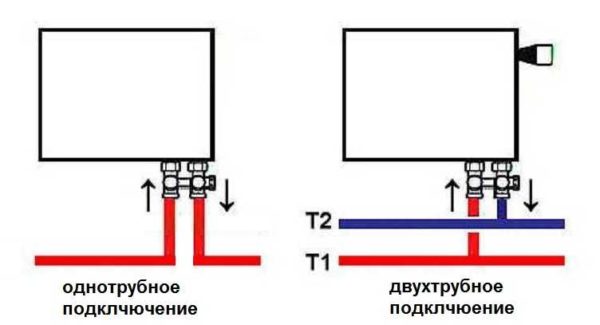

Bottom connection of heating radiators with one-pipe and two-pipe heating system
Specifically, where to connect the supply, and where the reverse is written in the installation instructions, which must be available.
Radiators with side connection
With lateral connection, there are much more options: here the supply and return pipelines can be connected into two nozzles, respectively, there are four options.
Option number 1. Diagonal connection
Such a connection of heating radiators is considered the most effective, it is taken as a standard and this is how manufacturers test their heating devices and the data in the passport for thermal power - for such a connection. All other types of connection give off heat less efficiently.


Diagonal connection diagram of heating radiators with two-pipe and one-pipe systems
This is because when the batteries are diagonally connected, the hot coolant is supplied to the upper inlet from one side, passes through the entire radiator and exits from the opposite, lower side.
Option number 2. Unilateral
As the name implies, pipelines are connected on one side - supply from above, return - from below. This option is convenient when the riser runs to the side of the heater, which is often the case in apartments, because this type of connection usually prevails. When the coolant is supplied from below, such a scheme is rarely used - it is not very convenient to place the pipes.
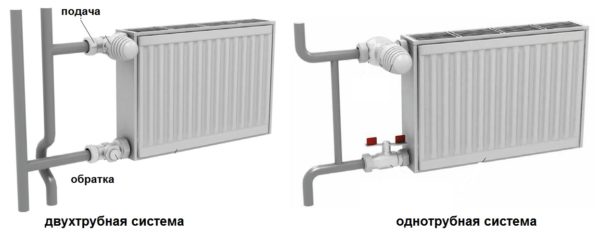

Side connection for two-pipe and one-pipe systems
With such a connection of radiators, the heating efficiency is only slightly lower - by 2%. But this is only if there are few sections in the radiators - no more than 10. With a longer battery, its farthest from the edge will not heat well or even remain cold. In panel radiators, to solve the problem, flow extenders are installed - tubes that bring the coolant a little further than the middle. The same devices can be installed in aluminum or bimetallic radiators, while improving heat transfer.
Option number 3. Bottom or saddle connection
Of all the options, the saddle connection of heating radiators is the least efficient. The losses are approximately 12-14%. But this option is the most inconspicuous - pipes are usually laid on the floor or under it, and this method is the most optimal from the point of view of aesthetics. And so that losses do not affect the temperature in the room, you can take a radiator a little more powerful than required.
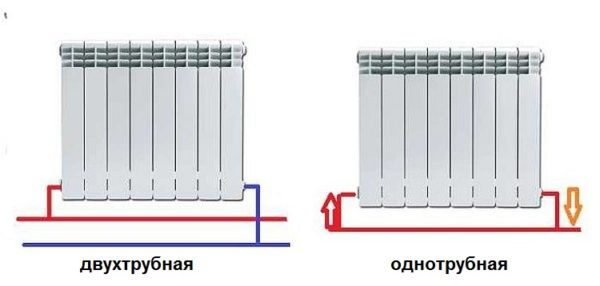

Saddle connection of heating radiators
In systems with natural circulation, this type of connection should not be done, but if there is a pump, it works well. In some cases, it is not even worse than lateral. It's just that at a certain speed of movement of the coolant, vortex flows arise, the entire surface heats up, and heat transfer increases. These phenomena have not yet been fully studied, therefore it is still impossible to predict the behavior of the coolant.
Bottom connections FAR (HEADLIGHTS) for radiators
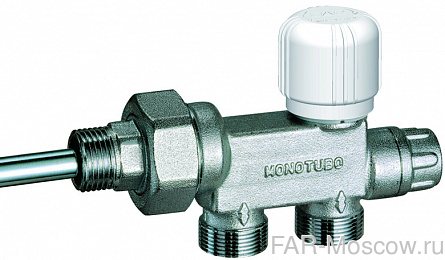
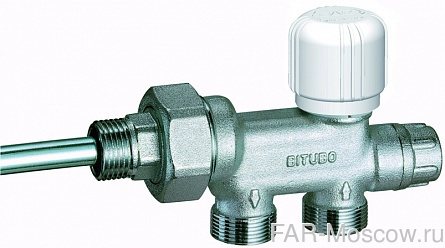
FAR one-pipe and two-pipe four-way assemblies are designed for one-way and one-point connection of hot water radiators, which improves the appearance of the heating device piping. Improves system reliability by avoiding hidden piping connections. Due to the installation of four-way nodes, there is a saving of piping materials: pipes, connecting fittings, ends.
Bottom connection node classification:
2.1 According to the connection diagram
- "Top-down" one-sided: art. 1440, 1442, 1457, 1575, 1585, 1590, 1595
- "Bottom-down" single point. With this scheme, the heat transfer of the radiator is reduced by ~ 10%. art. 1420, 1421, 1422, 1423, 1424, 1430, 1433, 1435, 1436, 1437, 1450, 1455, 1500, 1550
2.2 By type of heating system
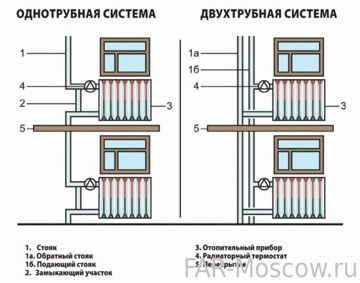

| 1421, 1422, 1423, 1424, 1435, 1436, 1437, 1438 | |
| 1420, 1440, 1442, 1450, 1455,1473, 1500, 1550 1575, 1585, 1590, 1595 | 1430, 1433, 1457 |
2.3 By the method of adjusting the thermal regime:
- without adjustment (system balancing only): art. 1575
- manual adjustment:
- - art. 1550 has shut-off and control valves
- - art. 1450, 1455, 1463, 1473, 1500, 1550, 1585, 1590, 1595 manual adjustment is carried out by turning the knob, which changes the position of the valve stem: when turning to the right, the handle is tightened and moves the valve towards the closing side, and when turned in the opposite direction, it opens
- automatic regulation: art. 1420, 1430, 1433, 1435, 1436, 1437, 1438, 1440, 1442, 1457
|
|
|
|
| 1 | |||
| 1421 - Eurocone 3/4 ″ 1422 - М24х19 | 1423 - Eurocone 3/4 ″ 1424 - М24х19 | 1481 - Eurocone 3/4 ″ 1482 - М24х19 | 1483 - Eurocone 3/4 ″ 1484 - М24х19 |
| 1 | |||
| Angle bottom connection for steel panel radiators for one- and two-pipe systems | Straight bottom connection for steel panel radiators for one- and two-pipe systems | Angle bottom connection for steel panel radiators for one- and two-pipe systems | Straight bottom connection for steel panel radiators for one- and two-pipe systems |
| 1 | |||
| 1 | |||
| 1 | |||
|
|
| |
| 1 | |||
| 1435 - М24х19 1431 - М24х19 (without probe) | 1436 - М24х19 1432 - М24х19 (without probe) | 1437 - М24х19 1433 - М24х19 (without probe) | LadyFAR |
| 1 | |||
| Straight bottom connection control unit for one and two pipe systems | Corner bottom connection control unit for one- and two-pipe systems | Corner bottom connection control unit for one- and two-pipe systems | Corner bottom connection control unit for one- and two-pipe systems |
| 1 | |||
| 1 | |||
| 1 | |||
|
|
| |
| 1 | |||
| 1420 - М24х19 | 1430 - М24х19 | 1438 - М24х19 | 1442 - М24х19 |
| 1 | |||
| Bottom connection control unit for one-pipe systems | Bottom connection control unit for one and two pipe systems | Bottom connection control unit for one and two pipe systems | Bottom connection control unit for one-pipe systems |
| 1 | |||
| 1 | |||
| 1 | |||
| 1 | |||
| 1440 - М24х19 | 1457 - М24х19 | 1575 - М24х19 | 1475 - М24х19 |
| 1 | |||
| Bottom connection control unit for one-pipe systems | Bottom connection control unit for one and two pipe systems | Bottom connection control unit for one-pipe systems | Bottom connection control unit for two-pipe systems |
| 1 | |||
| 1 | |||
| 1 | |||
| 1 | |||
| 1425 - М24х19 | 1428- М24х19 | 1600 | 1500 |
| 1 | |||
| Bottom connection control unit for one and two pipe systems | Bottom connection control unit for one and two pipe systems | Regulating unit for convectors with upward heating medium inlet for one-pipe systems | Bottom connection control unit for one-pipe systems |
| 1 | |||
| 1 | |||
| 1 | |||
| 1 | |||
| 1463 - М24х19 | 1465 - М24х19 | 1462- М24х19 | 1472 - М24х19 |
| 1 | |||
| Bottom connection control unit for one-pipe systems | Bottom connection control unit for two-pipe systems | Bottom connection control unit for one-pipe systems | Bottom connection control unit for one-pipe systems |
| 1 | |||
| 1 | |||
| 1 | |||
| 1 | |||
| 1473 - М24х19 | 1590 - М24х19 | 1585 - М24х19 | 1595 - М24х19 |
| 1 | |||
| Bottom connection control unit for one-pipe systems | Bottom connection control unit for one-pipe systems | Bottom connection control unit for one-pipe systems | Bottom connection control unit for one-pipe systems |
| 1 | |||
| 1 | |||
| 1 | |||
| 1474 - М24х19 | 1464 - М24х19 | 1452 - М24х19 | 1550 - М24х19 |
| Bottom connection control unit for two-pipe systems | Bottom connection control unit for two-pipe systems | Bottom connection control unit for one-pipe systems | Bottom connection control unit for single pipe systems |
| 1 | |||
| 1 | |||
| 1 | |||
| 1 | |||
| 1450 - М24х19 | 1451 - М24х19 | 1455 - М24х19 | 1456 - М24х19 |
| 1 | |||
| Bottom connection control unit for one-pipe systems | Bottom connection control unit for one-pipe systems | Bottom connection control unit for single pipe systems | Bottom connection control unit for two-pipe systems |
| 1 |
Sort by: Name Price Reset
We connect heating radiators correctly
Regardless of the type of radiators chosen and the connection diagram suitable for them, it is important to calculate and mount everything correctly. In each specific case, its own system will be optimal.
For expensive houses of a large area, it is advisable to contact specialists who can offer the best project. This is not a question to economize on.
In each case, its own system will be optimal. For expensive houses of a large area, it is advisable to contact specialists who can offer the best project. This is not an issue to economize on.
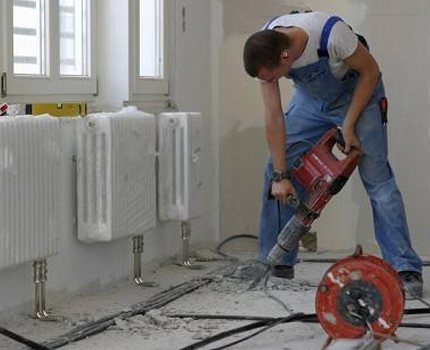

In order to correctly install and connect heating devices in a complex design scheme, it is better to use the services of professionals
For small residential houses, you can independently choose a suitable scheme and install heating devices.It is imperative to take into account the peculiarities of your home, the rules for installing batteries and the advisability of using a particular scheme.
When installing radiators, do not forget that the type of material for the battery itself and the pipes must be the same. Plastic pipes connected to cast iron heaters will bring a lot of problems, ruining the heating system.
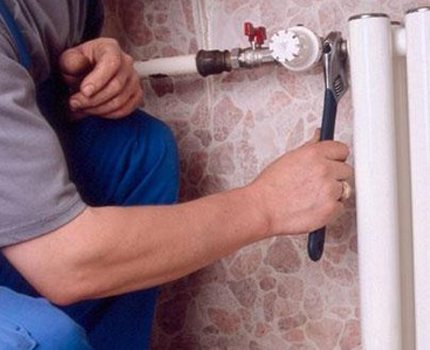

Being engaged in self-installation of heating batteries, one should not forget from the installation of ball valves for bleeding air and a regulator at the inlet
